一、基本概念
1.1 认证方式
1.1.1 基于session方式认证
他的流程是:用户认证成功后,服务端生成相应的用户数据保存在session中,发给客户端的session_id保存在cookie中。这样用户请求时只要带上session_id就可以验证服务端是否存在session,以此完成用户的校验。当用户退出系统或session过期时,客户端的session_id也就无效了。
1.1.2 基于token认证方式
他的流程是:用户认证成功后,服务端生成一个token发给客户端,客户端放到cookie或localStorage等存储中,每次请求带上token,服务端收到后就可以验证。
1.2 什么是授权
授权:用户认证通过后根据用户的权限来控制用户访问资源的过程。
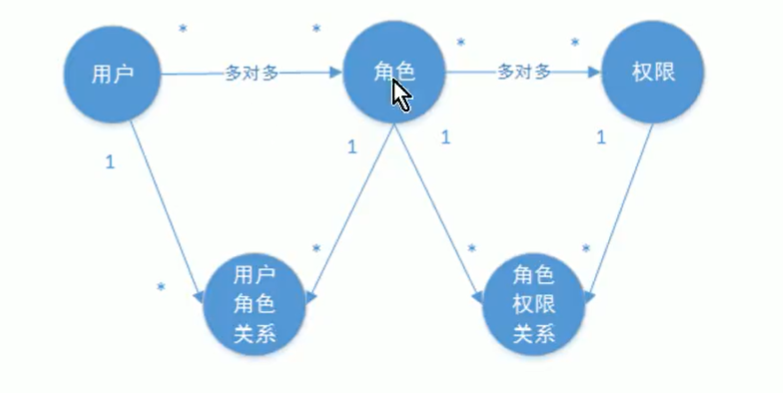
1.3 权限模型
最简单权限表设计。
二、快速入门
2.1 用户认证
先自行搭建一个SpringMvc或者SpringBoot项目.
2.1.1 引入依赖
   <dependency>
            <groupId>org.springframework.boot</groupId>
            <artifactId>spring-boot-starter-security</artifactId>
        </dependency>
2.1.2 配置类
@EnableWebSecurity
public class WebSecurityConfig  extends WebSecurityConfigurerAdapter {


    /**
     * 配置用户信息服务
     * @return
     */
    @Bean
    public UserDetailsService userDetailsService(){
        InMemoryUserDetailsManager manager=new InMemoryUserDetailsManager();
        manager.createUser(User.withUsername("zhangsan").password("123").authorities("p1").build());
        manager.createUser(User.withUsername("lisi").password("456").authorities("p2").build());
        return manager;
    }


    /**
     * 密码编码器
     * @return
     */
    @Bean
    public PasswordEncoder passwordEncoder(){
        return NoOpPasswordEncoder.getInstance();
    }

    /**
     * 安全拦截机制
     * @param http
     * @throws Exception
     */
    @Override
    protected void configure(HttpSecurity http) throws Exception {
        http.authorizeRequests()
                .antMatchers("/r/**").authenticated()
                .anyRequest().permitAll()
                .and()
                .formLogin()
                .successForwardUrl("/login-success");
    }

}
2.1.3 测试资源访问
写一个controller进行测试.
@RestController
public class ResourceController {


    @RequestMapping("/r/r1")
    public String r1(){
        return "访问资源1";
    }

    @RequestMapping("/r/r2")
    public String r2(){
        return "访问资源2";
    }
}
直接访问http://localhost:8080/r/r2,会跳到登陆页面,登陆成功后访问则成功.
以上就利用SpringSecurity完成来了认证功能.
2.2 资源控制
只需在antMatchers("/r/r1").hasAnyAuthority("p1")方法上加上hasAnyAuthority就可以了.
这个方法代表要访问/r/r1,必须得有p1权限.
 @Override
    protected void configure(HttpSecurity http) throws Exception {
        http.authorizeRequests()
                .antMatchers("/r/r1").hasAnyAuthority("p1")
                .antMatchers("/r/r2").hasAnyAuthority("p2")
                .anyRequest().permitAll()
                .and()
                .formLogin()
                .successForwardUrl("/login-success");
    }
注意:规则的顺序很重要,具体的规则要放在最上面,permitAll这种放在下面
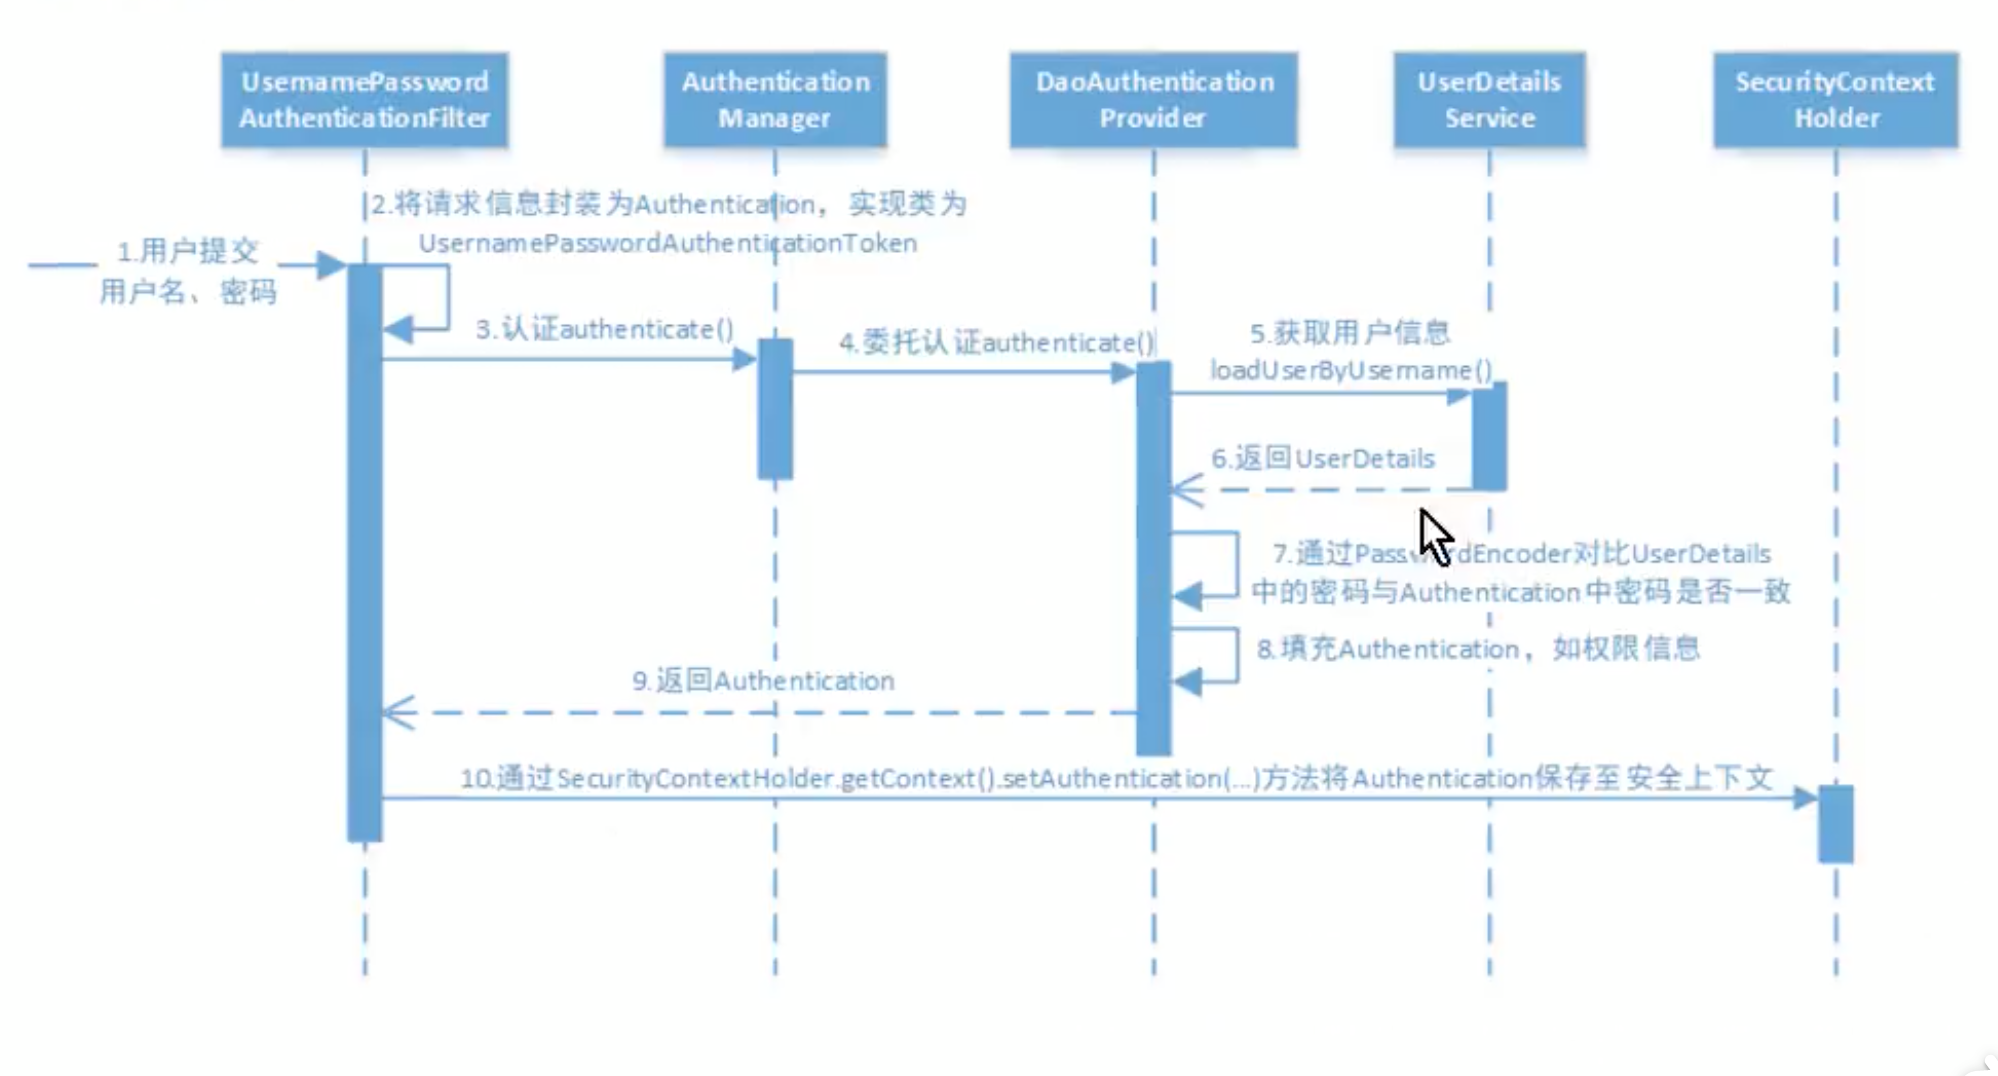
三、工作原理
Spring Security对资源对保护是通过filter来实现对,当初始化Spring Security时,会创建一个名为SpringSecurityFilterChain的Servlet过滤器,类型为FilterChainProxy,他实现了javax.servlet.Filter接口,因此外部的请求会经过此类.

SpringSecurity的功能主要是通过过滤器链来完成的.
下面介绍几个主要的拦截器:
- SecurityContextPersistenceFilter:整个拦截过程的入口和出口
- UsernamePasswordAuthenticationFilter:用于处理来自表单提交的认证
- FilterSecurityInterceptor:用于保护web资源的
- ExceptionTranslationFilter:能够捕获FilterChain的所有异常并处理.
认证过程:
3.1 改为从数据库查询用户
实现UserDetailsService接口
@Service
public class MyUserDetailService implements UserDetailsService {

    @Override
    public UserDetails loadUserByUsername(String username) throws UsernameNotFoundException {
        //这里可以写从数据库查的逻辑
        UserDetails userDetails = User.withUsername(username).password("123").authorities("p1").build();
        return userDetails;
    }
}
3.2 加密后的密码校对
先将密码加密器改为BCryptPasswordEncoder
@Bean
    public PasswordEncoder passwordEncoder(){
        return new BCryptPasswordEncoder();
    }
加密算法的使用
public static void main(String[] args) {
        //生成加盐的密码
        String hashpw = BCrypt.hashpw("123456", BCrypt.gensalt());
        //校验密码
        boolean checkpw = BCrypt.checkpw("123456", hashpw);
        System.out.print(checkpw);
    }
3.3 权限认证
授权流程:
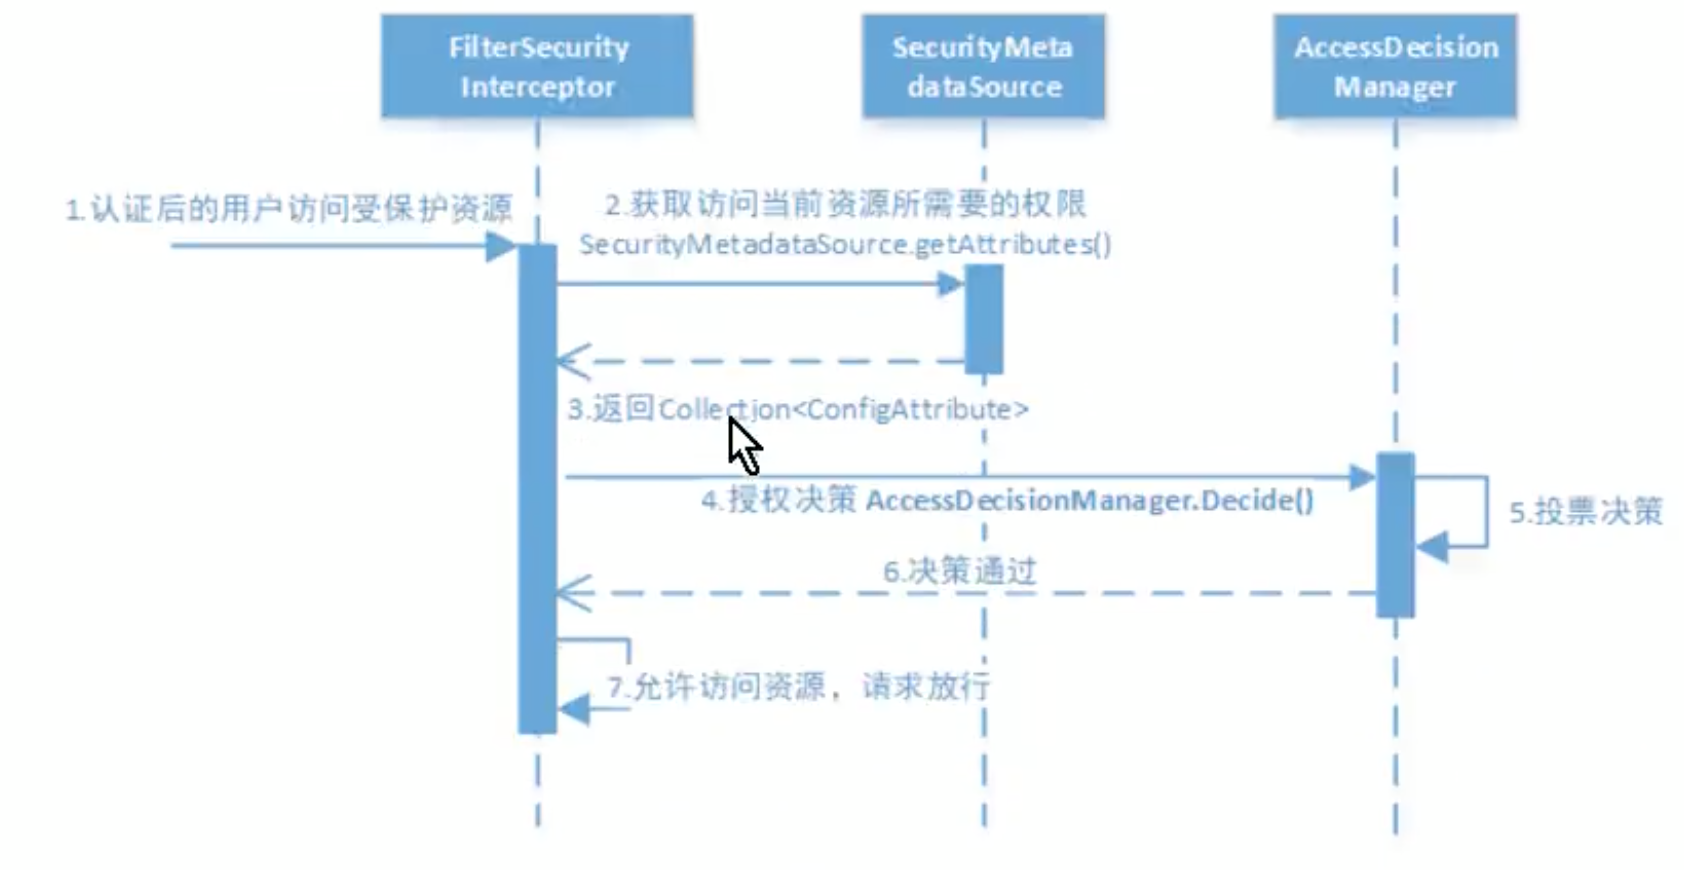
AccessDecisionManager采用投票的方式来确定是否能够访问对应受保护的资源.
默认的实现是AffirmativeBased类
四、自定义页面
4.1 自定义登陆页面
package com.mmc.config;

import org.springframework.context.annotation.Bean;
import org.springframework.security.config.annotation.authentication.builders.AuthenticationManagerBuilder;
import org.springframework.security.config.annotation.web.builders.HttpSecurity;
import org.springframework.security.config.annotation.web.configuration.EnableWebSecurity;
import org.springframework.security.config.annotation.web.configuration.WebSecurityConfigurerAdapter;
import org.springframework.security.core.userdetails.User;
import org.springframework.security.core.userdetails.UserDetailsService;
import org.springframework.security.crypto.bcrypt.BCryptPasswordEncoder;
import org.springframework.security.crypto.password.NoOpPasswordEncoder;
import org.springframework.security.crypto.password.PasswordEncoder;
import org.springframework.security.provisioning.InMemoryUserDetailsManager;

@EnableWebSecurity
public class WebSecurityConfig  extends WebSecurityConfigurerAdapter {


    /**
     * 密码编码器
     * @return
     */
    @Bean
    public PasswordEncoder passwordEncoder(){
        return new BCryptPasswordEncoder();
    }

    /**
     * 安全拦截机制
     * @param http
     * @throws Exception
     */
    @Override
    protected void configure(HttpSecurity http) throws Exception {
        //关闭csrf
        http.csrf().disable().
                authorizeRequests()
                .antMatchers("/r/r1").hasAnyAuthority("p1")
                .antMatchers("/r/r2").hasAnyAuthority("p2")
                .anyRequest().permitAll()
                .and()
                .formLogin()
                //登陆页面
                .loginPage("/loginPage")
               //登陆请求的url .loginProcessingUrl("/userlogin")
                .successForwardUrl("/login-success");
    }

}
定义一个登陆页面:
<!DOCTYPE html>
<html lang="en">
<head>
    <meta charset="UTF-8">
    <title>登陆页</title>
</head>
<body>

    <form action="/userlogin" method="post">
        <p>用户名:<input name="username" type="text"> </p>
        <p>密码:<input name="password" type="text"></p>
        <button type="submit">登陆</button>
    </form>


</body>
</html>
4.2 会话控制
4.2.1 获取当前用户信息
public String getUserInfo(){
        Authentication authentication = SecurityContextHolder.getContext().getAuthentication();
        //用户身份
        Object principal = authentication.getPrincipal();
        if(principal==null){
            return "";
        }
        if(principal instanceof UserDetails){
            UserDetails userDetails = (UserDetails) principal;
            return userDetails.getUsername();
        }else {
            return principal.toString();
        }
    }
4.2.2 会话控制
我们可以通过下列选项控制会话何时创建及如何与SpringSecurity交互
| 机制 | 描述 |
|---|---|
| always | 没有session存在就创建一个 |
| ifRequired | 如果有需要就创建一个登陆时(默认) |
| never | SpringSecurity不会创建session,但是应用其他地方创建来的话,可以使用 |
| stateless | 不创建不使用 |
配置地方如下:
 @Override
    protected void configure(HttpSecurity http) throws Exception {
        http.csrf().disable().
                authorizeRequests()
                .antMatchers("/r/r1").hasAnyAuthority("p1")
                .antMatchers("/r/r2").hasAnyAuthority("p2")
                .anyRequest().permitAll()
                .and()
                .formLogin()
                .loginPage("/loginPage")
                .loginProcessingUrl("/userlogin")
                .successForwardUrl("/login-success")
                .and()
                //控制器
                .sessionManagement()
                .sessionCreationPolicy(SessionCreationPolicy.IF_REQUIRED);

    }
4.3 自定义登出
可以配置如下选项:
 .and()
                .logout()
                .logoutSuccessUrl("/login-view")
                .addLogoutHandler(logoutHandle)
                .logoutSuccessHandler(logoutSuccessHandler);
4.4 授权
4.4.1 web方式授权
       http.csrf().disable().
                authorizeRequests()
                .antMatchers("/r/r1").hasAnyAuthority("p1")
                .antMatchers("/r/r2").hasAnyAuthority("p2")
4.4.2 方法授权
- 配置类上加注解
@EnableGlobalMethodSecurity(securedEnabled = true)
- 方法上加注解
  @RequestMapping("/saveUser")
    @ResponseBody
    @PreAuthorize("hasAuthrity('p1')")
    public String saveUser(){
        User user=new User();
        user.setUsername("zhangsan");
        user.setPassword(BCrypt.hashpw("123456",BCrypt.gensalt()));
        user.setMobile("18380430770");
        userMapper.insert(user);
        return "sucess";
    }
五、分布式系统认证方案
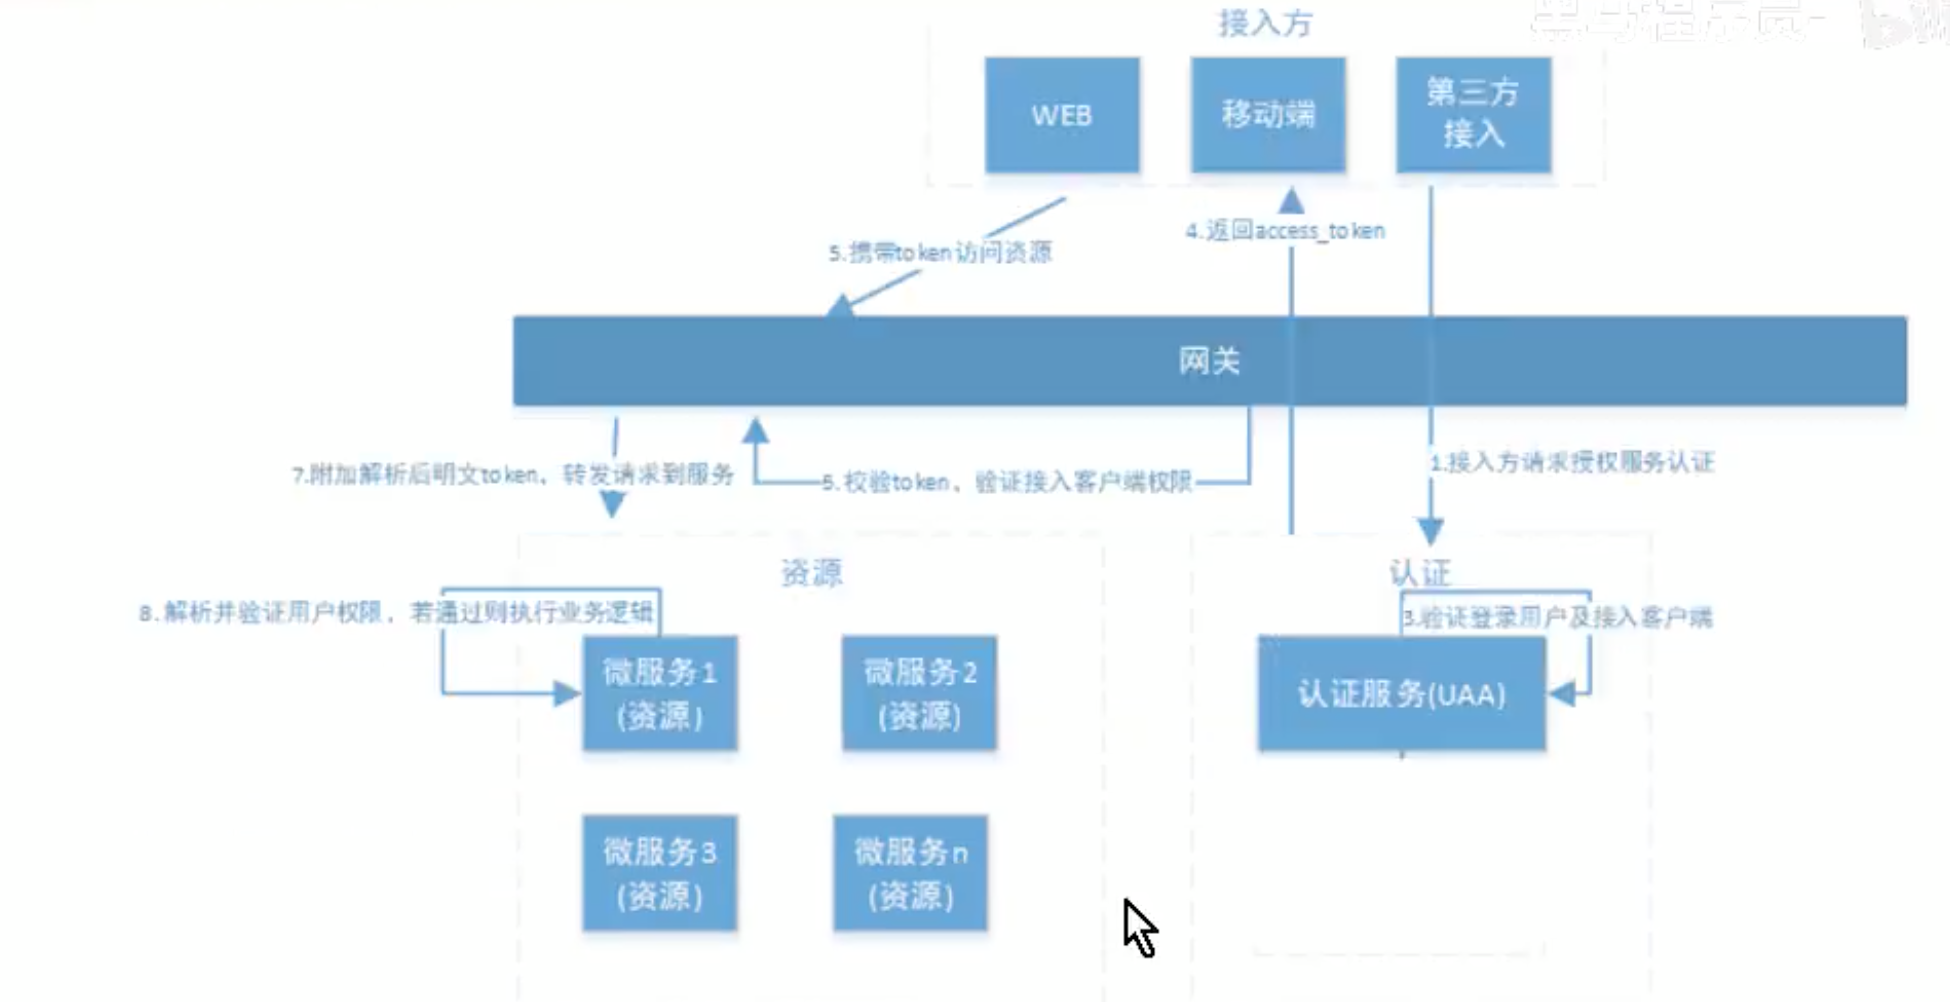
5.1 分布式认证需求
统一的认证授权
提供独立的认证服务,统一处理认证授权.无论上不同类型的用户,还是不同类型的客户端(web、app),均采用一致的认证、权限、会话机制,实现统一授权.
应用接入认证
应提供扩展和开放能力,提供安全的系统对接机制,并可开放部分API给 第三方使用.
5.2 分布式方案选型
5.2.1 采用session的方式
优点:安全、传输数据量小
缺点:分布式应用中需要同步session、session上基于coockie的,有的客户端不支持coockie
session处理的三个方法:
- session同步
- session黏贴,即用户去某服务器登陆,那么他的所有请求就都路由到指定服务器
- session统一存储.
5.2.2 采用token的方式
优点:第三方更适合接入,可使用当前流行的开放协议OAuth2.0和JWT
缺点:token中包含用户信息,数据大,带宽压力大、token检验需要耗费CPU
六、OAuth2.0
6.1 概念介绍
OAuth是一个开放标准,允许用户授权第三方应用访问存储在另外的服务器上的信息,而不用提供用户名或密码给第三方应用.
第三方登陆流程图:

OAuth2.0角色介绍:
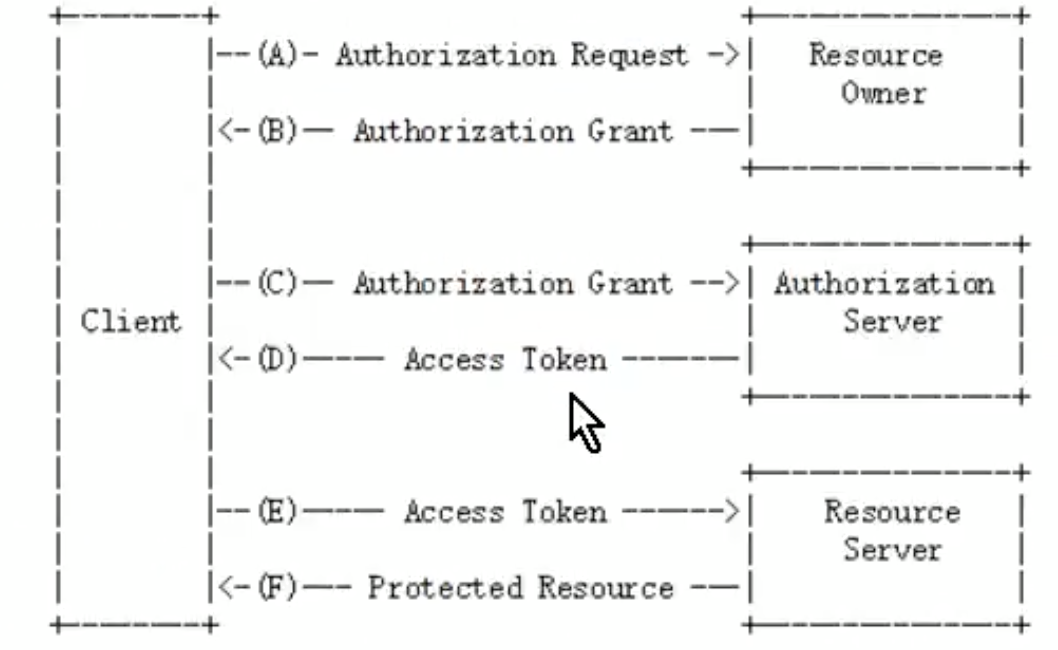
- 客户端
包括安卓客户端、浏览器、小程序等
2. 资源拥有者
通常是用户,也可以是应用程序
3. 认证服务器
用于服务提供商对资源拥有的身份进行认证、对访问资源进行授权.认证成功后发放令牌,作为访问资源服务器的凭证.
- 资源服务器
存储资源的服务器.
问题:
服务提供商会让所有的客户端接入到他的授权服务器吗?答案是不能.他会给准入的接入方一个身份:
- client_id:客户端标识
- client_secret:客户端密钥
6.2 环境搭建
6.2.1 创建项目
先自行创建一个springcloud微服务项目.父工程的pom文件为:
<?xml version="1.0" encoding="UTF-8"?>
<project xmlns="http://maven.apache.org/POM/4.0.0"
         xmlns:xsi="http://www.w3.org/2001/XMLSchema-instance"
         xsi:schemaLocation="http://maven.apache.org/POM/4.0.0 http://maven.apache.org/xsd/maven-4.0.0.xsd">
    <modelVersion>4.0.0</modelVersion>
    <modules>
        <module>spring-security-uaa</module>
        <module>spring-security-order</module>
    </modules>

    <parent>
        <groupId>org.springframework.boot</groupId>
        <artifactId>spring-boot-starter-parent</artifactId>
        <version>2.1.7.RELEASE</version>
    </parent>

    <groupId>com.mmc</groupId>
    <artifactId>spring-cloud-security-study</artifactId>
    <version>1.0-SNAPSHOT</version>
    <packaging>pom</packaging>

    <properties>
        <maven.compiler.source>8</maven.compiler.source>
        <maven.compiler.target>8</maven.compiler.target>
    </properties>


    <dependencyManagement>

        <dependencies>
            <dependency>
                <groupId>org.springframework.cloud</groupId>
                <artifactId>spring-cloud-dependencies</artifactId>
                <version>Greenwich.RELEASE</version>
                <type>pom</type>
                <scope>import</scope>
            </dependency>


            <dependency>
                <groupId>javax.servlet</groupId>
                <artifactId>javax.servlet-api</artifactId>
                <version>3.1.0</version>
                <scope>provided</scope>
            </dependency>

            <dependency>
                <groupId>javax.interceptor</groupId>
                <artifactId>javax.interceptor-api</artifactId>
                <version>1.2</version>
            </dependency>

            <dependency>
                <groupId>com.alibaba</groupId>
                <artifactId>fastjson</artifactId>
                <version>1.2.47</version>
            </dependency>


<!--            <dependency>-->
<!--                <groupId>mysql</groupId>-->
<!--                <artifactId>mysql-connector-java</artifactId>-->
<!--                <version>5.1.47</version>-->
<!--            </dependency>-->


            <dependency>
                <groupId>org.springframework.security</groupId>
                <artifactId>spring-security-jwt</artifactId>
                <version>1.0.10.RELEASE</version>
            </dependency>


            <dependency>
                <groupId>org.springframework.security.oauth.boot</groupId>
                <artifactId>spring-security-oauth2-autoconfigure</artifactId>
                <version>2.1.3.RELEASE</version>
            </dependency>

        </dependencies>
    </dependencyManagement>


    <build>
        <plugins>
            <plugin>
                <groupId>org.springframework.boot</groupId>
                <artifactId>spring-boot-maven-plugin</artifactId>
            </plugin>
        </plugins>
    </build>

</project>
再在里面创建一个授权服务的module,pom文件:
<?xml version="1.0" encoding="UTF-8"?>
<project xmlns="http://maven.apache.org/POM/4.0.0"
         xmlns:xsi="http://www.w3.org/2001/XMLSchema-instance"
         xsi:schemaLocation="http://maven.apache.org/POM/4.0.0 http://maven.apache.org/xsd/maven-4.0.0.xsd">
    <parent>
        <artifactId>spring-cloud-security-study</artifactId>
        <groupId>com.mmc</groupId>
        <version>1.0-SNAPSHOT</version>
    </parent>
    <modelVersion>4.0.0</modelVersion>

    <artifactId>spring-security-uaa</artifactId>

    <properties>
        <maven.compiler.source>8</maven.compiler.source>
        <maven.compiler.target>8</maven.compiler.target>
    </properties>

    <dependencies>

        <dependency>
            <groupId>org.springframework.boot</groupId>
            <artifactId>spring-boot-starter-web</artifactId>
        </dependency>

        <dependency>
            <groupId>org.springframework.cloud</groupId>
            <artifactId>spring-cloud-starter-security</artifactId>
        </dependency>

        <dependency>
            <groupId>org.springframework.cloud</groupId>
            <artifactId>spring-cloud-starter-oauth2</artifactId>
        </dependency>

        <dependency>
            <groupId>org.springframework.security</groupId>
            <artifactId>spring-security-jwt</artifactId>
        </dependency>


        <dependency>
            <groupId>com.alibaba</groupId>
            <artifactId>fastjson</artifactId>
        </dependency>
    </dependencies>

</project>
6.2.2 授权服务器配置
- 配置客户端详细信息
@Service
public class MyUserDetailService implements UserDetailsService {

    @Override
    public UserDetails loadUserByUsername(String username) throws UsernameNotFoundException {
        UserDetails userDetails = User.withUsername(username).password("$2a$10$R5vdYffOXhN2ay0Cke9YIezhlEzHaMt4i8Ndl9GXTOQepSp8ixpVy").authorities("p1").build();
        return userDetails;
    }
}
@Override
    public void configure(ClientDetailsServiceConfigurer clients) throws Exception {
        clients.inMemory()
                .withClient("c1")
                .secret(new BCryptPasswordEncoder().encode("secret"))
                //资源列表
                .resourceIds("res1")
                //授权类型
                .authorizedGrantTypes("authorization_code","password","client_credentials","implicit","refresh_token")
                //允许的授权范围,all是自定义的字符串
                .scopes("all")
                //false代表跳转到授权页面
                .autoApprove(false)
                //验证回调地址
                .redirectUris("http://www.baidu.com");
    }
- 管理令牌
@Configuration
public class TokenConfig {

    @Bean
    public TokenStore tokenStore(){
        return new InMemoryTokenStore();
    }
}
@Autowired
    private TokenStore tokenStore;

    @Autowired
    private ClientDetailsService clientDetailsService;

    @Bean
    public AuthorizationServerTokenServices tokenServices(){
        DefaultTokenServices services=new DefaultTokenServices();
        //客户端信息
        services.setClientDetailsService(clientDetailsService);
        //是否产生刷新令牌
        services.setSupportRefreshToken(true);
        //令牌存储策略
        services.setTokenStore(tokenStore);
        //令牌存活时间
        services.setAccessTokenValiditySeconds(60*5);
        services.setRefreshTokenValiditySeconds(60*10);
        return services;
    }
- 令牌访问端点配置
package com.mmc.uaa.config;

import org.springframework.context.annotation.Bean;
import org.springframework.security.authentication.AuthenticationManager;
import org.springframework.security.config.annotation.method.configuration.EnableGlobalMethodSecurity;
import org.springframework.security.config.annotation.web.builders.HttpSecurity;
import org.springframework.security.config.annotation.web.configuration.EnableWebSecurity;
import org.springframework.security.config.annotation.web.configuration.WebSecurityConfigurerAdapter;
import org.springframework.security.config.http.SessionCreationPolicy;
import org.springframework.security.crypto.bcrypt.BCryptPasswordEncoder;
import org.springframework.security.crypto.password.PasswordEncoder;

@EnableWebSecurity
@EnableGlobalMethodSecurity(securedEnabled = true)
public class WebSecurityConfig extends WebSecurityConfigurerAdapter {


    /**
     * 密码编码器
     * @return
     */
    @Bean
    public PasswordEncoder passwordEncoder(){
        return new BCryptPasswordEncoder();
    }


    /**
     * 认证管理器
     * @return
     * @throws Exception
     */
    @Bean
    public AuthenticationManager authenticationManager() throws Exception {
        return super.authenticationManager();
    }
    /**
     * 安全拦截机制
     * @param http
     * @throws Exception
     */
    @Override
    protected void configure(HttpSecurity http) throws Exception {
        http.csrf().disable().
                authorizeRequests()
                .antMatchers("/r/r1")
                .hasAnyAuthority("p1")
                .antMatchers("/login*").permitAll()
                .anyRequest().authenticated()
                .and()
                .formLogin();

    }

}
    @Autowired
    private AuthorizationCodeServices authorizationCodeServices;

    @Autowired
    private AuthenticationManager authenticationManager;


    @Bean
    public AuthorizationCodeServices authorizationCodeServices(){
        //基于内存的授权码模式
        return new InMemoryAuthorizationCodeServices();
    }


    /**
     * 令牌访问端点配置
     * @param endpoints
     * @throws Exception
     */
    @Override
    public void configure(AuthorizationServerEndpointsConfigurer endpoints) throws Exception {
        endpoints.
                //密码模式需要
                authorizationCodeServices(authorizationCodeServices)
                //授权码模式需要
                .authenticationManager(authenticationManager)
                .tokenServices(tokenServices())
                .allowedTokenEndpointRequestMethods(HttpMethod.POST);
    }
- 令牌访问端点安全配置
 /**
     * 令牌访问端点安全配置
     * @param security
     * @throws Exception
     */
    @Override
    public void configure(AuthorizationServerSecurityConfigurer security) throws Exception {
        security
                .tokenKeyAccess("permitAll()")
                .checkTokenAccess("permitAll()")
                .allowFormAuthenticationForClients();
    }
- 框架默认的url链接
- /oauth/authorize 授权端点
- /oauth/token 获取token
- /oauth/conirm_access 用户确认授权提交端点
- /oauth/error 授权服务错误信息
- /oauth/check_token 提供给资源服务使用的令牌解析端点
- /oauth/token_key 提供公有密钥的端点,如果你使用JWT令牌
6.2.3 授权模式
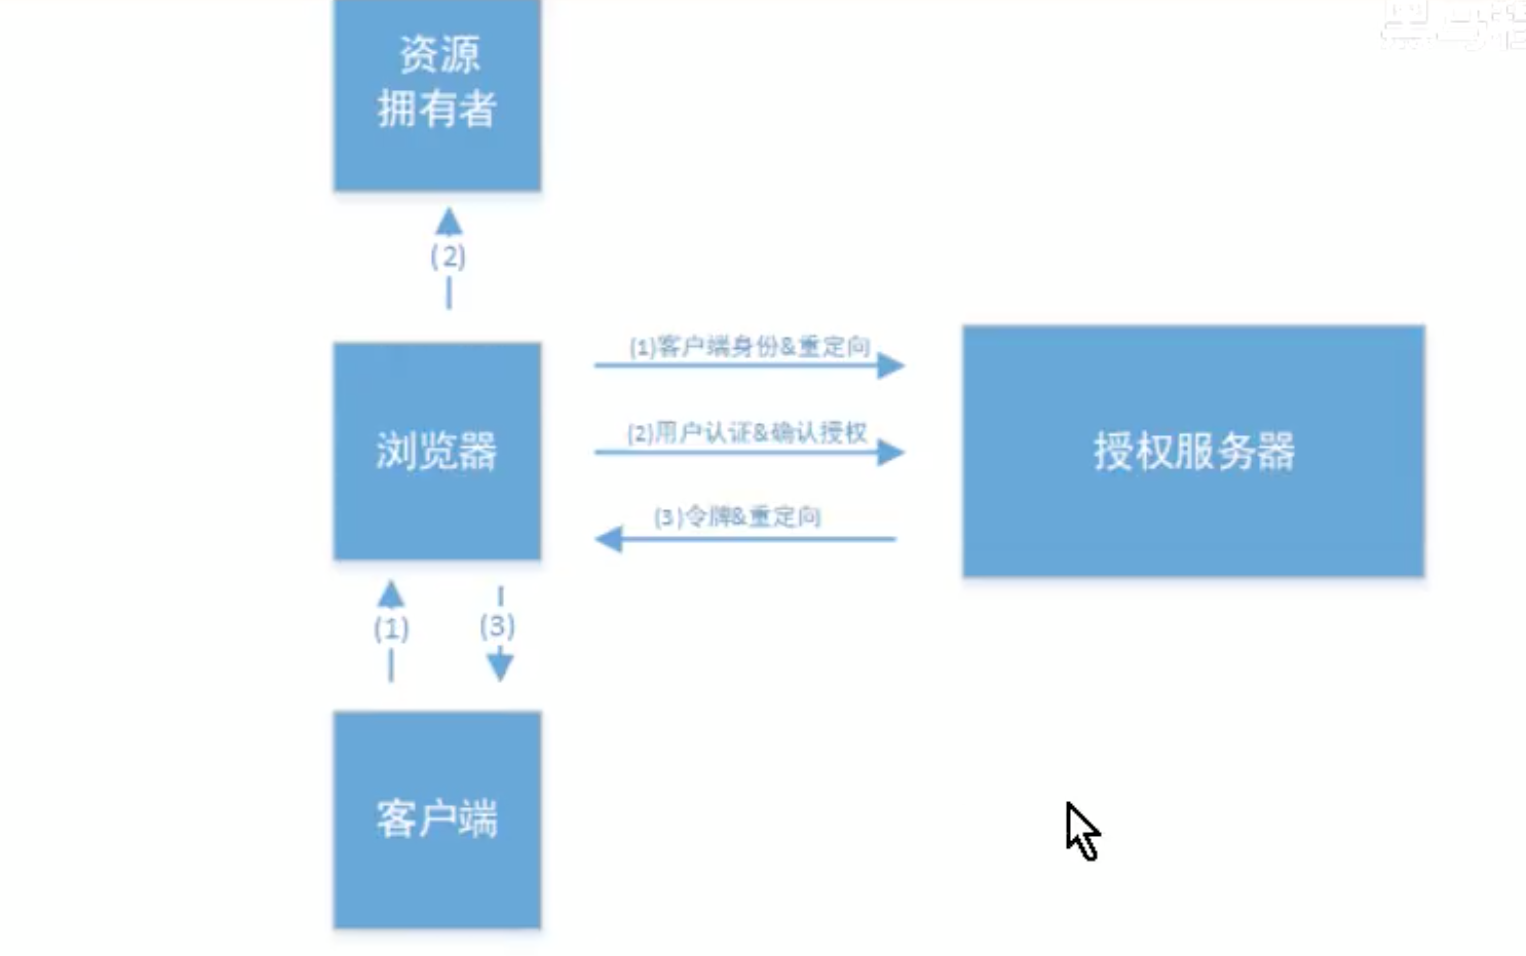
- 授权码模式

步骤1:获取code
请求示例:
登陆之后回跳到授权页面,点击允许后,会跳转到redirect_url,并显示出code
步骤2:获取token(注意如果请求方式配了POST就要用POST方式)
即可获取到token
授权码模式是四种模式中最安全的模式.一般用于client是web服务端应用或第三方原生app调用资源服务的时候.
- 简化模式
步骤1:直接拿token
一般来说简化模式用于没有服务器应用的第三方单页面应用,因为没有服务器就没法接收授权码.
- 密码模式
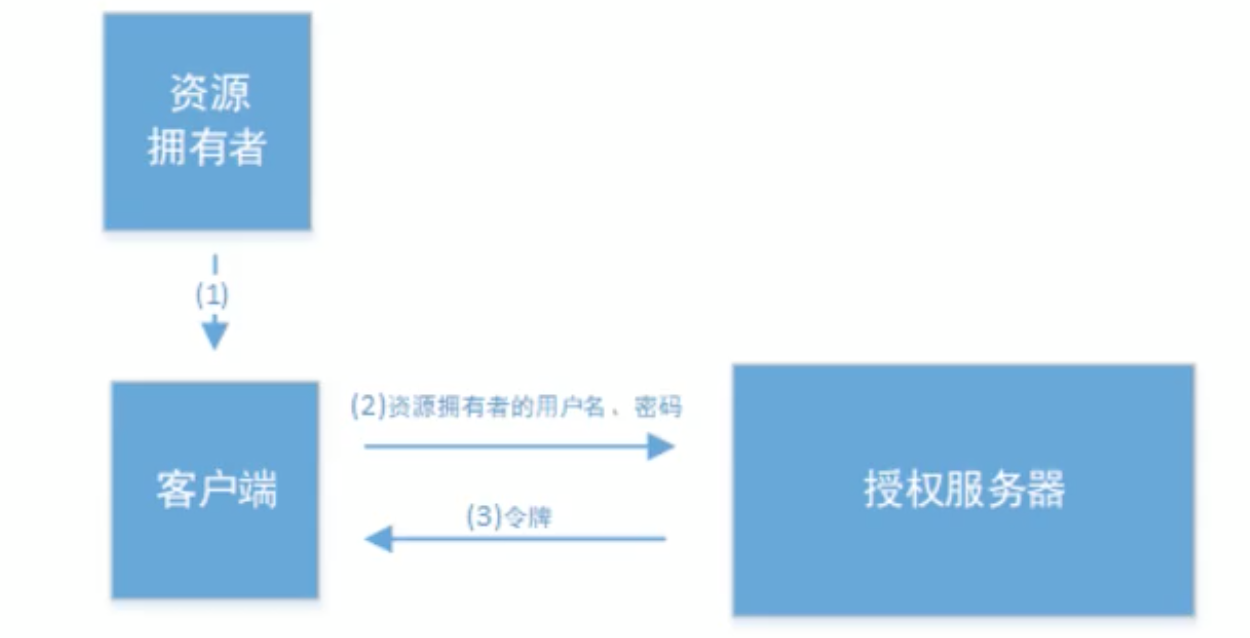
步骤1:
这种模式非常简单,但是却会将用户信息泄露给client,因此只能用于client是我们自己开发的情况.
- 客户端模式
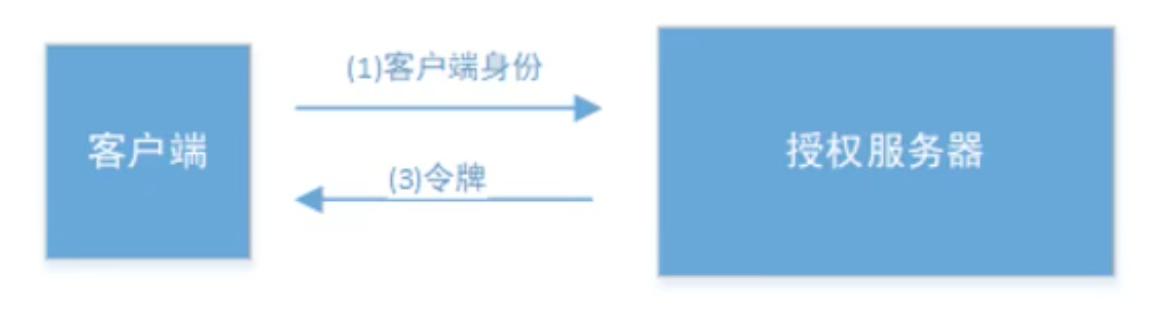
步骤1:
http://localhost:8080/oauth/token?client_id=c1&client_secret=secret&grant_type=client_credentials
6.3 JWT令牌
6.3.1 JWT简介
Json web token(JWT)是一个开放的行业标准.定义了一种简洁的,自包含的协议格式.用于在通信双方传递json对象,传递的信息经过数字签名可以被验证和信任.JWT可以使用HMAC或RSA签名,防止篡改.
JWT的优点:
- 基于json,方便解析
- 可以自定义内容,方便扩展
- 通过非对称加密算法及签名,安全性高
- 资源服务使用JWT可以不依赖认证服务即可完成授权.
JWT由以下三部分组成,每部分中间用.分割.如xxx.yyy.zzz
- header的部分
包括令牌的类型及使用的加密算法.
{
    "alg":"HS256",
    "typ":"JWT"
}

将上面的内容进行base64Url编码,得到一个字符串就是JWT的第一部分.
- Payload
第二部分是负载,内容也是json对象,它是存放有效信息的地方,可以存JWT的现有字段,也可以自定义字段.此部分不建议放敏感信息,因为可以被解码.最后将上面的内容进行base64Url编码,得到一个字符串就是JWT的第二部分.
例子:
{
    "merchantid":123,
    "name":"wang"
}
- Signature
第三部分是签名,防止内容被篡改.
例子:
HMACSH256(
base64UrlEncode(header)+.base64UrlEncode(payload),secret
)
secret:签名使用的密钥.
6.3.2 配置JWT
@Configuration
public class TokenConfig {

    public static final String SIGN_KEY = "abc123";

    @Bean
    public JwtAccessTokenConverter tokenConverter(){
        JwtAccessTokenConverter jwtAccessTokenConverter=new JwtAccessTokenConverter();
        jwtAccessTokenConverter.setSigningKey(SIGN_KEY);
        return jwtAccessTokenConverter;
    }

    @Bean
    public TokenStore tokenStore(){
       return new JwtTokenStore(tokenConverter());
    }
}
然后在配置生成令牌的地方,加一段增强令牌的代码:
 /**
     * 令牌管理服务
     * @return
     */
    @Bean
    public AuthorizationServerTokenServices tokenServices(){
        DefaultTokenServices services=new DefaultTokenServices();
        //客户端信息
        services.setClientDetailsService(clientDetailsService);
        //是否产生刷新令牌
        services.setSupportRefreshToken(true);
        //令牌存储策略
        services.setTokenStore(tokenStore);
        //令牌存活时间
        services.setAccessTokenValiditySeconds(60*5);
        services.setRefreshTokenValiditySeconds(60*10);

        //令牌增强
        TokenEnhancerChain tokenEnhancerChain=new TokenEnhancerChain();
        tokenEnhancerChain.setTokenEnhancers(Arrays.asList(jwtAccessTokenConverter));
        services.setTokenEnhancer(tokenEnhancerChain);

        return services;
    }