一、Spring框架设计
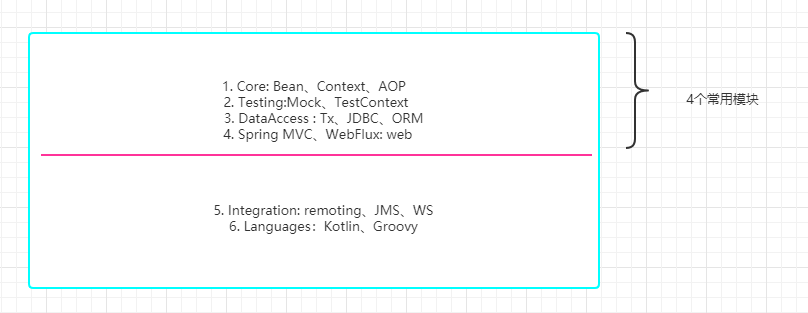
Spring framework 6大模块
1.1 Spring AOP
AOP: 面向切面编程
Spring 早期版本的核心功能,管理对象声明周期和对象装配
为了实现管理和装配,一个自然的想法就是,加一个中间层代理(字节码增强)来实现所有对象的托管
IoC:控制反转
IoC是一个宽泛的概念,而DI(依赖注入)是其中的一种实现方式。
从对象A直接引入和操作对象B,变成对象A只需要依赖一个接口IB,系统启动和装配阶段,把IB接口的实例对象注入到对象A,这样A就不需要依赖一个IB接口的具体实现。
从而达到修改配置文件,就可以在运行时替换成注入IB接口的其他实现类的一个对象实例。
思考:Spring怎么解决循环依赖?
当实例A依赖B,实例B依赖A时。就构成了循环依赖。Spring解决的思路就是先构造一个"早期"对象,对象的属性还没填充,然后将这个早期对象注入容器。让B完成实例化,此时A就能获取到B的引用,完成了实例化。
具体实现是通过Spring的三级缓存。
什么类型的循环依赖Spring无法处理?
答:双方都是构造函数注入或主bean对象(Spring启动中先加载的对象)使用构造函数注入。
构造器注入和setter注入在创建bean时候的区别
protected BeanWrapper createBeanInstance(String beanName, RootBeanDefinition mbd, @Nullable Object[] args) {
	///隐藏无用代码
		if (resolved) {
			if (autowireNecessary) {
				return autowireConstructor(beanName, mbd, null, null);
			}
			else {
				return instantiateBean(beanName, mbd);
			}
		}

	    //获取构造器注入
		Constructor<?>[] ctors = determineConstructorsFromBeanPostProcessors(beanClass, beanName);
		if (ctors != null || mbd.getResolvedAutowireMode() == AUTOWIRE_CONSTRUCTOR ||
				mbd.hasConstructorArgumentValues() || !ObjectUtils.isEmpty(args)) {
			return autowireConstructor(beanName, mbd, ctors, args);
		}

		// Preferred constructors for default construction?
		ctors = mbd.getPreferredConstructors();
		//如果ctors不为空,就是构造器注入
		if (ctors != null) {
			return
			//需要去创建构造器里依赖的bean,此时还没实例化出对象来放入三级缓存
			autowireConstructor(beanName, mbd, ctors, null);
		}

		//不是构造器注入,就可以实例化出一个bean来,并放入三级缓存里面了。
		return instantiateBean(beanName, mbd);
	}
Spring AOP的实现方式:
动态代理
接口类型,默认使用JDK动态代理。非接口类型默认使用CGlib。
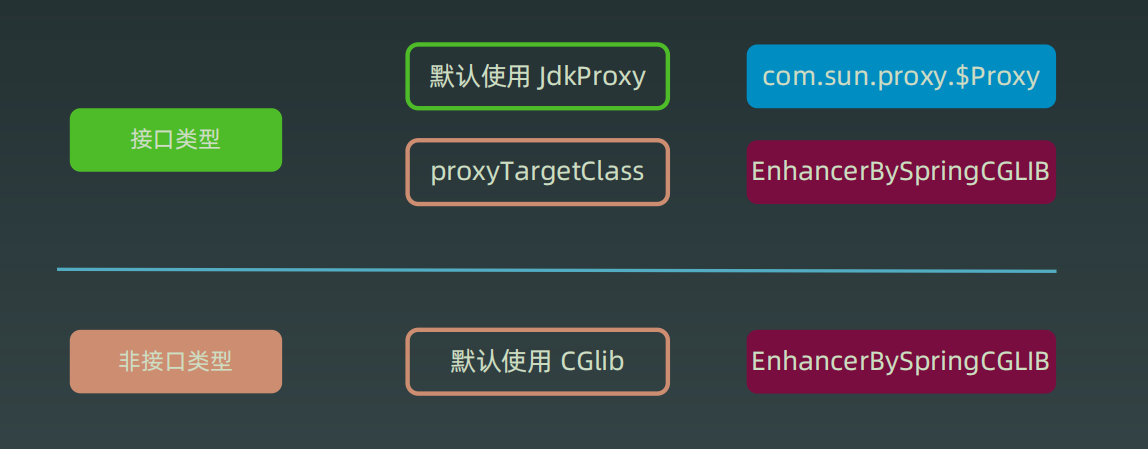
如果接口类型想改为用CBlib动态代理:
spring xml:
<aop:aspectj-autoproxy expose-proxy="true" proxy-target-class="true"/>
spring boot 配置文件:
# 增加@EnableAspectJAutoProxy
spring.aop.auto=true
# 开启CGLIB代理
spring.aop.proxy-target-class=true
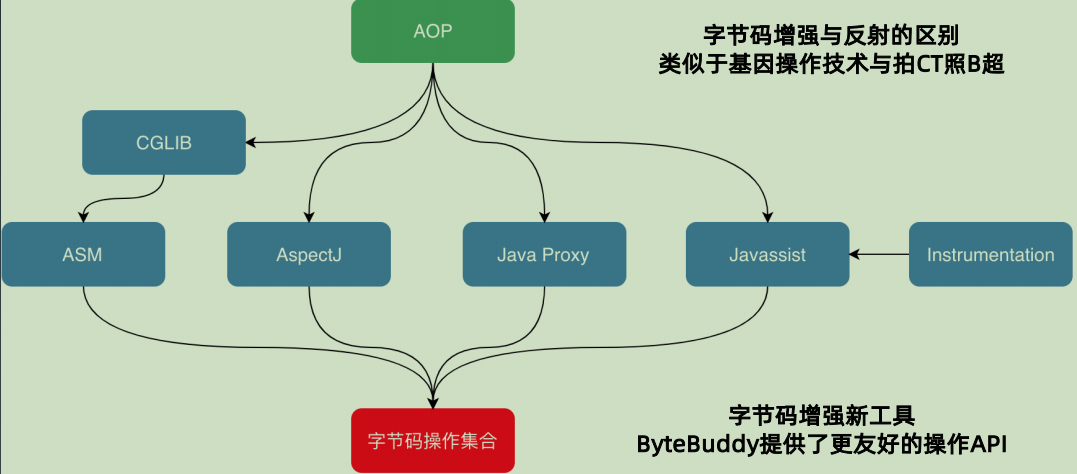
字节码增强
1.2 Spring Bean
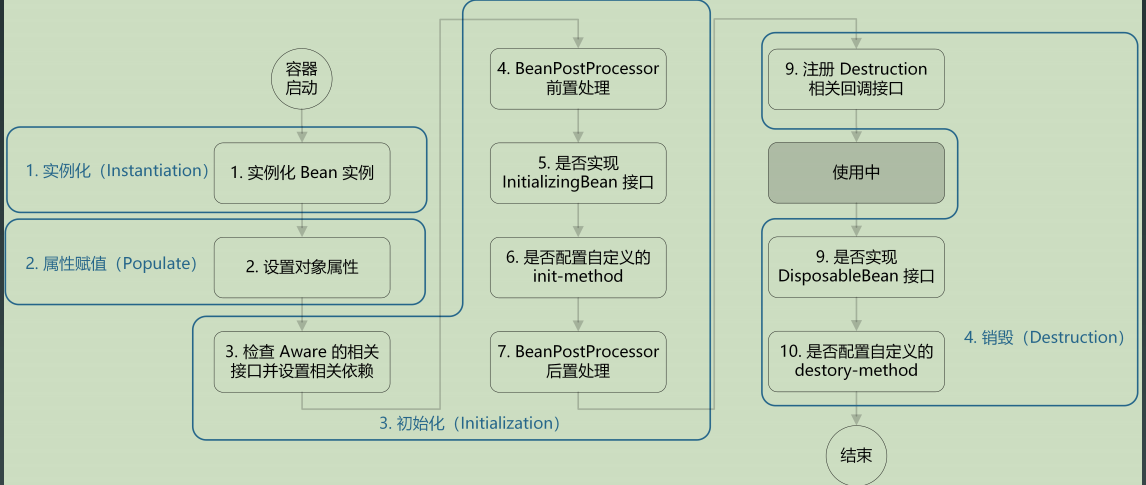
Bean的加载过程:
- 创建对象
- 属性赋值
- 初始化
- 注销接口注册
protected Object doCreateBean(final String beanName, final RootBeanDefinition mbd, final @Nullable Object[] args)
			throws BeanCreationException {
		// 1. 实例化bean
		BeanWrapper instanceWrapper = null;
		if (mbd.isSingleton()) {
			instanceWrapper = this.factoryBeanInstanceCache.remove(beanName);
		}
		if (instanceWrapper == null) {
			instanceWrapper = createBeanInstance(beanName, mbd, args);
		}
		final Object bean = instanceWrapper.getWrappedInstance();
		Class<?> beanType = instanceWrapper.getWrappedClass();
		if (beanType != NullBean.class) {
			mbd.resolvedTargetType = beanType;
		}

        /**
        省略部分代码
        **/

		// Initialize the bean instance.
		Object exposedObject = bean;
		try {
		    //2.属性赋值
			populateBean(beanName, mbd, instanceWrapper);
			//3.初始化
			exposedObject = initializeBean(beanName, exposedObject, mbd);
		}
		catch (Throwable ex) {
			if (ex instanceof BeanCreationException && beanName.equals(((BeanCreationException) ex).getBeanName())) {
				throw (BeanCreationException) ex;
			}
			else {
				throw new BeanCreationException(
						mbd.getResourceDescription(), beanName, "Initialization of bean failed", ex);
			}
		}

	/**
	省略部分代码
	**/

		// 4.销毁的回调方法
		try {
			registerDisposableBeanIfNecessary(beanName, bean, mbd);
		}
		catch (BeanDefinitionValidationException ex) {
			throw new BeanCreationException(
					mbd.getResourceDescription(), beanName, "Invalid destruction signature", ex);
		}

		return exposedObject;
	}
Bean的初始化过程:
- 检查Aware装配
- BeanPostProcessors前置处理
- init方法
- BeanPostProcessors后置处理
protected Object initializeBean(final String beanName, final Object bean, @Nullable RootBeanDefinition mbd) {
        //1.检查Aware接口并设置相关依赖
		if (System.getSecurityManager() != null) {
			AccessController.doPrivileged((PrivilegedAction<Object>) () -> {
				invokeAwareMethods(beanName, bean);
				return null;
			}, getAccessControlContext());
		}
		else {
			invokeAwareMethods(beanName, bean);
		}

		Object wrappedBean = bean;
		if (mbd == null || !mbd.isSynthetic()) {
		    //2.BeanPostProcessor前置处理
			wrappedBean = applyBeanPostProcessorsBeforeInitialization(wrappedBean, beanName);
		}

		try {
		    //若有init方法,则执行
		    //若实现了InitializingBean接口,则执行
			invokeInitMethods(beanName, wrappedBean, mbd);
		}
		catch (Throwable ex) {
			throw new BeanCreationException(
					(mbd != null ? mbd.getResourceDescription() : null),
					beanName, "Invocation of init method failed", ex);
		}
		if (mbd == null || !mbd.isSynthetic()) {
		    //BeanPostProcessor后置方法处理
			wrappedBean = applyBeanPostProcessorsAfterInitialization(wrappedBean, beanName);
		}

		return wrappedBean;
	}