本文记录一下使用SpringSecurityOAuth2配置JWT的步骤
1、相关知识
OAuth协议简介:https://www.cnblogs.com/javasl/p/13054133.html
OAuth 2.0官网:https://oauth.net/2/
使用SpringSecurityOAuth2默认实现OAuth2授权示例:https://www.cnblogs.com/javasl/p/13060284.html
使用SpringSecurityOAuth2配置自定义Token实现OAuth2授权示例:https://www.cnblogs.com/javasl/p/13068613.html
2、JWT基础
JWT全称是Json Web Token,它是JSON的一个开放的Token标准。JWT有三个特点:
1)自包含。JWT中包含着Token有意义的信息,拿到Token,解析后就能知道里面包含的信息是什么,而Spring默认生成的Token是UUID,没有任何有意义的信息。它的信息需要根据这个Token去Redis中读取。
2)密签。发出去的令牌不包含密码等敏感信息,使用指定的秘钥签名。
3)可扩展。包含的信息可以根据业务需求自己定义。
2、构建项目
本文使用的springboot版本是2.0.4.RELEASE,不同版本可能会有所区别。下面是主要的配置文件和类:
1)pom依赖
<dependency>
    <groupId>org.springframework.boot</groupId>
    <artifactId>spring-boot-starter-security</artifactId>
</dependency>
<dependency>
    <groupId>org.springframework.security.oauth.boot</groupId>
    <artifactId>spring-security-oauth2-autoconfigure</artifactId>
    <version>2.1.3.RELEASE</version>
</dependency>
2)application.properties
#不需要,暂时写死在代码中,重构时移植到此处即可
3)主配置类
@EnableWebSecurity
@Configuration
public class WebSecurityConfig extends WebSecurityConfigurerAdapter{

    @Override
    protected void configure(HttpSecurity http) throws Exception {
        http.httpBasic().and().csrf().disable();
    }
    @Bean("authenticationManager")
    public AuthenticationManager authenticationManagerBean() throws Exception {
        return super.authenticationManagerBean();
    }
    @Bean
    public PasswordEncoder passwordEncoder() {
        return new BCryptPasswordEncoder();
    }
}
4)用户认证类
@Component
public class MyUserDetailsService implements UserDetailsService{

    @Autowired
    private PasswordEncoder passwordEncoder;

    @Override
    public UserDetails loadUserByUsername(String username) throws UsernameNotFoundException {
        System.out.println("登录用户名:"+username);
        String  password = passwordEncoder.encode("123456");
        return new User(username,password,true,true,true,true,
                AuthorityUtils.commaSeparatedStringToAuthorityList("admin,ROLE_USER"));
    }
}
5)认证服务类
@Configuration
@EnableAuthorizationServer
public class AuthorizationServerConfig extends AuthorizationServerConfigurerAdapter{

    @Autowired
    private AuthenticationManager authenticationManager;
    @Autowired
    private UserDetailsService userDetailsService;
    @Autowired
    private PasswordEncoder passwordEncoder;
    @Autowired
    private TokenStore tokenStore;
    @Autowired
    private JwtAccessTokenConverter jwtAccessTokenConverter;

    @Override
    public void configure(AuthorizationServerEndpointsConfigurer endpoints) throws Exception {
        endpoints
                 .tokenStore(tokenStore)//如果使用RedisTokenStore,则会把Token存入redis中,否则存在内存
                 .accessTokenConverter(jwtAccessTokenConverter)
                 .authenticationManager(authenticationManager)
                 .userDetailsService(userDetailsService);
    }
    @Override
    public void configure(ClientDetailsServiceConfigurer clients) throws Exception {
        clients
               .inMemory()//Token保存在内存中
               .withClient("MyProject").secret(passwordEncoder.encode("MyProject_123"))//指明client-id和client-secret
               .accessTokenValiditySeconds(7200)//令牌有效时间,单位秒
               .authorizedGrantTypes("refresh_token","password","authorization_code")//支持刷新令牌、密码模式、授权码模式
               .scopes("all","read","write")//权限有哪些,如果这两配置了该参数,客户端发请求可以不带参数,使用配置的参数
               .redirectUris("http://127.0.0.1:8080/login");
    }
}
6)JWT配置类
@Configuration
public class JwtTokenConfig {

    @Bean
    public TokenStore jwtTokenStore() {
        return new JwtTokenStore(jwtAccessTokenConverter());
    }
    @Bean
    public JwtAccessTokenConverter jwtAccessTokenConverter() {
        JwtAccessTokenConverter accessTokenConverter = new JwtAccessTokenConverter();
        accessTokenConverter.setSigningKey("shxiang");//设置秘钥
        return accessTokenConverter;
    }
}
说明:上一篇讲到RedisTokenStore,这里又有JwtTokenStore,一定要区分开。
a)如果TokenStore的注入类型是RedisTokenStore,则生成的JWT会存入redis中。
b)如果TokenStore的注入类型是JwtTokenStore,或者endpoints不设置TokenStore,那么生成的JWT在内存中。
7)启动类
@SpringBootApplication
public class App {
    public static void main(String[] args) {
        SpringApplication.run(App.class, args);
    }
}
4、测试验证
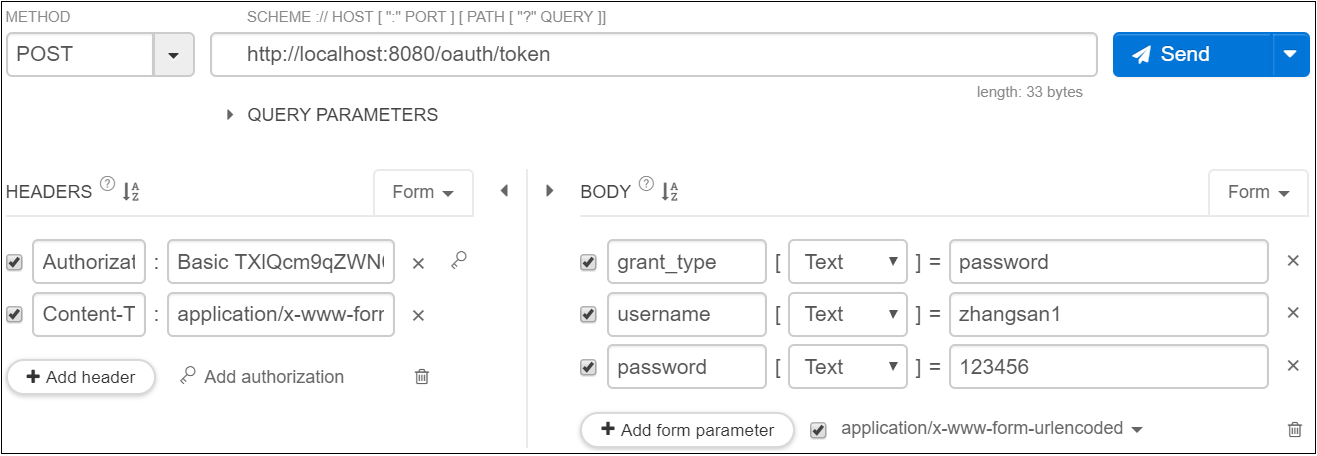
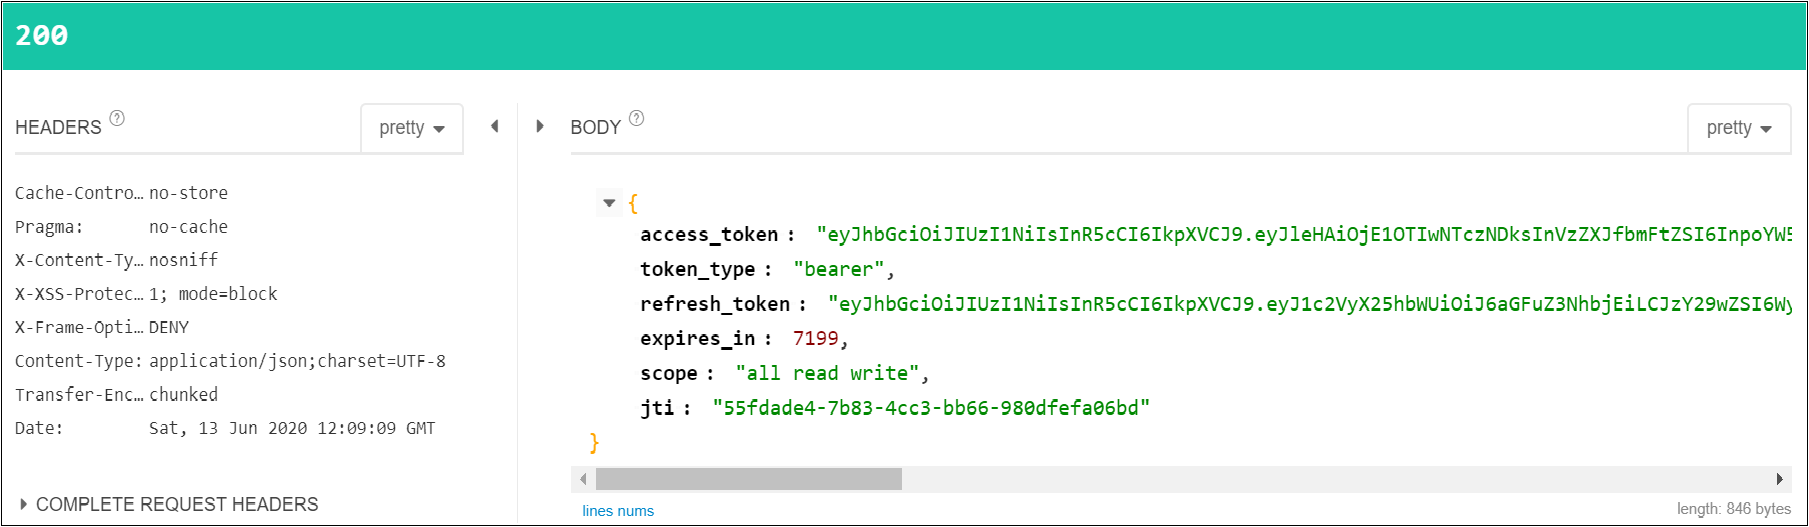
1)获取Token成功
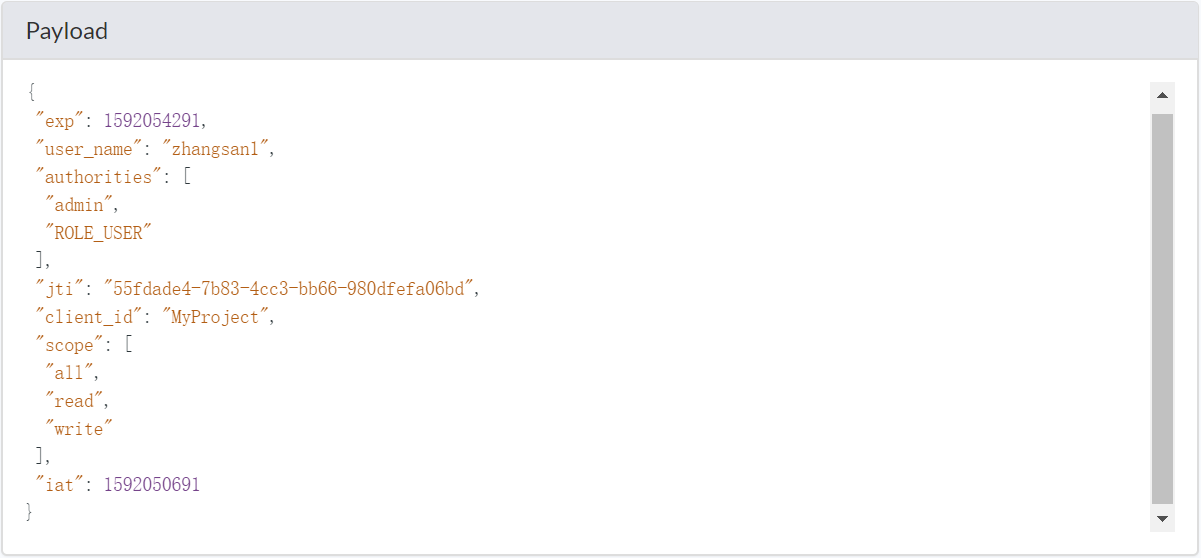
2)将Token复制到https://www.jsonwebtoken.io/解析Token成功
3)根据Token获取当前用户信息
@GetMapping("/me")
public Object getCurrentUser(Authentication user) {
    return user;
}


说明:上面是密码模式的测试,授权码模式的测试请参考上一篇的测试验证部分。
5、扩展自定义字段
1)添加Token增强类
public class MyJwtTokenEnhancer implements TokenEnhancer{

    @Override
    public OAuth2AccessToken enhance(OAuth2AccessToken accessToken, OAuth2Authentication authentication) {
        Map<String,Object> info = new HashMap<String, Object>();
        info.put("company","test test test");//拓展的字段
        ((DefaultOAuth2AccessToken)accessToken).setAdditionalInformation(info);
        return accessToken;
    }
}
2)修改JwtTokenConfig.java,添加jwtTokenEnhancer方法创建bean
@Bean
@ConditionalOnMissingBean(name = "jwtTokenEnhancer")
public TokenEnhancer jwtTokenEnhancer() {
    return new MyJwtTokenEnhancer();
}
3)修改AuthorizationServerConfig.java的configure方法,如下:
@Configuration
@EnableAuthorizationServer
public class AuthorizationServerConfig extends AuthorizationServerConfigurerAdapter{
    ... ...
    @Autowired
    private JwtAccessTokenConverter jwtAccessTokenConverter;
    @Autowired
    private TokenEnhancer jwtTokenEnhancer;

    @Override
    public void configure(AuthorizationServerEndpointsConfigurer endpoints) throws Exception {
        endpoints
             .authenticationManager(authenticationManager)
             .userDetailsService(userDetailsService);

        TokenEnhancerChain enhancerChain = new TokenEnhancerChain();
        List<TokenEnhancer> enhancers = new ArrayList<>();
        enhancers.add(jwtTokenEnhancer);
        enhancers.add(jwtAccessTokenConverter);
        enhancerChain.setTokenEnhancers(enhancers);

        endpoints.tokenEnhancer(enhancerChain);
        endpoints.accessTokenConverter(jwtAccessTokenConverter);
    }
    ... ...
}
测试结果如下:

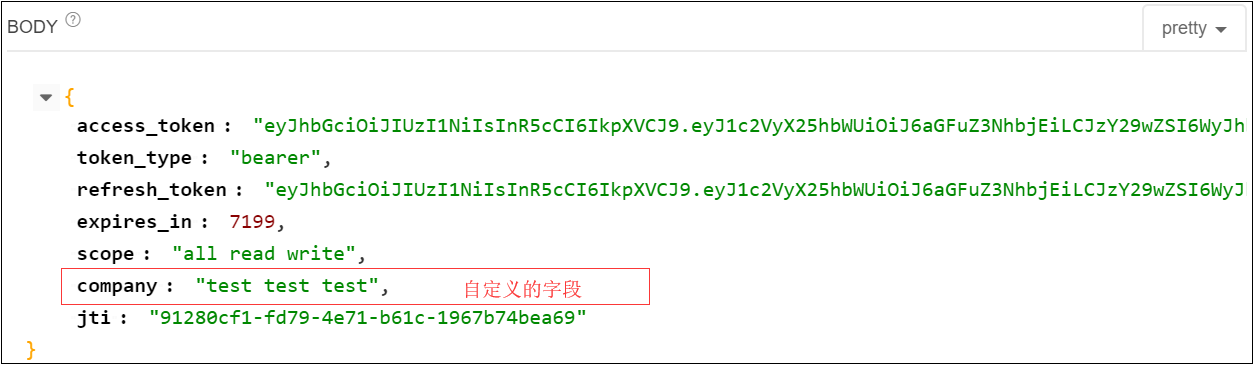

注意:拓展的字段不会封装到用户信息Authentication中,执行http://localhost:8080/me不会获取到拓展字段。
6、获取自定义字段
1)添加pom.xml依赖
<dependency>
    <groupId>io.jsonwebtoken</groupId>
    <artifactId>jjwt</artifactId>
    <version>0.7.0</version>
</dependency>
2)测试方法如下
@GetMapping("/me")
public Object getCurrentUser(Authentication user,HttpServletRequest request) throws ExpiredJwtException, UnsupportedJwtException, MalformedJwtException, SignatureException, IllegalArgumentException, UnsupportedEncodingException {
      String header = request.getHeader("Authorization");
      String token = StringUtils.substringAfter(header,"bearer ");
      Claims claims = Jwts.parser().setSigningKey("shxiang".getBytes("UTF-8"))//shxiang是秘钥
                .parseClaimsJws(token).getBody();
      String company = (String)claims.get("company");
      System.out.println("-------company----------:"+company);
      return user;
}
结果如下:


7、Token的刷新
获取令牌的时候会获取access_token和refresh_token,如下图所示:

使用refresh_token可以刷新Token,如下:
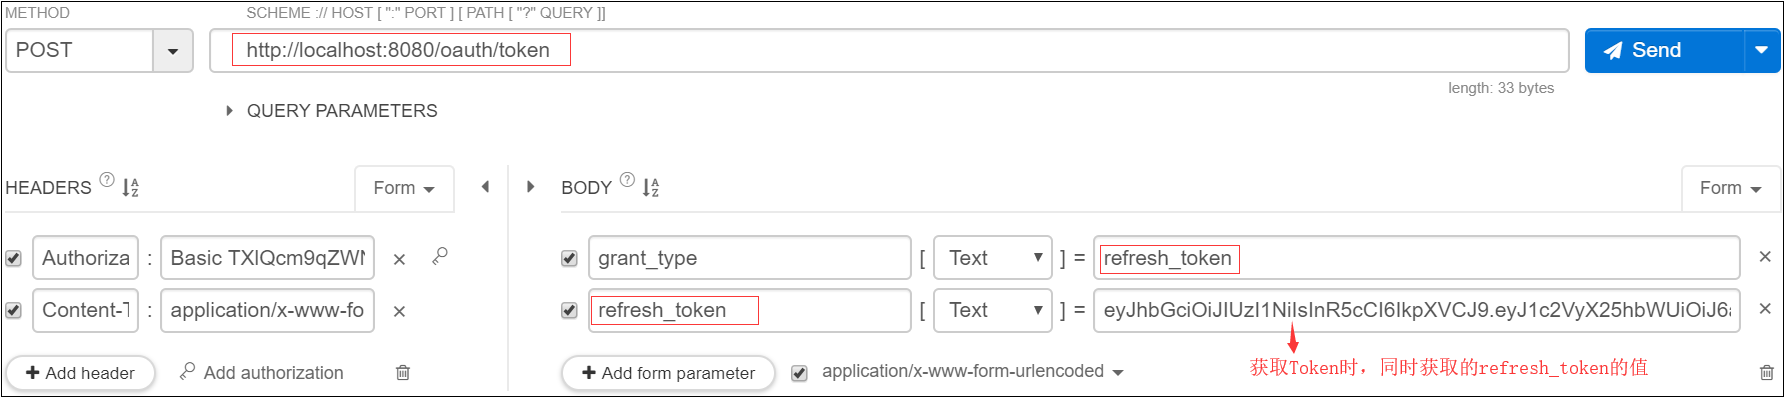

当用户使用Token访问时,发现超时了,在无感知的情况下立马使用refresh_token请求一个新的Token。refresh_token设置较长时间,如:
.accessTokenValiditySeconds(7200)
.refreshTokenValiditySeconds(2592000)