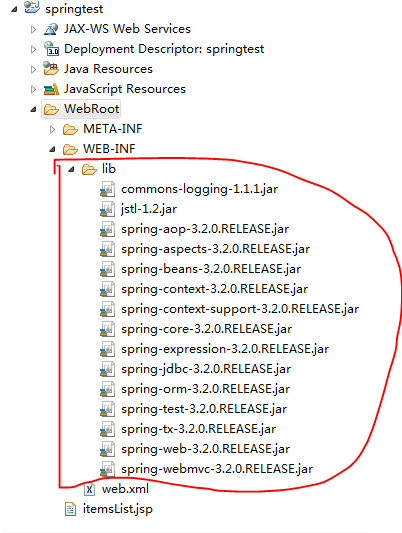
在进行springMVC开发时,我们也希望通过注解进行开发,这样比较快捷方便。现将springMVC开发步骤记录如下:
1、新建web程序,导入springMVC需要的jar包:

2、配置web.xml文件。主要是进行servlet的配置。
 1  <servlet>
 2       <servlet-name>springmvc</servlet-name>
 3       <servlet-class>org.springframework.web.servlet.DispatcherServlet</servlet-class>
 4       <init-param>
 5           <param-name>contextConfigLocation</param-name>
 6           <param-value>classpath:springmvc.xml</param-value>
 7       </init-param>
 8   </servlet>
 9
10   <servlet-mapping>
11       <servlet-name>springmvc</servlet-name>
12       <url-pattern>*.action</url-pattern>
13   </servlet-mapping>
注意:其中servlet-class的路径org.springframework.web.servlet.DispatcherServlet可以在spring-webmvc-3.2.0.RELEASE.jar中找到。
3、在工程目录下新建resource-folder命名为config,然后创建springmvc.xml文件,并进行配置,头部可以拷贝。

 1 <?xml version="1.0" encoding="UTF-8"?>
 2 <beans xmlns="http://www.springframework.org/schema/beans"
 3     xmlns:xsi="http://www.w3.org/2001/XMLSchema-instance" xmlns:mvc="http://www.springframework.org/schema/mvc"
 4     xmlns:context="http://www.springframework.org/schema/context"
 5     xmlns:aop="http://www.springframework.org/schema/aop" xmlns:tx="http://www.springframework.org/schema/tx"
 6     xsi:schemaLocation="http://www.springframework.org/schema/beans
 7         http://www.springframework.org/schema/beans/spring-beans-3.2.xsd
 8         http://www.springframework.org/schema/mvc
 9         http://www.springframework.org/schema/mvc/spring-mvc-3.2.xsd
10         http://www.springframework.org/schema/context
11         http://www.springframework.org/schema/context/spring-context-3.2.xsd
12         http://www.springframework.org/schema/aop
13         http://www.springframework.org/schema/aop/spring-aop-3.2.xsd
14         http://www.springframework.org/schema/tx
15         http://www.springframework.org/schema/tx/spring-tx-3.2.xsd ">
16
17 </beans>
4、在springmvc.xml文件中配置注解开发的映射器、适配器和视图解析器:
 1 <?xml version="1.0" encoding="UTF-8"?>
 2 <beans xmlns="http://www.springframework.org/schema/beans"
 3     xmlns:xsi="http://www.w3.org/2001/XMLSchema-instance" xmlns:mvc="http://www.springframework.org/schema/mvc"
 4     xmlns:context="http://www.springframework.org/schema/context"
 5     xmlns:aop="http://www.springframework.org/schema/aop" xmlns:tx="http://www.springframework.org/schema/tx"
 6     xsi:schemaLocation="http://www.springframework.org/schema/beans
 7         http://www.springframework.org/schema/beans/spring-beans-3.2.xsd
 8         http://www.springframework.org/schema/mvc
 9         http://www.springframework.org/schema/mvc/spring-mvc-3.2.xsd
10         http://www.springframework.org/schema/context
11         http://www.springframework.org/schema/context/spring-context-3.2.xsd
12         http://www.springframework.org/schema/aop
13         http://www.springframework.org/schema/aop/spring-aop-3.2.xsd
14         http://www.springframework.org/schema/tx
15         http://www.springframework.org/schema/tx/spring-tx-3.2.xsd ">
16        <!-- 使用了注解,但是不要忘记加载该类 为了方便实际开发建议使用context:component-scan 扫描组建-->
       <!-- <bean class="com.yy.ssm.controller.ItemsController3"/> -->

       <!--使用扫描组建扫描controller包  -->
       <context:component-scan base-package="com.yy.ssm.controller"></context:component-scan>

17     <!-- 注解的映射器 -->
18     <bean class="org.springframework.web.servlet.mvc.method.annotation.RequestMappingHandlerMapping"/>
19     <!-- 注解的适配器 -->
20     <bean class="org.springframework.web.servlet.mvc.method.annotation.RequestMappingHandlerAdapter"/>
21
22
23     <!-- 使用 mvc:annotation-driven代替上边注解映射器和注解适配器配置
24     mvc:annotation-driven默认加载很多的参数绑定方法,
25     比如json转换解析器就默认加载了,
26     如果使用mvc:annotation-driven不用配置上边的RequestMappingHandlerMapping和RequestMappingHandlerAdapter
27     实际开发时使用mvc:annotation-driven
28      -->
29     <!-- <mvc:annotation-driven></mvc:annotation-driven> -->
30     <!-- 视图解析器 -->
31       <bean class="org.springframework.web.servlet.view.InternalResourceViewResolver"/>
32 </beans>
注意:在实际开发工程可以使用<mvc:annotation-driven></mvc:annotation-driven>代替映射器和适配器。
5、编写模型层,并开发controler处理器。在处理器类上面使用@Controller注解,并在需要映射的方法上面使用@RequestMapping("/queryItems")注解。这样就可以访问地址/queryItmes.action了。
 1 package com.yy.ssm.controller;
 2
 3 import java.sql.Date;
 4 import java.util.ArrayList;
 5 import java.util.List;
 6
 7 import org.springframework.stereotype.Controller;
 8 import org.springframework.web.bind.annotation.RequestMapping;
 9 import org.springframework.web.servlet.ModelAndView;
10
11 import com.yy.po.Items;
12 /**
13  * 使用@Controller注解标识 它是一个控制器,另外要在springmvc.xml文件中要配置bean以加载该类
14  * @author YUAN
15  *
16  */
17 @Controller
18 public class ItemsController3 {
19     /**
20      * 使用@RequestMapping("/queryItems")注解标识, 用于映射该方法的映射路径,
21      * 默认的是.action,所以可以省略.action,不用特意写为:@RequestMapping("/queryItems.action")
22      * @return
23      */
24     @RequestMapping("/queryItems")
25     public ModelAndView queryItems() {
26         // 调用service查询数据
27         List<Items> itemsList = new ArrayList<Items>();
28         Items items1 = new Items("小浣熊", 2f, new Date(System.currentTimeMillis()), "好吃又实惠");
29         Items items2 = new Items("咖啡", 5f, new Date(System.currentTimeMillis()), "香浓更好心情");
30         Items items3 = new Items("雪碧加冰", 3f, new Date(System.currentTimeMillis()), "清新冰凉");
31         Items items4 = new Items("来一桶老坛酸菜面", 5f, new Date(System.currentTimeMillis()), "酸爽好哈吃");
32         itemsList.add(items1);
33         itemsList.add(items2);
34         itemsList.add(items3);
35         itemsList.add(items4);
36         // 返回modeAndView
37         ModelAndView modelAndView = new ModelAndView();
38         // 相当于request的setAttribute,可以在JSP页面中取出数据
39         modelAndView.addObject("itemsList", itemsList);
40         // 指定视图
41         modelAndView.setViewName("itemsList.jsp");
42         return modelAndView;
43     }
44
45 }

注意:注解的时候,使用的url会默认加上.action,所以输入网址的时候不要忘记了带上.action.
附:
其实,我们也可以改变springmvc.xml的配置,在视图解析器上配置视图的前缀和后缀。
1 <bean class="org.springframework.web.servlet.view.InternalResourceViewResolver">
2           <!--视图的前缀  -->
3           <property name="prefix" value="" />
4           <!--视图的后缀  -->
5           <property name="suffix" value=".jsp" />
6       </bean>
当加入了视图解析器的前缀和后缀以后,我们在跳转页面的时候就不用再加了,否则会出现重复导致路径错误。
1         // 指定视图
2         //modelAndView.setViewName("itemsList.jsp");
3         //配置了后缀,所以不要加.jsp
4         modelAndView.setViewName("itemsList");