Zipkin是分布式跟踪系统。
简单地理解,可以将Zipkin分为两部分。
一部分为Zipkin Server,其负责接受存储应用程序处理耗时数据,以及UI展示。
另一部分为Zipkin Client,负责在应用程序中收集数据,发送给Zipkin Server,针对Java,其插件为brave。
Zipkin是基于论文“Dapper, a Large-Scale Distributed Systems Tracing Infrastructure”进行设计,没有基于Opentracing API进行开发,但使用了Opentracing规范。在原理上,有许多地方都和基于Opentracing API的Jaeger相似。
brave作为Zipkin Client Java的插件,对于跟踪的系统类型做了很丰富的集成,例如:对MySQL、Servlet、RabbitMQ等都有跟踪的实现。详细情况请参考brave-instrumentation。
本文主要是阅读brave core代码之后,进行的理解记录,即brave-instrumentation实现的原理。运用brave-instrumentation进行跟踪,都会涉及到span的构建、管理和发送。于是我们按照以下的顺序,说一说brave core中Trace的实现。
- Tracing和Tracer构建
- Span构建与管理
- Span发送与关闭
Tracing和Tracer构建
在应用程序中,建议使用一个Tracing来管理Trace,它提供了一个已实例化的Tracer对象。
在Zipkin中,采用Builder模式构建Tracing,简单的构建结构如下:
1 Tracing tracing = Tracing.newBuilder().build();
这样构建出的Tracing,其中的参数都是默认的。
包括如下属性:
String localServiceName; // 设置跟踪数据服务所在应用程序的名称,属于Endpoint的属性(即serviceName)。默认值:unknown。
Endpoint endpoint; // 端口信息,属于Recorder的属性。
Reporter<zipkin2.Span> reporter; // 记录Span的方式。默认以日志的方式记录(LoggingReporter)
Clock clock; // 记录Span起始和结束时间,以及Span的Annotation的时间,属于Recorder的属性
Sampler sampler = Sampler.ALWAYS_SAMPLE; // 采样
CurrentTraceContext currentTraceContext = CurrentTraceContext.Default.inheritable(); // 当前跟踪上下文. 默认使用一个静态的InheritableThreadLocal自动继承这个context
boolean traceId128Bit = false; // traceId是否设置为128位。默认值为64位
boolean supportsJoin = true; //
Propagation.Factory propagationFactory = B3Propagation.FACTORY; // 对Span内容进行序列化和反序列化
ErrorParser errorParser = new ErrorParser(); // 这是用于解析错误的简化类型。作用于SpanCustomizer和ScopedSpan
build() 方法完成对Tracing的构造,并且将Tracer对象进行实例化。
Tracing类中有三个静态方法,newBuilder(),currentTracer(),current()。newBuilder() 上文说过,为Tracing实例提供了构造实例。current() 获取当前已实例化的Tracing对象,currentTracer() 获取已实例化的Tracer对象。
在Tracing创建之后,可以通过tracing.tracer()或者Tracing.currentTracer()获取Tracer对象。
Tracer包含如下属性:
final Clock clock;
final Propagation.Factory propagationFactory;
final Reporter<zipkin2.Span> reporter;
final Recorder recorder;final Sampler sampler;
final ErrorParser errorParser;
final CurrentTraceContext currentTraceContext;
final boolean traceId128Bit, supportsJoin;
final AtomicBoolean noop;
Reporter
其中Reporter接口在 io.zipkin.reporter2:zipkin-reporter 中实现。实现类如下:
- NOOP:对Span的信息不做任何操作
- CONSOLE:在控制台输出Span信息
- LoggingReporter:在日志中输出Span信息
- AsyncReporter:异步处理Span的信息。将Span添加到一个等待的队列中。当跟踪的那个线程调用flush()方法是,则会发送Span。
在brave官方的实例中,通过http的方式,将Span发送到Zipkin server。代码如下:
1 // Configure a reporter, which controls how often spans are sent
2 //   (the dependency is io.zipkin.reporter2:zipkin-sender-okhttp3)
3 sender = OkHttpSender.create("http://127.0.0.1:9411/api/v2/spans");
4 spanReporter = AsyncReporter.create(sender);
5
6 Tracing.newBuilder().spanReporter(spanReporter);
Sampler
在Zipkin中,Sampler是一个抽象类。在该类中定义了两个最简单的Sampler。ALWAYS_SAMPLE:所有的trace都会被记录。NEVER_SAMPLE:相反,所有trace都不会被记录。
Sampler还有4种类型的Sampler
BoundarySampler:适用于高流量的采样器。当rate为0时,采用NEVER_SAMPLE;当rate为1.0时,采用ALWAYS_SAMPLE;0.0001 <= rate < 1时,采用BoundarySampler。
CountingSampler:适用于低流量的采样器。同上,只有当0.01 <= rate < 1时,采用此采样器。
DeclarativeSampler:适用于注解的采样器。
ParameterizedSampler:适用于自定义采样规则的采样器。例如在http请求的跟踪中,可以建立只对特定请求进行拦截,或者不拦截等规则。
小结
以上,是对Tracing以及Tracer的初始化相关内容进行了介绍。Tracing控制了完整的服务追踪链,包括Tracing中属性说明,采样(Sampler),记录Span(Reporter)。在brave中。Tracing管理着Tracer,Tracer负责创建Spans,可以控制一个Span是否被采样,同时控制着Span的创建。
Span构建与管理
Span通过Tracer进行创建和管理。首先我们先看看Tracer类图,如下:
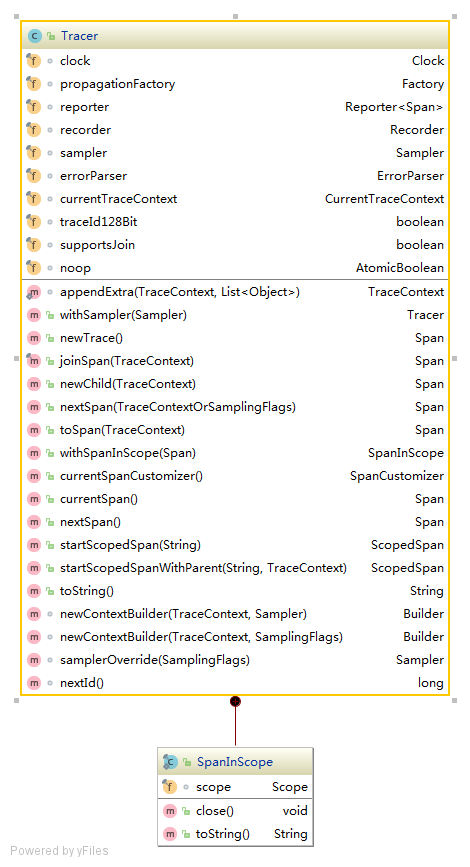
在Zipkin中,一个Trace中的Span是以树形的结构进行展示。Span与Span关系有两种,一种是“ChildOf”,即一个Span是一个父级Span的孩子;另一种是“FollowsFrom”,即一个Span与父级Span是平级,但是在这个父级Span的下面。
首先,我们先看看 Tracer 中创建Span的方法:
- 创建一个“ChildOf”关系的Span方法有:newChild(TraceContext);
- 创建一个“FollowsFrom”关系的Span方法有:nextSpan(TraceContextOrSamplingFlags)、nextSpan();
- 创建一个新的Span方法有:newTrace();
- 根绝CurrentTraceContext获取Span的方法:currentSpan();
- 根据TracContext创建一个Span方法:toSpan(TraceContext);
以上创建一个Span的方法都是比较好理解的,还有一个方法 joinSpan(TraceContext),它可以创建一个“ChildOf”关系的Span,也可以创建一个与父级Span相同且共享的Span,方法源码如下:
 1 public final Span joinSpan(TraceContext context) {
 2         if (context == null) {
 3             throw new NullPointerException("context == null");
 4         }
 5         if (!supportsJoin) {
 6             return newChild(context);
 7         }
 8         // If we are joining a trace, we are sharing IDs with the caller
 9         // If the sampled flag was left unset, we need to make the decision here
10         if (context.sampled() == null) { // then the caller didn't contribute data
11             context = context.toBuilder().sampled(sampler.isSampled(context.traceId())).build();
12         } else if (context.sampled()) { // we are recording and contributing to the same span ID
13             recorder.setShared(context);
14         }
15         return toSpan(context);
16     }
从Tracer源码来看,若 supportsJoin 参数为False,那么创建的为一个“ChildOf”关系的Span;反之,这个Span会与父级Span共用tracingId、spanId和parentId。
当 context.sampled() 为true时,这个Span就会在内存中设置为shared。(shared为true,不知道在什么情况下会使用。这个还有待在学习o(* ̄︶ ̄*)o brave官方解释:Indicates we are contributing to a span started by another tracer (ex on a different host))。
注意一点:如果在初始化Tracing,使用默认的Propagation.Factory,即B3Propagation.FACTORY,那么supportsJoin将永远为True;而Propagation.Factory#supportsJoin()返回的是false,那么joinSpan(TraceContext)返回的都是“ChildOf”关系的Span。
通过Tracer类的源码(这里就不将这个类完整的代码贴出),可知以上创建一个新的Span都是调用 toSpan(TraceContext) 方法生成。
Span管理
这里我们知道,可以通过父级的TraceContext构建一个“ChildOf”或者“FollowsFrom”关系的Span。但如果我们在不知道父级Span的情况下,如何可以构建一个与父级Span有正确关系的新Span呢?
例如,在一个应用程序系统中,要求跟踪Servlet拦截的请求以及对数据库的操作。如何管理好跟踪数据库操作的Span和拦截的请求的Span关系呢?
最差的方法是将拦截的请求的Span一层一层的传到访问数据库的方法中,但这样耦合度太高,不可取。我们知道一般处理这个请求的业务逻辑会在一个线程中进行,因此,Servlet拦截这个请求以及相应的数据库操作都会在一个线程中进行。这时就好办了,可以将Servlet的Span数据存入当前线程,在数据库操作记录Span时,我们就可以获取到这个父级的Span了。
下面从brave代码的角度来分析一下这个过程:
在父级Span的跟踪方法中,通过 Tracer#withSpanInScope(Span) 生成一个SpanInScope对象,或者通过Tracer#startScopedSpan(String) 或 Tracer#startScopedSpanWithParent(String, TraceConextext)生成一个ScopedSpan对象。这时,父级Span的TraceContext已植入Thread Local中,以供当前线程中其他跟踪方法获取父级Span的TraceContext(调用方法:ThreadLocalSpan.CURRENT_TRACER.next()或者ThreadLocalSpan.CURRENT_TRACER.next(TraceContextOrSamplingFlags))。由SpanInScope或ScopedSpan管理父级Span的TraceContext是否由ThreadLocal中移除。
-
TraceContext管理
Span的TraceContext通过CurrentTraceContext#newScope(TraceContext)方法置入ThreadLocal。我们先来看看CurrentTraceContext对象,以下是其类图。
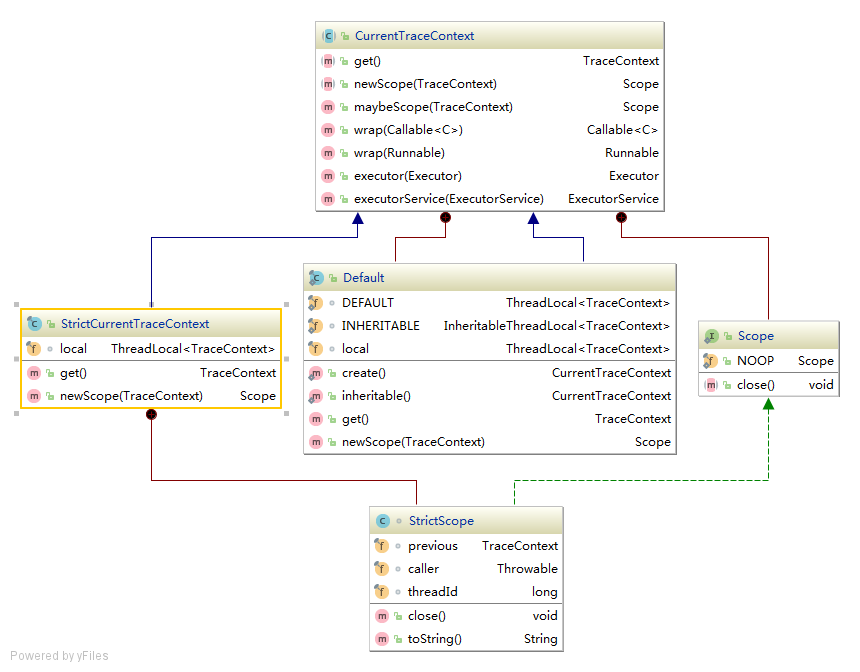
在Brave core中,CurrentTraceContext.Default 和 StrictCurrentTraceContext 继承了CurrentTraceContext。在实例化时,它们都会有一个final类型的thread local。在Tracing类中,CurrentTraceContext的默认值为:CurrentTraceContext.Default.inheritable(),在CurrentTraceContext中会有一个final类型的inheritable thread local。以下是CurrentTraceContext.Default中newScope(TraceContext)实现。
 1 public Scope newScope(@Nullable TraceContext currentSpan) {
 2     final TraceContext previous = local.get();
 3     local.set(currentSpan);
 4     class DefaultCurrentTraceContextScope implements Scope {
 5         @Override
 6         public void close() {
 7             local.set(previous);
 8         }
 9     }
10     return new DefaultCurrentTraceContextScope();
11 }
再来看看Tracer中是如何调用的。
-
startScopeSpanWithParent(String, TraceContext)
 1 public ScopedSpan startScopedSpanWithParent(String name, @Nullable TraceContext parent) {
 2     if (name == null) {
 3         throw new NullPointerException("name == null");
 4     }
 5     TraceContext context = propagationFactory.decorate(newContextBuilder(parent, sampler).build());
 6     CurrentTraceContext.Scope scope = currentTraceContext.newScope(context);
 7     ScopedSpan result;
 8     if (!noop.get() && Boolean.TRUE.equals(context.sampled())) {
 9         result = new RealScopedSpan(context, scope, recorder, errorParser);
10         recorder.name(context, name);
11         recorder.start(context);
12     } else {
13         result = new NoopScopedSpan(context, scope);
14     }
15     return result;
16 }
由此得知,startScopeSpanWithParent(String, TraceContext)会生成一个新的TraceContext,这个TraceContext由当前线程的ThreadLocal管理,然后会生成一个ScopedSpan对象对Span进行管理。
以下是brave生成ScopedSpan,以及对当前TraceContext管理的完整实例。
 1 // Note span methods chain. Explicitly start the span when ready.
 2 ScopedSpan span = tracer.startScopedSpan("encode");
 3 try {
 4     return encoder.encode();
 5 } catch (RuntimeException | Error e) {
 6     span.error(e); // Unless you handle exceptions, you might not know the operation failed!
 7     throw e;
 8 } finally {
 9     span.finish(); // finish - start = the duration of the operation in microseconds
10 }
ScopedSpan / SpanInScope控制着当前的TraceContext是否从ThreadLocal中移除。
先说说ScopedSpan。ScopedSpan是一个抽象类。它子类为NoopScopedSpan 和 RealScopedSpan。在没有数据进行记录时,使用NoopScopedSpan;反之,则使用RealScopedSpan。当Span完成跟踪,需要记录时,则调用finish()方法。在finish()方法中,则会调用Scope#close()将当前TraceContext从ThreadLocal中移除,恢复ThreadLocal的状态。
RealScopedSpan#finish()源码如下:
1 public void finish() {
2     scope.close();
3     recorder.finish(context);
4 }
-
startScopedSpan(String)
startScopedSpan(String)同理,其调用startScopeSpanWithParent(String, TraceContext)实现。
-
withSpanInScope(Span)
withSpanInScope(Span)创建了一个SpanInScope对象,传入的Span的TraceContext由ThreadLocal管理,与startScopeSpanWithParent(String, TraceContext)作用一样。
以下是ScopedSpan和SpanInScope的类图

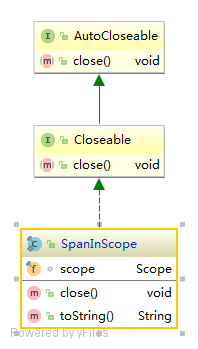
ScopedSpan 和 SpanInScope 不同的地方在于:
ScopedSpan 对Span进行管理,通过finish()方法调用scope.close()和recorder.finish(TraceContext),对ThreadLocal中的TraceContext进行恢复,以及记录Span的数据。
SpanInScope 对Span的TraceContext进行管理。当对象flush时,自动调用SpanInScope#close(),然后调用scope.close()。而recorder.finish(TraceContextt)调用,则是需要通过Span#finish()进行触发,完成Span的数据记录。
Tracing和Tracer的构建,以及Span构建和管理已说完。这里只是说了它们主要的流程,关于Propagation以及Sampler并没有提及太多。
P.S 如果有任何问题或者用词不当的地方,请指出,非常感谢o(* ̄︶ ̄*)o