前言
作为一名资深Delphi7程序员,想要实现摄像头扫描一维码/二维码功能,发现所有免费的第三方库都没有简便的实现办法,通用的OpenCV或者ZXing库基本上只支持XE以上的版本,而且一维码的识别还需要自己重新写,费时费力。最近,心里滋生一些用其他语言实现的想法。本篇讲解使用VS2019 C#程序调用AForge库实现调用摄像头拍照功能,接下来的几天学习使用ZXing库实现一维码/二维码的生成和识别,这样就能够做到,程序实现摄像头扫描一维码/二维码,并获取到码值。
AForge库的引用
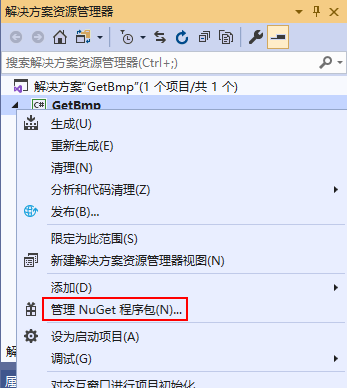
新建一个C# WinFrm应用程序,右键解决方案项目,选择管理NuGet程序包,并安装必要的AForge库,如下图。

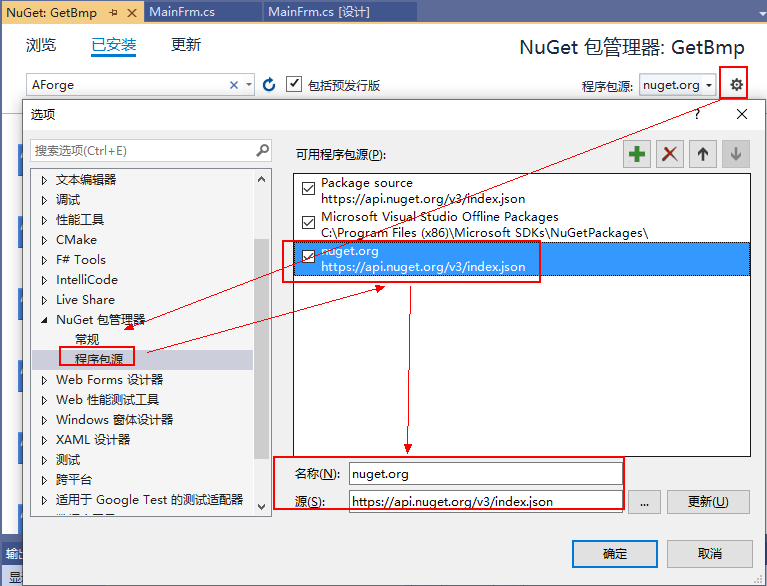
如果没有搜索到时,需要新增程序包源,然后重新搜索安装即可,如下图:
窗体控件部署
在窗体上添加必要的控件。当AForge库安装成功之后,可以在工具栏看到AForge.NET控件包,如下图。

核心代码
窗体载入时,枚举当前设备所有视频输入设备,并加载到设备列表中。
 1         /// <summary>
 2         /// 窗体初始化时,枚举所有视频输入设备,并加载到cmbDeviceLists中
 3         /// </summary>
 4         /// <param name="sender"></param>
 5         /// <param name="e"></param>
 6         private void MainFrm_Load(object sender, EventArgs e)
 7         {
 8             try
 9             {
10                 videoDevices = new FilterInfoCollection(FilterCategory.VideoInputDevice);
11                 if (videoDevices.Count == 0)
12                     throw new ApplicationException();
13                 foreach (FilterInfo device in videoDevices)
14                 {
15                     cmbDeviceLists.Items.Add(device.Name);
16                 }
17                 cmbDeviceLists.SelectedIndex = 0;
18             }
19             catch (ApplicationException)
20             {
21                 cmbDeviceLists.Items.Add("No local capture devices");
22                 videoDevices = null;
23             }
24         }
打开相机
 1         /// <summary>
 2         /// 打开相机
 3         /// </summary>
 4         /// <param name="sender"></param>
 5         /// <param name="e"></param>
 6         private void btnOpenCamera_Click(object sender, EventArgs e)
 7         {
 8             VideoCaptureDevice videoSource = new VideoCaptureDevice(videoDevices[cmbDeviceLists.SelectedIndex].MonikerString);
 9             this.videoSourcePlayer.VideoSource = videoSource;
10             this.videoSourcePlayer.Start();
11             this.btnOpenCamera.Enabled = false;
12             this.btnTakePic.Enabled = true;
13             this.btnExit.Enabled = true;
14         }
拍照
 1         /// <summary>
 2         /// 拍照
 3         /// </summary>
 4         /// <param name="sender"></param>
 5         /// <param name="e"></param>
 6         private void btnTakePic_Click(object sender, EventArgs e)
 7         {
 8             try
 9             {
10                 if (this.videoSourcePlayer.IsRunning)
11                 {
12                     this.pbImage.Visible = true;
13                     Bitmap bitMap = this.videoSourcePlayer.GetCurrentVideoFrame();
14                     this.pbImage.Image = bitMap;
15                     //设置图片相对控件的大小
16                     this.pbImage.SizeMode = PictureBoxSizeMode.StretchImage;
17                     this.btnSavePic.Enabled = true;
18                 }
19             }
20             catch (Exception ex)
21             {
22                 MessageBox.Show("摄像头异常:" + ex.Message);
23             }
24         }
保存图片
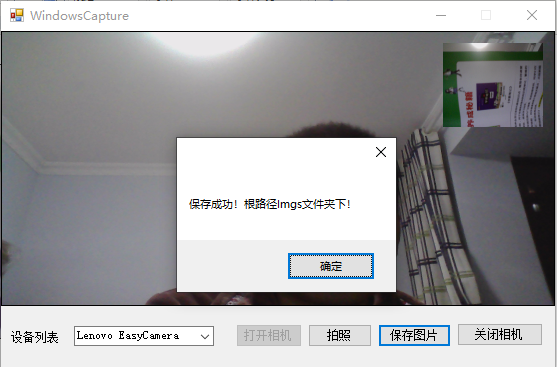
 1         /// <summary>
 2         /// 保存图片
 3         /// </summary>
 4         /// <param name="sender"></param>
 5         /// <param name="e"></param>
 6         private void btnSavePic_Click(object sender, EventArgs e)
 7         {
 8             BitmapSource bitmapSource = System.Windows.Interop.Imaging.CreateBitmapSourceFromHBitmap(
 9                                     videoSourcePlayer.GetCurrentVideoFrame().GetHbitmap(),
10                                     IntPtr.Zero,
11                                      Int32Rect.Empty,
12                                     BitmapSizeOptions.FromEmptyOptions());
13             PngBitmapEncoder pE = new PngBitmapEncoder();
14             pE.Frames.Add(BitmapFrame.Create(bitmapSource));
15             string picName = GetImagePath() + "\" + "Test" + ".bmp";
16             if (File.Exists(picName))
17             {
18                 File.Delete(picName);
19             }
20             using (Stream stream = File.Create(picName))
21             {
22                 pE.Save(stream);
23             }
24             MessageBox.Show("保存成功!根路径Imgs文件夹下!");
25         }
关闭相机
 1         /// <summary>
 2         /// 关闭相机
 3         /// </summary>
 4         /// <param name="sender"></param>
 5         /// <param name="e"></param>
 6         private void btnExit_Click(object sender, EventArgs e)
 7         {
 8             videoSourcePlayer.SignalToStop();
 9             videoSourcePlayer.WaitForStop();
10             this.btnOpenCamera.Enabled = true;
11             this.btnTakePic.Enabled = false;
12             this.btnExit.Enabled = false;
13             this.pbImage.Visible = false;
14         }
程序退出
1         private void MainFrm_FormClosed(object sender, FormClosedEventArgs e)
2         {
3             videoSourcePlayer.SignalToStop();
4             videoSourcePlayer.WaitForStop();
5         }
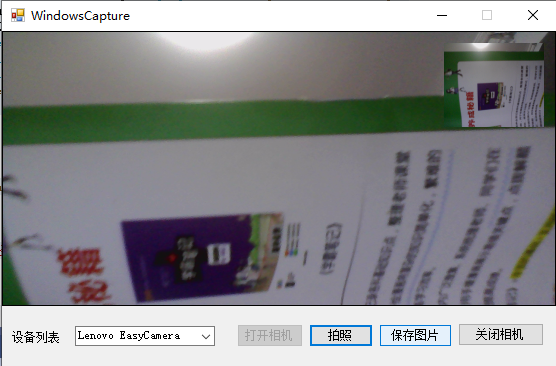
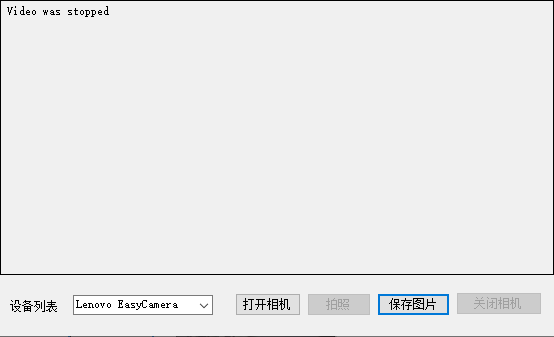
实现效果
至此,已全部完成!
作者:Jeremy.Wu
出处:https://www.cnblogs.com/jeremywucnblog/
本文版权归作者和博客园共有,欢迎转载,但未经作者同意必须保留此段声明,且在文章页面明显位置给出原文连接,否则保留追究法律责任的权利。