Silverlight4的本地化和全球化对于我们构建全球化应用来说提供一定的便利性,下来我们就来探讨如何实现其本地化和全球化。
我们启动VisualStudio2010,并构建一个Silverlight Application:
- ApplicationName:Jeriffe.SL.LocalGlobleApp
- 勾选:Host the Silverlight Application
- New Web project type我们选择ASP.NET Web Application Project
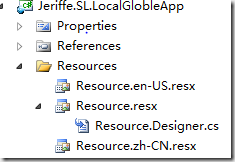
接着我们来构建Resource文件,这里我们创建Resources文件夹,并添加Resource.resx、Resource.en-US.resx及Resource.zh-CN.resx 3个资源文件(注意:这3格资源文件共用一个Resources.Designer.cs),截图如下:
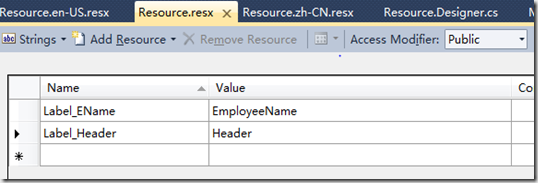
我们打开Resource.resx并添加2对Name Value串:
Label_EName EmployeeName
Label_Header Header
并且设置AccessModifier为Public:
以同样的方式我们在Resource.zh-CH.resx添加如下:
我们添加一个资源包装类ResourceWraper,我们为什么要添加这样一个类呢,我解释下缘由:
我们的资源文件(这里是Resource.resx、Resource.en-US.resx及Resource.zh-CN.resx)在我们每次修改后都会设置其后台Resources.Designer.cs内部的构造器
访问性修饰符为:Internal,如下图:
对于我们一般的C#应用来说internal是程序集内部可访问的,这个不存在什么问题,可是Silverlignt不知道为什么就不行,必须在这修改为Public才可以正常访问我们
的Resource,那么我们就会在每次修改完资源文件后还要修改这里的修饰符,这给我们的编程带来的一定的麻烦,有时候我们忘记修改这里会导致异常,所有我们这里
引入了一个包装类ResourceWraper,在包装类内部封装我们的资源文件类为一个只读的属性,这样我们就没有如上所述的困惑及麻烦,我们只需通过访问包装类来调用资源文件即可。包装类的代码如下:
namespace Jeriffe.SL.LocalGlobleApp.Resources
{
    public class ResourceWraper
    {
        private static Resource resource = new Resource();
        public Resource Resource
        {
            get
            {
                return resource;
            }
        }
    }
}
接着我们在MainPage.xaml中添加如下:
<UserControl x:Class="Jeriffe.SL.LocalGlobleApp.MainPage"
    xmlns="http://schemas.microsoft.com/winfx/2006/xaml/presentation"
    xmlns:x="http://schemas.microsoft.com/winfx/2006/xaml"
    xmlns:d="http://schemas.microsoft.com/expression/blend/2008"
    xmlns:mc="http://schemas.openxmlformats.org/markup-compatibility/2006"
    xmlns:res="clr-namespace:Jeriffe.SL.LocalGlobleApp.Resources"
    mc:Ignorable="d"
    d:DesignHeight="300" d:DesignWidth="400" Loaded="UserControl_Loaded">
    <UserControl.Resources>
        <res:ResourceWraper x:Name="GlobleResource"/>
    </UserControl.Resources>
        <Grid x:Name="LayoutRoot" Background="White">
        <Grid.RowDefinitions>
            <RowDefinition Height="Auto"/>
            <RowDefinition Height="Auto"/>
            <RowDefinition Height="Auto"/>
        </Grid.RowDefinitions>
            <TextBlock
                Name="lblHeader"
                Grid.Row="0"
                Foreground="Red"
                FontSize="20"
                Text="Design-Time"/>

                 <TextBlock
                    Grid.Row="1"
                    Margin="10"
                    FontSize="16"
                    Text="{Binding Resource.Label_EName,Source={StaticResource GlobleResource}}"/>
            <TextBlock/>
            <StackPanel
                Grid.Row="2"
                Orientation="Horizontal" >
            <Button
                Content="en-US"
                Margin="5"
                Name="btnen_US"
                Click="btnen_US_Click"/>
            <Button
                Content="zh-CH"
                Margin="5"
                Name="btnzh_CN"
                Click="btnzh_CN_Click"/>
        </StackPanel>
    </Grid>
</UserControl>
如上所示,加粗的字体有2部分:
- 第一部分资源声明,这里我们直接声明的是我们的资源包装类
- 第二部分是我们通过包装类来调用我们的资源文件写法。
接着就是我们的MainPage.xaml.cs文件的代码
using System;
using System.Collections.Generic;
using System.Linq;
using System.Net;
using System.Windows;
using System.Windows.Controls;
using System.Windows.Documents;
using System.Windows.Input;
using System.Windows.Media;
using System.Windows.Media.Animation;
using System.Windows.Shapes;
using Jeriffe.SL.LocalGlobleApp.Resources;
using System.IO.IsolatedStorage;

namespace Jeriffe.SL.LocalGlobleApp
{
    public partial class MainPage : UserControl
    {
        public MainPage()
        {
            InitializeComponent();
        }

        private void UserControl_Loaded(object sender, RoutedEventArgs e)
        {
            lblHeader.Text = Resource.Label_Header;
        }

        private void btnen_US_Click(object sender, RoutedEventArgs e)
        {
            StorageLanguage("en-US");
        }

        private void btnzh_CN_Click(object sender, RoutedEventArgs e)
        {
            StorageLanguage("zh-CN");
        }

        private void StorageLanguage(string language)
        {
            IsolatedStorageSettings settings = IsolatedStorageSettings.ApplicationSettings;
            if (settings.Contains(ConstDef.Language))
            {
                settings[ConstDef.Language] = language;
            }
            else
            {
                settings.Add(ConstDef.Language, language);
            }
        }
    }
}
代码功能如下:
我们在页面Loaded事件中实现了资源文件的运行时加载
我们UI有2格Button,他们Click事件来实现Language的转变
我们把设置的Language存储到隔离存储中:IsolatedStorageSettings
最后我们在App.xaml.cs中添加如下代码:
using System;
using System.Collections.Generic;
using System.Linq;
using System.Net;
using System.Windows;
using System.Windows.Controls;
using System.Windows.Documents;
using System.Windows.Input;
using System.Windows.Media;
using System.Windows.Media.Animation;
using System.Windows.Shapes;
using System.Globalization;
using System.Threading;
using System.IO.IsolatedStorage;

namespace Jeriffe.SL.LocalGlobleApp
{
    public partial class App : Application
    {
        ......
        private void Application_Startup(object sender, StartupEventArgs e)
        {
            IsolatedStorageSettings settings = IsolatedStorageSettings.ApplicationSettings;
            string language = "en-US";
            if (settings.Contains(ConstDef.Language))
            {
                language = settings[ConstDef.Language].ToString();
            }
            CultureInfo culture = new CultureInfo(language);
            Thread.CurrentThread.CurrentCulture = culture;
            Thread.CurrentThread.CurrentUICulture = culture;

            this.RootVisual = new MainPage();
        }

        ......
     }
}
//辅助类
namespace Jeriffe.SL.LocalGlobleApp
{
    public class ConstDef
    {
        public static string Language
        {
            get { return "language"; }
        }
    }
}
至此我们的应用已经构建完毕,但是我们还遗漏了最后也是最重要的一点,默认情况下Silverlight不会打包我们的语言资源文件到
XAP包中,我们必须需改Jeriffe.SL.LocalGlobleApp.csproj来使其自动的打包语言文件到XAP包:
这里我们用UE或者记事本打开Jeriffe.SL.LocalGlobleApp.csproj找到节点:并修改如下:
<SupportedCultures>zh-CN;en-US</SupportedCultures>
截图如下:
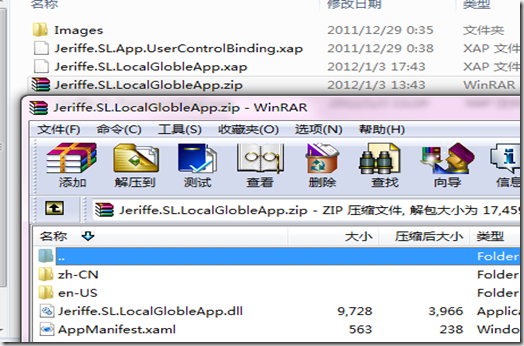
编译我们的应用,在HostWebProject的ClientBin目录下打开Jeriffe.SL.LocalGlobleApp.XAP包(修改扩展名XAP为zip打开,其实这就是格zip包,只是MS以XAP命名而已)
我们会看到如下:
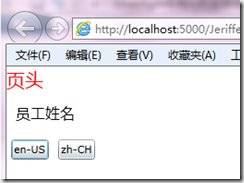
好了,我们应用现在已经OK,运行Host Web Project我们的应用如下所示: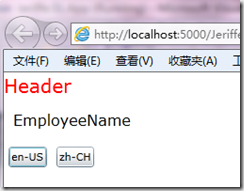
Click zh-CH按钮并刷新UI:
至此我们的应用就构建完毕了。
