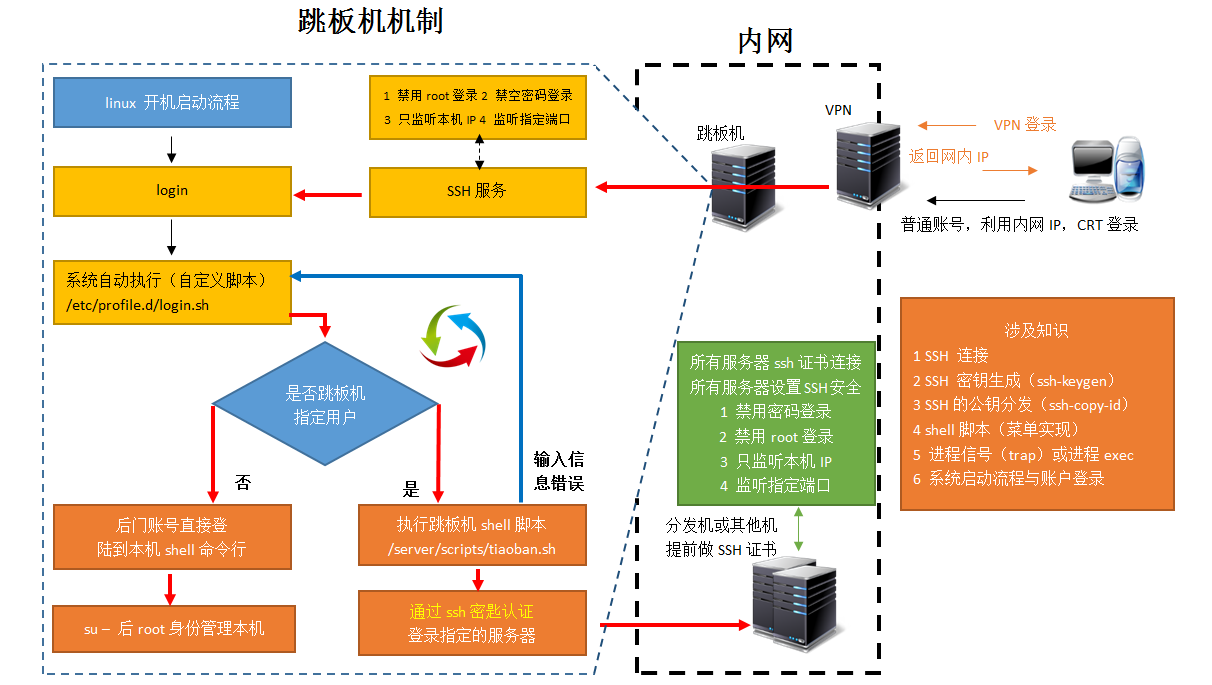
第一节 跳板机实现原理(图例)
第2节 涉及到的知识点
命令:trap
拓展知识:进程与信号
trap 语法,作用,使用
[jeson@mage-jump-01 ~/]$ trap -l
1) SIGHUP 2) SIGINT 3) SIGQUIT 4) SIGILL 5) SIGTRAP
6) SIGABRT 7) SIGBUS 8) SIGFPE 9) SIGKILL 10) SIGUSR1
| trap -l | 打印所有进程的信号 |
| trap -p | 显示那些信号已经被设置了。 |
| trap “” signals(或编号) | 为空表示这个信号,执行的命令为空。可以同设置多个trap “” signals1 signals2 signals N |
| trap “commands” signals(编号) | 收到signals指定信号时,信号功能复位同时执行commands命令。可以同时设置多个 |
| trap signals(或编号) | 没有命令部分,信号复原默认状态。可以同时恢复多个:trap signals1 signals2 signals N |
使用方法:
[jeson@mage-jump-01 ~/]$trap 'echo "I am a boy"' INT [jeson@mage-jump-01 ~/]$trap -p trap -- 'echo "I am a boy"' SIGINT trap -- '' SIGTSTP trap -- '' SIGTTIN trap -- '' SIGTTOU [jeson@mage-jump-01 ~/]$^CI am a boy # 设置按下ctrl + c 的时候,执行echo "I am a boy" [jeson@mage-jump-01 ~/]$trap 2 # 取消 echo hello 的命令,还原组合键(ctrl + c)的默认 [jeson@mage-jump-01 ~/]$trap -p trap -- '' SIGTSTP trap -- '' SIGTTIN trap -- '' SIGTTOU [jeson@mage-jump-01 ~/]$^C # 还原Ctrl+C 的默认功能 [jeson@mage-jump-01 ~/]$ |
案例:ctrl + c 后,清理工作
|
窗口1 |
窗口2 |
cat >touch_file.sh <<-EOF [jeson@mage-jump-01 ~/]$ bash touch_file.sh
|
# 观察窗口1按下ctrl + c后,是否自动清理文件
[jeson@mage-jump-01 ~/]$ watch -n 1 ls /tmp/jeson_* |
第2节 实现跳板机
跳板机主脚本:
|
窗口1:trap信号跳板机脚本 |
窗口2:设置特定用户登录不受跳板机代码影响 |
窗口3:测试效果 |
|
[jeson@mage-jump-01 ~/]$cat /server/scripts/tiao_ban_ji.sh #!/bin/bash ########################## # Date: 01:17 2018-04-07 # Author: Created by Jeson # Mail: 309769163@qq.com # Funcsion:This scripts funcsion is tiao ban ji ########################## function trapper(){ trap '' INT EXIT TSTP TERM HUP } while true do trapper clear cat <<-menu ========= Host List ======= 1) 10.0.0.3 lb-nginx-01 2) 10.0.0.4 lb-nginx-02 3) 10.0.0.10 web-lnmp-01 4) 10.0.0.11 web-lnmp-02 0) EXIT menu read -p "Please select:" num case "$num" in 1) ssh -P52113 $USER@lb-nginx-01 ;; 2) ssh -P52113 $USER@lb-nginx-02 ;; 3) ssh -P52113 $USER@web-lnmp-01 ;; 4) ssh -P52113 $USER@web-lnmp-02 ;; # 密码式调用分发密匙脚本 sshkey) bash /server/scripts/send_key.sh ;; # 只对特定用户有效 0) exit esac done |
[jeson@mage-jump-01 ~/]$ cat /etc/profile.d/tb.sh [ $UID -ne 0 ] && [ $USER != 'jeson' ] && source /server/scripts/tiao_ban_ji.sh 只有特定用户“root”和“jeson”可以使用“0) EXIT”功能。 |
======Host List========
|
密匙分发脚本:
| 密匙分发脚本1:cat /server/scripts/send_key.sh |
#!/bin/bash path_FenFa_sshKey_conf=/server/scripts/conf/sshkey.conf path_FenFa_sshKey_exp=/server/scripts/fenfa_sshkey.exp [ ! -f ~/.ssh/id_dsa ] && { ssh-keygen -t dsa -q -P '' -f ~/.ssh/id_dsa>/dev/null ; } while read line do remote_user=$(echo $line|awk -F "[@ -]+" '{ print $1 }') remote_password=$(echo $line|awk -F "[@ -]+" '{ print $2 }') remote_ip=$(echo $line|awk -F "[@ -]+" '{ print $3 }') remote_Port=$(echo $line|awk -F "[@ -]+" '{ print $4 }') expect $path_FenFa_sshKey_exp $remote_Port $remote_user $remote_password $remote_ip ~/.ssh/id_dsa.pub &>/dev /null done<$path_FenFa_sshKey_conf |
| 密匙分发exepect脚本实现非交互方式:cat /server/scripts/fenfa_sshkey.exp |
#!/bin/expect if { $argc != 5 } { send_user "usage: expect fenfa_sshkey.exp pub_key_file remote_user remote_passaword remote_ip " exit 10 } # defile var set remote_Port [ lindex $argv 0 ] set remote_user [ lindex $argv 1 ] set remote_password [ lindex $argv 2 ] set remote_ip [ lindex $argv 3 ] set remote_dsa [ lindex $argv 4 ] spawn ssh-copy-id -i $remote_dsa -p $remote_Port $remote_user@$remote_ip expect { "yes/no" { send "yes ";exp_continue } "*password" { send "$remote_password ";exp_continue } } |
| 需要分发到的主机配置文件: |
[root@web-lnmp-01 ~/]#cat /server/scripts/conf/sshkey.conf
root 123456 10.0.0.31 22 jeson 123456 10.0.0.200 52113 jeson 123456 10.0.0.10 52113 |