1、概述
由于一些项目使用了rancher进行部署发布,所以使用Rancher的流水线自动部署功能实现CICD,从gitlab、harbor安装,到流水线配置和中间的一些问题一一进行详细介绍解答。
2、准备工作
前期的Docker和Rancher安装就不在描述,直接进入正题
2.1 gitlab安装
gitlab安装很简单,配置到相应pvc和external_url即可
yaml文件如下
apiVersion: apps/v1beta2
kind: Deployment
metadata:
  annotations:
    deployment.kubernetes.io/revision: "1"
    field.cattle.io/creatorId: user-ff6zz
    field.cattle.io/publicEndpoints: '[{"addresses":["10.10.1.3"],"port":31901,"protocol":"TCP","serviceName":"gitlab:gitlab-nodeport","allNodes":true}]'
  creationTimestamp: "2019-12-02T12:48:28Z"
  generation: 2
  labels:
    cattle.io/creator: norman
    workload.user.cattle.io/workloadselector: deployment-gitlab-gitlab
  name: gitlab
  namespace: gitlab
  resourceVersion: "3780"
  selfLink: /apis/apps/v1beta2/namespaces/gitlab/deployments/gitlab
  uid: 68d9ca46-80bf-4b2b-af50-a9e69aadf12a
spec:
  progressDeadlineSeconds: 600
  replicas: 1
  revisionHistoryLimit: 10
  selector:
    matchLabels:
      workload.user.cattle.io/workloadselector: deployment-gitlab-gitlab
  strategy:
    rollingUpdate:
      maxSurge: 1
      maxUnavailable: 0
    type: RollingUpdate
  template:
    metadata:
      annotations:
        cattle.io/timestamp: "2019-12-02T12:48:37Z"
        field.cattle.io/ports: '[[{"containerPort":31901,"dnsName":"gitlab-nodeport","kind":"NodePort","name":"31901tcp319011","protocol":"TCP","sourcePort":31901}]]'
      creationTimestamp: null
      labels:
        workload.user.cattle.io/workloadselector: deployment-gitlab-gitlab
    spec:
      containers:
      - env:
        - name: GITLAB_OMNIBUS_CONFIG
          value: external_url 'http://10.10.1.3:31901'
        image: gitlab/gitlab-ce:12.4.5-ce.0
        imagePullPolicy: Always
        name: gitlab
        ports:
        - containerPort: 31901
          name: 31901tcp319011
          protocol: TCP
        resources: {}
        securityContext:
          allowPrivilegeEscalation: false
          capabilities: {}
          privileged: false
          readOnlyRootFilesystem: false
          runAsNonRoot: false
        stdin: true
        terminationMessagePath: /dev/termination-log
        terminationMessagePolicy: File
        tty: true
        volumeMounts:
        - mountPath: /etc/gitlab
          name: vol1
        - mountPath: /var/log/gitlab
          name: vol2
        - mountPath: /var/opt/gitlab
          name: vol3
      dnsPolicy: ClusterFirst
      restartPolicy: Always
      schedulerName: default-scheduler
      securityContext: {}
      terminationGracePeriodSeconds: 30
      volumes:
      - name: vol1
        persistentVolumeClaim:
          claimName: gitlab-config
      - name: vol2
        persistentVolumeClaim:
          claimName: gitlab-log
      - name: vol3
        persistentVolumeClaim:
          claimName: gitlab-data
status:
  availableReplicas: 1
  conditions:
  - lastTransitionTime: "2019-12-02T12:51:23Z"
    lastUpdateTime: "2019-12-02T12:51:23Z"
    message: Deployment has minimum availability.
    reason: MinimumReplicasAvailable
    status: "True"
    type: Available
  - lastTransitionTime: "2019-12-02T12:48:28Z"
    lastUpdateTime: "2019-12-02T12:51:23Z"
    message: ReplicaSet "gitlab-db7b54f5c" has successfully progressed.
    reason: NewReplicaSetAvailable
    status: "True"
    type: Progressing
  observedGeneration: 2
  readyReplicas: 1
  replicas: 1
  updatedReplicas: 12.2
2.2 harbor安装
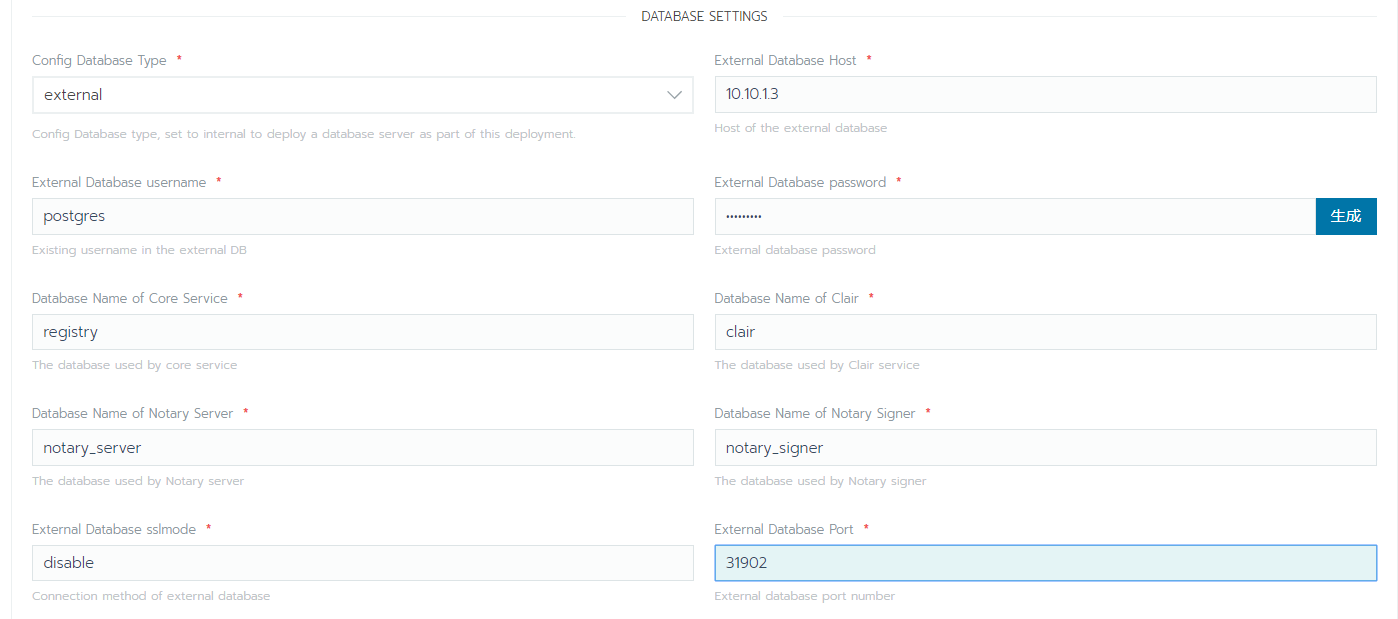
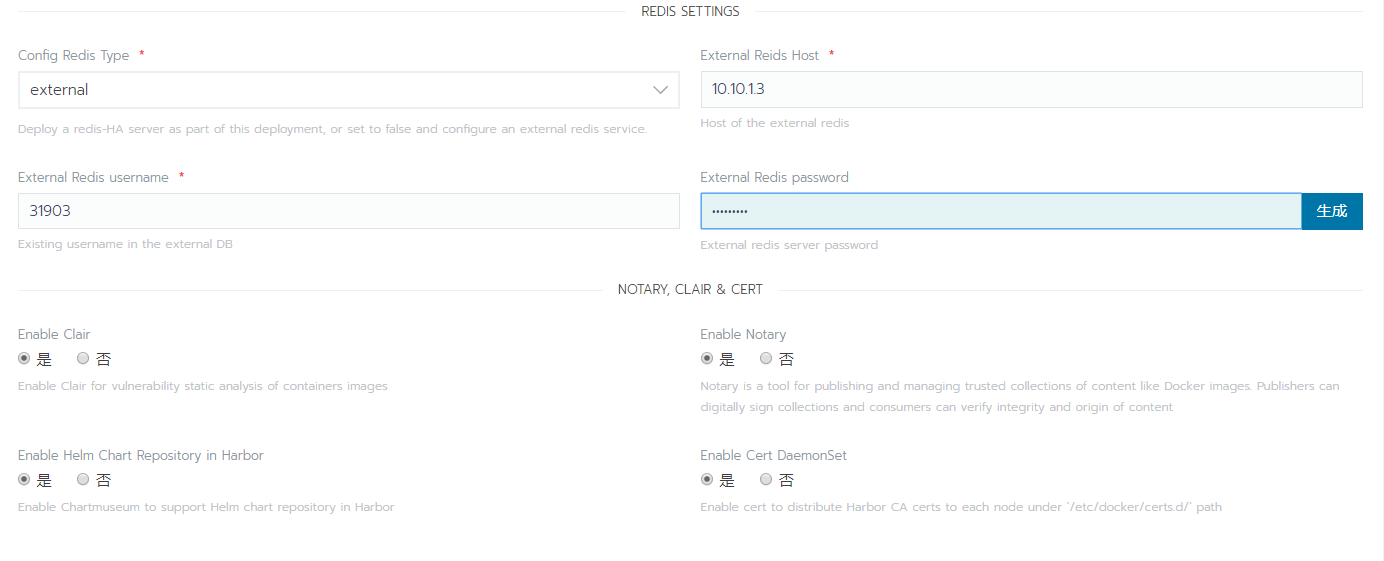
harbor私有docker镜像仓库安装,为了做到持久化,先行安装pgsql和redis。pgsql安装好后先创建registry,clair,notary_server,notary_signer4个数据库然后在商店选择harbor,配置相关选项,然后在harbor启动后,如果没有使用https,需要在node主机上的docker配置文件daemon.json中加入harbor私用镜像库地址 "insecure-registries":["10.10.1.3:30003"],不然docker会报证书问题的错误。然后在rancher的资源->镜像库凭证中添加相关凭证。最后把接下来需要的镜像上传到harbor,上传前需要docker login。
docker pull mcr.microsoft.com/dotnet/core/sdk:3.0
docker tag mcr.microsoft.com/dotnet/core/sdk:3.0 10.10.1.3:30003/jfwang/mcr.microsoft.com/dotnet/core/sdk:3.0
docker push 10.10.1.3:30003/jfwang/mcr.microsoft.com/dotnet/core/sdk:3.0


3、配置流水线
配置rancher的token和key在后续自动部署的时候直接操作容器,

点击添加key,然后记住token和key。
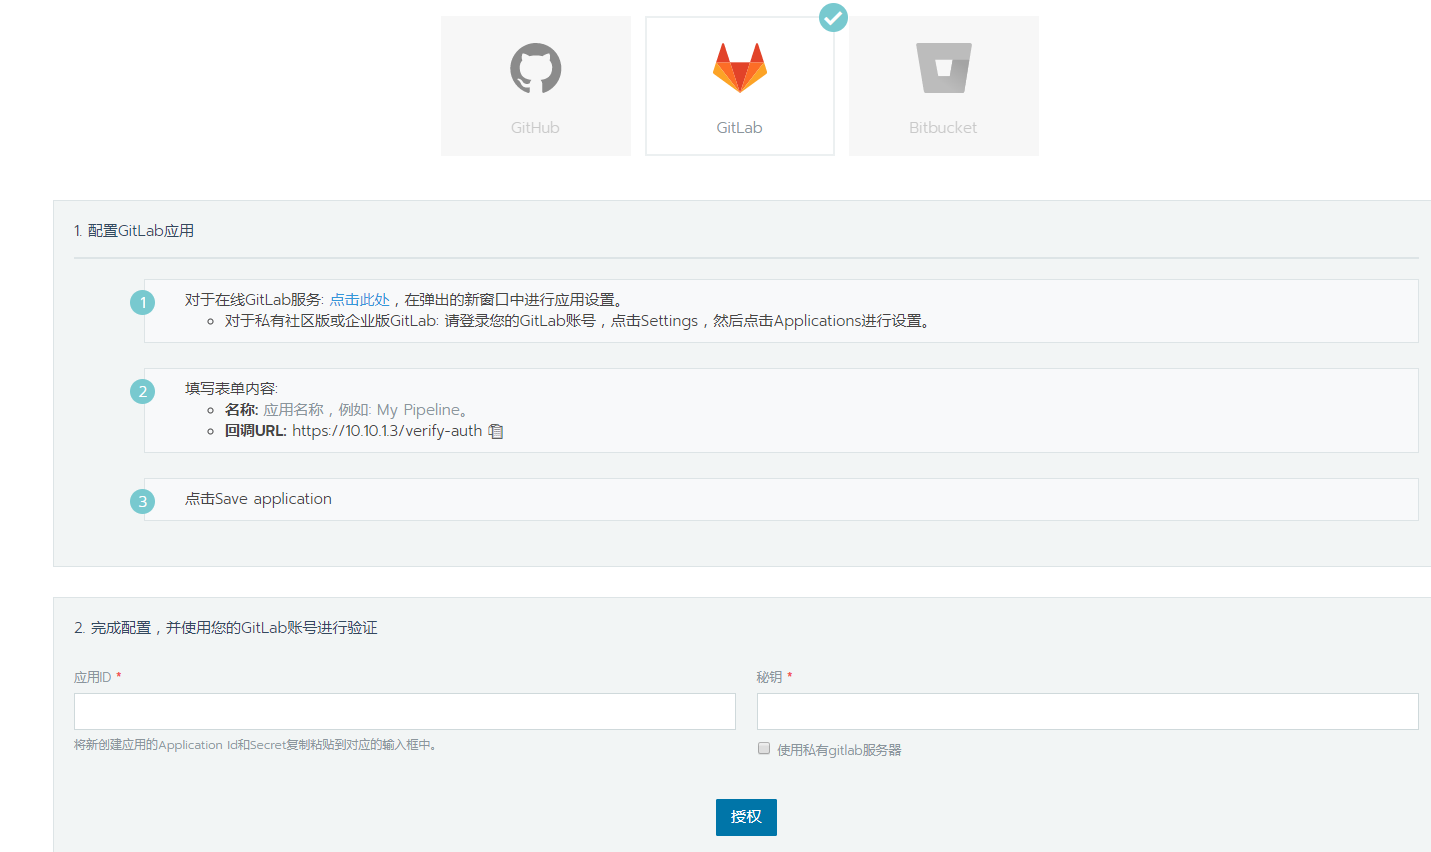
然后在工作负载->流水线->配置代码库->认证&同步代码库,我这里选择的gitlab,按照配置即可

授权成功后,需要在setting->network->Outbound requests下勾选Allow requests to the local network from web hooks and services,这样代码的pull命令才会触发钩子。
同步完代码库后,点击启用,点击编辑配置对流水线进行具体配置。
第一步clone代码是自带的无需配置
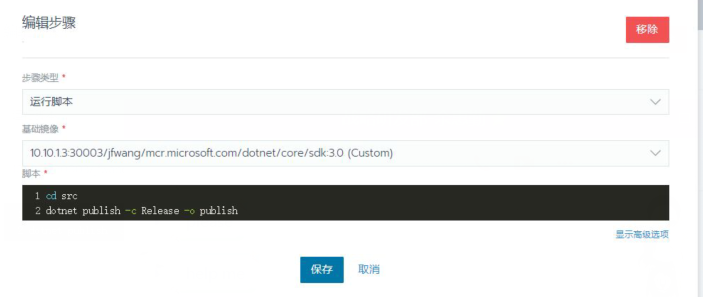
第二步执行测试操作,点击添加阶段。然后在阶段里添加步骤,步骤类型为运行脚本,基础镜像填你执行命令的所需镜像,不同程序语言执行不同的脚本

第三步 发布程序,步骤类型和基础镜像和第二步一样,脚本为发布脚本
第四不 构建镜像,步骤类型构建并发布镜像,Dockerfile路径就填写你代码中Dockerfile的路径,镜像名称如果你要push到自己的镜像仓库则规则必须是 镜像项目名/程序名,不然无权限,最后勾选我们最开始配置的私有镜像仓库地址。

Dockerfile
FROM 10.10.1.3:30003/jfwang/mcr.microsoft.com/dotnet/core/aspnet:3.0 AS runtime
WORKDIR /app
COPY /src/publish ./
ENTRYPOINT ["dotnet", "pipeline-example-dotnetcore.dll"]
第五步,因我们要自动部署应用到rancher,为了重复部署的时候防止端口被占用,名称重复等等,我们直接先通过rancher api 执行删除pod操作。注意如果不是用的https要在最后面加-k参数,不然会报证书错误。
curl -u "{token}:{key}"
-X DELETE
-H 'Accept: application/json'
'https://10.10.1.3/v3/project/c-24h9n:p-f9cxk/workloads/deployment:default:pipeline-example-dotnetcore' -k
第六步 通过yaml部署应用
路径填写代码中的yaml路径
yaml
apiVersion: apps/v1beta2
kind: Deployment
metadata:
  name: pipeline-example-dotnetcore
  namespace: default
spec:
  progressDeadlineSeconds: 600
  replicas: 1
  revisionHistoryLimit: 10
  selector:
    matchLabels:
      workload.user.cattle.io/workloadselector: deployment-default-pipeline-example-dotnetcore
  strategy:
    type: Recreate
  template:
    metadata:
      annotations:
        cattle.io/timestamp: "2019-12-01T08:37:18Z"
        field.cattle.io/ports: '[[{"containerPort":80,"dnsName":"pipeline-example-dotnetcore-hostport","hostPort":5000,"kind":"HostPort","name":"5000tcp50000","protocol":"TCP","sourcePort":5000}]]'
      creationTimestamp: null
      labels:
        workload.user.cattle.io/workloadselector: deployment-default-pipeline-example-dotnetcore
    spec:
      containers:
      - image: ${CICD_IMAGE}:1.${CICD_EXECUTION_SEQUENCE}
        imagePullPolicy: Always
        name: pipeline-example-dotnetcore
        ports:
        - containerPort: 80
          hostPort: 5000
          name: 5000tcp50000
          protocol: TCP
        resources: {}
        securityContext:
          allowPrivilegeEscalation: false
          capabilities: {}
          privileged: false
          readOnlyRootFilesystem: false
          runAsNonRoot: false
        stdin: true
        terminationMessagePath: /dev/termination-log
        terminationMessagePolicy: File
        tty: true
      dnsPolicy: ClusterFirst
      imagePullSecrets:
      - name: harbor
      restartPolicy: Always
      schedulerName: default-scheduler
      securityContext: {}
      terminationGracePeriodSeconds: 30
status:
  availableReplicas: 1
  conditions:
  - lastTransitionTime: "2019-12-01T08:37:21Z"
    lastUpdateTime: "2019-12-01T08:37:21Z"
    message: Deployment has minimum availability.
    reason: MinimumReplicasAvailable
    status: "True"
    type: Available
  - lastTransitionTime: "2019-12-01T08:32:53Z"
    lastUpdateTime: "2019-12-01T08:37:21Z"
    message: ReplicaSet "pipeline-example-dotnetcore-84d4cfbb75" has successfully progressed.
    reason: NewReplicaSetAvailable
    status: "True"
    type: Progressing
  observedGeneration: 7
  readyReplicas: 1
  replicas: 1
  updatedReplicas: 1
至此全部部署完毕。