zoukankan      html  css  js  c++  java
  • Netty源码分析-ChannelPipeline事件传播

    ChannelPipeline是Netty中非常非常非常重要的一个组件,Netty的事件传播以及我们自定义的业务处理,都是基于ChannelPipeline来实现的。在分析ChannelPipeline之前,我们先来了解一下与ChannelPipeline相关的另外三个超级重要的组件ChannelHandlerChannelInboundHandlerChannelOutboundHandlerChannelInboundInvokerChannelOutboundInvoker,接下来我们就详细分析一下这几个组件的作用

    ChannelHandlerChannelInboundHandlerChannelOutboundHandler的父类,里面定义了以下三个最基础的方法以及一个注解

    public interface ChannelHandler {
    // 新建客户端连接触发
       void handlerAdded(ChannelHandlerContext ctx) throws Exception;

    // 客户端中断连接触发
       void handlerRemoved(ChannelHandlerContext ctx) throws Exception;

       // 当发生异常时触发
       @Deprecated
       void exceptionCaught(ChannelHandlerContext ctx, Throwable cause) throws Exception;

       // 标识ChannelHandler是否可同时添加到不同的ChannelPipeline
       @Inherited
       @Documented
       @Target(ElementType.TYPE)
       @Retention(RetentionPolicy.RUNTIME)
       @interface Sharable {
           // no value
      }
    }

    ChannelInboundHandler定义了一系列客户端连接消息事件处理。我们可以这样理解,当有客户端连接或者当客户端发消息到服务端时,消息的流向是从客户端到服务端,对于服务端来说,消息就是流进来。所以当消息流进来时,会经过一系列的ChannelInboundHandler处理,ChannelInboundHandler中定义了很多方法,如下所示,比如:客户端连接事件,注册事件,激活事件,消息读取事件等等

    public interface ChannelInboundHandler extends ChannelHandler {
    // 客户端注册事件
       void channelRegistered(ChannelHandlerContext ctx) throws Exception;
    // 客户端取消注册事件
       void channelUnregistered(ChannelHandlerContext ctx) throws Exception;
    // 激活事件
       void channelActive(ChannelHandlerContext ctx) throws Exception;
    // 取消激活事件
       void channelInactive(ChannelHandlerContext ctx) throws Exception;
    // 消息读取事件
       void channelRead(ChannelHandlerContext ctx, Object msg) throws Exception;
    // 消息读取完成事件
       void channelReadComplete(ChannelHandlerContext ctx) throws Exception;
    // 用户事件触发事件
       void userEventTriggered(ChannelHandlerContext ctx, Object evt) throws Exception;
    // Channel通道是否可读状态变更事件
       void channelWritabilityChanged(ChannelHandlerContext ctx) throws Exception;
    // 异常处理事件
       @Override
       @SuppressWarnings("deprecation")
       void exceptionCaught(ChannelHandlerContext ctx, Throwable cause) throws Exception;

    ChannelOutboundHandler定义了一系列消息流出事件,对于服务端来说,当需要把消息回写给客户端时,就会经过ChannelOutboundHandler上的一系列事件处理。比如当发消息时,需要将消息进行编码处理,这时就是通过扩展ChannelOutboundHandler来实现

    public interface ChannelOutboundHandler extends ChannelHandler {
    // 调用一次绑定操作
       void bind(ChannelHandlerContext ctx, SocketAddress localAddress, ChannelPromise promise) throws Exception;

      // 调用一次连接操作
       void connect(
               ChannelHandlerContext ctx, SocketAddress remoteAddress,
               SocketAddress localAddress, ChannelPromise promise) throws Exception;

       // 调用一次中断连接操作
       void disconnect(ChannelHandlerContext ctx, ChannelPromise promise) throws Exception;

       //调用一次关闭连接操作
       void close(ChannelHandlerContext ctx, ChannelPromise promise) throws Exception;

       // 调用一次取消注册操作,比如在NioEvevtLoop事件轮询时,取消Channel的注册就可触发该事件
       void deregister(ChannelHandlerContext ctx, ChannelPromise promise) throws Exception;

       // 拦截 {@link ChannelHandlerContext#read()}的读事件
       void read(ChannelHandlerContext ctx) throws Exception;

       // 写数据事件
       void write(ChannelHandlerContext ctx, Object msg, ChannelPromise promise) throws Exception;

       // 刷数据到客户端事件
       void flush(ChannelHandlerContext ctx) throws Exception;
    }

    ChannelInboundInvoker的作用就是中间传递Inbound事件,然后疯狂调用ChannelInboundHandler类中的方法,ChannelOutboundInvoker传递Outbound事件,调用ChannelOutboundHandler类中的方法

    接下来就到了我们的重头戏了,ChannelPipeline有一个默认的实现类DefaultChannelPipeline,每个SocketChannel都会绑定一个DefaultChannelPipeline,当接收到SocketChannel事件时,Netty就会把事件传递给DefaultChannelPipeline。我们着重分析一下这个类,先看下DefaultChannelPipeline的构造函数

    protected DefaultChannelPipeline(Channel channel) {
       // 当前绑定的SocketChannel
       this.channel = ObjectUtil.checkNotNull(channel, "channel");
       // 一个channel的回调管理
       succeededFuture = new SucceededChannelFuture(channel, null);
       // 这也是一个channel的回调管理
       voidPromise =  new VoidChannelPromise(channel, true);
    // pipeline的尾节点
       tail = new TailContext(this);
       // pipeline的头节点
       head = new HeadContext(this);
       // 设置头节点的下一个节点是尾节点
       head.next = tail;
       // 设置尾节点的下一个节点是头节点
       tail.prev = head;
    }

    DefaultChannelPipeline的内部结构是一个双向链表,当初始化DefaultChannelPipeline时,会初始化DefaultChannelPipeline相关联的SocketChannel,并且在链表上会初始化两个节点,一个头节点HeadContext,一个尾节点TailContext。链表上的元素其实都是ChannelHandlerContext,它会包装一个ChannelHandler,并且会保存一些上下文信息,比如当前ChannelHandlerContext关联的DefaultChannelPipeline对象等。当数据流入时,会从HeadContext传递到TailContext,数据流出时,会从TailContext传递到HeadContext,所以HeadContext有两个非常重要的职责,一是读取来自客户端的数据,二是往客户端写入数据。接下来我们详细分析一下HeadContext读数据与写数据职责。

    final class HeadContext extends AbstractChannelHandlerContext
               implements ChannelOutboundHandler, ChannelInboundHandler {

       private final Unsafe unsafe;

       HeadContext(DefaultChannelPipeline pipeline) {
           super(pipeline, null, HEAD_NAME, HeadContext.class);
           unsafe = pipeline.channel().unsafe();
           setAddComplete();
      }
       // 省略部分代码
       @Override
       public void read(ChannelHandlerContext ctx) {
           // 开始读取来自客户端的数据
           unsafe.beginRead();
      }
       @Override
       public void write(ChannelHandlerContext ctx, Object msg, ChannelPromise promise) {
           // 开始往缓冲区写数据
           unsafe.write(msg, promise);
      }
       @Override
       public void flush(ChannelHandlerContext ctx) {
           // 刷缓冲区数据到客户端
           unsafe.flush();
      }
       // 省略部分代码
    }

    读客户端数据比较简单,只是调用了一个unsafe.beginRead()方法,而该方法的具体实现可以看下面代码片段,只是修改了一个是否正在读取标识以及移除了读事件

    protected void doBeginRead() throws Exception {
       // Channel.read() or ChannelHandlerContext.read() was called
       final SelectionKey selectionKey = this.selectionKey;
       if (!selectionKey.isValid()) {
           return;
      }
    // 等待读取中的这个表示置为true,表示正在读取
       readPending = true;
       final int interestOps = selectionKey.interestOps();
       if ((interestOps & readInterestOp) == 0) {
           // 移除读事件
           selectionKey.interestOps(interestOps | readInterestOp);
      }
    }

    我们再来看看下面的写数据流程,首先是获取当前的ChannelOutboundBuffer,如果为空,则提前返回。接着就是过滤消息以及计算消息的大小,为之后的添加数据到缓冲区作准备。

    public final void write(Object msg, ChannelPromise promise) {
       assertEventLoop();
    // 获取数据缓冲区
       ChannelOutboundBuffer outboundBuffer = this.outboundBuffer;
       if (outboundBuffer == null) {
           // 如果数据缓冲区为空,则触发失败回调并提前返回
           safeSetFailure(promise, newClosedChannelException(initialCloseCause));
           ReferenceCountUtil.release(msg);
           return;
      }
       int size;
       try {
           // 过滤消息
           msg = filterOutboundMessage(msg);
           // 获取消息大小
           size = pipeline.estimatorHandle().size(msg);
           if (size < 0) {
               size = 0;
          }
      } catch (Throwable t) {
           safeSetFailure(promise, t);
           ReferenceCountUtil.release(msg);
           return;
      }
    // 将数据写到缓冲区
       outboundBuffer.addMessage(msg, size, promise);
    }

    详细分析一下outboundBuffer.addMessage(msg, size, promise)方法,看看Netty到底是怎么把数据追加到缓冲区的

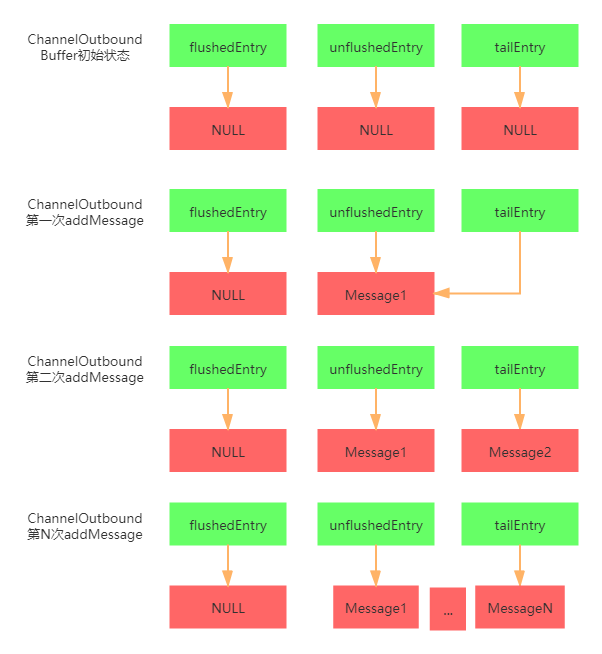
    public void addMessage(Object msg, int size, ChannelPromise promise) {
       // 把消息封装成Entry对象
       Entry entry = Entry.newInstance(msg, size, total(msg), promise);
       if (tailEntry == null) {
           flushedEntry = null;
      } else {
           // 如果当前队列不为空,则将尾节点的下一个节点设置为新添加的节点
           Entry tail = tailEntry;
           tail.next = entry;
      }
       // 将尾节点设置为当前节点
       tailEntry = entry;
       if (unflushedEntry == null) {
           unflushedEntry = entry;
      }
    // 增加缓冲区已用大小
       incrementPendingOutboundBytes(entry.pendingSize, false);
    }
    private void incrementPendingOutboundBytes(long size, boolean invokeLater) {
       if (size == 0) {
           return;
      }
    // 追加后的缓冲区已用大小
       long newWriteBufferSize = TOTAL_PENDING_SIZE_UPDATER.addAndGet(this, size);
       if (newWriteBufferSize > channel.config().getWriteBufferHighWaterMark()) {
           // 如果已用大小大于配置的最高可写水位,则设置当前已不可写,并且发送Channel可写状态变更事件
           setUnwritable(invokeLater);
      }
    }
    private void setUnwritable(boolean invokeLater) {
       for (;;) {
           final int oldValue = unwritable;
           final int newValue = oldValue | 1;
           // 使用CAS更新可写状态
           if (UNWRITABLE_UPDATER.compareAndSet(this, oldValue, newValue)) {
               if (oldValue == 0 && newValue != 0) {
                   // 如果状态更新成功,并且从可写变为不可写,则传递可写状态变更事件
                   fireChannelWritabilityChanged(invokeLater);
              }
               break;
          }
      }
    }

    ChannelOutboundBuffer内部结构也是一个单向链表,里面有几个比较重要的属性,flushedEntry表示链表上第一个刷新到客户端的数据,unflushedEntry表示链表上第一个没有刷新到客户端的数据,tailEntry表示链表的尾节点。我们通过下面一个图来表示数据的追加过程

    我们再来看看数据的刷新到客户端的过程

    public final void flush() {
       assertEventLoop();

       ChannelOutboundBuffer outboundBuffer = this.outboundBuffer;
       if (outboundBuffer == null) {
           return;
      }
    // 修改一些刷新数据标识
       outboundBuffer.addFlush();
       // 正儿八经执行刷新数据到客户端逻辑
       flush0();
    }
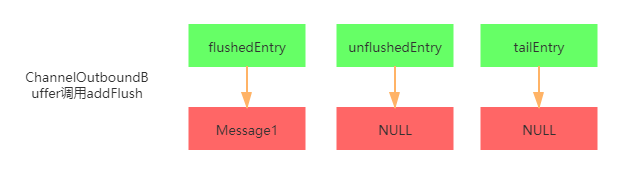
    public void addFlush() {
       // 获取链表上第一个未被刷新的数据
       Entry entry = unflushedEntry;
       if (entry != null) {
           if (flushedEntry == null) {
               // 如果刷新的第一个数据为空,则把第一个刷新的数据置为第一个未被刷新的数据
               flushedEntry = entry;
          }
           do {
               flushed ++;
               if (!entry.promise.setUncancellable()) {
                   // 调用取消方法保证释放内存
                   int pending = entry.cancel();
                   // 减少buffer的使用量
                   decrementPendingOutboundBytes(pending, false, true);
              }
               entry = entry.next;
          } while (entry != null);

           // 当数据刷新完了过后,将未被刷新的标识置为null
           unflushedEntry = null;
      }
    }
    private void decrementPendingOutboundBytes(long size, boolean invokeLater, boolean notifyWritability) {
       if (size == 0) {
           return;
      }
    // 减少buffer的使用量
       long newWriteBufferSize = TOTAL_PENDING_SIZE_UPDATER.addAndGet(this, -size);
       if (notifyWritability && newWriteBufferSize < channel.config().getWriteBufferLowWaterMark()) {
           // 如果buffer的使用量小于Channel配置的buffer最低水位,则表示buffer可写
           setWritable(invokeLater);
      }
    }
    private void setWritable(boolean invokeLater) {
       for (;;) {
           final int oldValue = unwritable;
           final int newValue = oldValue & ~1;
           // 使用CAS更新可写状态为可写
           if (UNWRITABLE_UPDATER.compareAndSet(this, oldValue, newValue)) {
               if (oldValue != 0 && newValue == 0) {
                   // 传递可写状态为可写的事件
                   fireChannelWritabilityChanged(invokeLater);
              }
               break;
          }
      }
    }

    我们也从下面一张图来表示数据刷新过后buffer标识的最终形态,如果觉得有点不明白的话,可以结合上面那张数据写入的图与源码一起再分析一下,相信多看两遍就可以看懂了

    最后我们看看flush0()方法

    protected void flush0() {
       if (inFlush0) {
           // Avoid re-entrance
           return;
      }

       final ChannelOutboundBuffer outboundBuffer = this.outboundBuffer;
       if (outboundBuffer == null || outboundBuffer.isEmpty()) {
           return;
      }

       inFlush0 = true;
    // 省略部分代码
       try {
           // 执行数据刷新
           doWrite(outboundBuffer);
      } catch (Throwable t) {
           // 省略部分代码
      } finally {
           inFlush0 = false;
      }
    }

    // NioSocketChannel#doWrite()
    protected void doWrite(ChannelOutboundBuffer in) throws Exception {
       // 获取当前的客户端Channel
       SocketChannel ch = javaChannel();
       // 配置可写多少次
       int writeSpinCount = config().getWriteSpinCount();
       do {
           if (in.isEmpty()) {
               // 如果buffer里没有数据,清除写事件
               clearOpWrite();
               return;
          }
           int maxBytesPerGatheringWrite = ((NioSocketChannelConfig) config).getMaxBytesPerGatheringWrite();
           // 将Netty的buffer转换成java NIO的ByteBuffer
           ByteBuffer[] nioBuffers = in.nioBuffers(1024, maxBytesPerGatheringWrite);
           // 计算有几个buffer可写
           int nioBufferCnt = in.nioBufferCount();

           switch (nioBufferCnt) {
               case 0:
                   // 当ByteBuffer为0时,我们可能还有其他东西要写,所以这里回退到普通的写操作
                   writeSpinCount -= doWrite0(in);
                   break;
               case 1: {
                   // 有一个ByteBufer可写,所以这里获取第一个ByteBuffer
                   ByteBuffer buffer = nioBuffers[0];
                   // 需要写的数据大小
                   int attemptedBytes = buffer.remaining();
                   // 调用JAVA原生NIO的API执行写操作
                   final int localWrittenBytes = ch.write(buffer);
                   if (localWrittenBytes <= 0) {
                       incompleteWrite(true);
                       return;
                  }
                   adjustMaxBytesPerGatheringWrite(attemptedBytes, localWrittenBytes, maxBytesPerGatheringWrite);
                   // 移除已写的数据
                   in.removeBytes(localWrittenBytes);
                   // 可写次数减一
                   --writeSpinCount;
                   break;
              }
               default: {
                   long attemptedBytes = in.nioBufferSize();
                   // 如果有多个ByteBuffer需要写,则调用NIO的批量写 操作
                   final long localWrittenBytes = ch.write(nioBuffers, 0, nioBufferCnt);
                   if (localWrittenBytes <= 0) {
                       incompleteWrite(true);
                       return;
                  }
                   adjustMaxBytesPerGatheringWrite((int) attemptedBytes, (int) localWrittenBytes,
                                                   maxBytesPerGatheringWrite);
                   // 移除已写的数据
                   in.removeBytes(localWrittenBytes);
                   // 可写次数减一
                   --writeSpinCount;
                   break;
              }
          }
      } while (writeSpinCount > 0);
    // 如果数据刷完了,则移除写事件,如果数据没有刷完,则会再执行一次刷新操作
       incompleteWrite(writeSpinCount < 0);
    }

    上面,我们把HeadContext的读写数据重要流程分析完了,接下来,我们看一下事件是怎么在DefaultChannelPipeline的链表上传播的,先看一下AbstractChannelHandlerContext#fireChannelRead()方法

    public ChannelHandlerContext fireChannelRead(final Object msg) {
       // 调用实现了ChannelInboundHandler的方法
       invokeChannelRead(findContextInbound(MASK_CHANNEL_READ), msg);
       return this;
    }

    // 查找ChannelInboundHandler
    private AbstractChannelHandlerContext findContextInbound(int mask) {
       AbstractChannelHandlerContext ctx = this;
       EventExecutor currentExecutor = executor();
       do {
           // 当前Context的下一个Context,对于第一次进来,当前Context就是HeadContext
           ctx = ctx.next;
      } while (skipContext(ctx, currentExecutor, mask, MASK_ONLY_INBOUND));// 会忽略掉不是ChannelInboundHandler类和标注了@Skip注解的类
       return ctx;
    }
    private static boolean skipContext(
               AbstractChannelHandlerContext ctx, EventExecutor currentExecutor, int mask, int onlyMask) {
       return (ctx.executionMask & (onlyMask | mask)) == 0 ||
          (ctx.executor() == currentExecutor && (ctx.executionMask & mask) == 0);
    }
    static void invokeChannelRead(final AbstractChannelHandlerContext next, Object msg) {
       // 针对ReferenceCounted类型的消息做特殊处理
       final Object m = next.pipeline.touch(ObjectUtil.checkNotNull(msg, "msg"), next);
       EventExecutor executor = next.executor();
       if (executor.inEventLoop()) {
           // 实际调用Channel的Read方法进行数据的读取进行传播
           next.invokeChannelRead(m);
      } else {
           executor.execute(new Runnable() {
               @Override
               public void run() {
                   // 实际调用Channel的Read方法进行数据的读取进行传播
                   next.invokeChannelRead(m);
              }
          });
      }
    }

    总结一下,对于数据流入来说,DefaultChannelPipeline的处理链路是HeadContext到TailContext,然后中间只找ChannelInboundHandler的实现类以及没有被@Skip注解标注的方法,通过ChannelHandlerContext的next元素,一个一个的执行read方法,最终就会调用到TailContext的read方法然后结束。此时你就可能会想,要是我在调用过程中出现了未知异常怎么办?下面我们接着分析一下Netty是怎么处理执行链路过程中产生的异常,AbstractChannelHandlerContext有个fireExceptionCaught方法,它就是用来传递异常的,我们先看看以下代码片段

    public ChannelHandlerContext fireExceptionCaught(final Throwable cause) {
       // 通过MASK_EXCEPTION_CAUGHT掩码查找ChannelInboundHandler实现了exceptionCaught的方法
       invokeExceptionCaught(findContextInbound(MASK_EXCEPTION_CAUGHT), cause);
       return this;
    }

    static void invokeExceptionCaught(final AbstractChannelHandlerContext next, final Throwable cause) {
       ObjectUtil.checkNotNull(cause, "cause");
       EventExecutor executor = next.executor();
       if (executor.inEventLoop()) {
           // 调用异常处理方法
           next.invokeExceptionCaught(cause);
      } else {
           try {
               executor.execute(new Runnable() {
                   @Override
                   public void run() {
                       next.invokeExceptionCaught(cause);
                  }
              });
          } catch (Throwable t) {
          }
      }
    }

    其实异常的处理链路和读取操作的处理链路模式是基本一致的,只是一个调用的是read方法,一个调用的是exceptionCaught方法。我们可以看出Netty查找异常方法时,是用的AbstractChannelHandlerContext的next元素向后查找的,所以当我们使用ChannelHandler进行统一的异常处理时,应把异常处理的ChannelHandler添加到DefaultChannelPipeline处理链的最后,这样才能捕获所有的业务异常

    接下来我们再看一下数据的流出,也就是数据的写入链路是怎样的,我们从方法Channel#writeAndFlush()入口开始看,Channel接口继承于ChannelOutboundInvoker接口,最终是通过AbstractChannel类来实现的,所以这里我们直接从AbstractChannel类看

    // AsbtractChannel
    public ChannelFuture writeAndFlush(Object msg) {
       return pipeline.writeAndFlush(msg);
    }
    // DefaultChannelPipeline
    public final ChannelFuture writeAndFlush(Object msg) {
        return tail.writeAndFlush(msg);
    }

    从上面的代码片段可以看出,AbstractChannel#writeAndFlush()方法其实是直接转调的DefaultChannelPipeline#writeAndFlush()方法,然后DefaultChannelPipeline又会去调TailContext#writeAndFlush方法,所以我们再来分析TailContext#writeAndFlush()方法

    public ChannelFuture writeAndFlush(Object msg) {
       return writeAndFlush(msg, newPromise());
    }

    public ChannelFuture writeAndFlush(Object msg, ChannelPromise promise) {
       write(msg, true, promise);
       return promise;
    }

    private void write(Object msg, boolean flush, ChannelPromise promise) {
       ObjectUtil.checkNotNull(msg, "msg");
    // 省略部分代码
       // 查找ChannelOutboundHandlerContext类型的write方法,并且会忽略掉标注了@Skip注解的方法
       final AbstractChannelHandlerContext next = findContextOutbound(flush ?
                                                                      (MASK_WRITE | MASK_FLUSH) : MASK_WRITE);
       final Object m = pipeline.touch(msg, next);
       EventExecutor executor = next.executor();
       if (executor.inEventLoop()) {
           if (flush) {
               // 写入并刷新缓冲区
               next.invokeWriteAndFlush(m, promise);
          } else {
               // 写入缓冲区
               next.invokeWrite(m, promise);
          }
      } else {
           // 如果不是当前事件轮询线程,则封装成一个异步任务
           final WriteTask task = WriteTask.newInstance(next, m, promise, flush);
           // 安全的执行任务,其实也就是捕获了异常
           if (!safeExecute(executor, task, promise, m, !flush)) {
               // 如果任务执行失败,则需要将缓冲区里面新加的数据清理掉,避免浪费缓冲区
               task.cancel();
          }
      }
    }

    从上面的代码片段可以看出,数据写入到客户端,是从TailContext流向到HeadContext,并且查找的是ChannelOutboundHandlerContext类型的类来做处理,最终通过HeadContext#write()方法回写到客户端,

    写入处理链发生异常的处理方式和上面的读取异常处理方式是一样的,所以这里就不再分析了

    总结

    DefaultChannelPipeline是Netty数据处理链最重要的部分,它的核心就是数据读取是从HeadContext传递到TailContext,数据写入是从TailContext传递到HeadContext,所以DefaultChannelPipeline设计的是一个双向链表,对我们用户来说,我们自定义的业务处理Handler就添加在HeadContext与TailContext之间,数据的读取和数据的写入都是在HeadContext中进行。在处理链中,通过掩码的方式来筛选符合条件的ChannelHandler,这种设计真的非常的巧妙,我们平时工作中也可以参考一波

  • 相关阅读:
    变量与常量
    velocity基本用法
    jboss之mod_cluster集群
    jboss部署出现MarshalOutputStream找不到错误
    redis--安装
    java-基础
    jboss使用(eap 6.0以后版本)
    ZooKeeper安装
    linux-redhat5找回root密码
    发布JavaWeb项目时如何将本地lib下的架包发布到服务器上
  • 原文地址:https://www.cnblogs.com/jhbbd/p/14318744.html
Copyright © 2011-2022 走看看