一、回顾
1.介绍ES
2.ES原理
3.ES功能
4.ES使用场景
5.ES安装
1)ES配置文件(单点配置)
[root@es01 ~]# grep '^[a-z]' /etc/elasticsearch/elasticsearch.yml
node.name: es-1
path.data: /data/es/data
path.logs: /data/es/log
bootstrap.memory_lock: true
network.host: 10.0.0.71,127.0.0.1,172.16.1.71
http.port: 9200
二、跟ES交互的方式
1.使用curl命令
#创建索引
[root@es01 ~]# curl -XPUT 'http://10.0.0.71:9200/test1?pretty'
{
  "acknowledged" : true,
  "shards_acknowledged" : true,
  "index" : "test1"
}

#插入数据
[root@es01 ~]# curl -XPUT '10.0.0.71:9200/student/user/1?pretty' -H 'Content-Type: application/json' -d '{"name": "lhd","sex":"man","age":"18","about":"good good study","interests":["chinese","english"]}'
2.使用head插件的方式
3.kibana的方式
1)安装
[root@es01 ~]# ll
-rw-r--r--  1 root root 185123116 Jan 29  2019 kibana-6.6.0-x86_64.rpm

[root@es01 ~]# rpm -ivh kibana-6.6.0-x86_64.rpm
2)配置kibana
[root@es01 ~]# grep '^[a-z]' /etc/kibana/kibana.yml
server.port: 5601
server.host: "10.0.0.71"
elasticsearch.hosts: ["http://10.0.0.71:9200"]
3)启动
[root@es01 ~]# systemctl start kibana

[root@es01 ~]# netstat -lntp | grep 5601
tcp        0      0 10.0.0.71:5601          0.0.0.0:*               LISTEN      14960/node
4)访问
http://10.0.0.71:5601
三、ES数据的操作
1.创建索引
1)语法
PUT /<index>
2)示例
PUT /index

curl -XPUT 'http://10.0.0.71:9200/index'
2.创建数据
1)数据结构
ES存储三个必要构成
_index
_type
_id
| 构成 |
说明 |
| _index |
索引(数据存储的地方) |
| _type |
类型(数据对应类) |
| _id |
数据的唯一标识 |
2)语法
PUT /<index>/_doc/<_id>
POST /<index>/_doc/
PUT /<index>/_create/<_id>
POST /<index>/_create/<_id>

index:索引的名称,如果索引不存在,会自动创建
_doc:类型
_id:唯一标识,可以手动指定,也可以自动生成
3)使用自定义ID插入数据
PUT /index/_doc/1
{
  "name":"qiudao",
  "age":"18"
}

#该方式企业应用较少
	1.需要修改id的值
	2.指定ID插入数据时,ES会先拿着指定的id去对比一遍所有数据,看看有没有相同值
4)使用随机ID插入数据
POST /index/_doc/
{
  "name":"qiudao",
  "age":"20"
}
5)添加字段指定ID
POST /index/_doc/
{
  "id":"1",
  "name":"qiudao",
  "age":"20"
}
3.查询数据
1)简单查询
#查询所有索引的信息
GET /_all
GET _all

#查看所有索引的数据
GET /_all/_search

#查看指定索引的信息
GET /teacher

#查看指定索引的数据
GET /teacher/_search

#查看索引中指定的数据
GET /teacher/user/2
GET /teacher/user/1m-gGHYB5ia7o7wd9dPk
2)单条件查询
1>方法一:
GET /teacher/_search
{
  "query": {
    "term": {
      "age": {
        "value": "18"
      }
    }
  }
}
2>方法二:
GET /teacher/_search
{
  "query": {
    "term": {
      "age": "18"
    }
  }
}
3>方法三:
GET /teacher/_search
{
  "query": {
    "match": {
      "age": "18"
    }
  }
}

#指定条件可以使用term也可以使用match,term搜索数据时不进行分词,适合进行精确查找,match搜索时进行分词适用于全文检索
3)多条件查询
1>must查询
#多个查询条件必须全部满足  &
GET /teacher/_search
{
  "query": {
    "bool": {
      "must": [
        {
          "term": {
            "age": {
              "value": "18"
            }
          }
        },
        {
          "term": {
            "sex": {
              "value": "nv"
            }
          }
        }
      ]
    }
  }
}
2>filter查询
#跟must作用一样,但是速度要比must快一点
GET /teacher/_search
{
  "query": {
    "bool": {
      "filter": [
        {
          "term": {
            "age":"18"
          }
        },
        {
          "term": {
            "sex":"nv"
          }
        }
      ]
    }
  }
}
3>should查询
#多条件查询时,符合其中一个条件就可以  |
GET /teacher/_search
{
  "query": {
    "bool": {
      "should": [
        {
          "term": {
            "age": {
              "value": "18"
            }
          }
        },
        {
          "term": {
            "id": {
              "value": "5"
            }
          }
        }
      ]
    }
  }
}
4)must_not
GET /teacher/_search
{
  "query": {
    "bool": {
      "must_not": [
        {
          "term": {
            "age": {
              "value": "18"
            }
          }
        },
        {
          "term": {
            "id": {
              "value": "5"
            }
          }
        }
      ]
    }
  }
}
5)must和should结合使用
#查询年龄是21或者年龄是18岁并且名字是lizhenglin的数据
GET /teacher/_search
{
  "query": {
    "bool": {
      "should": [
        {
          "term": {
            "age": {
              "value": "21"
            }
          }
        },
        {
          "bool": {
            "must": [
              {
                "term": {
                  "age": {
                    "value": "18"
                  }
                }
              },
              {
                "term": {
                  "name": {
                    "value": "lizhenglin"
                  }
                }
              }
            ]
          }
        }
      ]
    }
  }
}
4.修改数据
#修改数据通过_id进行修改,修改数据是,除了要修改的字段意外,其他的字段也要全部写上
PUT /teacher/user/9G-FHXYB5ia7o7wdEdOH
{
  "id":"6",
  "name":"wananfeng",
  "sex":"nan",
  "age":"25"
}
5.删除数据
#删除指定数据,通过_id进行选择删除
DELETE /teacher/user/9G-FHXYB5ia7o7wdEdOH

#删除索引
DELETE /teacher
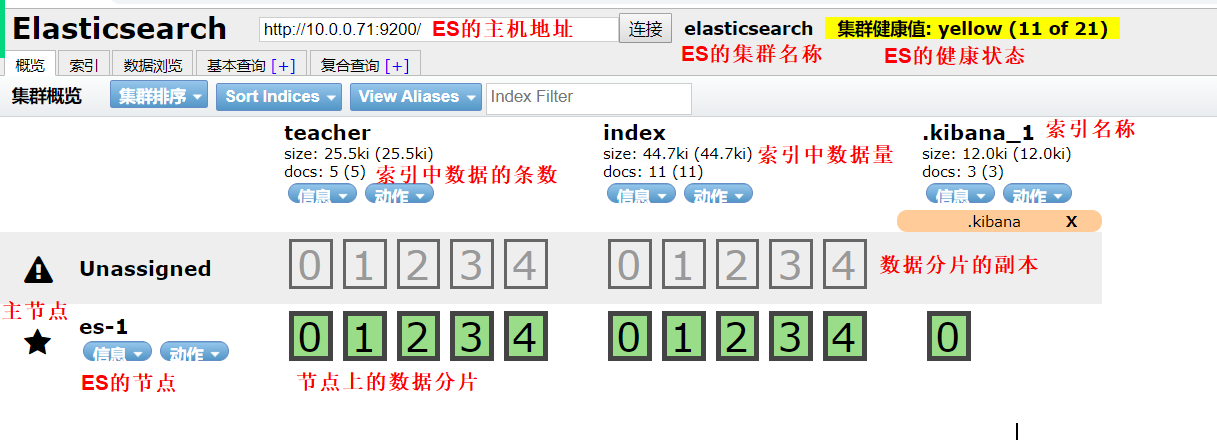
四、ES集群

1.ES插件页面
1)集群状态
1.红色:数据不完整
2.黄色:数据完整,但是副本有问题
3.绿色:数据和副本全部都没有问题,集群状态正常
2)节点类型
1.主节点:负责调度分配数据存储
2.数据节点:负责储存由主机点传来的数据
3)分片
1.主分片:存储数据,负责读写数据
2.副本分片:主分片的备份,当主分片故障时,提供有问题的数据
2.搭建集群
1)准备服务器
| 主机 |
IP |
| es01 |
10.0.0.71 |
| es02 |
10.0.0.72 |
| es03 |
10.0.0.73 |
2)时间同步
[root@es01 ~]# ntpdate time1.aliyun.com
[root@es02 ~]# ntpdate time1.aliyun.com
[root@es03 ~]# ntpdate time1.aliyun.com
3)安装java环境
[root@es01 ~]# scp jdk-8u181-linux-x64.rpm 172.16.1.72:/root/
[root@es01 ~]# scp jdk-8u181-linux-x64.rpm 172.16.1.73:/root/

[root@es01 ~]# yum localinstall -y jdk-8u181-linux-x64.rpm
[root@es02 ~]# yum localinstall -y jdk-8u181-linux-x64.rpm
[root@es03 ~]# yum localinstall -y jdk-8u181-linux-x64.rpm
4)安装ES
[root@es01 ~]# scp elasticsearch-6.6.0.rpm 172.16.1.72:/root
[root@es01 ~]# scp elasticsearch-6.6.0.rpm 172.16.1.73:/root

[root@es01 ~]# rpm -ivh elasticsearch-6.6.0.rpm
[root@es02 ~]# rpm -ivh elasticsearch-6.6.0.rpm
[root@es03 ~]# rpm -ivh elasticsearch-6.6.0.rpm

[root@es01 ~]# systemctl daemon-reload
[root@es02 ~]# systemctl daemon-reload
[root@es03 ~]# systemctl daemon-reload
5)配置ES
1>第一台机器的配置
[root@es01 ~]# grep '^[a-z]' /etc/elasticsearch/elasticsearch.yml
#集群的名称
cluster.name: es-cluster
node.name: es-1
path.data: /data/es/data
path.logs: /data/es/log
bootstrap.memory_lock: true
network.host: 10.0.0.71,127.0.0.1,172.16.1.71
http.port: 9200
#集群中的服务器ip地址
discovery.zen.ping.unicast.hosts: ["172.16.1.71", "172.16.1.72"]
#选举主节点时投票的机器数
discovery.zen.minimum_master_nodes: 2
2>第二台机器的配置
[root@es02 ~]# grep '^[a-z]' /etc/elasticsearch/elasticsearch.yml
cluster.name: es-cluster
node.name: es-2
path.data: /var/lib/elasticsearch
path.logs: /var/log/elasticsearch
bootstrap.memory_lock: true
network.host: 172.16.1.72,10.0.0.72,127.0.0.1
http.port: 9200
discovery.zen.ping.unicast.hosts: ["172.16.1.72", "172.16.1.73"]
discovery.zen.minimum_master_nodes: 2
3>第三台机器的配置
[root@es03 ~]# grep '^[a-z]' /etc/elasticsearch/elasticsearch.yml
cluster.name: es-cluster
node.name: es-3
path.data: /var/lib/elasticsearch
path.logs: /var/log/elasticsearch
bootstrap.memory_lock: true
network.host: 172.16.1.73,10.0.0.73,127.0.0.1
http.port: 9200
discovery.zen.ping.unicast.hosts: ["172.16.1.73", "172.16.1.71"]
discovery.zen.minimum_master_nodes: 2
4>三台机器都修改启动脚本
[root@es02 ~]# vim /usr/lib/systemd/system/elasticsearch.service
[Service]
... ...
LimitMEMLOCK=infinity
6)启动三台ES
[root@es01 ~]# systemctl start elasticsearch
[root@es01 ~]# netstat -lntp | grep java
