工具/原料
-
eclipse
-
maven
-
spring boot
-
spring cloud
1.新建一个maven项目
2.文件-》新建-》项目

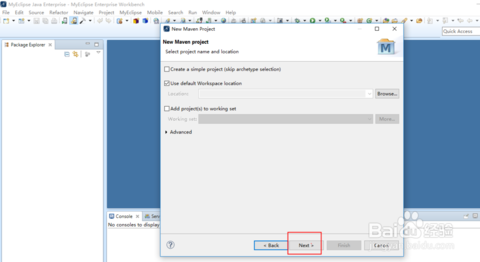
3.选择Maven project,然后点击下一步

4.再点击下一步
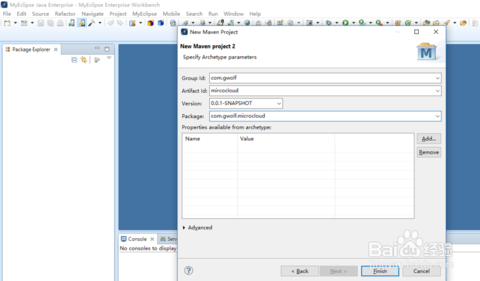
5.选择maven-archetype-quicktype

6.输入group id, artifact id等信息,点击完成
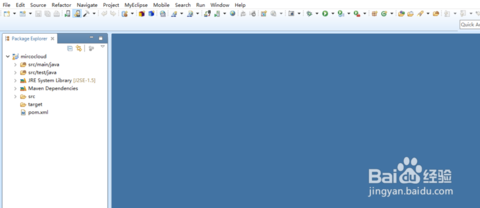
7.项目结构如图
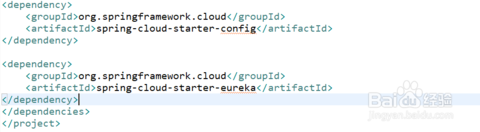
8.在pom文件中增加spring cloud配置:
<project xmlns="http://maven.apache.org/POM/4.0.0" xmlns:xsi="http://www.w3.org/2001/XMLSchema-instance"

  xsi:schemaLocation="http://maven.apache.org/POM/4.0.0 http://maven.apache.org/xsd/maven-4.0.0.xsd">

  <modelVersion>4.0.0</modelVersion>

  <groupId>com.gwolf</groupId>

  <artifactId>mircoclouds</artifactId>

  <version>0.0.1-SNAPSHOT</version>

  <packaging>jar</packaging>

  <name>mircoclouds</name>

  <url>http://maven.apache.org</url>

  <properties>

    <project.build.sourceEncoding>UTF-8</project.build.sourceEncoding>

  </properties>

  <parent>

    <groupId>org.springframework.boot</groupId>

    <artifactId>spring-boot-starter-parent</artifactId>

    <version>1.5.6.RELEASE</version>

</parent>

<dependencyManagement>

    <dependencies>

        <dependency>

            <groupId>org.springframework.cloud</groupId>

            <artifactId>spring-cloud-dependencies</artifactId>

            <version>Dalston.SR4</version>

            <type>pom</type>

            <scope>import</scope>

        </dependency>

    </dependencies>

</dependencyManagement>

<dependencies>

<dependency>

    <groupId>org.springframework.cloud</groupId>

    <artifactId>spring-cloud-starter-config</artifactId>

</dependency>

<dependency>

    <groupId>org.springframework.cloud</groupId>

    <artifactId>spring-cloud-starter-eureka</artifactId>

</dependency>

</dependencies>

</project>


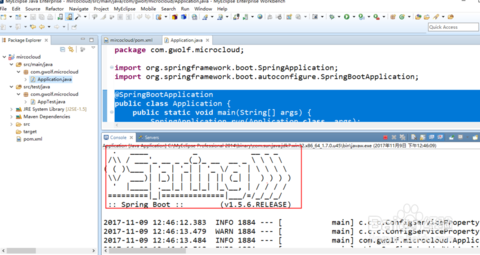
9.编写Application程序
package com.gwolf.mircoclouds;

import org.springframework.boot.SpringApplication;
import org.springframework.boot.autoconfigure.SpringBootApplication;

@SpringBootApplication

public class Application {

    public static void main(String[] args) {

        SpringApplication.run(Application.class, args);

    }

}

10.执行Application程序,如果没有错误输出说明spring boot已经搭建成功了。
11.spring cloud需要了解spring boot的知识,我们会写相关方面的文章介绍spring boot
原文链接:https://jingyan.baidu.com/article/91f5db1b1c7ebf1c7e05e374.html