yum install -y vim* yum install -y wget 安装vim 跟 wget
需要安装java环境 es5版本之后不能使用root权限启动
添加用户:useradd -m 【用户名】 hoyan
创建es目录 mkdir es
chown -R hoyan:hoyan elasticsearch 给与用户hoyan使用elasticsearch 的权限
下载 https://www.elastic.co/cn/downloads/past-releases#elasticsearch 选择版本 然wget下载 解压至 es
mv 改名叫elasticsearch
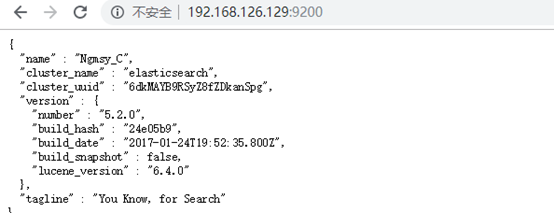
使用创建的用户启动 sh ./bin/elasticsearch 后台启动 ./bin/elasticsearch -d
可能出错:max virtual memory areas vm.max_map_count [65530] is too low, increase to at least [262144]
|
切换到root用户
|
||
错误
max file descriptors [4096] for elasticsearch process is too low, increase to at least [65536]
| 方案一·
max file descriptors [4096] for elasticsearch process is too low, increase to at least [65536] 切换到root用户 ulimit -Hn 查看硬限制 vim /etc/security/limits.conf 添加下面设置 hadoop是用户 hoyan soft nofile 65536 退出用户重新登录,使配置生效 重新 ulimit -Hn 查看硬限制 会发现数值有4096改成65535 |
查看防火墙状态。
systemctl status firewalld
临时关闭防火墙命令。重启电脑后,防火墙自动起来。
systemctl stop firewalld
永久关闭防火墙命令。重启后,防火墙不会自动启动。
systemctl disable firewalld
打开防火墙命令。
systemctl enable firewalld
如果关闭防火墙还是无法访问 使用root权限 开启9200端口
/sbin/iptables -I INPUT -p tcp --dport 9200 -j ACCEPT
安装插件
Linux 需要安装node.js 版本需要在6以上
wget https://nodejs.org/dist/v8.11.4/node-v8.11.4-linux-x64.tar.xz
tar xvf node-v8.11.4-linux-x64.tar.xz #解压
mv node-v8.11.4-linux-x64 node-v8.11.4 #改短名
Vim etc/profile
添加

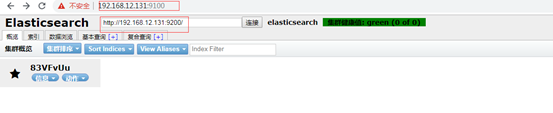
下载插件 https://github.com/mobz/elasticsearch-head是zip包 unzip解压
在解压的目录内 进行npm install 完成之后 npm run start
将插件和es关联
配置文件elasticsearch .yml文件最后添加这两项配置注意空格
http.cors.enabled: true
http.cors.allow-origin: "*”
./bin/elasticsearch -d 后台启动
使用同一个账号开启es 和 es-head
配置集群
主节点
http.cors.enabled: true
http.cors.allow-origin: "*"
cluster.name: es
network.host: 0.0.0.0
http.port: 9200
node.name: master
node.master: true
从节点
从节点配置
cluster.name: es
node.name: slave1
network.host: 127.0.0.1
http.port: 8200
discovery.zen.ping.unicast.hosts: ["127.0.0.1"] //主节点ip
如果虚拟机内存较小的话可以修改es的jvm的配置文件将(默认)2g改为256m即可

----------------------------此为安装在一台机器上----------------------------------------
简单使用
安装kibana 下载相对应的安装包 解压 改名 然后启动即可
http://ip:5601 如果浏览器无法访问 查看端口 修改kibana的配置文件修改server.host="localhost" 改为自己的ip即可
