一、概述
1.什么是NIO
NIO即New IO,这个库是在JDK1.4中才引入的。NIO和IO有相同的作用和目的,但实现方式不同,NIO主要用到的是块,所以NIO的效率要比IO高很多。
在Java API中提供了两套NIO,一套是针对标准输入输出NIO,另一套就是网络编程NIO
更多介绍与全面概述,请参见:http://www.iteye.com/magazines/132-Java-NIO#579
2.NIO与IO的主要区别
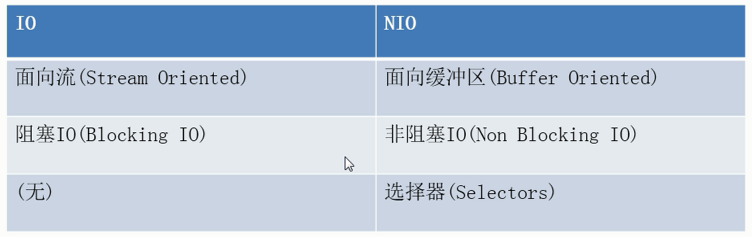
// 原先的IO是面向流的,类似水流,是单向的;现在的NIO是面向缓冲的双向的,类似铁路,提供一个运输的通道,实际运输的是火车(缓冲区)
简而言之,通道(channel)负责传输(打开通往文件的通道),缓冲区(Buffer)负责存储
其它特性将会在后续陆续介绍
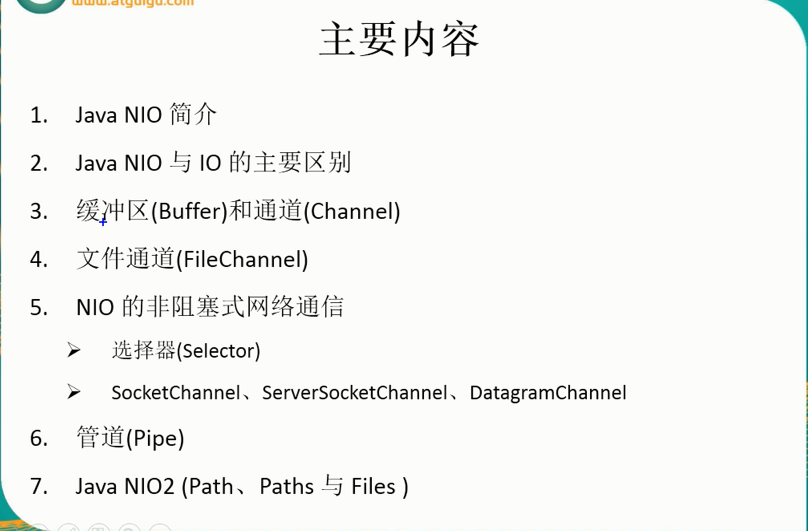
3.NIO的主要内容
二、通道(channel)与缓冲区(buffer)
1.缓冲区的数据存取
初始化分配缓冲区:——通过两个静态方法

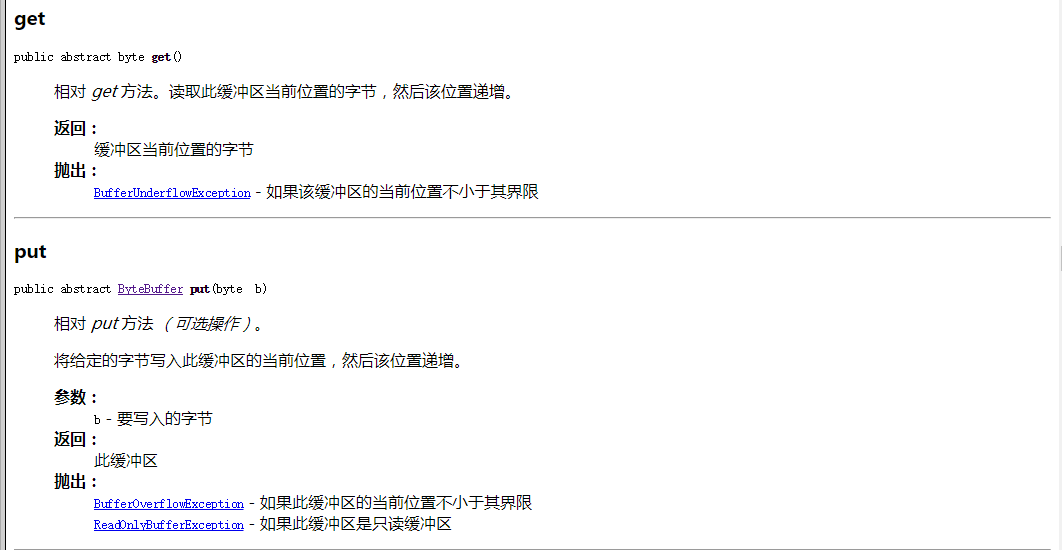
数据存取:——主要通过put和get方法
要操作缓冲区,必须理解其中四个重要属性——位于父类Buffer中:
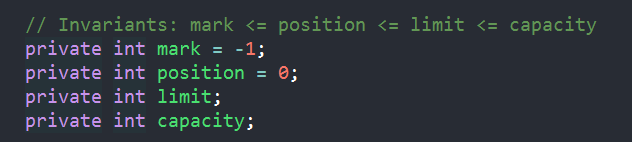
capacity:容量——缓冲区最大存储数据容量,一旦声明不能改变(底层数组的限制)
limit:界限——缓冲区中可操作数据的大小(limit后的数据不能操作)
position:位置——缓冲区中正在操作数据的位置
mark:标记——记住当前position的位置,可以通过reset()恢复到position位置
// 注意这三个属性都是 Int 类型,代表的是位置(可以理解为类似数组下标)
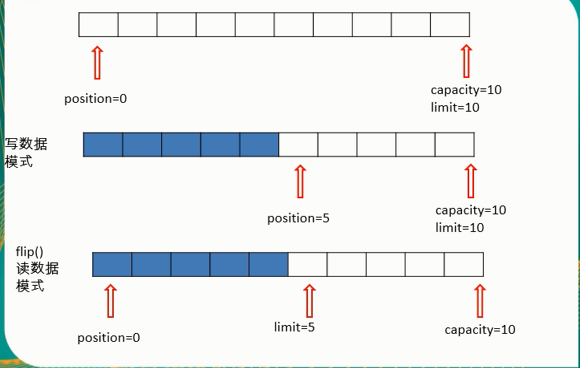
图解如下:
测试以上几个属性如下:
初始状态:


 @Test
    public void test1() {
        // 分配一个指定大小的字节缓冲区
        ByteBuffer buf = ByteBuffer.allocate(1024);
        System.out.println("position:"+buf.position()+" limit:"+buf.limit()+" cap:"+buf.capacity());
    }
结果:

使用put存数据:
  @Test
    public void test1() {
        // 分配一个指定大小的字节缓冲区
        ByteBuffer buf = ByteBuffer.allocate(1024);
        System.out.println("position:"+buf.position()+" limit:"+buf.limit()+" cap:"+buf.capacity());
        String str = "i love the world!";
        buf.put(str.getBytes());
        System.out.println("position:"+buf.position()+" limit:"+buf.limit()+" cap:"+buf.capacity());
    }

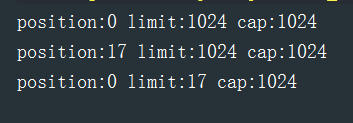
读数据模式:
 @Test
    public void test1() {
        // 分配一个指定大小的字节缓冲区
        ByteBuffer buf = ByteBuffer.allocate(1024);
        System.out.println("position:"+buf.position()+" limit:"+buf.limit()+" cap:"+buf.capacity());
        String str = "i love the world!";
        // 存数据模式
        buf.put(str.getBytes());
        System.out.println("position:"+buf.position()+" limit:"+buf.limit()+" cap:"+buf.capacity());
        // 读数据模式——flip()
        buf.flip();
        System.out.println("position:"+buf.position()+" limit:"+buf.limit()+" cap:"+buf.capacity());

    }
结果:
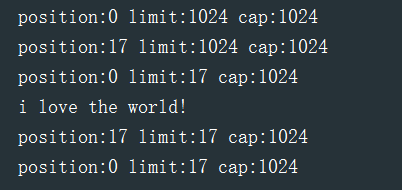
使用get读取数据:
 @Test
    public void test1() {
        // 分配一个指定大小的字节缓冲区
        ByteBuffer buf = ByteBuffer.allocate(1024);
        System.out.println("position:"+buf.position()+" limit:"+buf.limit()+" cap:"+buf.capacity());
        String str = "i love the world!";
        // 存数据模式put()
        buf.put(str.getBytes());
        System.out.println("position:"+buf.position()+" limit:"+buf.limit()+" cap:"+buf.capacity());
        // 读数据模式——flip()
        buf.flip();
        System.out.println("position:"+buf.position()+" limit:"+buf.limit()+" cap:"+buf.capacity());
        // 利用get()读取缓冲区数据
        byte[] dst = new byte[buf.limit()];
        buf.get(dst);
        System.out.println(new String(dst, 0, dst.length));
        System.out.println("position:"+buf.position()+" limit:"+buf.limit()+" cap:"+buf.capacity());
    }
结果:
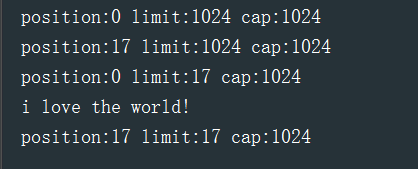
//读数据的时候游标position也是会移动过去的,就像读模式游标自动到首位
使用rewind()重读数据(将get读取时导致的position的位置偏移改回来,使position回到初始位置0)
 @Test
    public void test1() {
        // 分配一个指定大小的字节缓冲区
        ByteBuffer buf = ByteBuffer.allocate(1024);
        System.out.println("position:"+buf.position()+" limit:"+buf.limit()+" cap:"+buf.capacity());
        String str = "i love the world!";
        // 存数据模式put()
        buf.put(str.getBytes());
        System.out.println("position:"+buf.position()+" limit:"+buf.limit()+" cap:"+buf.capacity());
        // 读数据模式——flip()
        buf.flip();
        System.out.println("position:"+buf.position()+" limit:"+buf.limit()+" cap:"+buf.capacity());
        // 利用get()读取缓冲区数据
        byte[] dst = new byte[buf.limit()];
        buf.get(dst);
        System.out.println(new String(dst, 0, dst.length));
        System.out.println("position:"+buf.position()+" limit:"+buf.limit()+" cap:"+buf.capacity());
        // rewind()进行重读
        buf.rewind();
        System.out.println("position:"+buf.position()+" limit:"+buf.limit()+" cap:"+buf.capacity());
    }
结果:
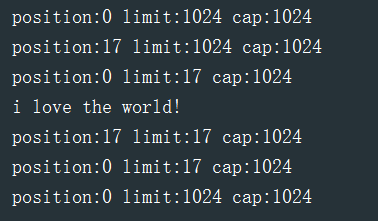
使用clear()清空数据缓冲区
  @Test
    public void test1() {
        // 分配一个指定大小的字节缓冲区
        ByteBuffer buf = ByteBuffer.allocate(1024);
        System.out.println("position:"+buf.position()+" limit:"+buf.limit()+" cap:"+buf.capacity());
        String str = "i love the world!";
        // 存数据模式put()
        buf.put(str.getBytes());
        System.out.println("position:"+buf.position()+" limit:"+buf.limit()+" cap:"+buf.capacity());
        // 读数据模式——flip()
        buf.flip();
        System.out.println("position:"+buf.position()+" limit:"+buf.limit()+" cap:"+buf.capacity());
        // 利用get()读取缓冲区数据
        byte[] dst = new byte[buf.limit()];
        buf.get(dst);
        System.out.println(new String(dst, 0, dst.length));
        System.out.println("position:"+buf.position()+" limit:"+buf.limit()+" cap:"+buf.capacity());
        // rewind()进行重读
        buf.rewind();
        System.out.println("position:"+buf.position()+" limit:"+buf.limit()+" cap:"+buf.capacity());
        // clear()进行缓冲区清空
        buf.clear();
        System.out.println("position:"+buf.position()+" limit:"+buf.limit()+" cap:"+buf.capacity());

    }
结果:(位置清零,限制置为容量,回到最初状态,但并不是真正清空缓冲区,只是相应属性被重置,缓冲区数据处于“被遗忘”状态)
使用reset()重置到mark()标记的位置:
   @Test
    public void test1() {
        // 分配一个指定大小的字节缓冲区
        ByteBuffer buf = ByteBuffer.allocate(1024);
        System.out.println("position:"+buf.position()+" limit:"+buf.limit()+" cap:"+buf.capacity());
        String str = "i love the world!";
        // 存数据模式put()
        buf.put(str.getBytes());
        System.out.println("position:"+buf.position()+" limit:"+buf.limit()+" cap:"+buf.capacity());
        // 读数据模式——flip()
        buf.flip();
        System.out.println("position:"+buf.position()+" limit:"+buf.limit()+" cap:"+buf.capacity());
        // 利用get()读取缓冲区数据
        byte[] dst = new byte[buf.limit()];
        buf.get(dst, 0, 6);
        System.out.println(new String(dst, 0, 6));
        System.out.println("position:"+buf.position()+" limit:"+buf.limit()+" cap:"+buf.capacity());
        // 通过mark()标记position位置
        buf.mark();
        // 继续读取,改变position位置
        buf.get(dst, 6,4);
        System.out.println("position:"+buf.position()+" limit:"+buf.limit()+" cap:"+buf.capacity());
        System.out.println(new String(dst, 6, 4));
        // 使用reset()恢复position到mark位置
        buf.reset();
        System.out.println("position:"+buf.position()+" limit:"+buf.limit()+" cap:"+buf.capacity());

    }
结果:

//其它例如查看缓冲区可操作数据的方法 hasRemaining()等参见API

2.直接缓冲区与非直接缓冲区
概念:
非直接缓冲区:通过 allocate() 方法分配缓冲区,将缓冲区建立在 JVM 的内存中
直接缓冲区:通过 allocateDirect() 方法分配直接缓冲区,将缓冲区建立在物理内存中。可以提高效率
关于这方面的详细介绍,请参见:http://www.cnblogs.com/androidsuperman/p/7083049.html
API中也有相关的判断直接缓冲区的方法:isDirect()
3.通道(channel)
概念:
通道(Channel):由 java.nio.channels 包定义 的。Channel 表示 IO 源与目标打开的连接。 Channel 类似于传统的“流”。只不过 Channel 本身不能直接访问数据,Channel 只能与 Buffer 进行交互。
通道是访问IO服务的导管,负责缓冲区数据的传输,配合缓冲区传输数据。通过通道,我们可以以最小的开销来访问操作系统的I/O服务
通道相关的介绍,请参见 风一样的码农 的随笔:http://www.cnblogs.com/chenpi/p/6481271.html
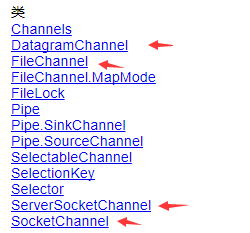
分类:主要是红箭头所指处的实现类
获取通道:——打开通道,打开一条向哪个文件的通道
getChannel()
静态方法 open()——1.7后的NIO.2
Files工具类的 newByteChannel()——1.7后的NIO.2
使用通道:
使用方式一进行文件复制:
 @Test
    public void test1() {
        FileInputStream fis = null;
        FileOutputStream fos = null;
        FileChannel fisChannel = null;
        FileChannel fosChannel = null;
        try {
            fis = new FileInputStream(new File("D:\test\1.jpg"));
            fos = new FileOutputStream(new File("D:\test\2.jpg"));

            // 获取通道
            fisChannel = fis.getChannel();
            fosChannel = fos.getChannel();

            // 分配非直接缓冲区进行数据存取
            ByteBuffer byteBuffer = ByteBuffer.allocate(1024);
            // 与IO流类似的读取思路
            while ((fisChannel.read(byteBuffer)) != -1) {
                // 将读到的数据进行存储,一定要切换为读模式!
                byteBuffer.flip();// 切换读模式
                fosChannel.write(byteBuffer);
                byteBuffer.clear();// 清空缓冲区
            }
            System.out.println("复制完成!");
        } catch (IOException e) {
            e.printStackTrace();
        } finally {
            // 4个平行的if即使某个出现异常,后续的也会关闭。而且后续1.7后获取通道将会简化
            if (fosChannel != null) {
                try {
                    // 显示关闭流
                    fosChannel.close();
                } catch (IOException e) {
                    e.printStackTrace();
                }
            }
            if (fisChannel != null) {
                try {
                    // 显示关闭流
                    fisChannel.close();
                } catch (IOException e) {
                    e.printStackTrace();
                }
            }
            if (fos != null) {
                try {
                    // 显示关闭流
                    fos.close();
                } catch (IOException e) {
                    e.printStackTrace();
                }
            }
            if (fis != null) {
                try {
                    // 显示关闭流
                    fis.close();
                } catch (IOException e) {
                    e.printStackTrace();
                }
            }
        }

    }
// 也不需要缓冲流包装之类了
使用方式二通过内存映射进行文件复制:
 @Test
    public void test2() {
        FileChannel inChnnel = null;
        FileChannel outChnnel = null;
        try {
            // NIO.2的方式获取读通道
            inChnnel = FileChannel.open(Paths.get("D:\test\2.jpg"), StandardOpenOption.READ);
            // 由于outMappedBuf为读写模式,故这里给outChannel加读写两个模式(CREATE_NEW为创建新文件)
            outChnnel = FileChannel.open(Paths.get("D:\test\3.jpg"), StandardOpenOption.CREATE_NEW, StandardOpenOption.WRITE,StandardOpenOption.READ);
            // 使用内存映射创建直接缓冲区(只有byteBuffer支持),与allocateDirect()原理一致
            MappedByteBuffer inMappedBuf = inChnnel.map(FileChannel.MapMode.READ_ONLY, 0, inChnnel.size());
            MappedByteBuffer outMappedBuf = outChnnel.map(FileChannel.MapMode.READ_WRITE, 0, inChnnel.size());
            // 现在往缓冲区中放数据就直接放到文件中了,无需通过通道读写
            byte[] dst = new byte[inMappedBuf.limit()];
            inMappedBuf.get(dst);
            outMappedBuf.put(dst);
        } catch (IOException e) {
            e.printStackTrace();
        } finally {
            if (outChnnel != null) {
                try {
                    outChnnel.close();
                } catch (IOException e) {
                    e.printStackTrace();
                }
            }
            if (inChnnel != null) {
                try {
                    inChnnel.close();
                } catch (IOException e) {
                    e.printStackTrace();
                }
            }
        }

    }
关于其中得MappedByteBuffer,请参见:http://blog.csdn.net/z69183787/article/details/53695590
事实上,NIO提供了通道之间传输数据得方式:

   @Test
    public void test3() {
        FileChannel inChannel = null;
        FileChannel outChannel = null;
        try {
            // NIO.2的方式获取读通道
            inChannel = FileChannel.open(Paths.get("D:\test\3.jpg"), StandardOpenOption.READ);
            // 由于outMappedBuf为读写模式,故这里给outChannel加读写两个模式
            outChannel = FileChannel.open(Paths.get("D:\test\4.jpg"), StandardOpenOption.CREATE, StandardOpenOption.WRITE,StandardOpenOption.READ);
            // 通道之间传送数据
            inChannel.transferTo(0, inChannel.size(), outChannel);
        } catch (IOException e) {
            e.printStackTrace();
        } finally {
            if (outChannel != null) {
                try {
                    outChannel.close();
                } catch (IOException e) {
                    e.printStackTrace();
                }
            }
            if (inChannel != null) {
                try {
                    inChannel.close();
                } catch (IOException e) {
                    e.printStackTrace();
                }
            }
        }
    }
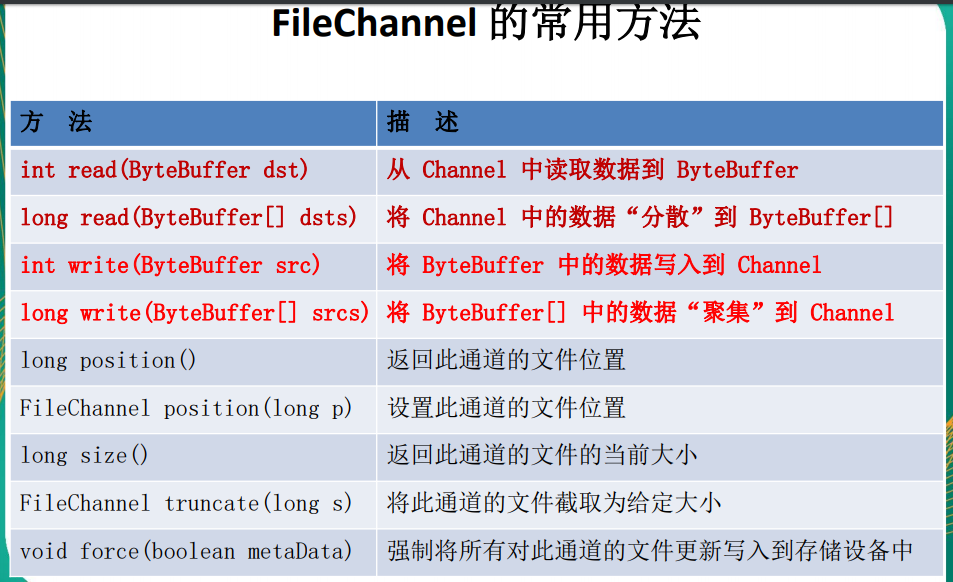
FileChannel常用方法:
4.分散和聚集
分散读取(Scattering Reads):
将通道中的数据分散到各个缓冲区中
  @Test
    public void test4() {
        RandomAccessFile raf = null;
        FileChannel rafChannel = null;
        try {
            raf = new RandomAccessFile("D:\test\hello.txt", "rw");
            rafChannel = raf.getChannel();
            // 分配缓冲区
            ByteBuffer byteBuffer1 = ByteBuffer.allocate(400);
            ByteBuffer byteBuffer2 = ByteBuffer.allocate(201);
            ByteBuffer byteBuffer3 = ByteBuffer.allocate(800);
            ByteBuffer[] bufs = {byteBuffer1, byteBuffer2, byteBuffer3};
            // 分散读取
            rafChannel.read(bufs);
            // 切换读模式,读取缓冲区数据
            for (ByteBuffer buf : bufs) {
                buf.flip();
                System.out.println(new String(buf.array(), 0, buf.limit()));
                System.out.println("==================================");
            }
        } catch (IOException e) {
            e.printStackTrace();
        } finally {
            if (raf != null) {
                try {
                    raf.close();
                } catch (IOException e) {
                    e.printStackTrace();
                }
            }
            if (rafChannel != null) {
                try {
                    rafChannel.close();
                } catch (IOException e) {
                    e.printStackTrace();
                }
            }
        }
    }
聚集写入(Gathering Writes):
将多个缓冲区中的数据聚集到通道中
示例与分散类似,也是操作缓冲区数组
5.字符集(Charset)
编码:编成字节码(数组)——将字符串转换成字节数组
解码:解释成看的懂的字符串——将字节数组解成字符串
查看所有可用的字符集:
@Test
    public void test5() {
        // 所有可用的字符集
        Map<String, Charset> map = Charset.availableCharsets();
        for (Map.Entry<String, Charset> entry : map.entrySet()) {
            System.out.println("key:"+entry.getKey()+" value:"+entry.getValue());
        }
    }
编码:
  @Test
    public void test6() {
        // 获取字符集的字符集对象
        Charset cs1 = Charset.forName("GBK");
        // 获取编码器与解码器
        CharsetEncoder encoder = cs1.newEncoder();
        CharsetDecoder decoder = cs1.newDecoder();
        // 进行编码与解码(其实也就是CharBuffer与ByteBuffer之间的转换)
        CharBuffer charBuffer = CharBuffer.allocate(1024);
        charBuffer.put("金陵岂是池中物,一遇风云便化龙。");
        // 切换读模式,开始编码
        charBuffer.flip();
        ByteBuffer byteBuffer = null;
        try {
            byteBuffer = encoder.encode(charBuffer);
        } catch (IOException e) {
            e.printStackTrace();
        }
        for (int i = 0; i < 32; i++){
            System.out.println(byteBuffer.get());
        }
    }
结果是字节数组的形式(数值):
解码查看:
    @Test
    public void test6() {
        // 获取字符集的字符集对象
        Charset cs1 = Charset.forName("GBK");
        // 获取编码器与解码器
        CharsetEncoder encoder = cs1.newEncoder();
        CharsetDecoder decoder = cs1.newDecoder();
        // 进行编码与解码(其实也就是CharBuffer与ByteBuffer之间的转换)
        CharBuffer charBuffer = CharBuffer.allocate(1024);
        charBuffer.put("金陵岂是池中物,一遇风云便化龙。");
        // 切换读模式,开始编码
        charBuffer.flip();
        ByteBuffer byteBuffer = null;
        try {
            byteBuffer = encoder.encode(charBuffer);
            CharBuffer charBuffer1 = decoder.decode(byteBuffer);
            System.out.println(charBuffer1.toString());
        } catch (IOException e) {
            e.printStackTrace();
        }
//        for (int i = 0; i < 32; i++){
//            System.out.println(byteBuffer.get());
//        }
    }