前一篇中数据源采用的是从一个socket中拿数据,有点属于“旁门左道”,正经的是从kafka等消息队列中拿数据!
主要支持的source,由官网得知如下:
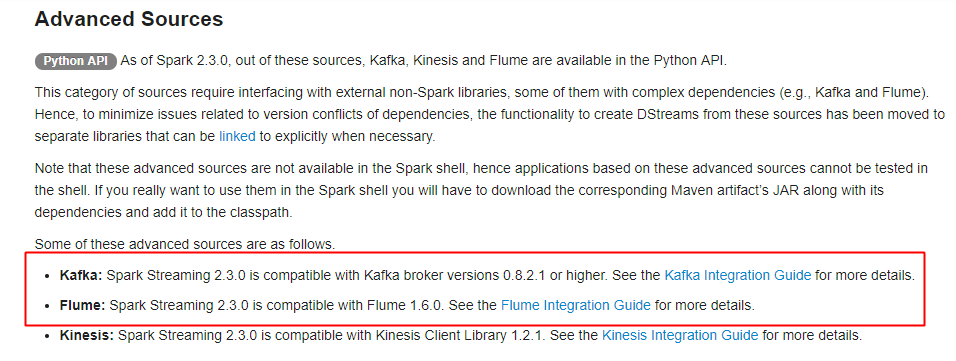
获取数据的形式包括推送push和拉取pull
一、spark streaming整合flume
1.push的方式
更推荐的是pull的拉取方式
引入依赖:
     <dependency>
            <groupId>org.apache.spark</groupId>
            <artifactId>spark-streaming-flume_2.10</artifactId>
            <version>${spark.version}</version>
        </dependency>
编写代码:
package com.streaming

import org.apache.spark.SparkConf
import org.apache.spark.streaming.flume.FlumeUtils
import org.apache.spark.streaming.{Seconds, StreamingContext}

/**
  * Created by ZX on 2015/6/22.
  */
object FlumePushWordCount {

  def main(args: Array[String]) {
    val host = args(0)
    val port = args(1).toInt
    val conf = new SparkConf().setAppName("FlumeWordCount")//.setMaster("local[2]")
    // 使用此构造器将可以省略sc,由构造器构建
    val ssc = new StreamingContext(conf, Seconds(5))
    // 推送方式: flume向spark发送数据(注意这里的host和Port是streaming的地址和端口,让别人发送到这个地址)
    val flumeStream = FlumeUtils.createStream(ssc, host, port)
    // flume中的数据通过event.getBody()才能拿到真正的内容
    val words = flumeStream.flatMap(x => new String(x.event.getBody().array()).split(" ")).map((_, 1))

    val results = words.reduceByKey(_ + _)
    results.print()
    ssc.start()
    ssc.awaitTermination()
  }
}
flume-push.conf——flume端配置文件:


# Name the components on this agent
a1.sources = r1
a1.sinks = k1
a1.channels = c1

# source
a1.sources.r1.type = spooldir
a1.sources.r1.spoolDir = /export/data/flume
a1.sources.r1.fileHeader = true

# Describe the sink
a1.sinks.k1.type = avro
#这是接收方
a1.sinks.k1.hostname = 192.168.31.172
a1.sinks.k1.port = 8888

# Use a channel which buffers events in memory
a1.channels.c1.type = memory
a1.channels.c1.capacity = 1000
a1.channels.c1.transactionCapacity = 100

# Bind the source and sink to the channel
a1.sources.r1.channels = c1
a1.sinks.k1.channel = c1
2.pull的方式
属于推荐的方式,通过streaming来主动拉取flume产生的数据
编写代码:(依赖同上)
package com.streaming

import java.net.InetSocketAddress

import org.apache.spark.SparkConf
import org.apache.spark.storage.StorageLevel
import org.apache.spark.streaming.flume.FlumeUtils
import org.apache.spark.streaming.{Seconds, StreamingContext}

object FlumePollWordCount {
  def main(args: Array[String]) {
    val conf = new SparkConf().setAppName("FlumePollWordCount").setMaster("local[2]")
    val ssc = new StreamingContext(conf, Seconds(5))
    //从flume中拉取数据(flume的地址),通过Seq序列,里面可以new多个地址,从多个flume地址拉取
    val address = Seq(new InetSocketAddress("172.16.0.11", 8888))
    val flumeStream = FlumeUtils.createPollingStream(ssc, address, StorageLevel.MEMORY_AND_DISK)
    val words = flumeStream.flatMap(x => new String(x.event.getBody().array()).split(" ")).map((_,1))
    val results = words.reduceByKey(_+_)
    results.print()
    ssc.start()
    ssc.awaitTermination()
  }
}
配置flume
通过拉取的方式需要flume的lib目录中有相关的JAR(要通过spark程序来调flume拉取),通过官网可以得知具体的JAR信息:
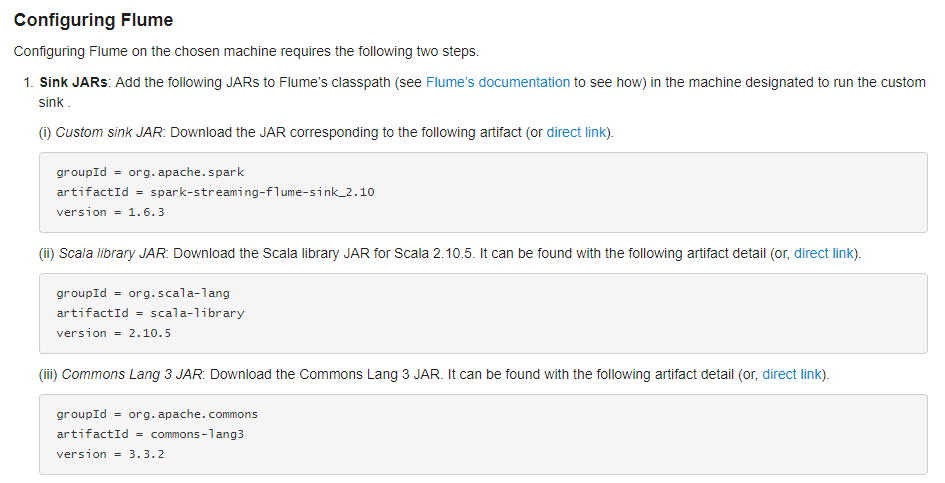
配置flume:
# Name the components on this agent
a1.sources = r1
a1.sinks = k1
a1.channels = c1

# source
a1.sources.r1.type = spooldir
a1.sources.r1.spoolDir = /export/data/flume
a1.sources.r1.fileHeader = true

# Describe the sink(配置的是flume的地址,等待拉取)
a1.sinks.k1.type = org.apache.spark.streaming.flume.sink.SparkSink
a1.sinks.k1.hostname = mini1
a1.sinks.k1.port = 8888

# Use a channel which buffers events in memory
a1.channels.c1.type = memory
a1.channels.c1.capacity = 1000
a1.channels.c1.transactionCapacity = 100

# Bind the source and sink to the channel
a1.sources.r1.channels = c1
a1.sinks.k1.channel = c1
启动flume,然后启动IDEA中的spark streaming:
bin/flume-ng agent -c conf -f conf/netcat-logger.conf -n a1  -Dflume.root.logger=INFO,console
// -D后参数可选
二、spark streaming整合kafka
前导知识,复习kafka:http://www.cnblogs.com/jiangbei/p/8537625.html
1.引入依赖
    <dependency>
            <groupId>org.apache.spark</groupId>
            <artifactId>spark-streaming-kafka_2.10</artifactId>
            <version>${spark.version}</version>
        </dependency>
2.编写代码
package com.streaming

import org.apache.spark.{HashPartitioner, SparkConf}
import org.apache.spark.storage.StorageLevel
import org.apache.spark.streaming.kafka.KafkaUtils
import org.apache.spark.streaming.{Seconds, StreamingContext}

object KafkaWordCount {
  val updateFunc = (iter: Iterator[(String, Seq[Int], Option[Int])]) => {
    //iter.flatMap(it=>Some(it._2.sum + it._3.getOrElse(0)).map(x=>(it._1,x)))
    iter.flatMap { case (x, y, z) => Some(y.sum + z.getOrElse(0)).map(i => (x, i)) }
  }
  def main(args: Array[String]): Unit = {
    val Array(zkQuorum, group, topics, numThreads) = args
    val conf = new SparkConf().setAppName("kafkaWordCount").setMaster("local[2]")
    val ssc = new StreamingContext(conf, Seconds(5))
    // 设置ck
    ssc.checkpoint("F:/ck")
    // 产生topic的map
    val topicMap = topics.split(",").map((_, numThreads.toInt)).toMap
    // data是一个DStream
    val data = KafkaUtils.createStream(ssc, zkQuorum, group, topicMap, StorageLevel.MEMORY_AND_DISK_SER)
    val words = data.map(_._2).flatMap(_.split(" "))
    // 使用update进行累加统计
    val wordCounts = words.map((_, 1)).updateStateByKey(updateFunc, new HashPartitioner(ssc.sparkContext.defaultParallelism), true)
    // 启动
    ssc.start()
    ssc.awaitTermination()
  }
}
结合kafka也是存在两种拉取数据的形式,包括Receiver和Direct两种形式
更多参考:https://www.cnblogs.com/xlturing/p/6246538.html
但是使用更多的是Direct的直连方式,因为直连方式使用的不需要记录日志,不会影响性能
使用实例,参考:https://blog.csdn.net/ligt0610/article/details/47311771