Spring Boot入门:
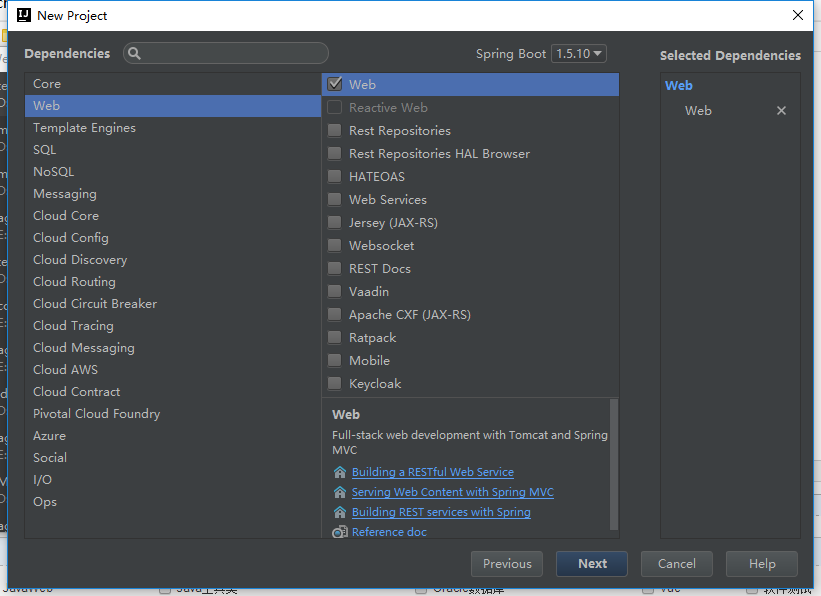
使用IDEA创建Spring Boot 项目:
选择

勾选Web
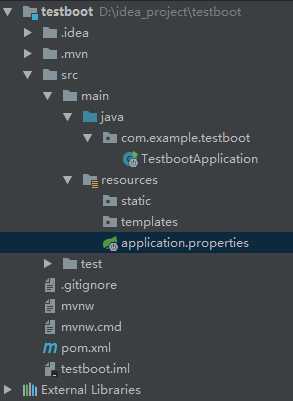
生成项目结构:
例子:
package com.example.testboot;

import org.springframework.web.bind.annotation.GetMapping;
import org.springframework.web.bind.annotation.RestController;

@RestController
public class HelloController {

    @GetMapping("/hello")
    public String say(){
        return "hello";
    }
}
然后运行主程序:
package com.example.testboot;

import org.springframework.boot.SpringApplication;
import org.springframework.boot.autoconfigure.SpringBootApplication;
import org.springframework.web.bind.annotation.RequestMapping;
import org.springframework.web.bind.annotation.RequestMethod;

@SpringBootApplication
public class TestbootApplication {

    public static void main(String[] args) {
        SpringApplication.run(TestbootApplication.class, args);
    }
}
配置文件:
#端口号
server.port=8081
#项目前缀
server.context-path=/test
也可以使用yml格式配置文件:
server:
  port: 8081
  cotent-path: /sd
可以区分生产环境和开发环境的多环境配置。
Controller的使用:
注解:
@RestController注解相当于@ResponseBody + @Controller合在一起的作用。
1)如果只是使用@RestController注解Controller,则Controller中的方法无法返回jsp页面,配置的视图解析器InternalResourceViewResolver不起作用,返回的内容就是Return 里的内容。
例如:本来应该到success.jsp页面的,则其显示success.
2)如果需要返回到指定页面,则需要用 @Controller配合视图解析器InternalResourceViewResolver才行。
3)如果需要返回JSON,XML或自定义mediaType内容到页面,则需要在对应的方法上加上@ResponseBody注解。
@GetMapping({"/hello","/hi"})
@PostMapping({"/hello","/hi"})
@RequestMapping({"/hello","/hi"})
可以使用集合的方式指定多个入口@RequestMapping也可以给Controller指定
@PathVaribale 获取url中的数据
//@RequestMapping(value="/hello/{id}",method= RequestMethod.GET)
    @GetMapping("/hello/{id}")
    public String sayHello(@PathVariable("id") Integer id){
        return "id:"+id;
    }
效果:

注意,这里
@RequestMapping(value="/hello/{id}",method= RequestMethod.GET)
的效果等同于
@GetMapping("/hello/{id}")
同样,如果我们需要在url有多个参数需要获取,则如下代码所示来做就可以了。
   @RequestMapping(value="/hello/{id}/{name}",method= RequestMethod.GET)
    public String sayHello(@PathVariable("id") Integer id,@PathVariable("name") String name){
        return "id:"+id+" name:"+name;
    }
@RequestParam 获取请求参数的值
    @RequestMapping(value="/hello",method= RequestMethod.GET)
    public String sayHello(@RequestParam("id") Integer id){
        return "id:"+id;
    }


//@RequestMapping(value="/hello/{id}",method= RequestMethod.GET)
    @GetMapping("/hello")
    //required=false 表示url中可以不穿入id参数,此时就使用默认参数
    public String sayHello(@RequestParam(value="id",required = false,defaultValue = "1") Integer id){
        return "id:"+id;
    }


如果是有多个参数的情况:
    @GetMapping("/hello")
    public String sayHello(@RequestParam("id") Integer id,@RequestParam("name") String name){
        return "id:"+id+ " name:"+name;
    }
@GetMapping
等同于@RequestMapping(method = RequestMethod.GET)
还有@PostMapping和@PutMapping等等
数据库操作:
配置yml文件:
server:
  port: 8090
  session-timeout: 30
  tomcat.max-threads: 0
  tomcat.uri-encoding: UTF-8

spring:
  datasource:
    url : jdbc:mysql://localhost:3306/mybill
    username : root
    password : root
    driverClassName : com.mysql.jdbc.Driver
  jpa:
    database : MYSQL
    show-sql : true
    hibernate:
      ddl-auto : update
      naming-strategy : org.hibernate.cfg.ImprovedNamingStrategy
    properties:
      hibernate:
        dialect : org.hibernate.dialect.MySQL5Dialect
配置实体类:
package com.example.testboot;


import javax.persistence.Entity;
import javax.persistence.GeneratedValue;
import javax.persistence.Id;

@Entity
public class User {

    @Id
    @GeneratedValue
    private Integer id;

    private  String name;

    public User() {
    }

    public User(String name) {
        this.name = name;
    }

    public Integer getId() {
        return id;
    }

    public String getName() {
        return name;
    }

    public void setId(Integer id) {
        this.id = id;
    }

    public void setName(String name) {
        this.name = name;
    }
}
运行项目即可在数据库指定位置生成数据表。
数据库简单操作:
获取数据:
新建接口:
package com.example.testboot;

import org.springframework.data.jpa.repository.JpaRepository;

public interface UserRepository extends JpaRepository<User,Integer> {
}
Controller:
package com.example.testboot;

import org.springframework.beans.factory.annotation.Autowired;
import org.springframework.web.bind.annotation.GetMapping;
import org.springframework.web.bind.annotation.RequestParam;
import org.springframework.web.bind.annotation.RestController;

import java.util.List;

@RestController
public class UserController {

    @Autowired
    private UserRepository userRepository;

    /**
     * 返回用户列表
     * @return
     */
    @GetMapping("/getuser")
    public List<User> getUser(){
        return userRepository.findAll();
    }
}

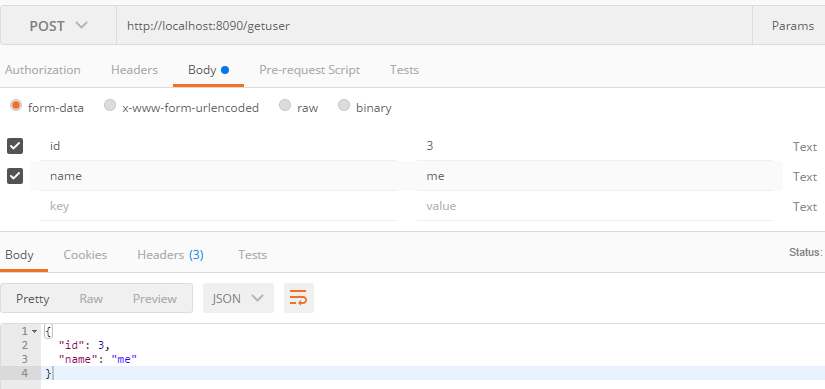
添加的方法:
    /**
     * 添加
     * @param id
     * @param name
     * @return
     */
    @PostMapping("/getuser")
    public User addUser(@RequestParam("id")Integer id,@RequestParam("name")String name){
        User user=new User();
        user.setId(id);
        user.setName(name);
        return userRepository.save(user);
    }
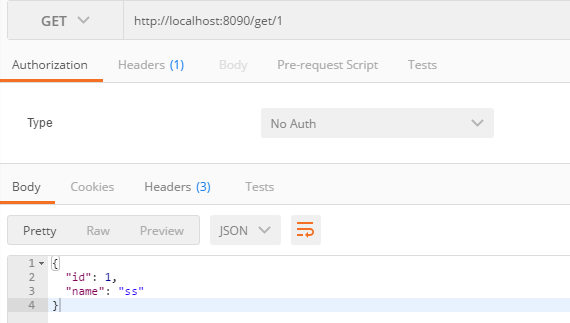
    /**
     * 查询一个用户
     * @param id
     * @return
     */
    @GetMapping("/get/{id}")
    public User findUser(@PathVariable("id")Integer id){
        return userRepository.findOne(id);
    }
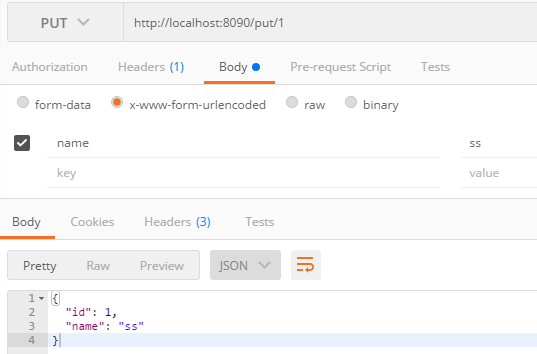
    /**
     * 更新一个用户
     * @param id
     * @param name
     * @return
     */
    @PutMapping("/put/{id}")
    public User putUser(@PathVariable("id")Integer id,@RequestParam("name")String name){
        User user=new User();
        user.setId(id);
        user.setName(name);
        return userRepository.save(user);
    }
    /**
     * 删除用户
     * @param id
     */
    @DeleteMapping("/del/{id}")
    public void delUser(@PathVariable("id")Integer id){
        userRepository.delete(id);
    }

事务管理:
@Transactional
    @DeleteMapping("/del/{id}")
    public void delUser(@PathVariable("id")Integer id){
        userRepository.delete(id);
    }
通过注解 @Transactional
使得操作一个不完成时都不完成,除了查询方法都应添加事务。