
01.Ajax入门.html
<!DOCTYPE html>
<html lang="en">

<head>
    <meta charset="UTF-8">
    <title>Document</title>
</head>

<body>
    <script type="text/javascript">
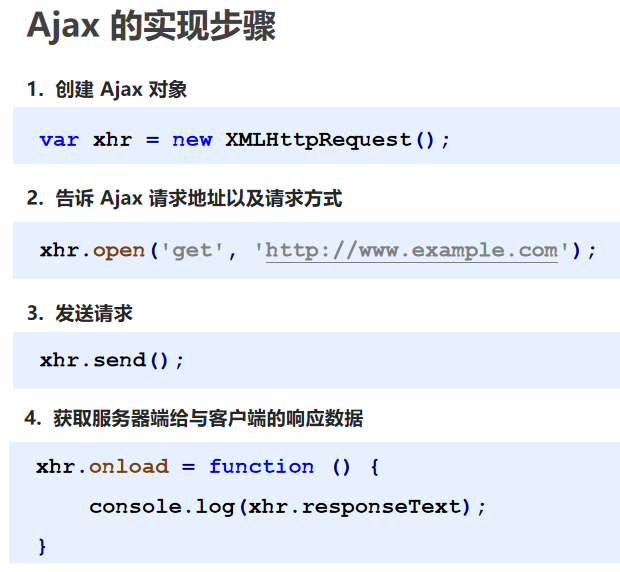
        // 1.创建ajax对象
        var xhr = new XMLHttpRequest();

        // 2.告诉Ajax对象要向哪发送请求,以什么方式发送请求
        // 1)请求方式 2)请求地址 【即路由表】
        xhr.open('get', 'http://localhost:3000/first');

        // 3.发送请求
        xhr.send();

        // 4.获取服务器端响应到客户端的数据
        // 【MDN的解释 --> load:XMLHttpRequest请求成功完成时触发,也可以使用 onload 属性.】
        xhr.onload = function() {
            console.log(xhr.responseText) // Hello, Ajax
        }
    </script>
</body>

</html>
app.js
// 引入express框架
const express = require('express');
// 路径处理模块
const path = require('path');
const bodyParser = require('body-parser');
const fs = require('fs');
// 创建web服务器
const app = express();

app.use(bodyParser.json());

// 静态资源访问服务功能
app.use(express.static(path.join(__dirname, 'public')));

// 对应01html文件
app.get('/first', (req, res) => {
	res.send('Hello, Ajax');
});

// 对应02html文件
app.get('/responseData', (req, res) => {
	res.send({"name": "zs"});
});

// 对应03html文件
app.get('/get', (req, res) => {
	res.send(req.query);
});

// 对应04html文件
app.post('/post', (req, res) => {
	res.send(req.body);
});

// 对应05html文件
app.post('/json', (req, res) => {
	res.send(req.body);
});

// 对应06html文件
app.get('/readystate', (req, res) => {
	res.send('hello');
});

// 对应07html文件
app.get('/error', (req, res) => {
	//console.log(abc);
	res.status(400).send('not ok');
});

// 对应08html文件
app.get('/cache', (req, res) => {
	fs.readFile('./test.txt', (err, result) => {
		res.send(result);
	});
});

// 监听端口
app.listen(3000);
// 控制台提示输出
console.log('服务器启动成功');

