<!--pages/wxss/wxss.wxml-->
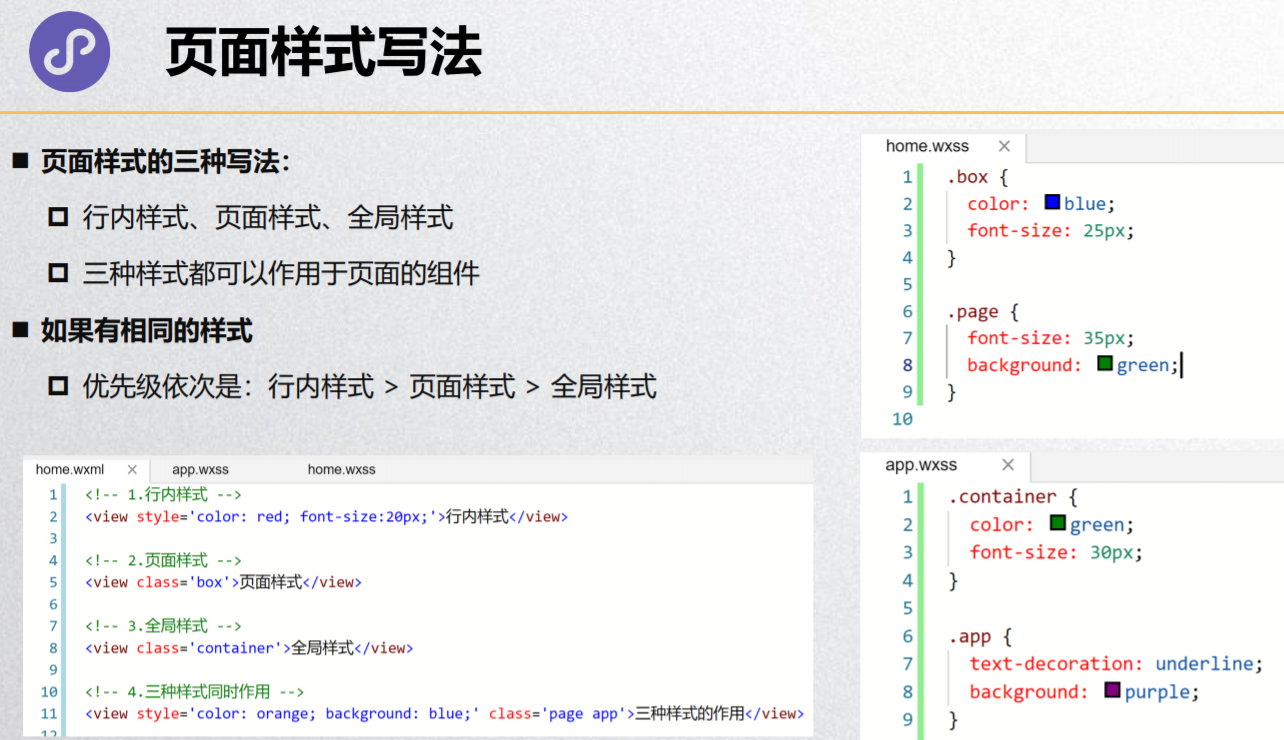
<!-- 1.设置样式的三种方式 -->
<!-- 1.1.行内(内联)样式 -->
<view style='color: red; font-size:32px;'>哈哈哈</view>
<!-- 1.2.页内样式 -->
<view class='box'>呵呵呵</view>
<!-- 1.3.全局样式 -->
<view class='container'>嘿嘿嘿</view>
<!-- 2.三种的样式作用于同一个组件 -->
<view style='background: red;' class='content'>嘻嘻嘻</view>
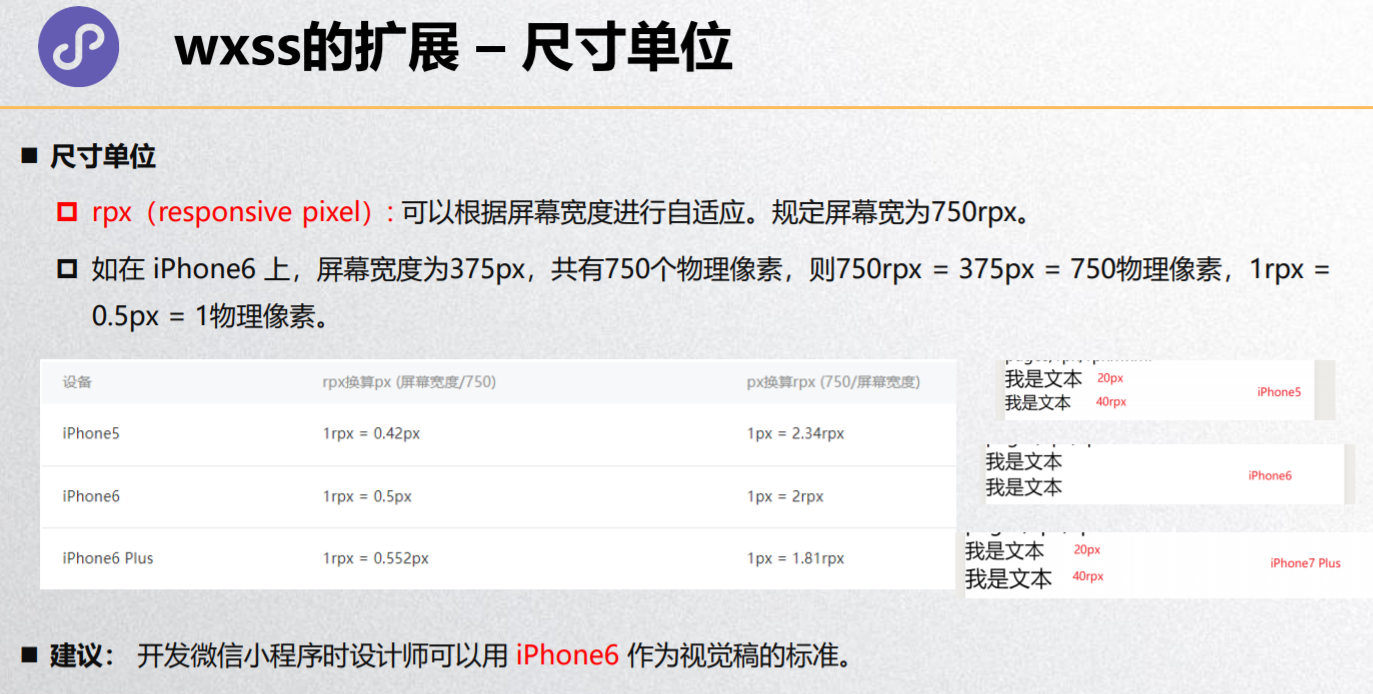
<!-- 3.wxss中的单位: rpx -->
<!-- 前端也需要进行配置尺寸的适配: em/rem/vw/wh -->
<view class='box1'></view>
<view class='box2'></view>
<view class='content1'>哈哈哈</view>
<view class='content2'>呵呵呵</view>
<button class='btn'>按钮</button>
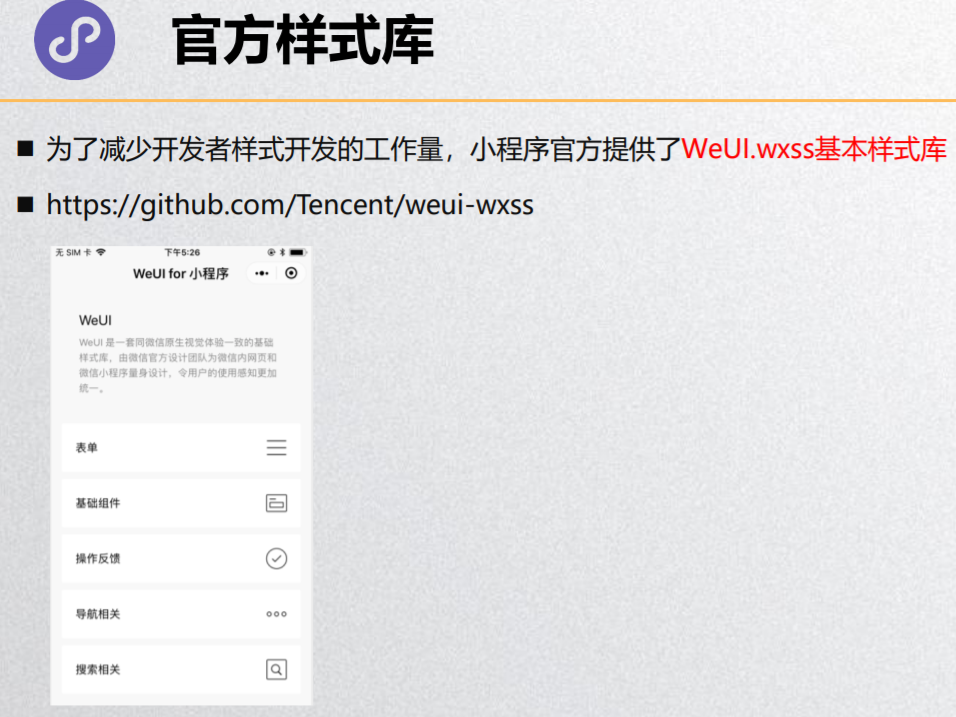
<!-- 4.使用官方的样式库开发一个搜索框 【在这里赋值结构,在css里赋值样式。】 -->
<view class="weui-search-bar">
<view class="weui-search-bar__form">
<view class="weui-search-bar__box">
<icon class="weui-icon-search_in-box" type="search" size="14"></icon>
<input type="text" class="weui-search-bar__input" placeholder="搜索" value="{{inputVal}}" focus="{{inputShowed}}" bindinput="inputTyping" />
<view class="weui-icon-clear" wx:if="{{inputVal.length > 0}}" bindtap="clearInput">
<icon type="clear" size="14"></icon>
</view>
</view>
<label class="weui-search-bar__label" hidden="{{inputShowed}}" bindtap="showInput">
<icon class="weui-icon-search" type="search" size="14"></icon>
<view class="weui-search-bar__text">搜索</view>
</label>
</view>
<view class="weui-search-bar__cancel-btn" hidden="{{!inputShowed}}" bindtap="hideInput">取消</view>
</view>
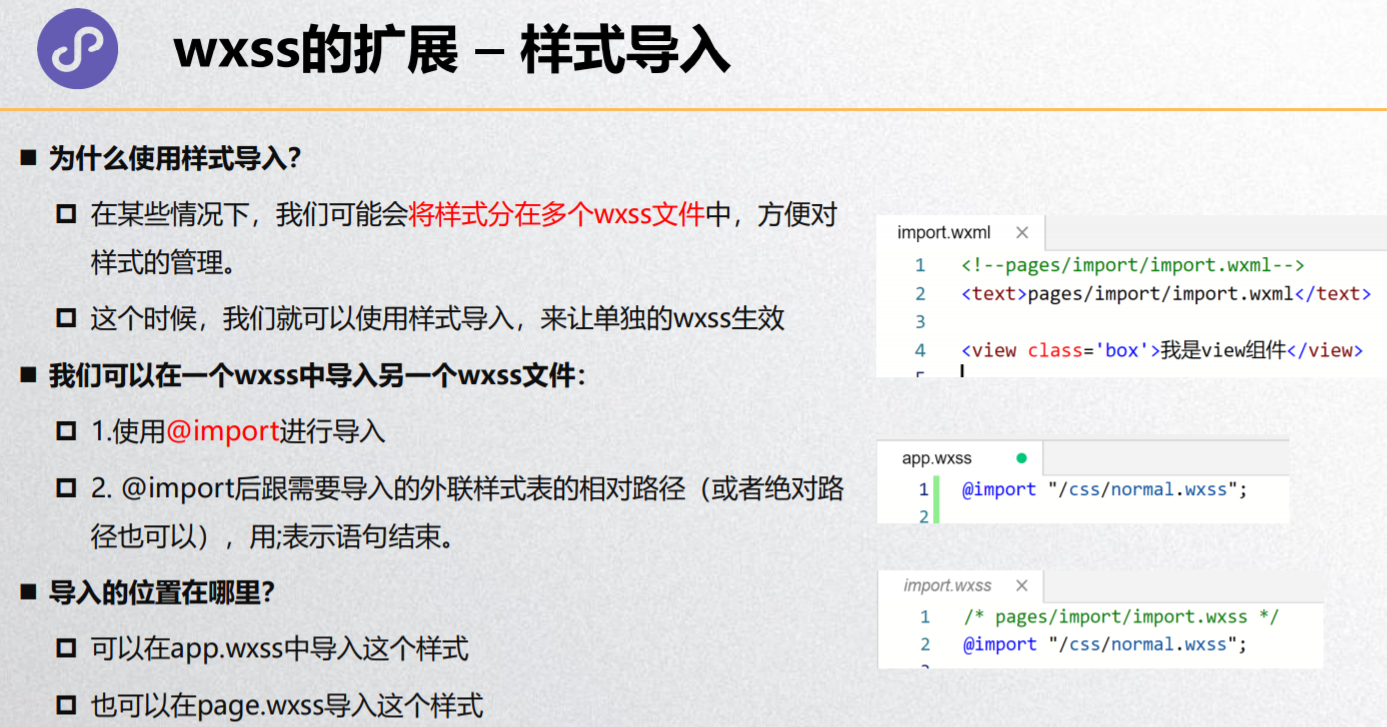
/* pages/wxss/wxss.wxss */
@import './style/box.wxss';
@import './style/content.wxss';
@import './style/weui-searchbar.wxss';

.box {
  color: blue;
  font-size: 32px;
}

.content {
  background: purple;
}

/*
.box1 {
   100px;
  height: 100px;
  background: orange;
}

.box2 {
   200rpx;
  height: 200rpx;
  background: purple;
} */

/*
.content1 {
  font-size: 32px;
}

.content2 {
  font-size: 64rpx;
} */
@import './style/btn.wxss';

.container {
  color: green;
  font-size: 32px;
}

.content {
  background: orange;
}
Mustache语法(一)
Mustache语法(二)
逻辑判断
列表渲染 – wx:for基础
block标签
列表渲染 – item/index名称

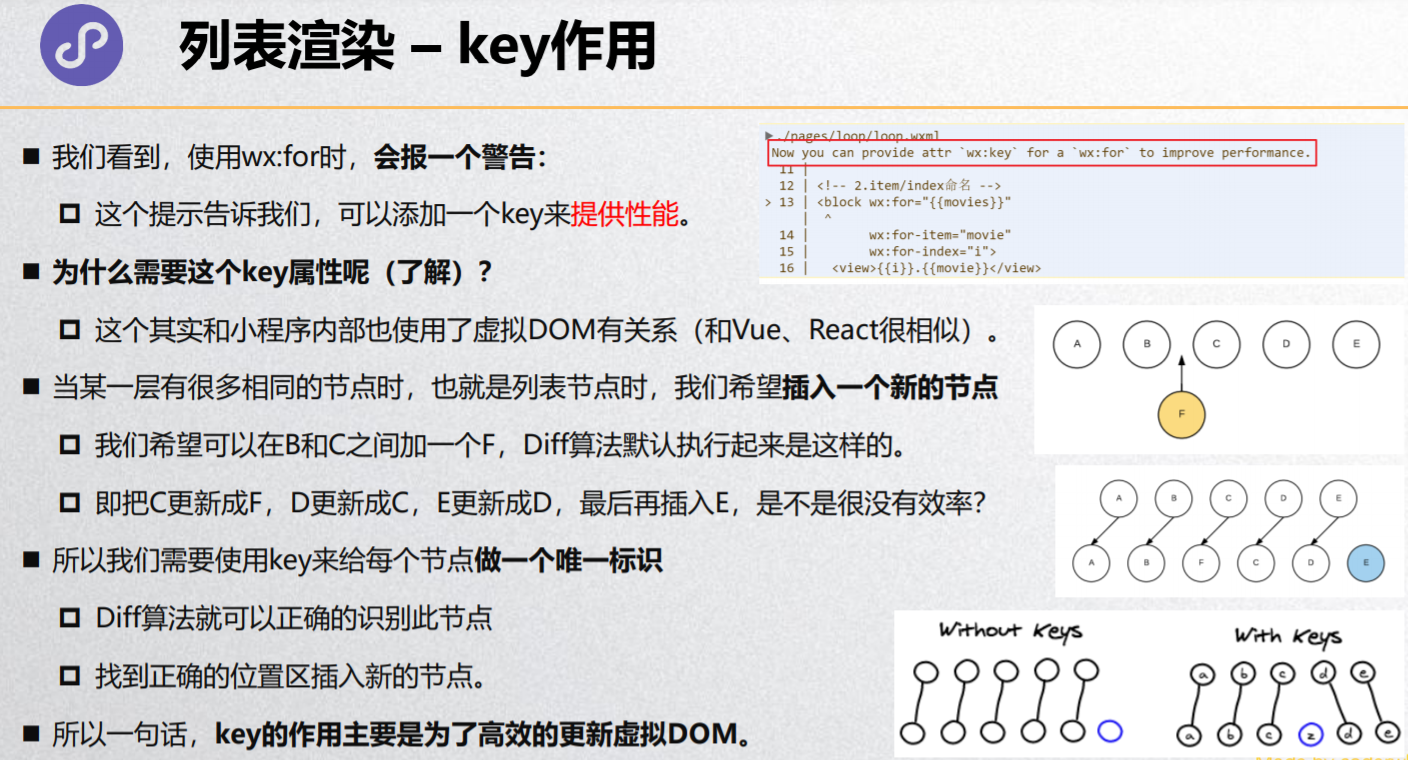
列表渲染 – key作用
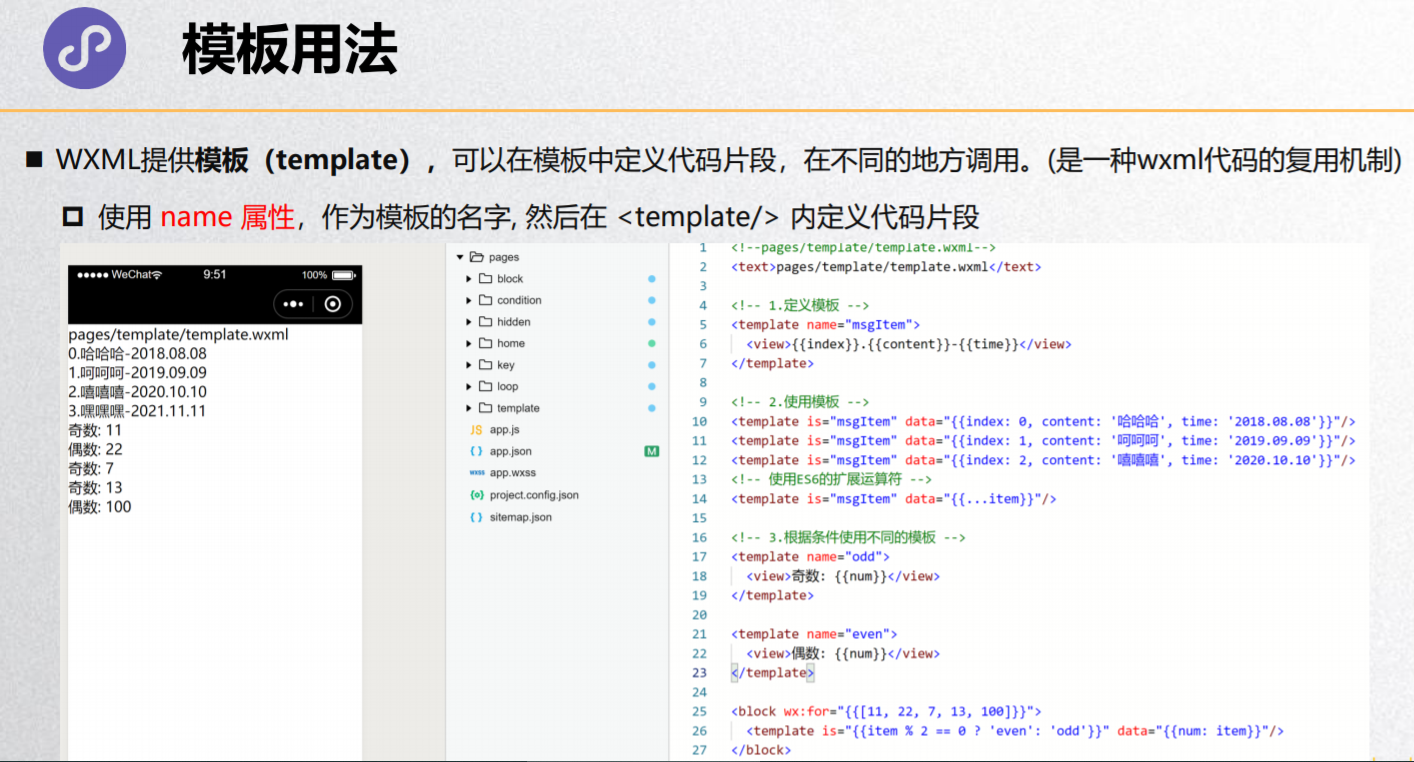
模板用法
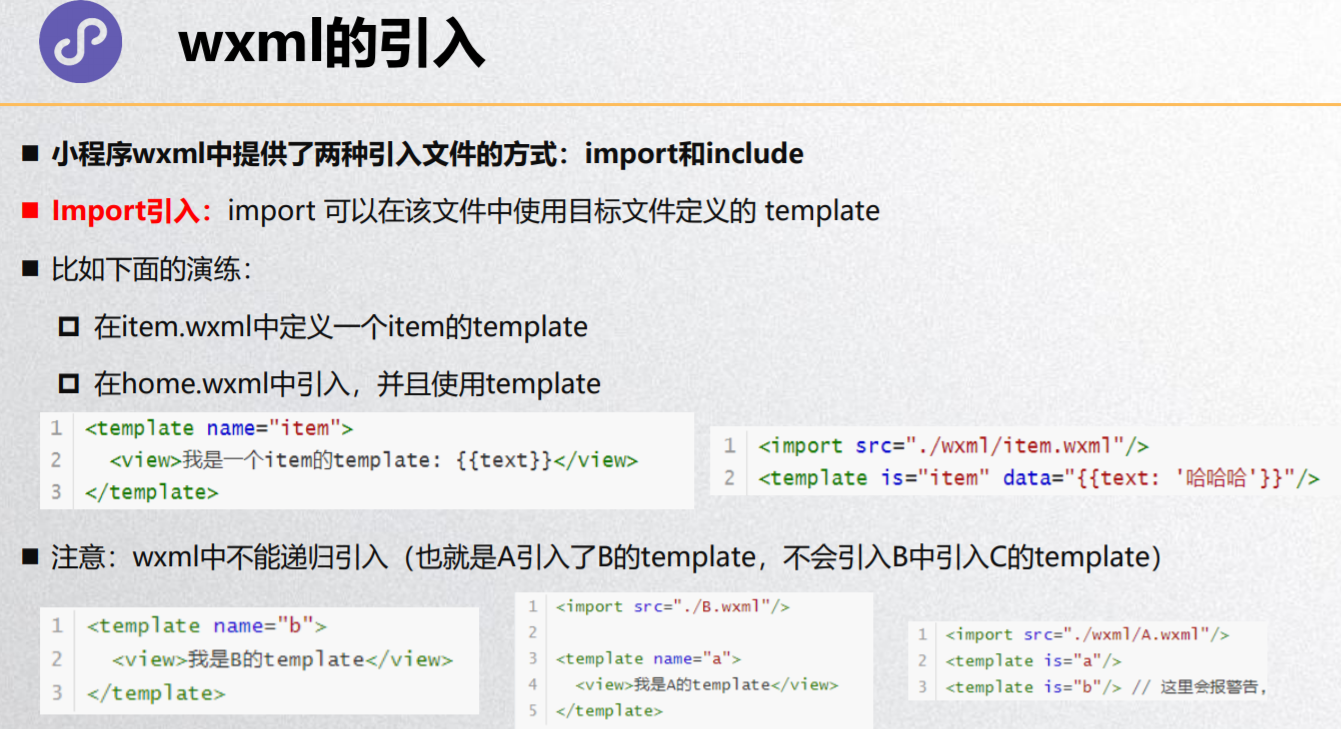
wxml的引入
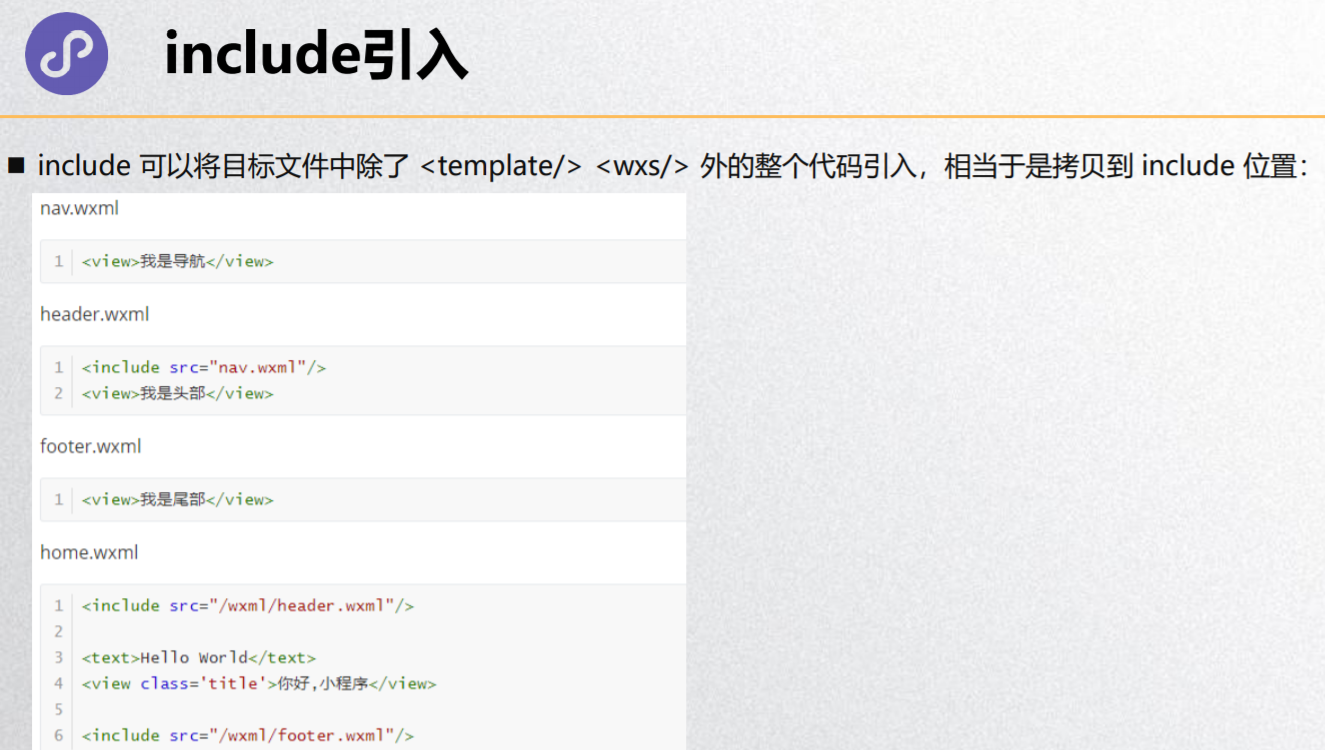
include引入
<!--pages/wxml/wxml.wxml-->
<!-- 1.wxml的格式 -->
<!-- <view></view>
<image/>
<input/> -->
<!-- <view Class="" class=""></view> -->
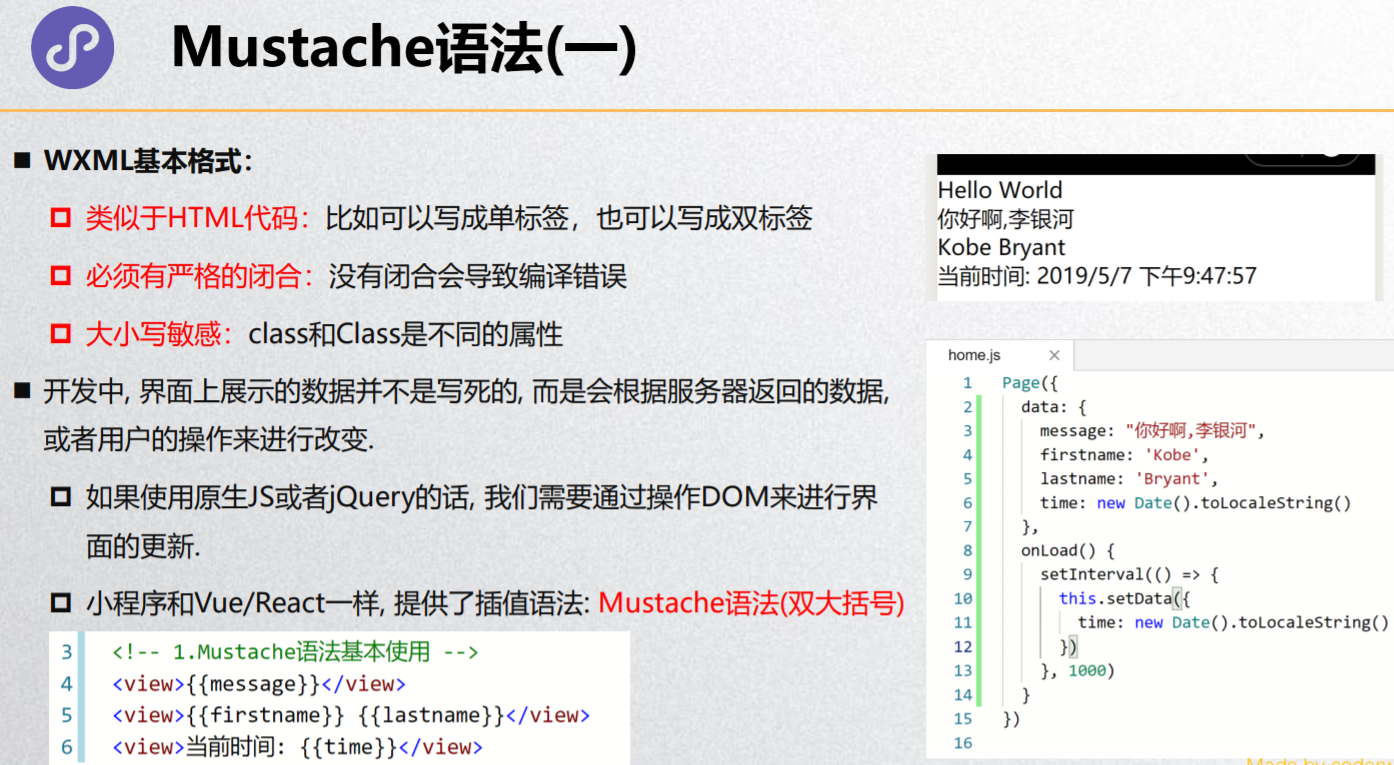
<!-- 2.Mustache -->
<view>{{message}}</view>
<view>{{firstname}} {{lastname}}</view>
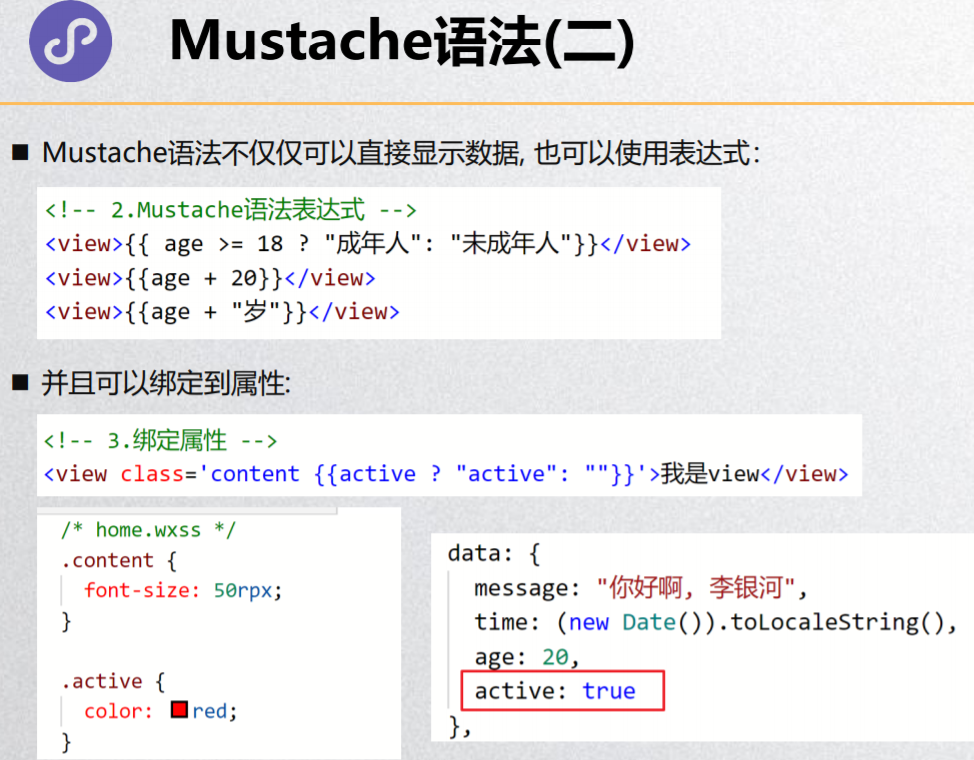
<view>{{firstname + ' ' + lastname}}</view>
<view>{{age >= 18 ? '成年人': '未成年人'}}</view>
<view>{{nowTime}}</view>
<button size='mini' bindtap='handleSwitchColor'>切换颜色</button>
<view class='box {{isActive ? "active": ""}}'>哈哈哈</view>
<!-- <map class='map' longitude='116.11' latitude='39.6'></map> -->
<view>--------- 条件判断 ----------</view>
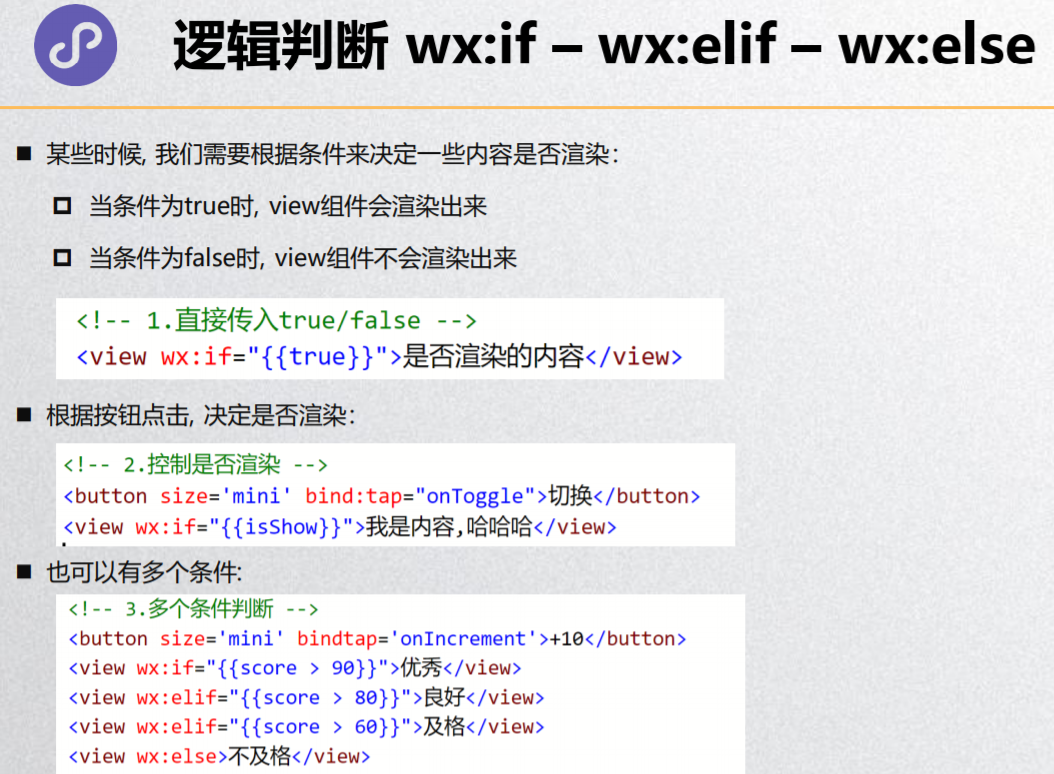
<!-- wx:if的使用 -->
<button size='mini' bindtap='handleSwitchShow'>切换显示</button>
<view wx:if="{{isShow}}">哈哈哈</view>
<!-- wx:elif/wx:else -->
<button size='mini' bindtap="handleIncrement">分数递增6</button>
<view wx:if="{{score >= 90}}">优秀</view>
<view wx:elif="{{score >= 80}}">良好</view>
<view wx:elif="{{score >= 60}}">及格</view>
<view wx:else>不及格</view>
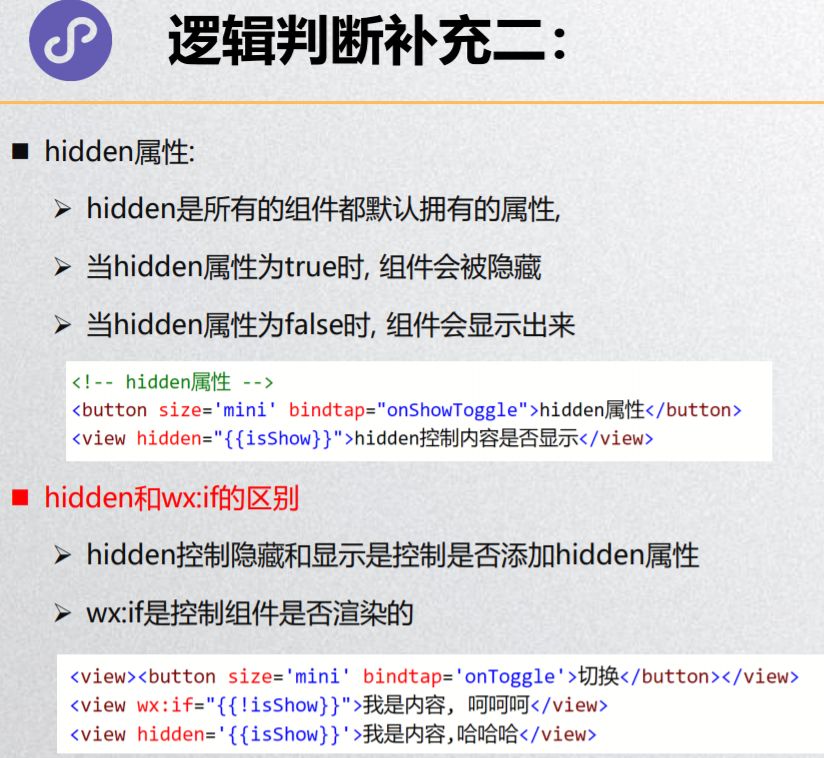
<!-- hidden属性 -->
<view hidden='{{false}}'>我是hidden属性控制的内容</view>
<!-- wx:if和hidden在隐藏组件时有什么区别 -->
<!--
区别:
hidden: 将一个组件隐藏起来时,该组件依然是存在(display: none)
wx:if: 将一个组件隐藏起来时, 该组件根本不存在(压根没有创建)
选择:
如果显示和隐藏切换的频繁非常高, 选择使用hidden
如果显示和隐藏切换的频繁非常低, 那么选择wx:if
-->
<view>------------------</view>
<view hidden='{{true}}'>我是通过hidden控制的内容</view>
<view wx:if="{{false}}">我是通过wx:if控制的内容</view>
<view>----------- 列表渲染 -----------</view>
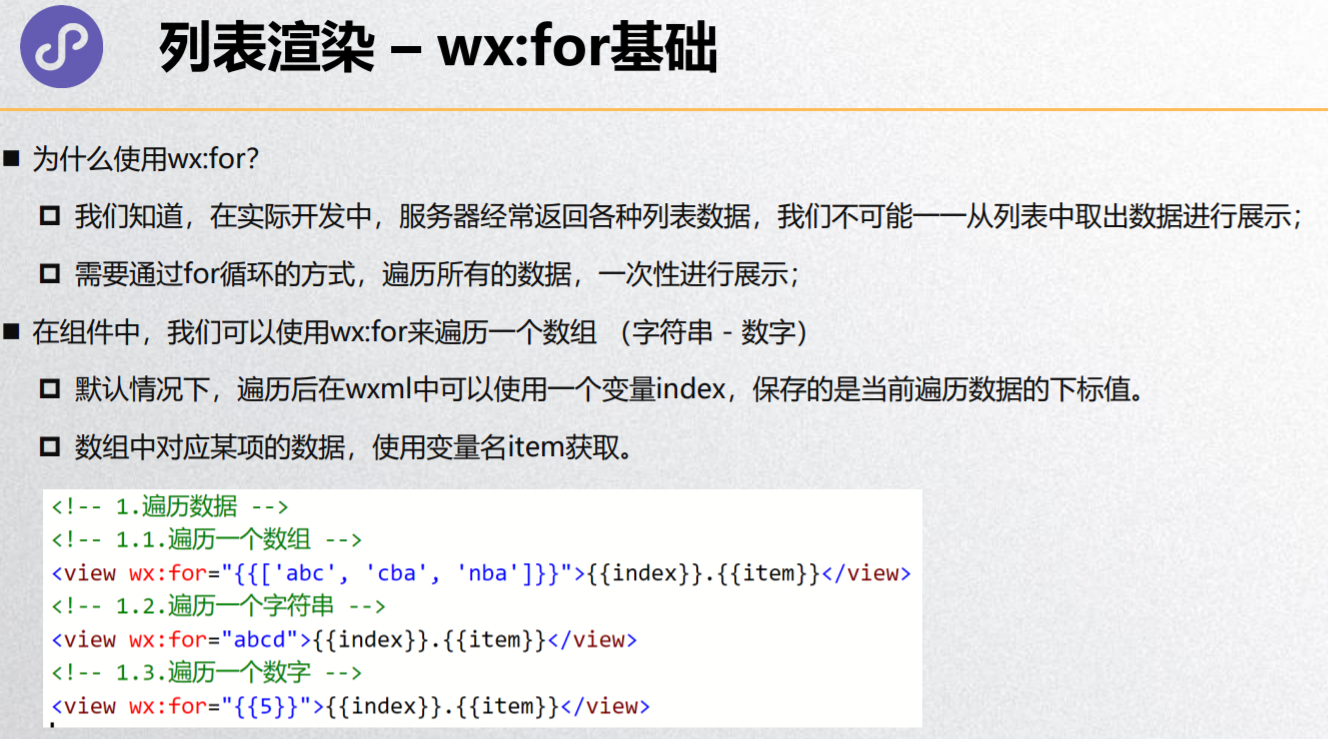
<!-- 1.wx:for的回顾 -->
<!-- 1.1.遍历数组/字符串/数字 -->
<!-- <view wx:for="{{['abc', 'cba', 'nba']}}">{{item}} {{index}}</view>
<view wx:for="coderwhy">{{item}} {{index}}</view>
<view wx:for="{{9}}">{{item}}</view> -->
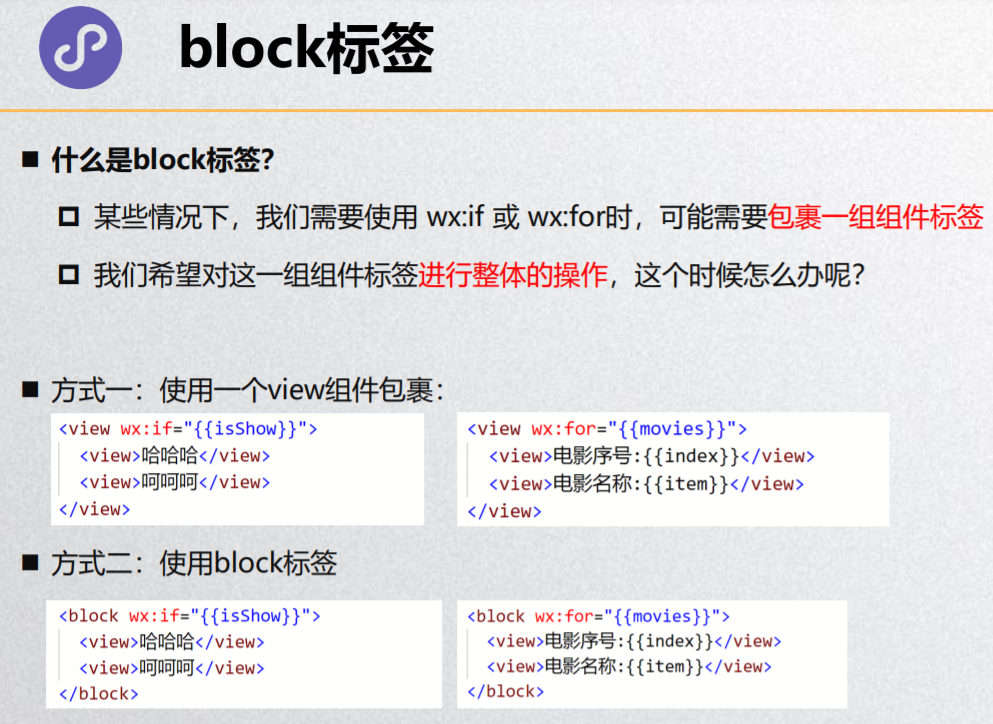
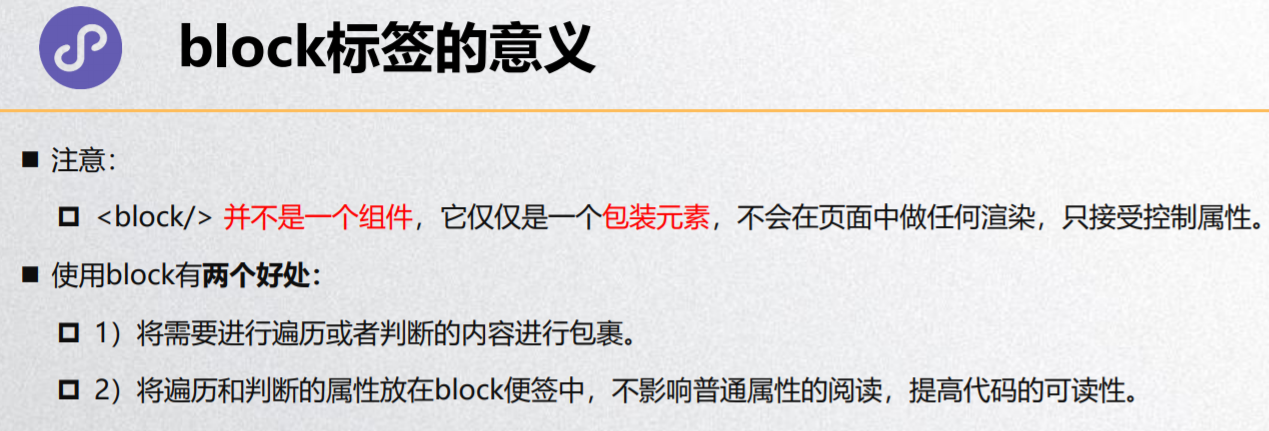
<!-- 2.block标签 -->
<!-- <block wx:if="{{isShow}}">
<button>按钮</button>
<view>呵呵呵</view>
<text>我是内容</text>
</block>
<block wx:for="{{3}}">
<button>按钮</button>
<view>呵呵呵</view>
<text>我是内容</text>
</block> -->
<!-- 3.item、index起名字 -->
<!-- 【变量需要用 {{}}包裹,别名是字符串,不需要用{{}}包裹】 -->
<view wx:for="{{movies}}" wx:for-item="movie" wx:for-index="i">{{movie}} {{i}}</view>
<block wx:for="{{nums}}" wx:for-item="inner_nums">
<block wx:for="{{inner_nums}}">
<view>{{item}}</view>
</block>
</block>
<!-- 4.key的作用 -->
<!-- 如果用index仅仅是消除警告 -->
<view class='container'>
<view wx:for="{{letters}}" wx:key="{{item}}">{{item}}</view>
</view>
<view>---------- template -------</view>
<!-- 现在用得不多,之前的时候小程序不支持自定义组件, 为了进行代码的复用: template -->
<!-- 模板中包裹的内容, 在没有被使用前,是不会进行任何的渲染的 -->
<!-- <template name="contentItem">
<button size='mini'>{{btnText}}</button>
<view>{{content}}</view>
</template> -->
<!-- 结论: include是不能导入模板 -->
<!--
关于wxml的导入有两种方式:
import导入:
1.主要是导入template
2.特点: 不能进行递归导入
include引入:
1.将公共的wxml中的组件抽取到一个文件中
2.特点: 不能导入template/wxs, 可以进行递归导入
-->
<!-- <include src="/wxml/template.wxml"/> -->
<import src="/wxml/template.wxml"/>
<import src="/wxml/abc.wxml"/>
<template is="contentItem" data="{{btnText: '按钮', content: '哈哈哈'}}"/>
<template is="contentItem" data="{{btnText: '警告', content: '呵呵呵'}}"/>
<template is="contentItem" data="{{btnText: '点击', content: '嘿嘿嘿'}}"/>
<template is="contentItem" data="{{btnText: '登录', content: '嘻嘻嘻'}}"/>
<template is="abc"/>
<!-- <import src="./abc.wxml"/> -->
<!-- <include src="./abc.wmxl"/> -->

<template name="contentItem">
  <button size='mini'>{{btnText}}</button>
  <view>{{content}}</view>
</template>
<view>
  <include src="./nav.wxml"/>
  <view>标题</view>
</view>
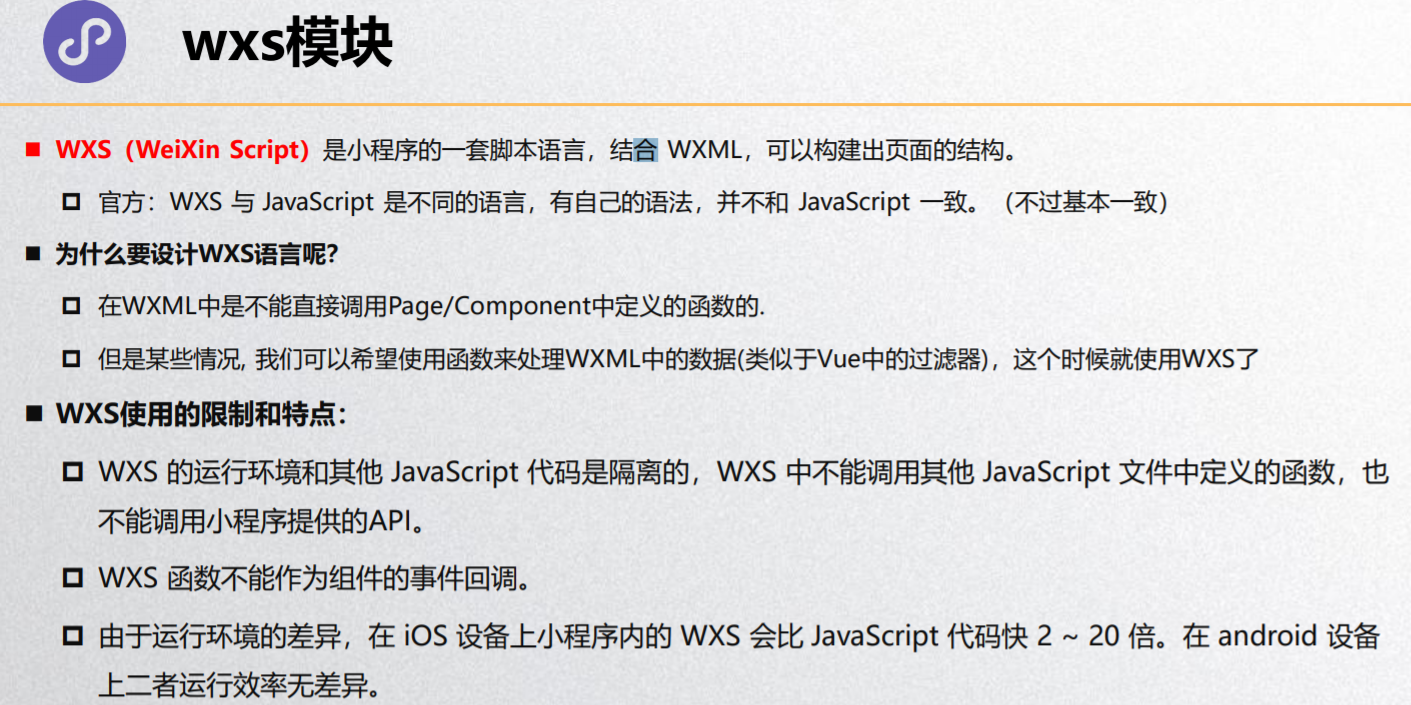
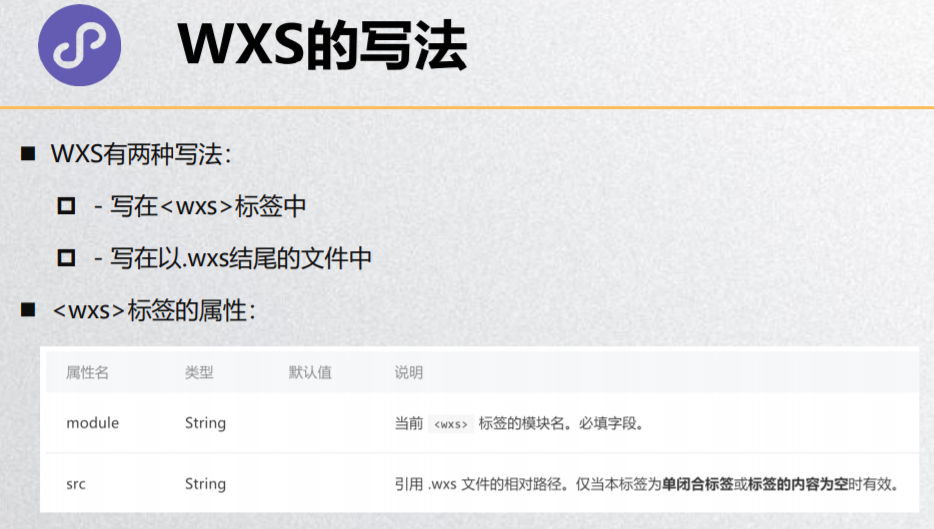
wxs模块
<!--pages/wxs/wxs.wxml-->
<!-- 1.错误的写法 -->
<!-- <view>{{25.6666666.toFixed(2)}}</view> -->
<!-- <view>{{25.6666666}}</view> -->
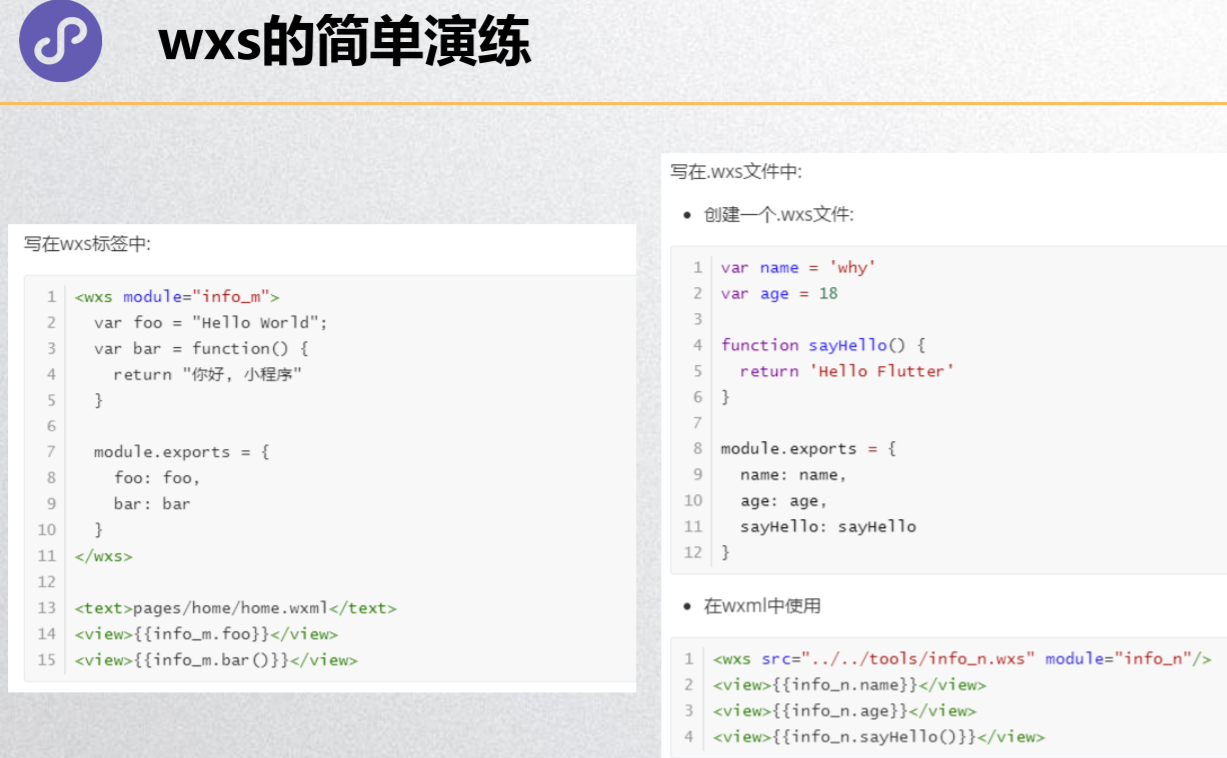
<!-- 2.wxs的定义方式 -->
<!-- 2.1.直接在wxml中定义 -->
<!-- <wxs module="info">
// JS代码
var message = "Hello World";
var name = "coderwhy";
function sum(num1, num2) {
return num1 + num2
}
function test() {
return "test function"
}
// commonjs的模块化导出的写法
module.exports = {
message: message,
name: name,
sum: sum,
test: test
}
</wxs> -->
<!-- 2.2.定义在单独的wxs文件中, 再使用<wxs>标签进行导入 -->
<!-- 不能使用绝对路径, 必须使用相对路径 -->
<wxs src="../../wxs/info.wxs" module="info"/>
<view>{{info.message}}</view>
<view>{{info.name}}</view>
<view>{{info.sum(20, 30)}}</view>
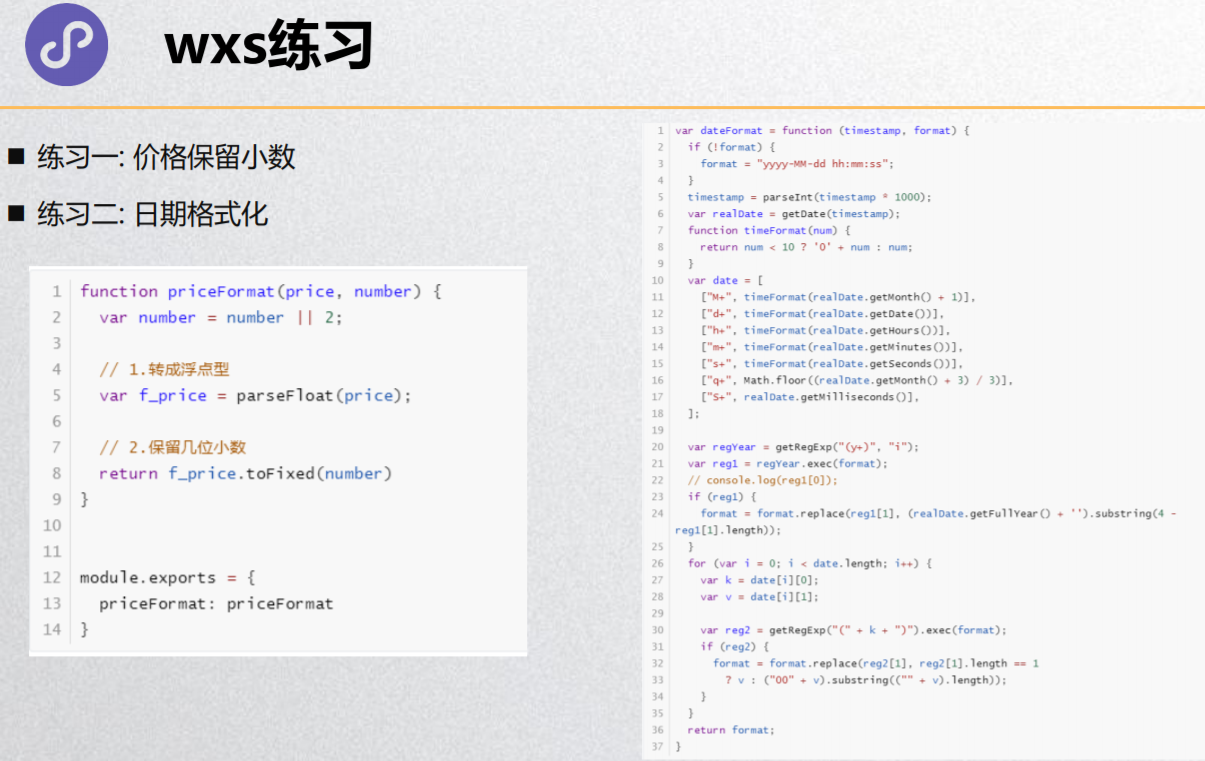
<!-- 3.wxs的应用 -->
<wxs src="../../wxs/format.wxs" module="format"/>
<view>{{format.priceFormat(price, 3)}}</view>
<view>{{format.dateFormat(time, 'yyyy/MM/dd')}}</view>
info.wxs
// 【wxs文件里不支持es6,不能用const】
// JS代码
var message = "Hello World";
var name = "coderwhy";

function sum(num1, num2) {
  return num1 + num2
}

function test() {
  return "test function"
}

// commonjs的模块化导出的写法
// 【必须是键值对的形式,不能简写,因为wxs文件里不支持es6。】
module.exports = {
  message: message,
  name: name,
  sum: sum,
  test: test
}
// 价格格式化
function priceFormat(price, number) {
  var number = number || 2;
  var f_price = parseFloat(price)

  return f_price.toFixed(number)
}

// 时间格式化
function dateFormat(timestamp, format) {
  if (!format) {
    format = "yyyy-MM-dd hh:mm:ss";
  }
  timestamp = parseInt(timestamp * 1000);
  var realDate = getDate(timestamp);
  function timeFormat(num) {
    return num < 10 ? '0' + num : num;
  }
  var date = [
    ["M+", timeFormat(realDate.getMonth() + 1)],
    ["d+", timeFormat(realDate.getDate())],
    ["h+", timeFormat(realDate.getHours())],
    ["m+", timeFormat(realDate.getMinutes())],
    ["s+", timeFormat(realDate.getSeconds())],
    ["q+", Math.floor((realDate.getMonth() + 3) / 3)],
    ["S+", realDate.getMilliseconds()],
  ];

  var regYear = getRegExp("(y+)", "i");
  var reg1 = regYear.exec(format);
  if (reg1) {
    format = format.replace(reg1[1], (realDate.getFullYear() + '').substring(4 - reg1[1].length));
  }
  for (var i = 0; i < date.length; i++) {
    var k = date[i][0];
    var v = date[i][1];

    var reg2 = getRegExp("(" + k + ")").exec(format);
    if (reg2) {
      format = format.replace(reg2[1], reg2[1].length == 1
        ? v : ("00" + v).substring(("" + v).length));
    }
  }
  return format;
}

module.exports = {
  priceFormat: priceFormat,
  dateFormat: dateFormat
}