切换组件案例

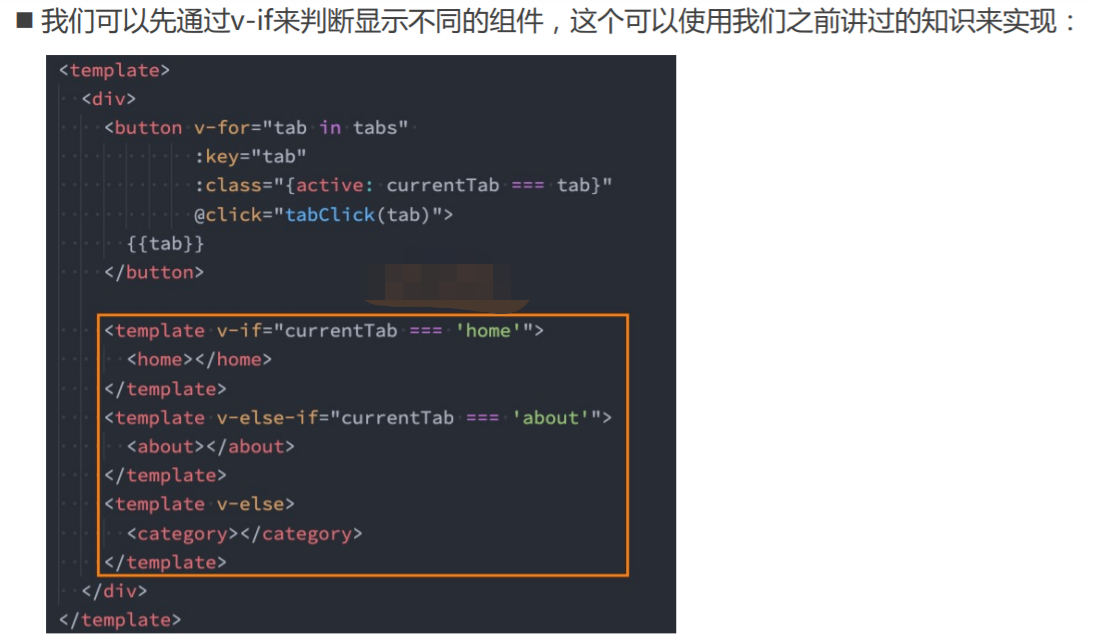
v-if显示不同的组件
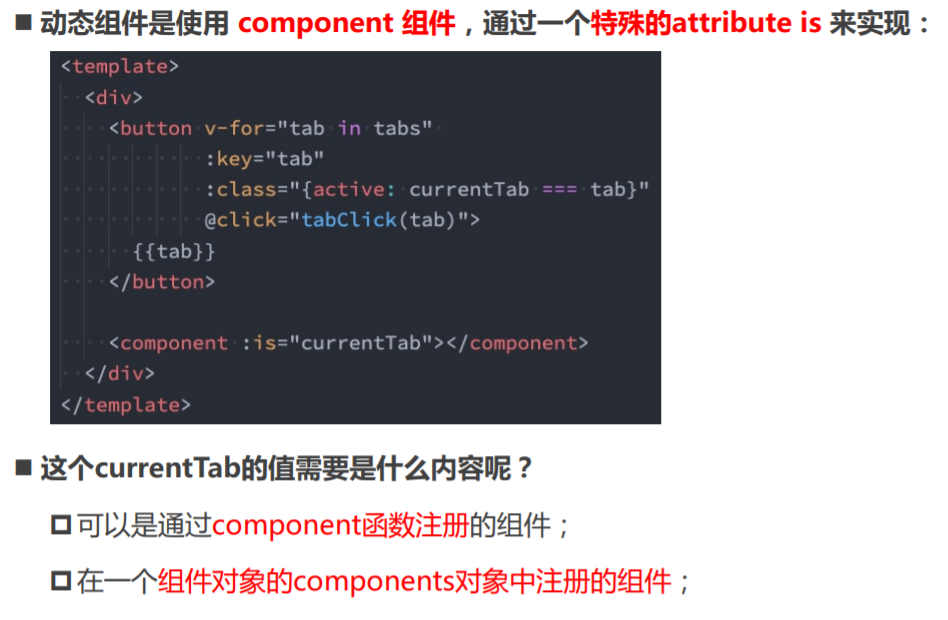
动态组件的实现
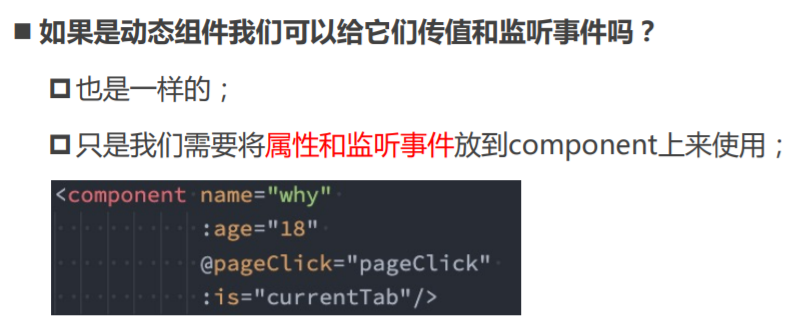
动态组件的传值
认识keep-alive
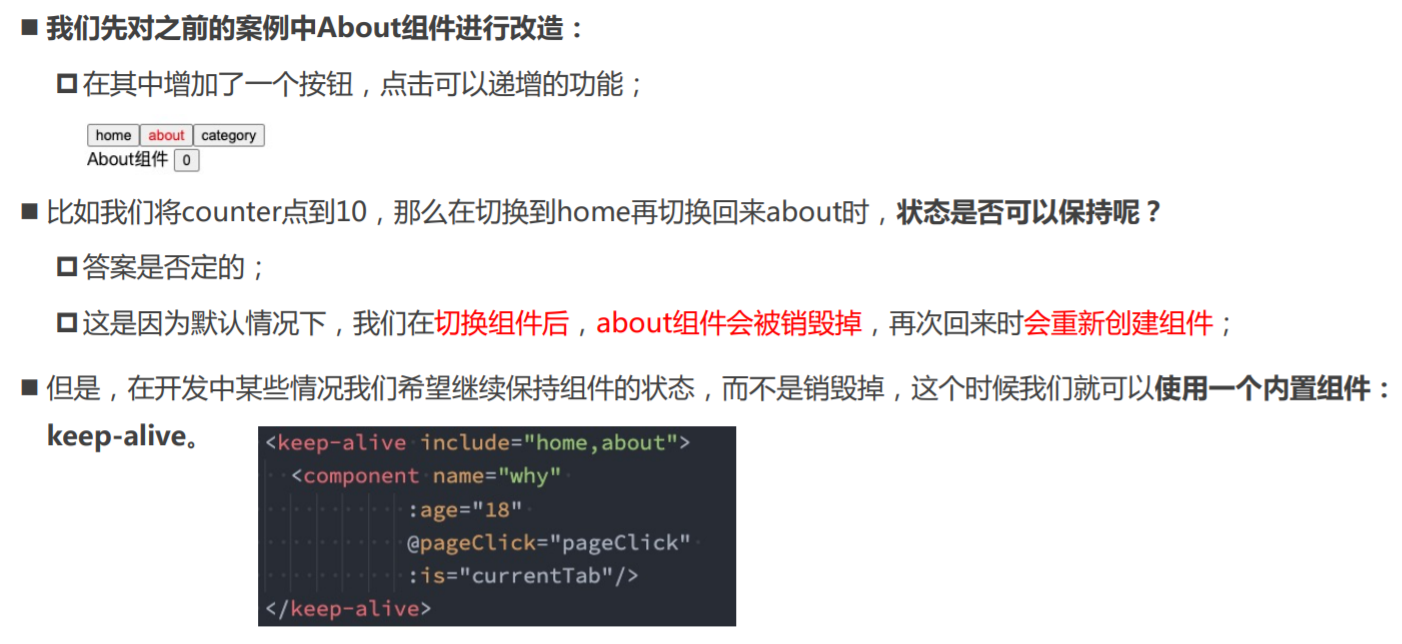
keep-alive属性

缓存组件的生命周期

App.vue
<template>
  <div>
    <button
      v-for="item in tabs"
      :key="item"
      @click="itemClick(item)"
      :class="{ active: currentTab === item }"
    >
      {{ item }}
    </button>

    <!-- 2.动态组件 -->
    <keep-alive include="home,about">
      <component
        :is="currentTab"
        name="coderwhy"
        :age="18"
        @pageClick="pageClick"
      >
      </component>
    </keep-alive>

    <!-- 1.v-if的判断实现 -->
    <!-- <template v-if="currentTab === 'home'">
      <home></home>
    </template>
    <template v-else-if="currentTab === 'about'">
      <about></about>
    </template>
    <template v-else>
      <category></category>
    </template> -->
  </div>
</template>

<script>
  import Home from "./pages/Home.vue";
  import About from "./pages/About.vue";
  import Category from "./pages/Category.vue";

  export default {
    components: {
      Home,
      About,
      Category,
    },
    data() {
      return {
        tabs: ["home", "about", "category"],
        currentTab: "home",
      };
    },
    methods: {
      itemClick(item) {
        this.currentTab = item;
      },
      pageClick() {
        console.log("page内部发生了点击");
      },
    },
  };
</script>

<style scoped>
  .active {
    color: red;
  }
</style>
Home.vue
<template>
  <div @click="divClick">
    Home组件: {{name}} - {{age}}
  </div>
</template>

<script>
  export default {
    name: "home",  // home是字符串
    props: {
      name: {
        type: String,
        default: ""
      },
      age: {
        type: Number,
        default: 0
      }
    },
    emits: ["pageClick"],
    methods: {
      divClick() {
        this.$emit("pageClick");
      }
    }
  }
</script>

<style scoped></style>
About.vue
<template>
  <div>
    <div>About组件</div>
    <button @click="counter++">{{ counter }}</button>
  </div>
</template>

<script>
  export default {
    name: "about",
    data() {
      return {
        counter: 0,
      };
    },
    created() {
      console.log("about created");
    },
    unmounted() {
      console.log("about unmounted");
    },
    activated() {
      console.log("about activated");
    },
    deactivated() {
      console.log("about deactivated");
    },
  };
</script>

<style scoped></style>
Category.vue
<template>
  <div>
    <div>Category组件</div>
    <button @click="counter++">{{ counter }}</button>
  </div>
</template>

<script>
  export default {
    name: "category",
    data() {
      return {
        counter: 0,
      };
    },
  };
</script>

<style scoped></style>
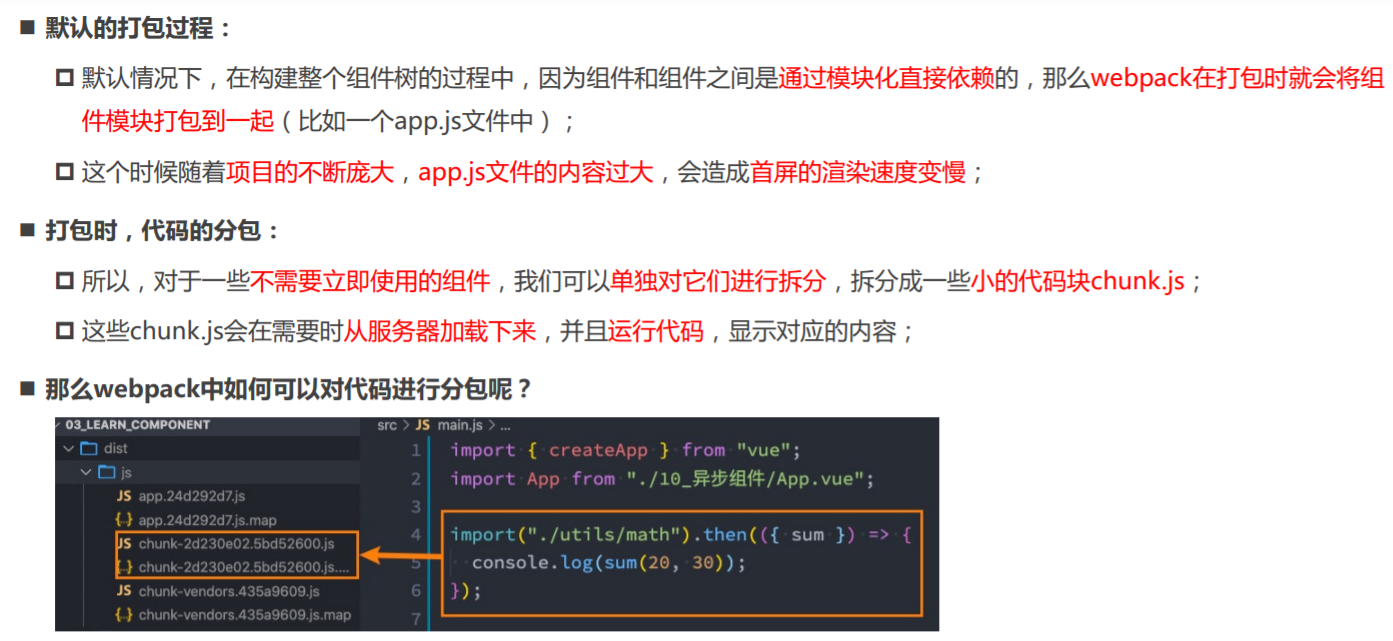
Webpack的代码分包
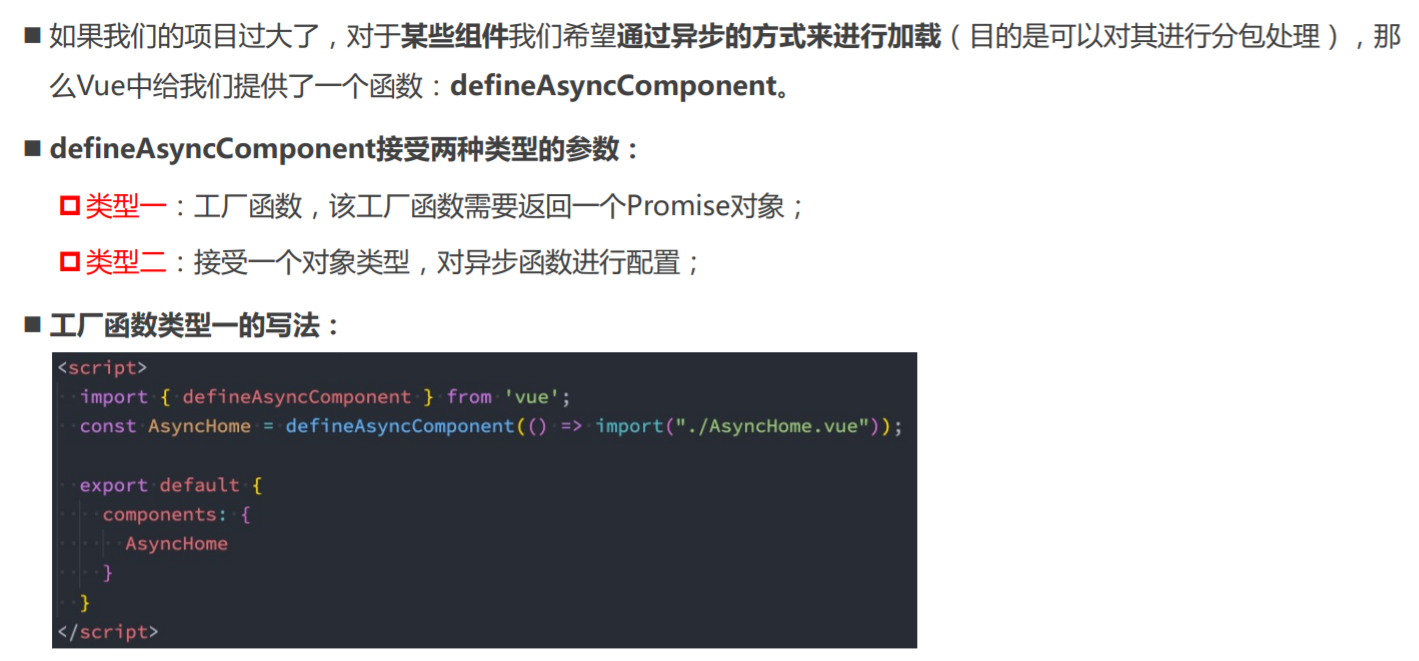
Vue中实现异步组件
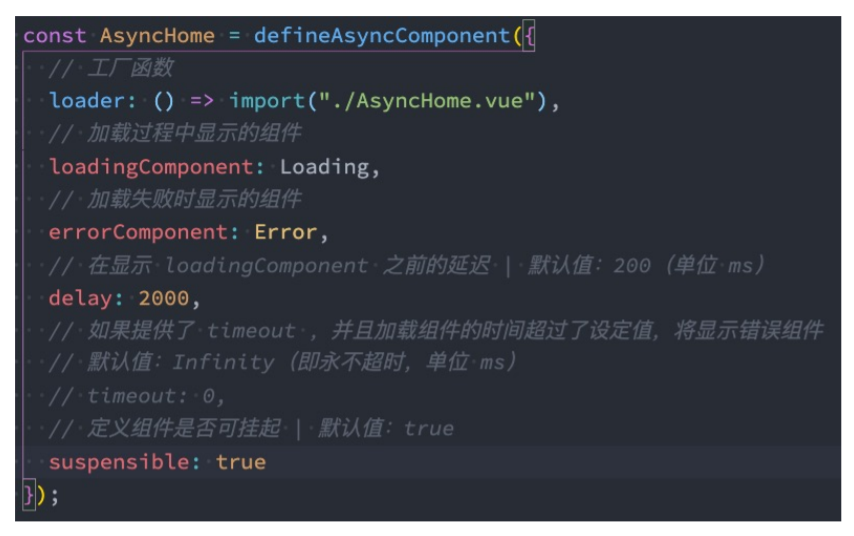
异步组件的写法二
异步组件和Suspense

App.vue
<template>
  <div>
    App组件
    <home></home>

    <suspense>
      <template #default>
        <async-category></async-category>
      </template>
      <template #fallback>
        <loading></loading>
      </template>
    </suspense>
  </div>
</template>

<script>
  import { defineAsyncComponent } from "vue";

  import Home from "./Home.vue";
  import Loading from "./Loading.vue";

  // import AsyncCategory from './AsyncCategory.vue';
  const AsyncCategory = defineAsyncComponent(() =>
    import("./AsyncCategory.vue")
  );

  const AsyncCategory = defineAsyncComponent({
    loader: () => import("./AsyncCategory.vue"),
    loadingComponent: Loading,
    // errorComponent,
    // 在显示loadingComponent组件之前, 等待多长时间
    delay: 2000,
    /**
     * err: 错误信息,
     * retry: 函数, 调用retry尝试重新加载
     * attempts: 记录尝试的次数
     */
    onError: function(err, retry, attempts) {},
  });

  export default {
    components: {
      Home,
      AsyncCategory,
      Loading,
    },
  };
</script>

<style scoped></style>
Home.vue
<template>
  <div>
    Home组件
  </div>
</template>

<script>
  export default {};
</script>

<style scoped></style>
Loading.vue
<template>
  <div>
    Loading
  </div>
</template>

<script>
  export default {};
</script>

<style scoped></style>
AsyncCategory.vue
<template>
  <div>
    <h2>{{ message }}</h2>
  </div>
</template>

<script>
  export default {
    data() {
      return {
        message: "Hello Category",
      };
    },
  };
</script>

<style scoped></style>
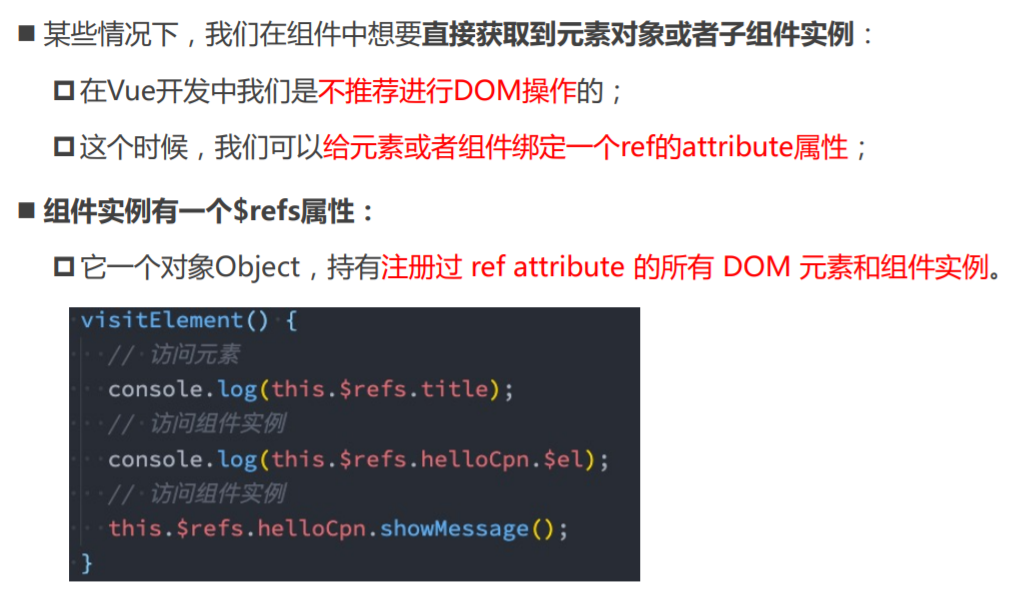
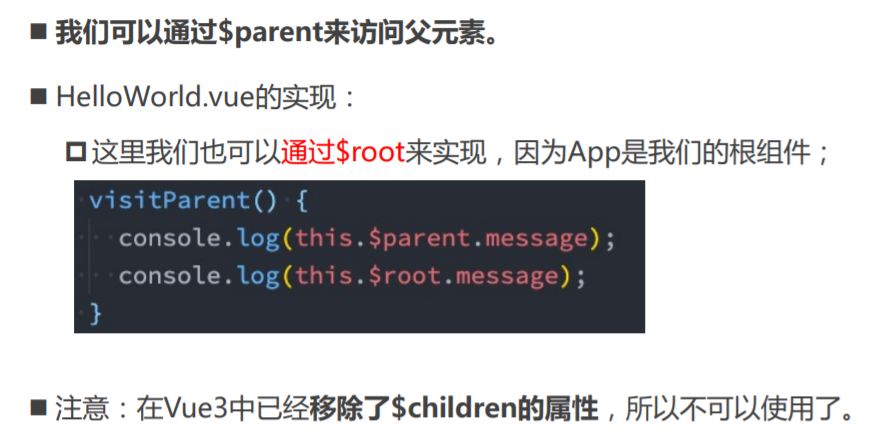
$refs的使用
$parent和$root
App.vue
<template>
  <div>
    <!-- 绑定到一个元素上 -->
    <h2 ref="title">哈哈哈</h2>

    <!-- 绑定到一个组件实例上 -->
    <nav-bar ref="navBar"></nav-bar>

    <button @click="btnClick">获取元素</button>
  </div>
</template>

<script>
  import NavBar from "./NavBar.vue";

  export default {
    components: {
      NavBar,
    },
    data() {
      return {
        names: ["abc", "cba"],
      };
    },
    methods: {
      btnClick() {
        console.log(this.$refs.title);

        console.log(this.$refs.navBar.message);
        this.$refs.navBar.sayHello();

        // $el
        console.log(this.$refs.navBar.$el);
      },
    },
  };
</script>

<style scoped></style>
NavBar.vue
<template>
  <div>
    <h2>NavBar</h2>
    <button @click="getParentAndRoot">获取父组件和根组件</button>
  </div>
</template>

<script>
  export default {
    data() {
      return {
        message: "我是NavBar中的message",
      };
    },
    methods: {
      sayHello() {
        console.log("Hello NavBar");
      },
      getParentAndRoot() {
        console.log(this.$parent);
        console.log(this.$root);
      },
    },
  };
</script>

<style scoped></style>
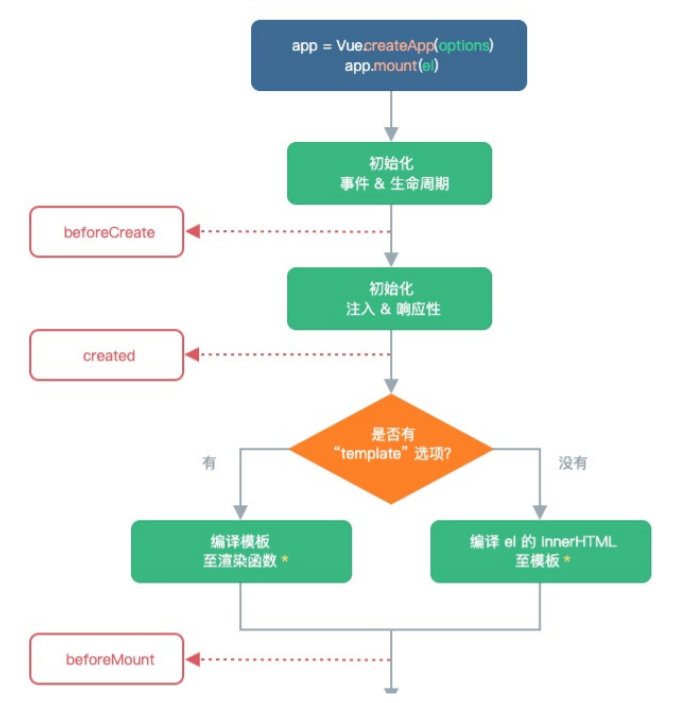
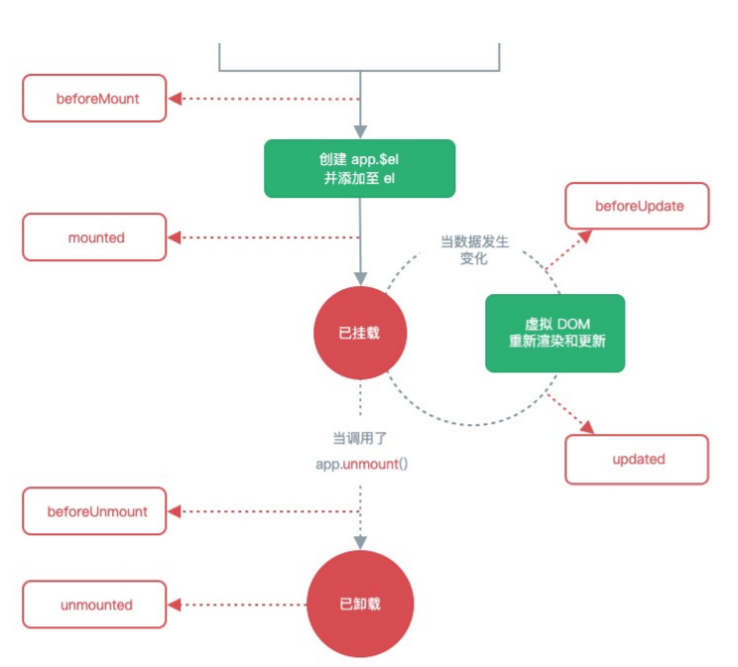
认识生命周期
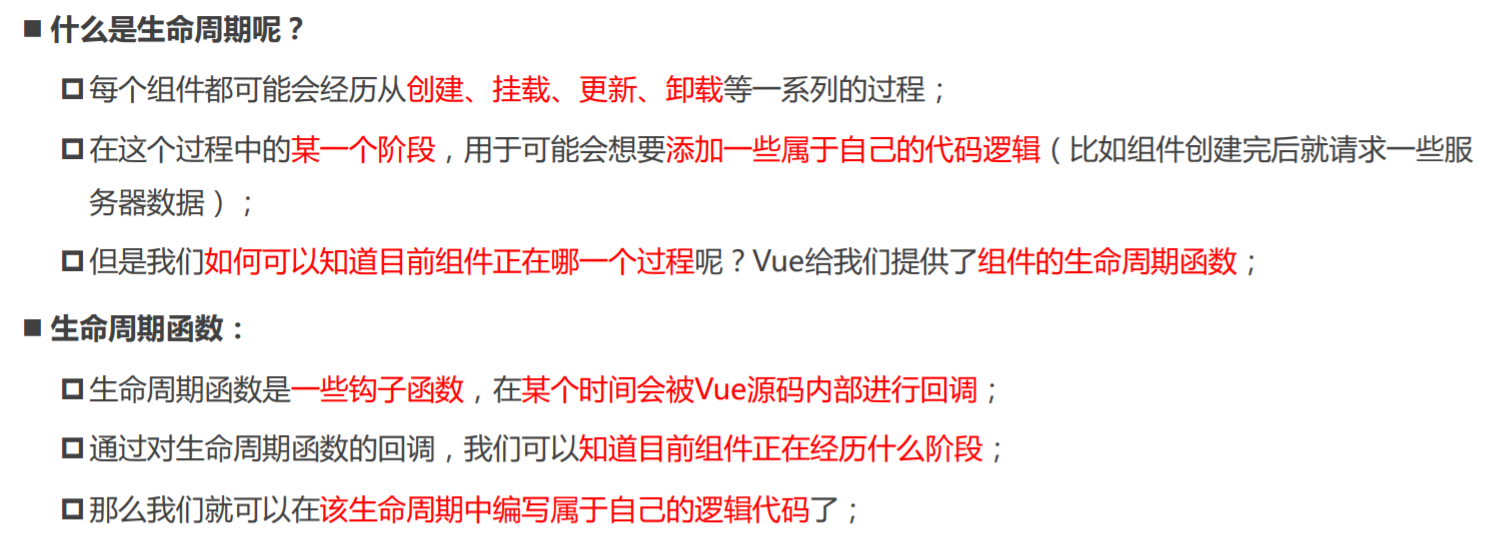
生命周期的流程
App.vue
<template>
  <div>
    <button @click="isShow = !isShow">切换</button>
    <template v-if="isShow">
      <home></home>
    </template>
  </div>
</template>

<script>
  import Home from "./Home.vue";

  export default {
    components: {
      Home,
    },
    data() {
      return {
        isShow: true,
      };
    },
  };
</script>

<style scoped></style>
Home.vue
<template>
  <div>
    <h2 ref="title">{{ message }}</h2>
    <button @click="changeMessage">修改message</button>
  </div>
</template>

<script>
  export default {
    data() {
      return {
        message: "Hello Home",
      };
    },
    methods: {
      changeMessage() {
        this.message = "你好啊, 哈哈";
      },
    },
    beforeCreate() {
      console.log("home beforeCreate");
    },
    created() {
      console.log("home created");
    },
    beforeMount() {
      console.log("home beforeMount");
    },
    mounted() {
      console.log("home mounted");
    },
    beforeUnmount() {
      console.log("home beforeUnmount");
    },
    unmounted() {
      console.log("home unmounted");
    },
    beforeUpdate() {
      console.log(this.$refs.title.innerHTML);
      console.log("home beforeUpdate");
    },
    updated() {
      console.log(this.$refs.title.innerHTML);
      console.log("home updated");
    },
  };
</script>

<style scoped></style>
组件的v-model
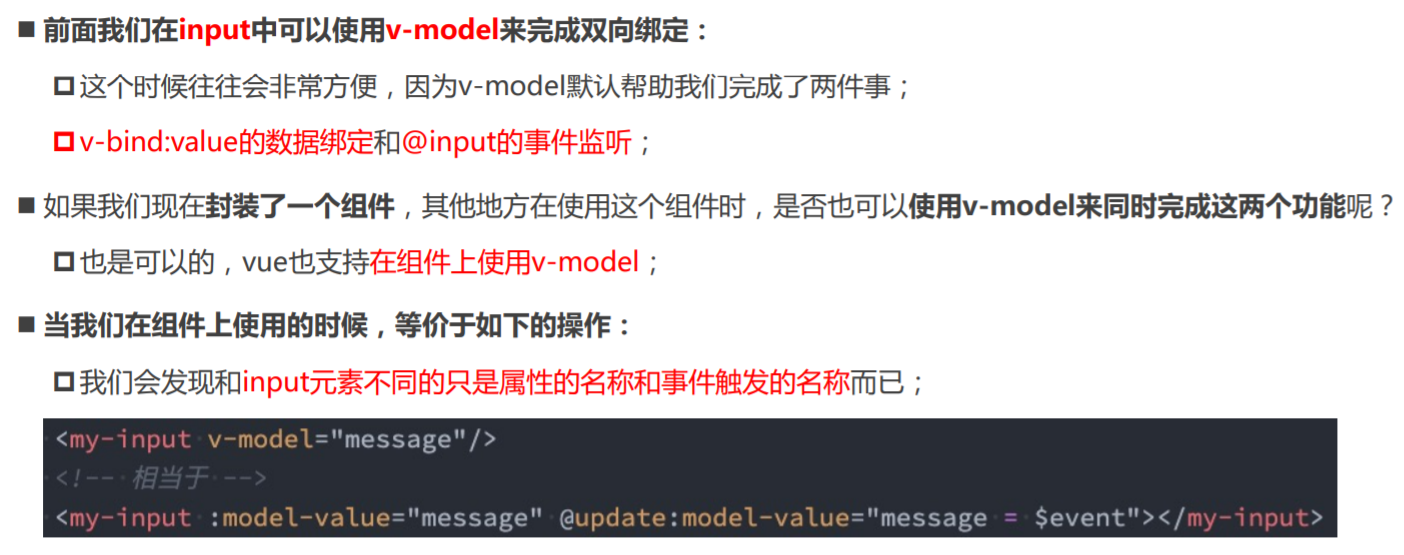
组件v-model的实现

computed实现

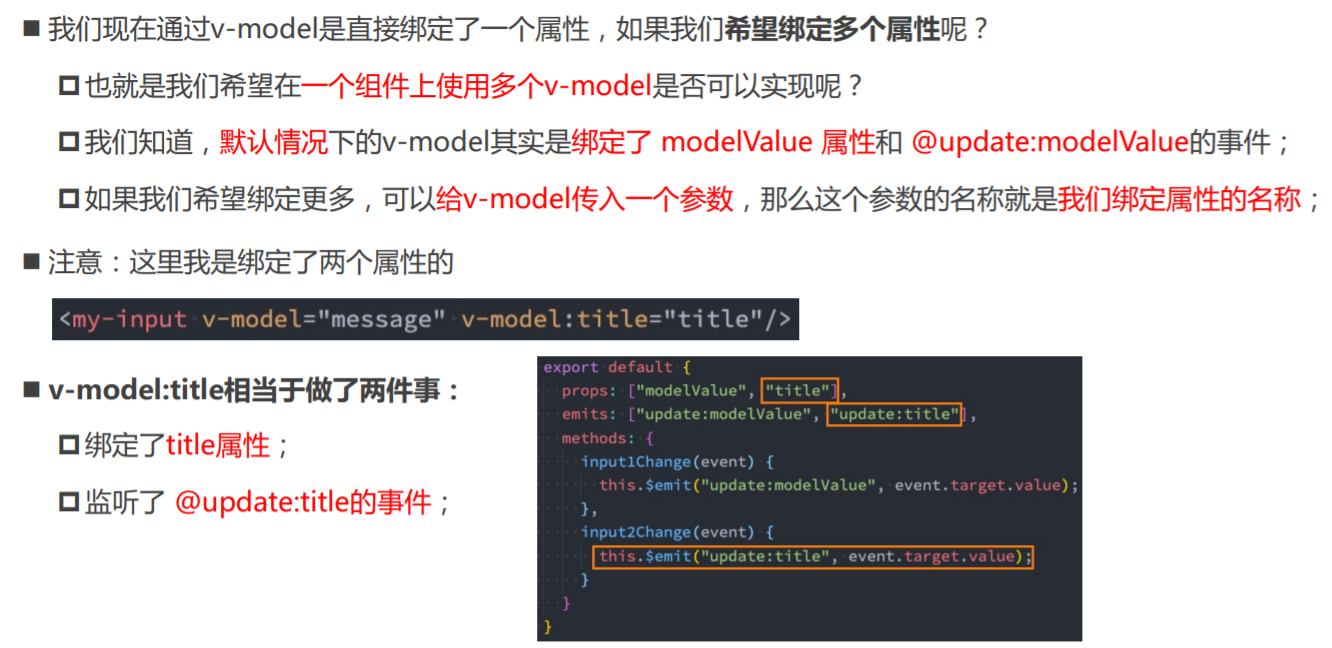
绑定多个属性
App.vue
<template>
  <div>
    <!-- 元素上使用v-model -->
    <!-- <input v-model="message">
    <input :value="message" @input="message = $event.target.value"> -->

    <!-- 组件上使用v-model 【封装高阶的表单组件的时候使用。】 -->
    <!-- <hy-input v-model="message"></hy-input> -->

    <!-- (1)上面这行代码相当于做了2件事:绑定属性modelValue,绑定事件@update:model-value,通过这个事件实现双向绑定,给message赋值。(2)既然这里绑定了属性modelValue、事件update:model-value,那么子组件中就要绑定modelValue,并触发这个事件。(3)这是组件,不是原生的html元素,所以不用$event.target.value,用event,即组件HyInput传过来的是什么值就是什么值。 -->
    <!-- <hy-input :modelValue="message" @update:model-value="message = $event"></hy-input> -->

    <!-- 绑定两个v-model -->
    <!-- 【v-model:参数:v-model可以传参】 -->
    <hy-input v-model="message" v-model:title="title"></hy-input>

    <h2>{{ message }}</h2>
    <h2>{{ title }}</h2>
  </div>
</template>

<script>
  import HyInput from './HyInput.vue'

  export default {
    components: {
      HyInput,
    },
    data() {
      return {
        message: 'Hello World',
        title: '哈哈哈',
      }
    },
  }
</script>

<style scoped></style>
<template>
  <div>
    <h3>我是HyInput2组件</h3>

    <!-- 1.默认绑定和事件处理 【非input元素。】 -->
    <!-- <button @click="btnClick">hyinput按钮</button>
    <div>HyInput的message: {{modelValue}}</div> -->

    <!-- 2.通过input 【不使用input的v-model,而是直接使用:value、 @input】 -->
    <!-- <input :value="modelValue" @input="btnClick"> -->

    <!-- 3.绑定到props中是不对的。开发中,不要随便更改props的值。这里改变props的值,跟外界木有关系。 -->
    <!-- <input v-model="modelValue"> -->

    <!-- 4. 【(1)更好的封装方式:既然是input,直接使用input的v-model,而不是:value、 @input。(2)使用computed,value是自定义的computed。(3)如果是input元素,直接使用computed。】-->
    <input v-model="value" />
  </div>
</template>

<script>
  export default {
    emits: ['update:modelValue'], // 这里写成小驼峰,使用的时候,用横线
    // 开发中,不要随便更改props的值
    props: {
      modelValue: String, // 【在这里定义modelValue】
    },
    computed: {
      value: {
        set(value) {
          this.$emit('update:modelValue', value)
          // this.modelValue = value // 这样写报错
        },
        get() {
          return this.modelValue
        },
      },
    },
    methods: {
      btnClick(event) {
        this.$emit('update:modelValue', event.target.value)
      },
    },
  }
</script>

<style scoped></style>
<template>
  <div>
    <input v-model="value" />
    <input v-model="why" />
  </div>
</template>

<script>
  export default {
    props: {
      modelValue: String, // 【在这里定义modelValue】
      title: String,
    },
    emits: ['update:modelValue', 'update:title'],
    computed: {
      value: {
        set(value) {
          this.$emit('update:modelValue', value)
        },
        get() {
          return this.modelValue
        },
      },
      why: {
        set(why) {
          this.$emit('update:title', why)
        },
        get() {
          return this.title
        },
      },
    },
  }
</script>

<style scoped></style>