注意,本文涉及的Vue源码版本为2.6.11。
读完本文你将知道
- Vue的生命周期是什么?
- Vue中的钩子函数
- Ajax请求放在哪个钩子函数中?
- beforeDestroy何时使用?
Vue的生命周期是什么?
每个new出来的Vue实例都会有从实例化创建、初始化数据、编译模板、挂载DOM、数据更新、页面渲染、卸载销毁等一系列完整的、从“生”到“死”的过程,这个过程即被称之为生命周期。
在生命周期的每个节点,Vue提供了一些钩子函数,使得开发者的代码能被有机会执行。这里的钩子函数可以简单理解为,在Vue实例中预先定义了一些像created,mounted等特定名称的函数,函数体的内容开发给开发者填充,当被实例化的时候,会按照确定的先后顺序来执行这些钩子函数,从而将开发者的代码有机会执行。
对于如何在Vue内部调用开发者的代码原理,可以看看下面这个例子。
// 比如这是Vue的源码
function Vue(options) {
  console.log('初始化');
  // 开始执行一些代码
  console.log('开始创建');
  options.created();
  // 开始执行一些代码
  console.log('创建完成');
  options.mounted();
  console.log('其他操作');
}
// 实例化Vue构造函数
new Vue({
  // 挂载两个方法
  created () {
    console.log('我是开发者的代码, 我需要在创建完成前执行')
  },
  mounted () {
    console.log('我是开发者的代码, 我需要在创建完成后执行')
  },
})
/**
初始化
开始创建
我是开发者的代码, 我需要在创建完成前执行
创建完成
我是开发者的代码, 我需要在创建完成后执行
其他操作
*/
Vue中的钩子函数
接下来我们从两个层面看看Vue中的钩子函数执行。第一,从开发者的代码层面看看,与开发者较为密切的数据模型与页面DOM结构在各个生命周期钩子函数执行时的变化。第二,在源码层面看一下这些生命周期钩子函数它们各自的执行过程。
下面是源码里所列出来的所有可承载开发者代码的钩子函数。
var LIFECYCLE_HOOKS = [
  'beforeCreate',
  'created',
  'beforeMount',
  'mounted',
  'beforeUpdate',
  'updated',
  'beforeDestroy',
  'destroyed',
  'activated',
  'deactivated',
  'errorCaptured',
  'serverPrefetch'
];
beforeCreate与created

可以看到beforeCreate在执行的时候,data还没有被初始化,DOM也没有初始化,所以不能在这里发起异步请求并且不能给数据模型的属性赋值。
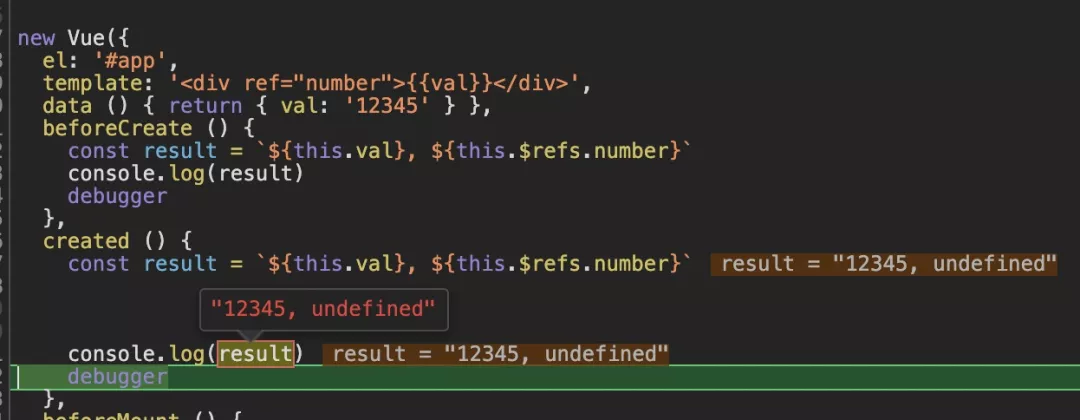
与beforeCreate不同的是,created被执行的时候数据模型下的val已经完成了初始化工作,但是页面DOM依旧不能获取到。说明在created里,我们可以发起异步请求进行数据模型的赋值操作,但是不能做页面DOM的操作。
beforeCreate与created执行源码解析
// Vue入口
function Vue (options) {
  if (!(this instanceof Vue)
  ) {
    warn('Vue is a constructor and should be called with the `new` keyword');
  }
  // 调用_init方法
  this._init(options);
}
// _init实现
Vue.prototype._init = function (options) {
  var vm = this;
  ...
  initLifecycle(vm);   //初始化生命周期
  initEvents(vm);  //初始化事件监听
  initRender(vm);  //初始定义渲染选项,并且对一些属性进行监听。
  //执行开发者的beforeCreate内的代码
  callHook(vm, 'beforeCreate');
  initInjections(vm); // resolve injections before data/props
  initState(vm);  // 初始化数据模型
  initProvide(vm); // resolve provide after data/props
   //执行开发者的created内的代码
  callHook(vm, 'created');
  if (vm.$options.el) {
    vm.$mount(vm.$options.el);
  }
};
// Vue中调用钩子函数的封装函数
function callHook (vm, hook) {
  ...
  // 开发者写好的某hook函数
  var handlers = vm.$options[hook];
  ...
  if (handlers) {
    for (var i = 0, j = handlers.length; i < j; i++) {
      ...
      // 封装好的调用开发者方法
      invokeWithErrorHandling(handlers[i], vm, null, vm, info);
      ...
    }
  }
  ...
}

// 执行hook函数
function invokeWithErrorHandling (handler,context,args,vm,info) {
  var res;
  try {
    // 调用执行
    res = args ? handler.apply(context, args) : handler.call(context);
    ...
  } catch (e) {
    handleError(e, vm, info);
  }
}
beforeMount与Mounted

可以从下面的源码里看到,beforeMount与created之间只有一个是否是浏览器的判断,所以这时候在钩子函数中的里数据模型里、页面的状态,与created是一样的。
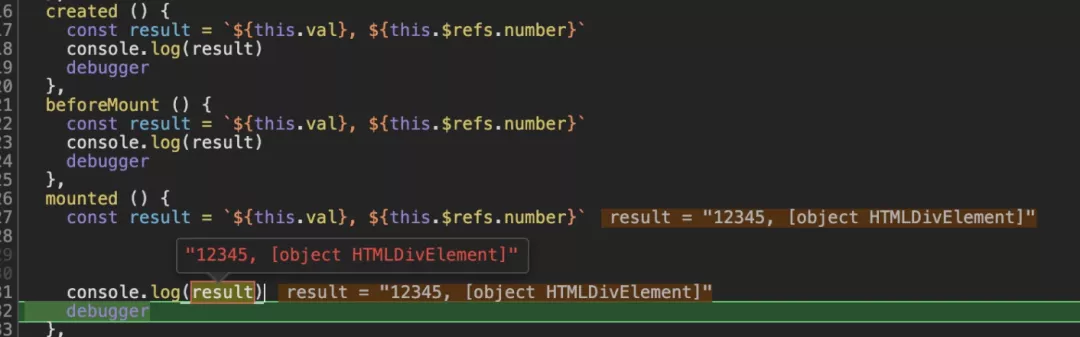
mounted被执行到的时候,数据模型和页面的DOM都初始化完成,在这里我们可以给数据模型赋值也可以进行DOM操作了。
beforeMount与Mounted源码解析
// _init实现
Vue.prototype._init = function (options) {
  var vm = this;
  ...
  if (vm.$options.el) {
    // 挂载执行
    vm.$mount(vm.$options.el);
  }
};
// 开始挂载组件信息
Vue.prototype.$mount = function (el, hydrating) {
  el = el && inBrowser ? query(el) : undefined;  // 浏览器判断
  return mountComponent(this, el, hydrating)
};
function mountComponent (vm, el, hydrating) {
  vm.$el = el;  //this.$el开始挂载到实例中
  ...
  callHook(vm, 'beforeMount');  // 执行开发者的beforeMount内的代码
  ...
  updateComponent = function () {  // 定义全局更新函数updateComponent
    vm._update(vm._render(), hydrating);
  };
  ...
  // 启动Watcher,绑定vm._watcher属性
  new Watcher(vm, updateComponent, noop, {
    before: function before () {
      if (vm._isMounted && !vm._isDestroyed) {
        // 执行开发者的beforeUpdate内的代码
        callHook(vm, 'beforeUpdate');
      }
    },
  }, true /* isRenderWatcher */);
  if (vm.$vnode == null) {
    vm._isMounted = true;
    // 执行开发者的mounted内的代码
    callHook(vm, 'mounted');
  }
  return vm
}
// Watch构造函数
var Watcher = function Watcher (vm, expOrFn, cb, options, isRenderWatcher) {
  this.vm = vm;
  ...
  // 将上面的updateComponent进行复制给this.getter 属性
  if (typeof expOrFn === 'function') {
    this.getter = expOrFn;
  } else {
    this.getter = parsePath(expOrFn);
    if (!this.getter) {
      this.getter = noop;
      ...
    }
  }
  ...
  // 调用get方法
  this.get()
};
// watcher的get方法运行getter方法
Watcher.prototype.get = function get () {
  ...
  var vm = this.vm;
  try {
    // 实际执行了Vue的构造函数里的_init方法定义的updateComponent函数
    // vm._update(vm._render(), hydrating);
    value = this.getter.call(vm, vm);
  } catch (e) {
  ...
  return value
};

Vue.prototype._update = function (vnode, hydrating) {
  var vm = this;
  ...
  // 渲染页面,更新节点
  if (!prevVnode) {
    vm.$el = vm.__patch__(vm.$el, vnode, hydrating, false /* removeOnly */);
  } else {
    // updates
    vm.$el = vm.__patch__(prevVnode, vnode);
  }
  ...
};
beforeUpdate与Update

这里要注意下,beforeUpdate里的代码并不像前面四个钩子函数会把自动执行,而是通过操作数据模型里的值来触发执行的,图上的例子中,由于mounted的this.val='56789'执行,造成了beforeUpdate的执行,而且在beforeUpdate执行的时候,数据模型里的值已经是操作后的最新值。
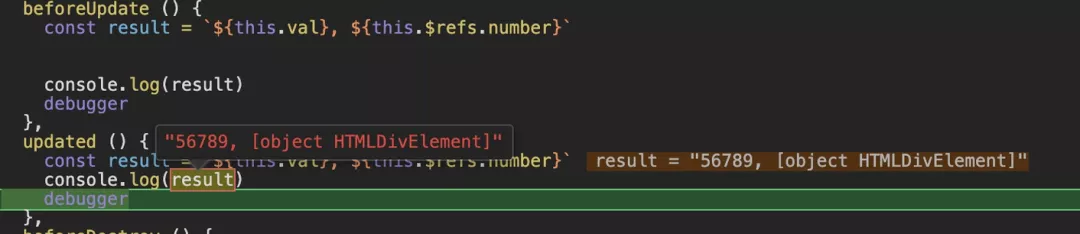
Update的执行在beforeUpdate之后,与beforeUpdate的数据与页面保持一致。
beforeUpdate与Update源码解析
...
// 启动Watcher,绑定vm._watcher属性
new Watcher(vm, updateComponent, noop, {
  before: function before () {
    if (vm._isMounted && !vm._isDestroyed) {
      callHook(vm, 'beforeUpdate');   // 执行开发者的beforeUpdate内的代码
    }
  },
}, true /* isRenderWatcher */);
...
//数据模型里面的值变化时触发该函数(可以看上一篇文章)
// 例如this.val=345改变data里的val属性的时候,该函数将得到执行。
function flushSchedulerQueue () {
  ...
  var watcher, id
  for (index = 0; index < queue.length; index++) {
    watcher = queue[index];
    if (watcher.before) {
      //触发beforeUpdate的钩子函数
      watcher.before();
    }
  }
  ...
   //调用activate的钩子函数
  callActivatedHooks(activatedQueue);
   //调用update的钩子函数
  callUpdatedHooks(updatedQueue);
  ...
}

// 调用updated钩子函数
function callUpdatedHooks (queue) {
  var i = queue.length;
  while (i--) { // 轮询队列里所有的变化
    var watcher = queue[i];
    var vm = watcher.vm;
    if (vm._watcher === watcher && vm._isMounted && !vm._isDestroyed) {
      callHook(vm, 'updated');  // 执行开发者的updated内的代码
    }
  }
}
activated与deactivated
在 2.2.0 及其更高版本中,activated钩子函数和deactivated钩子函数被引用进来,因为这两个钩子函数只会是被keep-alive标签包裹的子组件才会得到触发机会,所以很少被人注意到,先看一个入门例子。
import Vue from './node_modules/_vue@2.6.11@vue/dist/vue.common.dev'
new Vue({
  el: '#app',
  template: `
    <div id="app">
      <keep-alive>
        <my-comp v-if="show" :val="val"></my-comp>
      </keep-alive>
    </div>`,
  data () { return { val: '12345', show: true } },
  components: {
    // 自定义子组件my-comp
    'my-comp': {
      template: '<div>{{val}}</div>',
      props: [ 'val' ],
      activated() {
        debugger; // 加载时触发执行
      },
      deactivated() {
        debugger; //两秒后触发执行
      }
    }
  },
  mounted() {
    setTimeout(() => {
      this.show = false
    }, 2000)
  }
})
activated触发源码
它只有被标签缓存的组件激活的时候才会被调用。
// 当keep-alive的子组件被激活的时候insert方法将得到执行
// 也就是上面例子中this.show = true的时候
insert: function insert (vnode) {
  var context = vnode.context;
  var componentInstance = vnode.componentInstance;
  if (!componentInstance._isMounted) {
    componentInstance._isMounted = true;
    // 先调用keep-alive子组件的mounted钩子方法
    callHook(componentInstance, 'mounted');
  }
  if (vnode.data.keepAlive) {
    if (context._isMounted) {
      // 如果外部组件是已经加载完成的,即上面例子里的show初始为false,加载完后this.show=true
      // 将callActivatedHooks所调用的activatedQueue队列push进去值
      queueActivatedComponent(componentInstance);
    } else {
      // 如果外部组件未加载完成的。
      // 就像上面例子的写法,show初始为true,加载完后this.show=false
      // 然后在activateChildComponent直接触发activated钩子函数
      activateChildComponent(componentInstance, true /* direct */);
    }
  }
}

//数据模型里面的值变化时触发该函数(可以看上一篇文章)
//例如this.val=345改变data里的val属性的时候,该函数将得到执行。
//执行的时候触发callActivatedHooks函数,会在这时候调用activate钩子函数
function flushSchedulerQueue () {
  ...
  var watcher, id
  for (index = 0; index < queue.length; index++) {
    watcher = queue[index];
    if (watcher.before) {
      //触发beforeUpdate的钩子函数
      watcher.before();
    }
  }
  ...
   //调用activate的钩子函数
  callActivatedHooks(activatedQueue);
   //调用update的钩子函数
  callUpdatedHooks(updatedQueue);
  ...
}

// 数据模型data数据变化时触发执行
function callActivatedHooks (queue) {
  for (var i = 0; i < queue.length; i++) {
    ...
    // 调用activated的钩子函数执行
    activateChildComponent(queue[i], true /* true */);
  }
}
// 只有缓存的组件触发该钩子函数
function activateChildComponent (vm, direct) {
  ...
  if (vm._inactive || vm._inactive === null) {
    vm._inactive = false;
    for (var i = 0; i < vm.$children.length; i++) {
      // 递归调用子组件触发其钩子函数
      activateChildComponent(vm.$children[i]);
    }
    // 执行开发者的activated钩子函数内的代码
    callHook(vm, 'activated');
  }
}
deactivated的执行
deactivated钩子函数的触发是keep-alive标签缓存的组件停用时触发,像下面例子中被keep-alive标签包裹的my-comp组件,当子组件被v-if置为false的时候,deactivated钩子函数将得到执行。

deactivated的触发源码
//对于deactivate的触发,只会是子组件destroy方法执行时被调用,
function destroy (vnode) { // 调用组件注销时触发
  if (!componentInstance._isDestroyed) {
    // 当触发的组件不是keep-alive标签的组件时触发$destroy
    if (!vnode.data.keepAlive) {
      // 触发实例组件的注销
      componentInstance.$destroy();
    } else {
      // 触发deactivated的钩子函数
      deactivateChildComponent(componentInstance, true /* direct */);
    }
  }
}
function deactivateChildComponent (vm, direct) {
  ...
  if (!vm._inactive) {
    vm._inactive = true;
    for (var i = 0; i < vm.$children.length; i++) {
      deactivateChildComponent(vm.$children[i]);  //递归执行触发deactivated钩子函数
    }
    // 执行开发者的deactivated内的代码
    callHook(vm, 'deactivated');
  }
}
beforeDestroy与destoryed
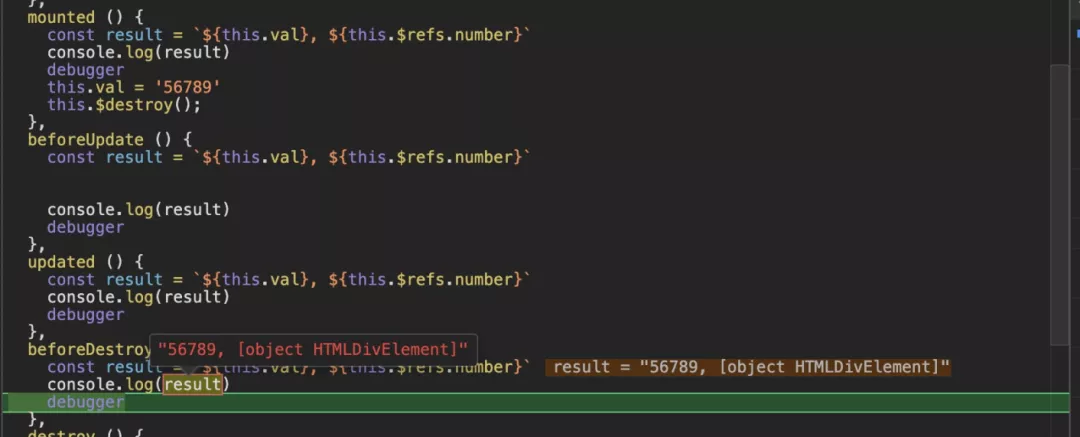
在mounted手动进行了destory销毁组件,触发了beforeDestroy钩子函数执行,在这里依旧能看到数据模型与DOM是未被注销的。
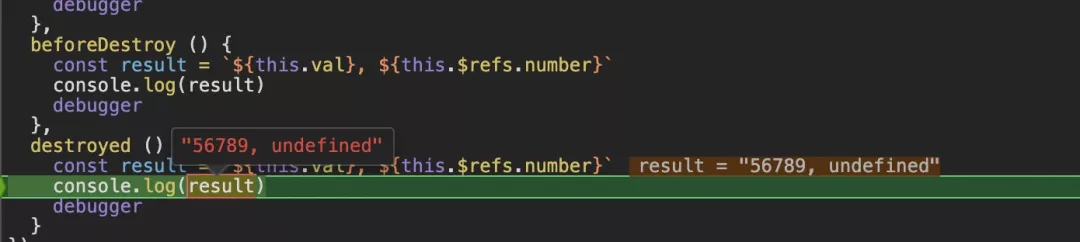
在这里我们可以看到DOM已经被清除了。
beforeDestroy与destoryed源码解析
// Vue的原型链方法 $destroy
Vue.prototype.$destroy = function () {
  var vm = this;
  ...
  // 执行开发者的beforeDestroy内的代码
  callHook(vm, 'beforeDestroy');
  ...
  var parent = vm.$parent;
  if (parent && !parent._isBeingDestroyed && !vm.$options.abstract) {
    remove(parent.$children, vm);
  }
  // 将数据监听移除
  if (vm._watcher) {
    vm._watcher.teardown();
  }
  var i = vm._watchers.length;
  while (i--) {
    vm._watchers[i].teardown();
  }
  if (vm._data.__ob__) {
    vm._data.__ob__.vmCount--;
  }
  // 调用一次渲染,将页面dom树置为null
  vm.__patch__(vm._vnode, null);
  //调用开发者的destroyed钩子函数代码
  callHook(vm, 'destroyed');
  // 关闭时间监听
  vm.$off();
  // 移除Vue的所有依赖
  if (vm.$el) {
    vm.$el.__vue__ = null;
  }
  // 节点置为null
  if (vm.$vnode) {
    vm.$vnode.parent = null;
  }
};
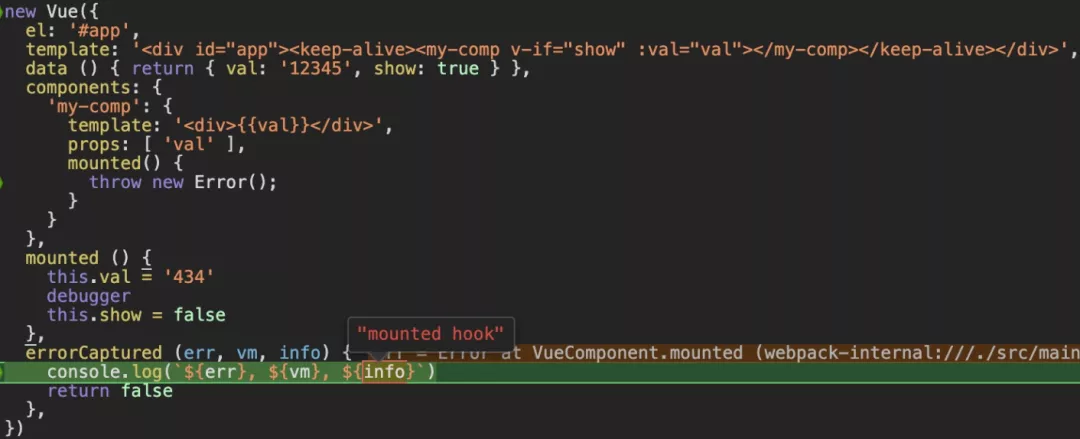
errorCaptured
2.5.0+之后引入的钩子函数,目的是为了稳定性,当子孙组件发生异常的时候,则会触发这个钩子函数,它有三个参数,错误对象、发生错误的组件实例、错误来源信息,可以主动返回 false 阻止该错误继续向上面的父组件传播。
可以看下面这个例子,我在子组件my-comp的mounted里直接throw new Error,在外层组件里的erroeCaptured钩子函数得到触发执行。
errorCaptured源码解析
可以看出它的本质其实是一个包裹子组件的try catch,将所有捕获到的异常内容做了一次拦截,并且在catch的时候决定是否继续往外层抛错。
// errorCaptured的执行则不通过callHook来执行,而是直接取了$options.errorCaptured来执行
function handleError (err, vm, info) {
  ...
  var hooks = cur.$options.errorCaptured;
  if (hooks) {
    for (var i = 0; i < hooks.length; i++) {
      try {
        // 执行开发者定义的errorCaptured函数
        var capture = hooks[i].call(cur, err, vm, info) === false;
        // 如果钩子函数返回为false时,直接return,不在往上传播错误
        if (capture) { return }
      } catch (e) {
        globalHandleError(e, cur, 'errorCaptured hook');
      }
    }
  }
}
serverPrefetch
这个方法是2.6+里新增的且只能在服务端渲染时能得到触发的钩子函数,它会返回一个promise,因为这里没法用浏览器调试,暂时不介绍这个API,待后续再细写。
Ajax请求放在哪个钩子函数中?
仔细看完了上面解析,我们便可清楚的知道,Ajax请求应该放在created钩子函数是最好的,这时候数据模型data已经初始化好了。
如果放在beforeCreate函数里,这时候data还没有初始化,无法将获取到的数据赋值给数据模型。
如果放在mounted里,这时候页面结构已经完成,如果获取的数据与页面结构无联系的话,这个阶段是略微有点迟的。
beforeDestroy何时使用?
实际对于销毁的场景大部分使用的destroy就足够了,而beforeDestroy何时使用呢?
看看它俩的区别,beforeDestroy执行的时候页面DOM还是存在未被销毁的,而Destroy执行的时候,页面已经重新渲染完了,所以我们可以在beforeDestroy里执行一些组件销毁前对页面的特殊操作。