


Introduction
When Microsoft upgraded Visual Studio 6 to Visual Studio 7 (.NET), many of the familiar graphical controls (Image control, Shape control) were dropped. Although similar functionalities previously achieved by these controls can be attained using appropriate classes in the .NET library, much more effort is required.
After getting familiar with graphical programming in .NET, I am able to port most of my VB6 graphical programs to C#. However, I find that time and again, I need to implement replacement functionalities for the VB6 Shapecontrol in .NET. There are probably already many Shape controls for .NET by third parties, but I could not find one to my satisfaction.
In this article, I would like to share with the readers how I attempted to implement the Shape control for .NET.
Background
In VB6, the Shape control is a graphical light-weight control, it is not a real control and does not have a Hwndproperty. In .NET, all controls are real controls with Hwnd property. Although there is no equivalent Shape control in Visual Studio .NET, there are various classes in the .NET library that can collectively be used to implement the Shape control.
Basically the Shape control is an image with a certain shape. To handle the image functionalities, there are the Image and Bitmap classes. For shapes, there is the GraphicsPath class.
These classes are the key components for implementing the Shape control.
Transparency
In VB6, we can set the DrawMode property to achieve the effect of seeing through the VB6 Shape control. The DrawMode property could still be implemented using GDI/GDI+ functions in .NET, but there is an easier and more elegant way. .NET supports 32 bit ARGB rendering. In VB6, although 32 bit ARGB values can be assigned to colors, the A (Alpha) component of the value is never used.
For any standard control derived from System.Windows.Form.Control, there are at least two properties that take Color values: BackColor and ForeColor. Each of these properties can be assigned ARGB values.
How would you test for transparency? The answer is a background. All controls must reside within a container. For most cases, the form is the container. However, there are also controls that serve as containers, for example the Panel control. To test for transparency, we can set the container's background to an image and the backcolor of the control within the container to a color where the Alpha is less than 255 (maybe 100). You will then be able to see the background image through the control. The lower the Alpha, the more of the background is seen.
Shape
In VB6, we can also create custom controls with different shapes. However, this can only be done by calling Win32 API functions. In .NET, every control has a Region property which can be used to specify its shape. When the control is rendered, Windows will only paint on pixels within the region. A Region can be created by specifying its outline. The outline can be constructed using a GraphicsPath object. The code below creates a GraphicsPath object, adds an ellipse shape to the path and then uses the path to instantiate a new Regionobject to be assigned to a control's Region property. The end result is that the control will take the shape of the Region, which in this case is an ellipse.
Hide Copy Code
GraphicsPath _outline=new GraphicsPath();
_outline.AddEllipse(0,0,100,100);
this.Region=new Region(_outline);
Custom Design-time Editors
When you use Visual Studio .NET IDE to assign Color properties, you can do so using the standard Color Editor where you can select from a series of colors, or you can directly type in the ARGB values. When you use the standard Color Editor, you cannot specify the Alpha values. And when you directly type in the ARGB values, you do not know how the color will appear. Either way, you do not have an ideal way to enter Color values.
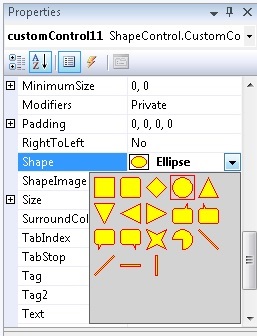
However, Visual Studio .NET allows you to create your own editor to edit property values. For the Shape control, I have created two custom design-time editors. One for editing ARGB values and the other to pick the shape for the Shape control.
In this article, I would not be discussing on how to create a custom design-time editor. You can get more information from the .NET documentation for System.Drawing.Design namespace.

Extending Shape Control
The source code for the Shape control (ShapeControl.cs) allows for easy addition/deletion of shapes. All shapes are enumerated in the ShapeType enum block. You can edit this block to add/delete shapes.
Hide Copy Code
public enum ShapeType{
                Rectangle,
                RoundedRectangle,
                Diamond,
                Ellipse,
                TriangleUp,
                TriangleDown,
                TriangleLeft,
                TriangleRight,
                BallonNE,
                BallonNW,
                BallonSW,
                BallonSE,
                CustomPolygon,
                CustomPie
            }
Correspondingly add/edit the block that creates the outline path for the shape.
Hide Shrink  Copy Code
internal static void updateOutline(ref GraphicsPath outline,
                     ShapeType shape, int width,int height)
{
    Switch (Shape)
    {
        Case ShapeType.CustomPie:
            outline.AddPie(0,0,width,height,180,270);
            break;
        Case ShapeType.CustomPolygon:
            outline.AddPolygon(new Point[]{
                          new Point(0,0),
                          new Point(width/2,height/4),
                          new Point(width,0),
                          new Point((width*3)/4,height/2),
                          new Point(width,height),
                          new Point(width/2,(height*3)/4),
                          new Point(0,height),
                          new Point(width/4,height/2)
                                          }
                );
            break;
        Case ShapeType.Diamond:
            outline.AddPolygon(new Point[]{
                        new Point(0,height/2),
                        new Point(width/2,0),
                        new Point(width,height/2),
                        new Point(width/2,height)
                                          });
            break;

        Case ShapeType.Rectangle:
            outline.AddRectangle(new Rectangle(0,0,width,height));
            break;
        .....
The shape selection design-time editor is coded in such a way that it queries the ShapeType enum and calls the updateOutline function while rendering the design-time UI. It will automatically display the shapes correctly.
ShapeImage, ShapeImageRotation and ShapeImageTexture Property
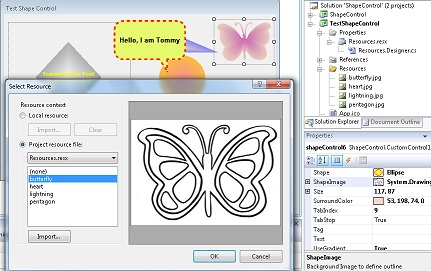
I have added ShapeImage property that allows you to specify an image that you would like to use for generating the outline for the Shape control. A suitable image would be one with clear outline, like those included in the project's resources. The above picture shows the setting of the ShapeImage property of a Shapecontrol to take the shape of a butterfly. Note that the ShapeImage property will override the Shape property. If you want to use the Shape property, first set ShapeImage property to (none).
The outline extraction implementation for the ShapeImage property is based on my article.
Fun with Outlines http://www.codeproject.com/Articles/760660/Fun-with-Outlines
The ShapeImageRotation property allows the image to be rotated before the outline is generated. Valid value for this property is between -180 and 180 degree.
The ShapeImageTexture property allows a texture image to be applied to the shape. Note that a texture image is different from simply a background image. The texture is like a skin on the shape and when the shape is resized, rotated and stretched, the texture will also be resized, rotated and stretched.
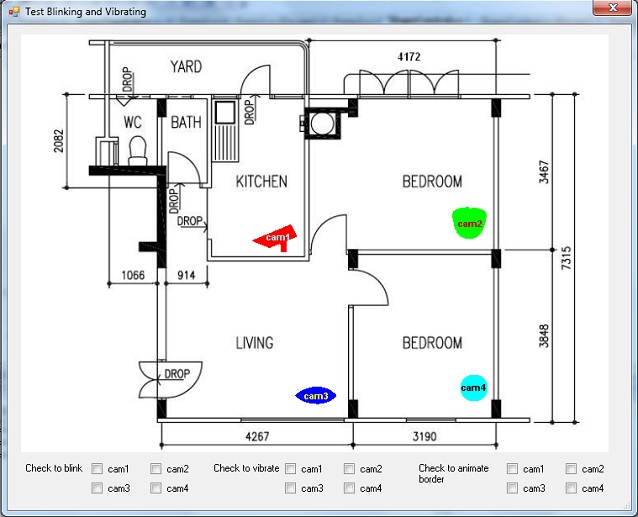
Blink, Vibrate, AnimateBorder Property
Setting these properties cause the control to blink, vibrate and animate the border respectively. This may be useful if you want to use the shape control as some kind of beacon.
Connecter Property
I have added Connecter property that is used to specify how a Line shape would connect to the Shape control. The values for the Connecter property are Center, Left, Right, Top, Bottom.

The code below shows how to connect a line shape control to 2 shape controls. ctrl1 is the line shape control. The line would extends from source shape control (ctrlsrc) to the destination shape control (ctrldest). ShapeControl.Line.setConnectors() sets the appropriate ConnecterType for the Connector property for the source and destination shape controls. ShapeControl.Line.setConnectorPoint() extracts the coordinates for the anchor points for the source and destination from ctrlsrc and ctrldest respectively. ShapeControl.Line.setLine() set the anchor coordinates for the line shape control.
Hide Copy Code
ShapeStorage properties
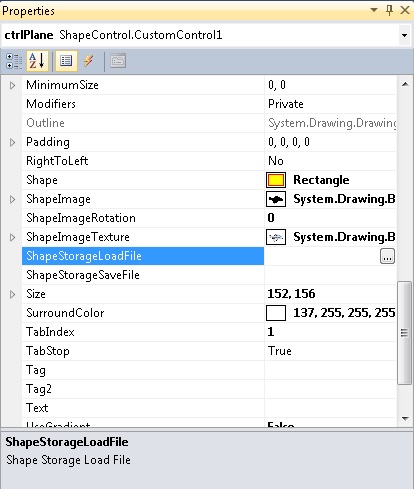

I have added 2 properties to the shape control: ShapeStorageSave and ShapeStorageLoad. The main purpose of these properties is to enable you to save shapes to disk and to load them at design time. When you click on these properties in the properties list, a dialog box will pop up to enable you to view and select the file you want to use. The default extension for the shape files is .shp.jpg. For each .shp.jpg file there would be a corresponding .shp file. The .shp file store all the properties and resources used by the shape control. Note that in the Visual Studio Designer these ShapeStorage properties will always be blank, as their sole purpose is to bring up dialog boxes for you to work on.
Demo Sample Applications
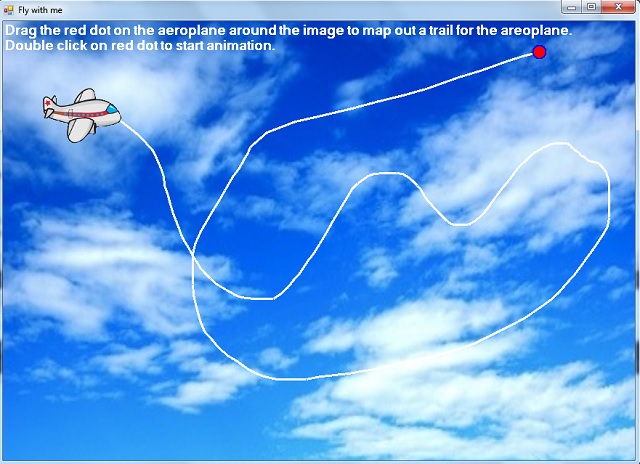
Demo1 shows the features of the shape control. The left panel demonstrates transparency as you drag the diamond shape around the panel. The other shape controls show the various different shapes and settings.Demo2 shows the use of the Blink, Vibrate and AnimateBorder property of the shape control in a typical floor plan to flag alarm/alert.Demo3 is a more advanced demo, showing a camera placement designer application. You can add cameras, move them around, resize them, change their properties and connect them up via drag and drop. Direction of connection can also be set and changed. You can also test the animation for the cameras and connecting lines. The configurations can be saved and reload.Demo4 shows a simple cognitive game, where parts of underlaying images of well known personalities are shown within 2 moving clock hands, and the objective is to identify as many of these personalities as possible. The UI demonstrates a creative use of the shape control.Demo5 shows an interesting use of the ShapeImageRotation property. You can trace out the flight path of a areoplane shape control. The aeroplane shape control would move along the flight path with the correct orientation by rotating to head in the direction of flight. Demo6 illustrates the use of the ShapeImageTexture property. You can see different effects after applying no texture/background, generic texture and specified texture to 2 different shapes.Demo7 shows the saving and loading of shape controls from file at run timeDemo8 shows the use of the ShapeStorageSave and ShapeStorageLoad properties.
Double Buffering
Double buffering enables smooth rendering of controls on a form or container. Since .NET 2.0, the Control.DoubleBuffered property has been introduced. However, this property is protected. To enable this property in a control, you could create a custom class inheriting from the Control class, and then set the property in your custom class. However, you can still set this property on existing controls using reflection, without subclassing. The code below shows how to set double buffering for a panel control.
Hide Copy Code
Conclusion
I hope that readers would benefit not only from using the shape control to create fanciful UI, but also from their exploration of the various .NET classes used to create the magic of the shape control.
History
- 20th April 2014: Updated
Shape Type (Property) Editor to work correctly in Visual Studio 2008 and later
- 29th April 2014: Add in
ShapeImage property
- 7th May 2016: Add in
Blink and Vibrate property
- 9th May 2016: Advance demo showing a camera placement designer application
- 10th May 2016: Add in double buffering in the demo for smooth dragging of the control
- 10th May 2016: Add in VB.NET code converted by SharpDevelop (open source IDE)
- 14th May 2016: Add 4 Lines shapes
- 16thMay 2016: Add in
AnimateBorder property
- 17th May 2016: Enhance
Demo3 (Cam Placement Application) to allow cams to be connected up with the Line shape controls via "Drag and Drop" technique
- 20th May 2016: Add in
Direction property for Line shapes
- 24th May 2016: Add in
Connecter property
- 22nd Feb 2017: Add in
ShapeImageRotation property in V4b
- 22th Feb 2017: Change the rendering of rotated shape image to get smoother edges in V4b1
- 25th Feb 2017: Add in
Demo5 (Tracing the flight path of a butterfly shape control)
- 27th Feb 2017: Enhance outline generation for ShapeImage shapes. Fine tuned
Demo5. Add in Demo6 to show use of ShapeImageTexture property in V5
- 1st March 2017: Corrected
ColorEditor for VB V4a
- 9th March 2017: Add in
ShapeStorageSave and ShapeStorageLoad properties in V6
- 24th March 2017: Add in VB.NET source for V6