一、架构
下面谈谈我对Tomcat架构的理解
总体架构:
1、面向组件架构
2、基于JMX
3、事件侦听
1)面向组件架构
tomcat代码看似很庞大,但从结构上看却很清晰和简单,它主要由一堆组件组成,如Server、Service、Connector等,并基于JMX管理这些组件,另外实现以上接口的组件也实现了代表生存期的接口Lifecycle,使其组件履行固定的生存期,在其整个生存期的过程中通过事件侦听LifecycleEvent实现扩展。Tomcat的核心类图如下所示:
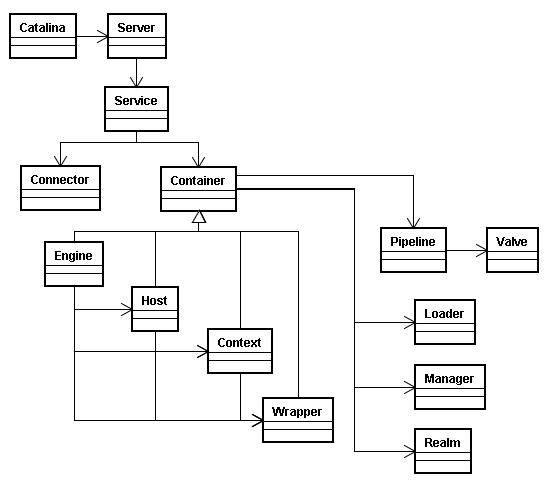
1、Catalina:与开始/关闭shell脚本交互的主类,因此如果要研究启动和关闭的过程,就从这个类开始看起。
2、Server:是整个Tomcat组件的容器,包含一个或多个Service。
3、Service:Service是包含Connector和Container的集合,Service用适当的Connector接收用户的请求,再发给相应的Container来处理。
4、Connector:实现某一协议的连接器,如默认的有实现HTTP、HTTPS、AJP协议的。
5、Container:可以理解为处理某类型请求的容器,处理的方式一般为把处理请求的处理器包装为Valve对象,并按一定顺序放入类型为Pipeline的管道里。Container有多种子类型:Engine、Host、Context和Wrapper,这几种子类型Container依次包含,处理不同粒度的请求。另外Container里包含一些基础服务,如Loader、Manager和Realm。
6、Engine:Engine包含Host和Context,接到请求后仍给相应的Host在相应的Context里处理。
7、Host:就是我们所理解的虚拟主机。
8、Context:就是我们所部属的具体Web应用的上下文,每个请求都在是相应的上下文里处理的
9、Wrapper:Wrapper是针对每个Servlet的Container,每个Servlet都有相应的Wrapper来管理。
可以看出Server、Service、Connector、Container、Engine、Host、Context和Wrapper这些核心组件的作用范围是逐层递减,并逐层包含。
下面就是些被Container所用的基础组件:
1、Loader:是被Container用来载入各种所需的Class。
2、Manager:是被Container用来管理Session池。
3、Realm:是用来处理安全里授权与认证。
分析完核心类后,再看看Tomcat启动的过程,Tomcat启动的时序图如下所示:
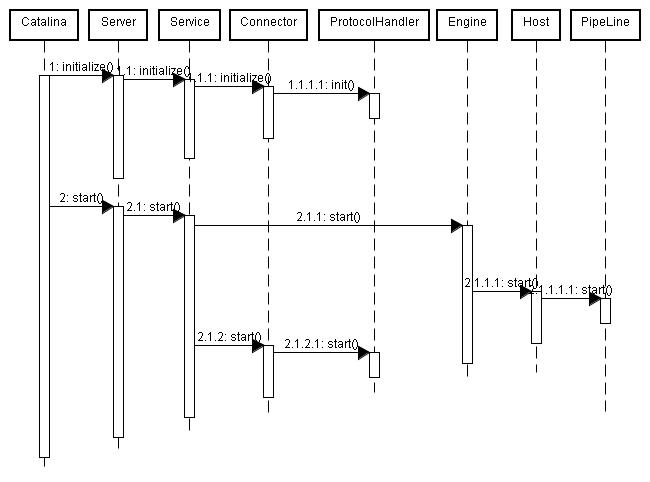
从上图可以看出,Tomcat启动分为init和start两个过程,核心组件都实现了Lifecycle接口,都需实现start方法,因此在start过程中就是从Server开始逐层调用子组件的start过程。
2)基于JMX
Tomcat会为每个组件进行注册过程,通过Registry管理起来,而Registry是基于JMX来实现的,因此在看组件的init和start过程实际上就是初始化MBean和触发MBean的start方法,会大量看到形如:
Registry.getRegistry(null, null).invoke(mbeans, "init", false); Registry.getRegistry(null, null).invoke(mbeans, "start", false); |
这样的代码,这实际上就是通过JMX管理各种组件的行为和生命期。
3)事件侦听
各个组件在其生命期中会有各种各样行为,而这些行为都有触发相应的事件,Tomcat就是通过侦听这些时间达到对这些行为进行扩展的目的。在看组件的init和start过程中会看到大量如:
lifecycle.fireLifecycleEvent(AFTER_START_EVENT, null); |
这样的代码,这就是对某一类型事件的触发,如果你想在其中加入自己的行为,就只用注册相应类型的事件即可。
二、一次完整请求的里里外外
前几天分析了一下Tomcat的架构和启动过程,今天开始研究它的运转机制。Tomcat最本质就是个能运行JSP/Servlet的Web服务器 ,因此最典型的应用就是用户通过浏览器访问服务器,Tomcat接收到请求后转发给Servlet,由Servlet处理完后,把结果返回给客户端。今天就专门解析一下这么一个完整的请求的内部机理。
通过DEBUG,一路跟下来,发现Tomcat处理请求的核心过程是以下几点:
1、启动的时候启动预支持协议的Endpoint,Endpoint会起专门的线程监听相应协议的请求,默认的情况下,会启动JIoEndpoint,JIoEndpoint基于Java ServerSocket接收Http的请求
2、ServerSocket接收到客户端请求的Socket后,一路包装,并一路从Host一直传递到Wrapper,再请求到相应的Servlet
下面将重点解析以上两个过程。
通过以前的分析(Tomcat源码分析一)可知道当Tomcat启动的时候会启动Connector,此时Connector会通过ProtocolHandler把Endpoint启动起来。默认情况下,Tomcat会启动两种Connector,分别是Http协议和AJP协议的,依次对应Http11Protocol和AjpProtocol,两者都是启动JIoEndpoint。下面看看JIoEndpoint的start方法:
public void start() throws Exception {
    // Initialize socket if not done before
    if (!initialized) {
        init();
    }
    if (!running) {
        running = true;
        paused = false;
        // Create worker collection
        if (getExecutor() == null) {
            createExecutor();
        }
        // Start acceptor threads
        for (int i = 0; i < acceptorThreadCount; i++) {
            Thread acceptorThread = new Thread(new Acceptor(), getName() + "-Acceptor-" + i);
            acceptorThread.setPriority(threadPriority);
            acceptorThread.setDaemon(getDaemon());
            acceptorThread.start();
        }
    }
}
|
 public void start() throws Exception {
    // Initialize socket if not done before
    if (!initialized) {
        init();
    }
    if (!running) {
        running = true;
        paused = false;
        // Create worker collection
        if (getExecutor() == null) {
            createExecutor();
        }
        // Start acceptor threads
        for (int i = 0; i < acceptorThreadCount; i++) {
            Thread acceptorThread = new Thread(new Acceptor(), getName() + "-Acceptor-" + i);
            acceptorThread.setPriority(threadPriority);
            acceptorThread.setDaemon(getDaemon());
            acceptorThread.start();
        }
    }
}
|
以上代码很清晰地表示启动acceptorThreadCount个线程,每个线程由Acceptor代理,具体看看Acceptor的run方法:
public void run() {
    // Loop until we receive a shutdown command
    while (running) {
        // Loop if endpoint is paused
        while (paused) {
            try {
                Thread.sleep(1000);
            } catch (InterruptedException e) {
                // Ignore
            }
        }
        // Accept the next incoming connection from the server socket
        try {
            Socket socket = serverSocketFactory.acceptSocket(serverSocket);
            serverSocketFactory.initSocket(socket);
            // Hand this socket off to an appropriate processor
            if (!processSocket(socket)) {
                // Close socket right away
                try {
                    socket.close();
                } catch (IOException e) {
                    // Ignore
                }
            }
        }catch ( IOException x ) {
            if ( running ) log.error(sm.getString("endpoint.accept.fail"), x);
        } catch (Throwable t) {
            log.error(sm.getString("endpoint.accept.fail"), t);
        }
        // The processor will recycle itself when it finishes
    }
}
|
由此可得到这么一个结论:Tomcat就是通过ServerSocket监听Socket的方式来接收客户端请求的。具体代码就无需我解析了,稍微了解Java net的人都能看懂以上代码,Tomcat就是用最标准和最基础的Socket调用方法来处理网络请求的。找到处理请求的源头后下面要做的是事情就简单了,打好断点,在浏览器里请求一个最简单的Hello world,一路debug下去。一路跟下来,主流程的时序图如下所示:
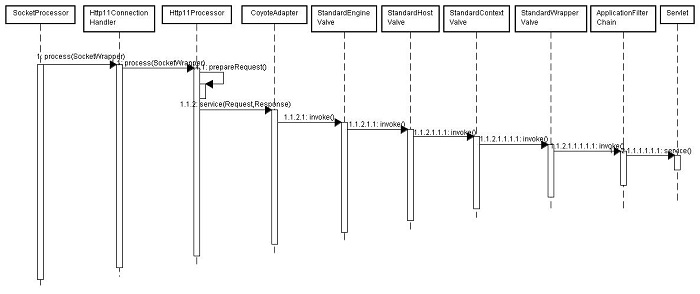
从上图可知,以上过程可分解成以下三个最主要的核心点:
1、基于Http1.1协议对Socket的解析和包装
2、StandardEngineValve、StandardHostValve、StandardContextValve和StandardWrapperValve四种Valve的一路inoke。四种不同层次的Valve做了不同层次的处理和封装
3、基于责任链模式ApplicationFilterChain实现Filter拦截和实际Servlet的请求
以上三个核心点都是内容非常丰富的可研究点,会在以后几天逐一进行剖析。
三、可携带状态的线程池
最近想实现一个可携带状态的线程池,具体需求就是池中的线程被用来处理某种信息,而此信息可视为线程所依赖的外部状态。如果用简单的线程池来实现,线程初始化时就得赋予某些信息,使得线程无法被再次利用。在看老版Tomcat的源码时,找到了答案,其实现思路主要是利用了线程的等待和唤起,HttpProcessor的实现正好基于此思路,时序图如下所示:
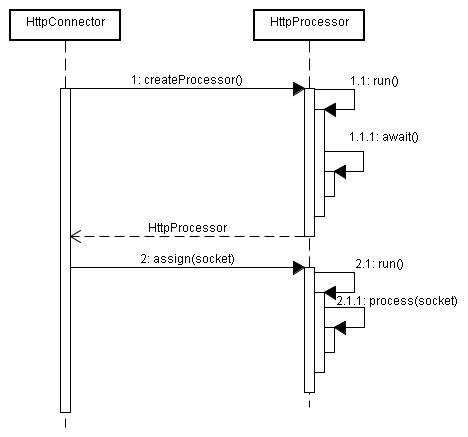
初始化HttpProcessor线程时,没法赋予所需的Socket对象,因为如果在初始化阶段就赋予Socket会导致此线程没法回收用来处理其他Socket。因此,在HttpProcessor的run阶段,先把线程给wait住,具体在await方法里体现,代码如下所示:
/**
* Await a newly assigned Socket from our Connector, or
|
/**
* Await a newly assigned Socket from our Connector, or
|
当HttpConnector调用HttpProcessor.assign(socket)方法时,会给此线程赋予Socket对象,并唤起此线程,使其继续执行,assign方法的源码如下所示:
/**
 * Process an incoming TCP/IP connection on the specified socket.  Any
 * exception that occurs during processing must be logged and swallowed.
 * NOTE:  This method is called from our Connector's thread.  We
 * must assign it to our own thread so that multiple simultaneous
 * requests can be handled.
 *
 * @param socket TCP socket to process
 */
synchronized void assign(Socket socket) {

    // Wait for the Processor to get the previous Socket
    while (available) {
        try {
            wait();
        } catch (InterruptedException e) {
        }
    }

    // Store the newly available Socket and notify our thread
    this.socket = socket;
    available = true;
    notifyAll();

    if ((debug >= 1) && (socket != null))
        log(" An incoming request is being assigned");

}
|
线程被唤起和赋予socket对象后,继续执行核心的process方法,HttpProcessor.run的完整源码如下所示:
/**
 * The background thread that listens for incoming TCP/IP connections and
 * hands them off to an appropriate processor.
 */
public void run() {

    // Process requests until we receive a shutdown signal
    while (!stopped) {

        // Wait for the next socket to be assigned
        Socket socket = await();
        if (socket == null)
            continue;

        // Process the request from this socket
        try {
            process(socket);
        } catch (Throwable t) {
            log("process.invoke", t);
        }

        // Finish up this request
        connector.recycle(this);

    }

    // Tell threadStop() we have shut ourselves down successfully
    synchronized (threadSync) {
        threadSync.notifyAll();
    }

}
|
四、Request和Response处理的全过程
从Tomcat源码分析(二)可知,用户的一个请求会经过n个环节的处理,最后到达开发人员写的Servlet,传给Servlet也就是HttpServletRequest和HttpServletResponse,因此可以认为这一路走下来无非就是把最原始的Socket包装成Servlet里用到的HttpServletRequest和HttpServletResponse,只不过每个环节完成的包装功能和部分不一样而已,信息流如下图所示:

其中,Request与Response的类图如下所示:
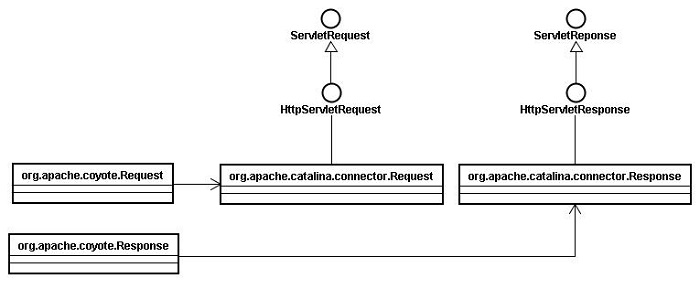
org.apache.coyote.Request和org.apache.coyote.Response是Tomcat内部使用的,不提供给开发者调用,类是final类型的。下面结合一次完整请求的时序图来看看从Socket到org.apache.catalina.connector.Request的加工过程:
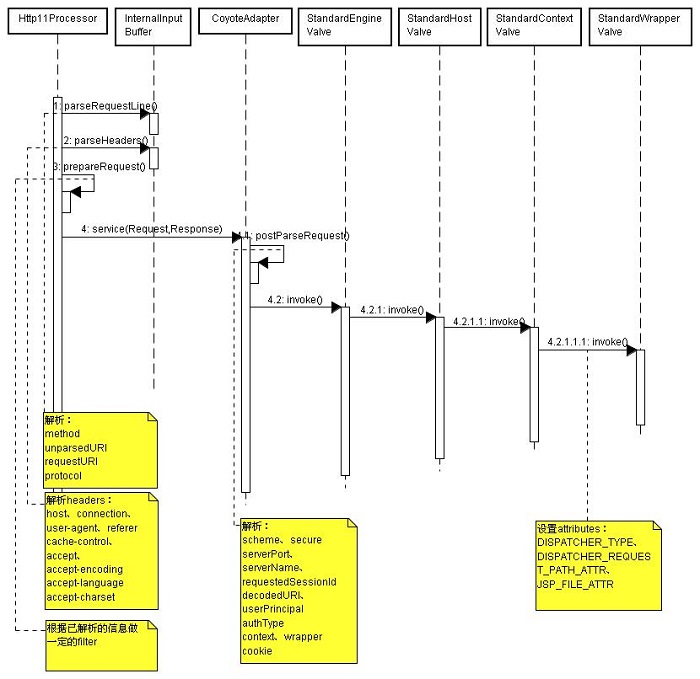
由上图可见,Request的解析和加工过程不是在一个方法里搞定,而是信息流动过程中逐步解析的,不同层次的处理器解析不同层次的信息,在解析过程同时做了些判断和拦截的工作,比如当发现是要访问WEB-INF的资源,会直接返回错误给客户端等等。