通过对IIS7的配置进行优化,调整IIS7应用池的队列长度,请求数限制,TCPIP连接数等方面,从而使WEB服务器的性能得以提升,保证WEB访问的访问流畅
通过对IIS7的配置进行优化,调整IIS7应用池的队列长度,请求数限制,TCPIP连接数等方面,从而使WEB服务器的性能得以提升,保证WEB访问的访问流畅。
IIS7.5是微软推出的最新平台IIS,性能也较以前有很大的提升,但是默认的设置配不适合很大的请求。但是我们可以根据实际的需要进行IIS调整,使其性能更佳,支持同时10万个请求。
以下方案,通过对IIS7的配置进行优化,调整IIS7应用池的队列长度,请求数限制,TCPIP连接数等方面,从而使WEB服务器的性能得以提升,保证WEB访问的访问流畅。
今天下午17点左右,博客园博客站点出现这样的错误信息:
Error Summary:
HTTP Error 503.2 - Service Unavailable
The serverRuntime@appConcurrentRequestLimit setting is being exceeded.
Detailed Error Information:
Module IIS Web Core
Notification BeginRequest
Handler StaticFile
Error Code 0x00000000
由于之前使用的是默认配置,服务器最多只能处理5000个同时请求,今天下午由于某种情况造成同时请求超过5000,从而出现了上面的错误。
为了避免这样的错误,我们根据相关文档调整了设置,让服务器从设置上支持10万个并发请求。
具体设置如下:
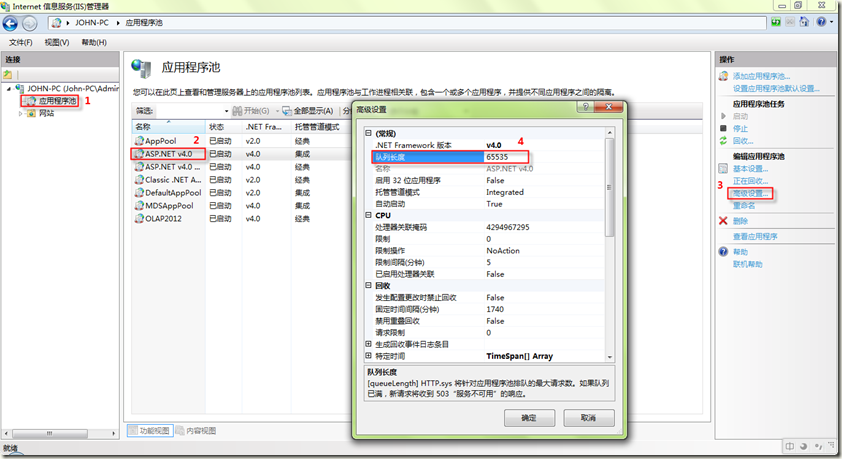
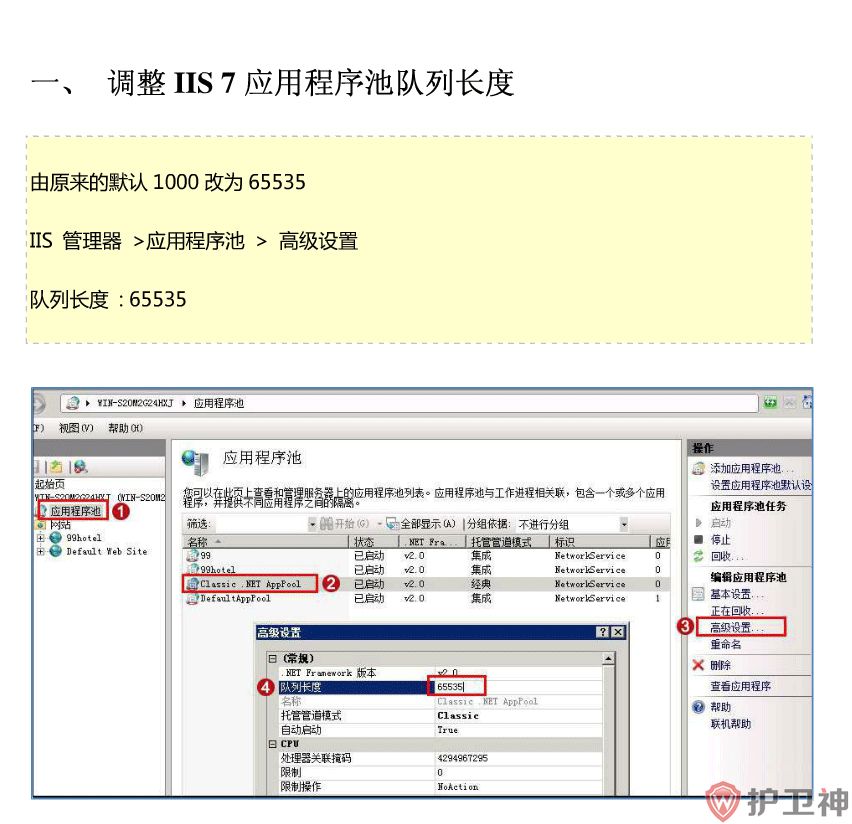
1. 调整IIS 7应用程序池队列长度
由原来的默认1000改为65535。
IIS Manager > ApplicationPools > Advanced Settings
Queue Length : 65535
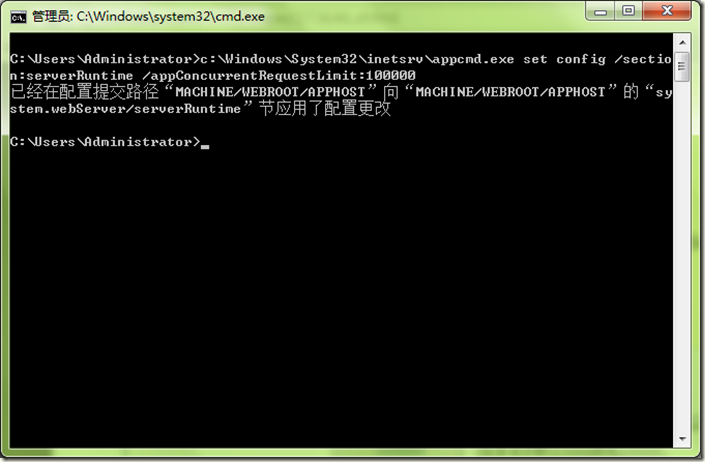
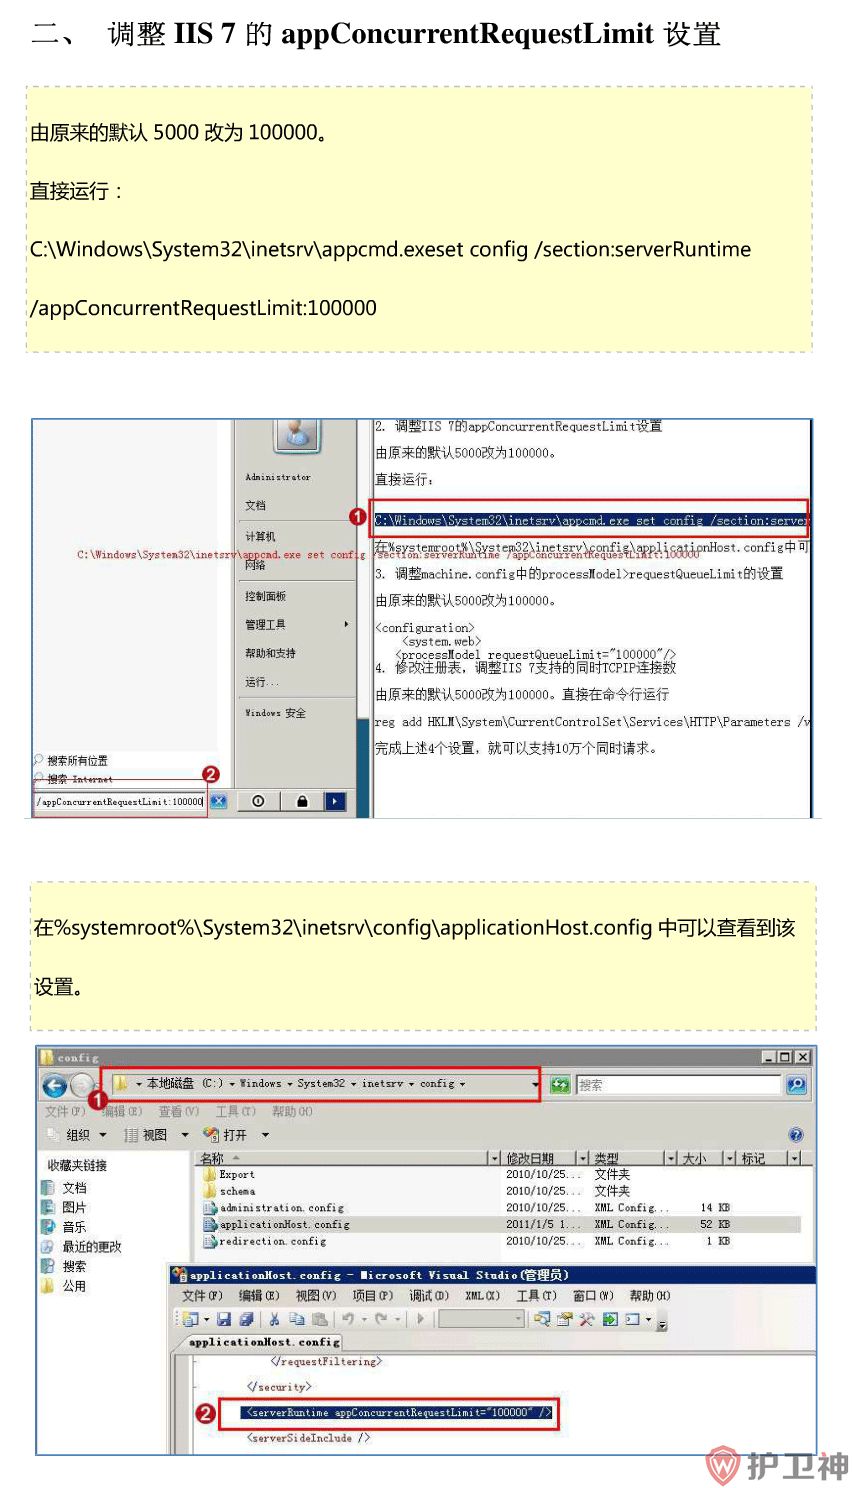
2. 调整IIS 7的appConcurrentRequestLimit设置
由原来的默认5000改为100000。
c:windowssystem32inetsrvappcmd.exe set config /section:serverRuntime /appConcurrentRequestLimit:100000
在%systemroot%System32inetsrvconfigapplicationHost.config中可以查看到该设置:
<serverRuntime appConcurrentRequestLimit="100000" />

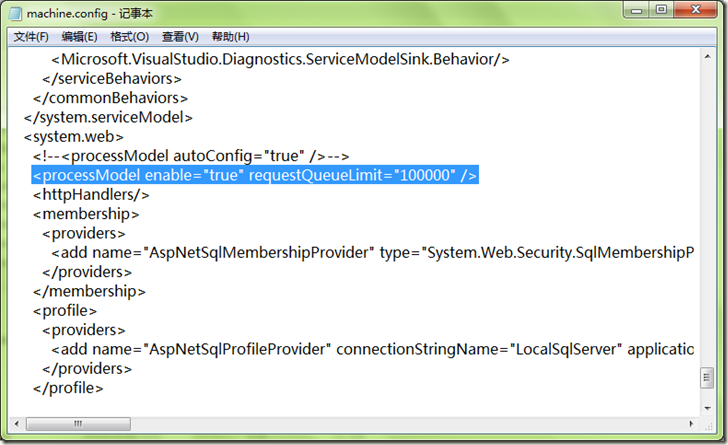
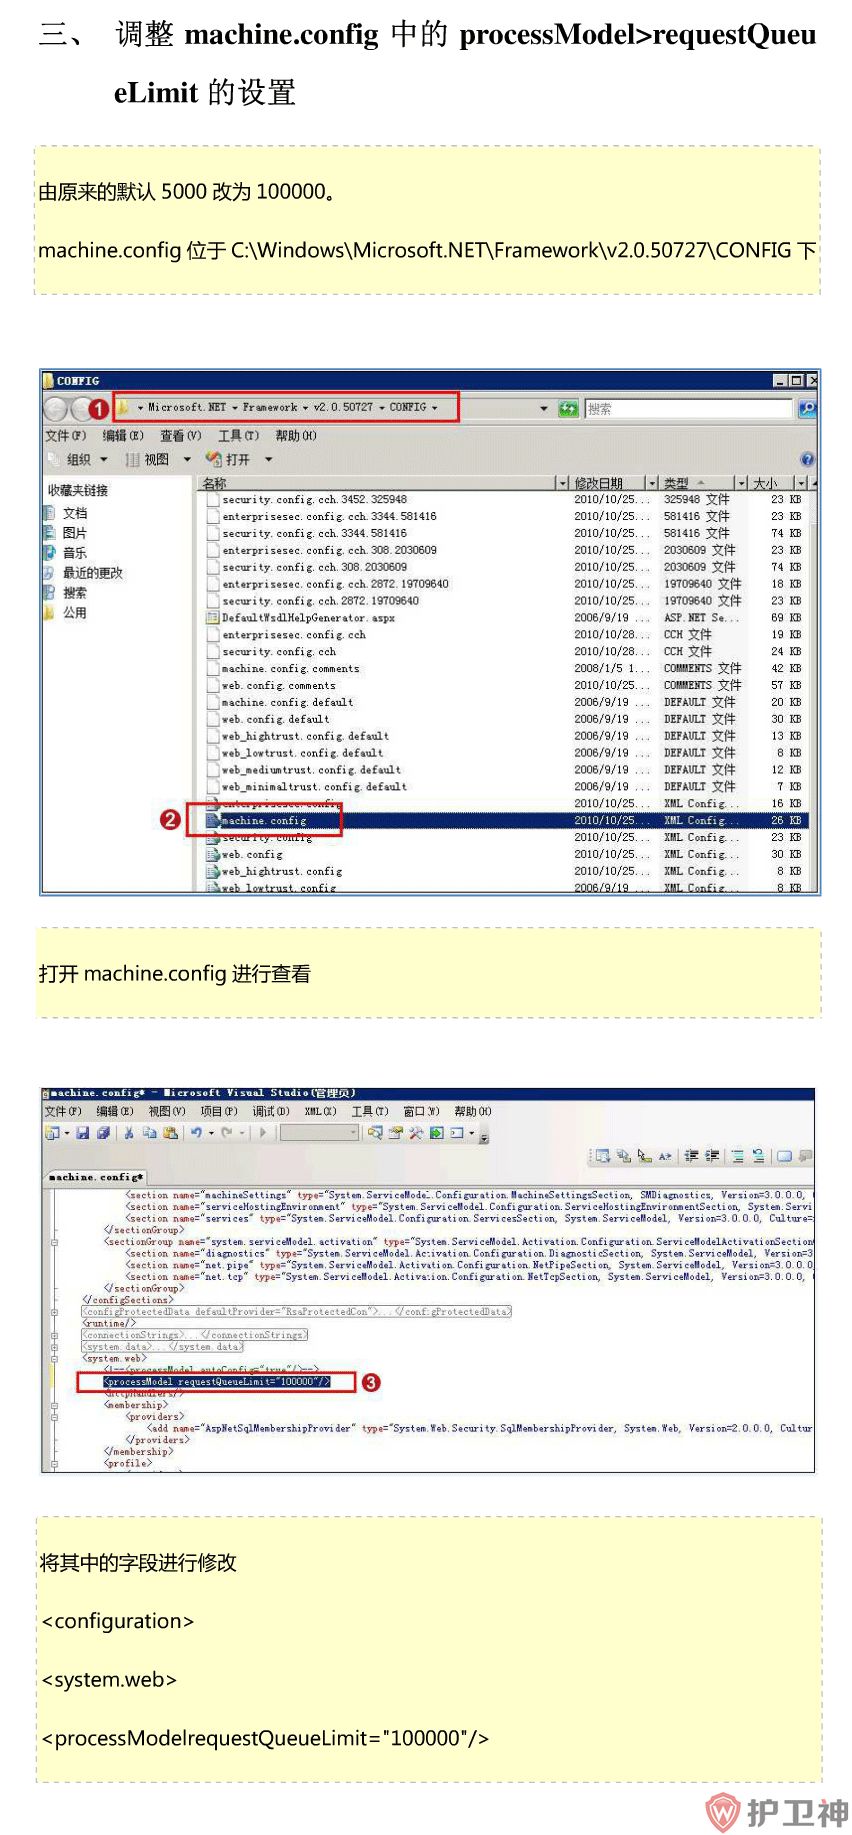
3. 调整machine.config中的processModel>requestQueueLimit的设置
1、单击“开始”,然后单击“运行”。
2、在“运行”对话框中,键入 notepad %systemroot%Microsoft.NetFramework64v4.0.30319CONFIGmachine.config,然后单击“确定”。(不同的.NET版本路径不一样,你可以选择你自己当前想设置的.NET版本的config)
对于.net2.0对应的是
notepad %systemroot%WindowsMicrosoft.NETFramework64v2.0.50727CONFIGmachine.config
.4.0
notepad %systemroot%Microsoft.NetFramework64v4.0.30319CONFIGmachine.config
3、找到如下所示的 processModel 元素:<processModel autoConfig="true" />
4、将 processModel 元素替换为以下值:<processModel enable="true" requestQueueLimit="100000" />
5、保存并关闭 Machine.config 文件。
由原来的默认5000改为100000。
<configuration>
<system.web>
<processModel enable="true" requestQueueLimit="100000"/>参考文章:http://technet.microsoft.com/en-us/library/dd425294(office.13).aspx
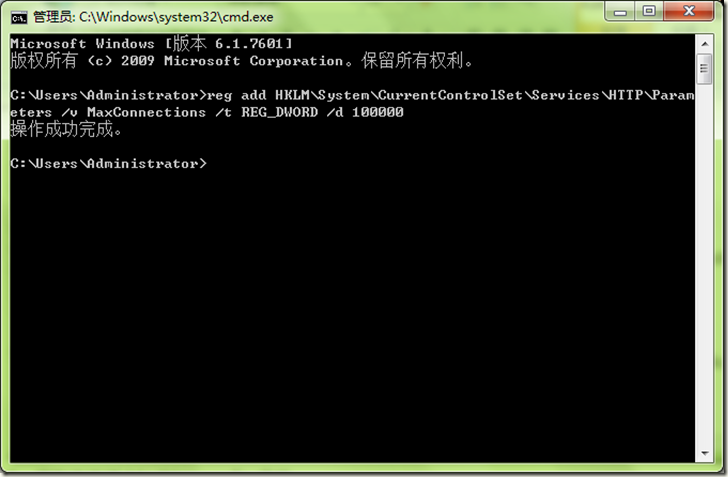
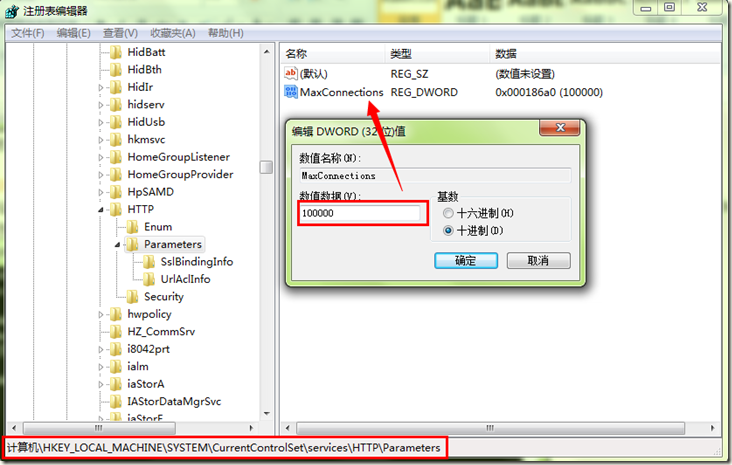
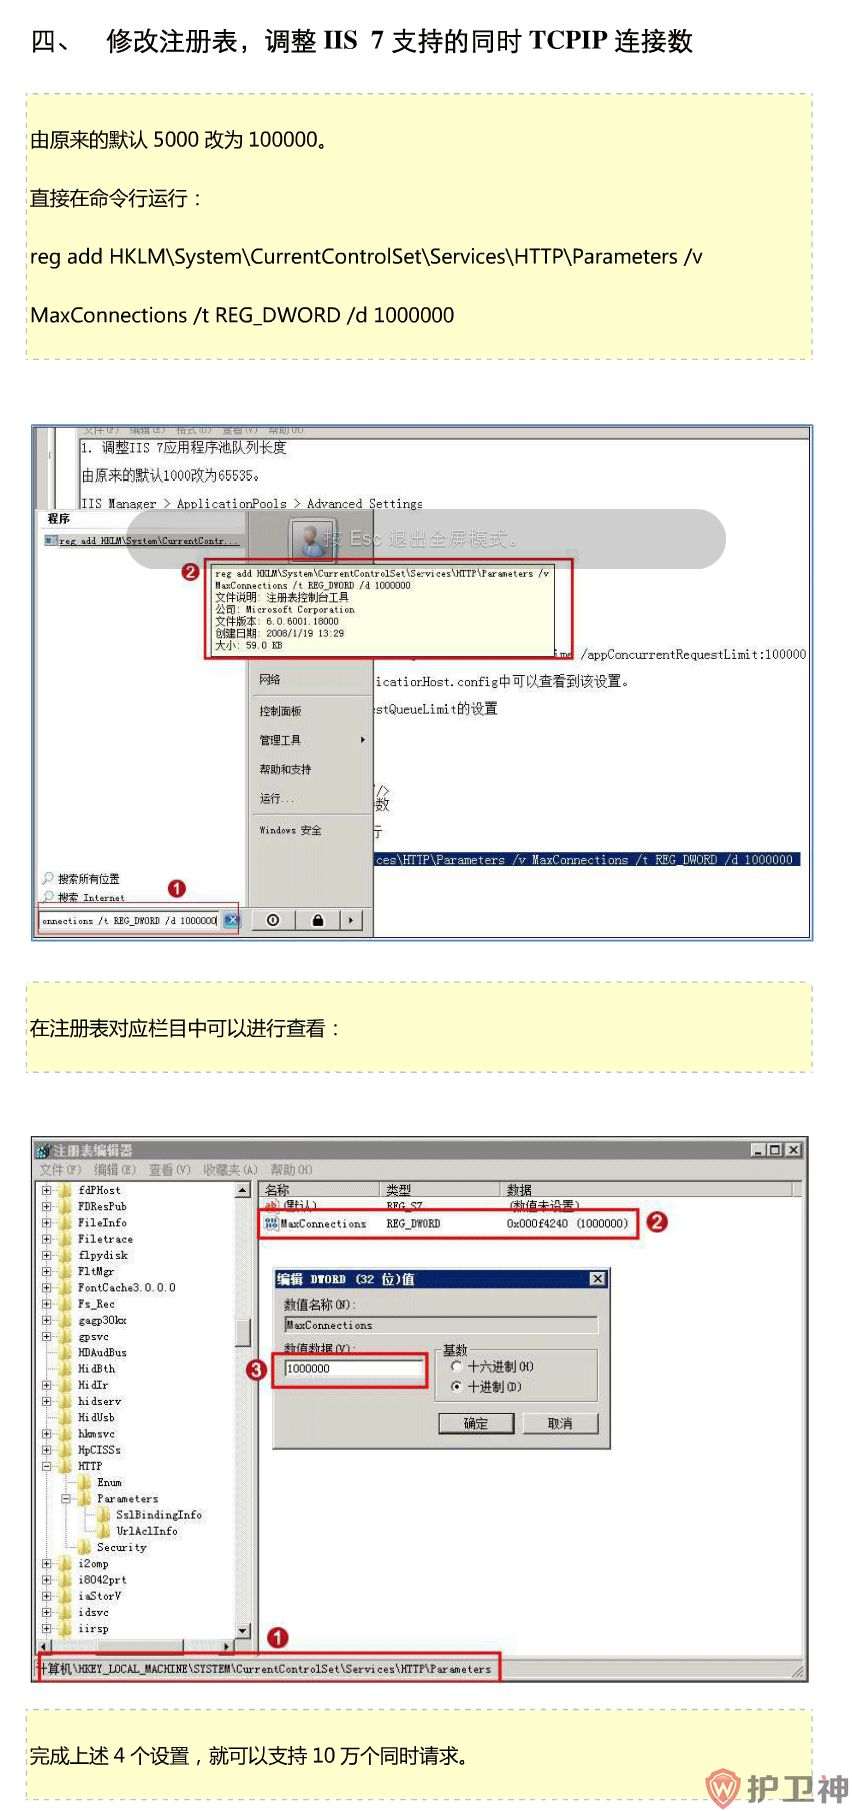
4. 修改注册表,调整IIS 7支持的同时TCPIP连接数
由原来的默认5000改为100000。
reg add HKLMSystemCurrentControlSetServicesHTTPParameters /v MaxConnections /t REG_DWORD /d 100000
可在注册表中查看
5. 运行命令使用设置生效
net stop http & net start http & iisreset 完成上述4个设置,就可以支持10万个并发请求,博客园博客服务器已经启用上述设置。
解决方案:
步骤一:调整IIS的应用程序池队列长度。
在【应用程序池】列表中,选择你相应网站所使用的应用程序池,将原来的队列长度由1000改为65535。当然这里的队列长度你可以根据自己的访问用户*1.5来设置,例如:你有2000用户,你此处就可以设置为3000(3000=2000用户数*1.5), 官方参考
设置如下图:
步骤二:调整IIS的appConcurrentRequestLimit值
打开cmd命令,运行命令:c:WindowsSystem32inetsrvappcmd.exe set config /section:serverRuntime /appConcurrentRequestLimit:100000
步骤三:修改ASP.NET请求队列限制即调整machine.config中的processModel>RequestQueueLimit
1、单击“开始”,然后单击“运行”。
2、在“运行”对话框中,键入 notepad %systemroot%Microsoft.NetFramework64v4.0.30319CONFIGmachine.config,然后单击“确定”。(不同的.NET版本路径不一样,你可以选择你自己当前想设置的.NET版本的config)
3、找到如下所示的 processModel 元素:<processModel autoConfig="true" />
4、将 processModel 元素替换为以下值:<processModel enable="true" requestQueueLimit="15000" />
5、保存并关闭 Machine.config 文件。
步骤四:修改注册表,调整IIS支持的并发TCPIP连接数
在cmd命令中运行命令:reg add HKLMSystemCurrentControlSetServicesHTTPParameters /v MaxConnections /t REG_DWORD /d 100000,当然也可以手动去注册表修改
为了方法大家与自己使用,我把上面能用bat操作简单放到一个bat文件里面了。将下面的内容保存为do.bat文件运行就可以了,需要手工的自己操作
|
1 2 3 4 5 6 7 8 9 10 11 |
|
下面为大家补充一点知识:
支持高并发的IIS Web服务器常用设置
适用的IIS版本:IIS 7.0, IIS 7.5, IIS 8.0
适用的Windows版本:Windows Server 2008, Windows Server 2008 R2, Windows Server 2012
1、应用程序池(Application Pool)的设置:
•General->Queue Length设置为65535(队列长度所支持的最大值)
•Process Model->Idle Time-out设置为0(不让应用程序池因为没有请求而回收)
•Recycling->Regular Time Interval设置为0(禁用应用程序池定期自动回收)
2、.Net Framework相关设置
a) 在machine.config中将
<processModel autoConfig="true" />
改为
<processModel enable="true" requestQueueLimit="100000"/>
(保存后该设置立即生效)
b) 打开C:WindowsMicrosoft.NETFramework64v4.0.30319ConfigBrowsersDefault.browser,找到<defaultBrowser id="Wml" parentID="Default" >,注释<capabilities>部分,然后运行在命令行中运行aspnet_regbrowsers -i。
|
1 2 3 4 5 6 7 8 9 10 11 12 |
|
以解决text/vnd.wap.wml问题。
3、IIS的applicationHost.config设置
设置命令:
c:windowssystem32inetsrvappcmd.exe set config /section:serverRuntime /appConcurrentRequestLimit:100000
设置结果:
<serverRuntime appConcurrentRequestLimit="100000" />
(保存后该设置立即生效)
4、http.sys的设置
注册表设置命令1(将最大连接数设置为10万):
reg add HKLMSystemCurrentControlSetServicesHTTPParameters /v MaxConnections /t REG_DWORD /d 100000
注册表设置命令2(解决Bad Request - Request Too Long问题):
reg add HKEY_LOCAL_MACHINESYSTEMCurrentControlSetservicesHTTPParameters /v MaxFieldLength /t REG_DWORD /d 32768
reg add HKEY_LOCAL_MACHINESYSTEMCurrentControlSetservicesHTTPParameters /v MaxRequestBytes /t REG_DWORD /d 32768
(需要在命令行运行 net stop http & net start http & iisreset 使设置生效)
5、针对负载均衡场景的设置
在Url Rewrite Module中增加如下的规则:
|
1 2 3 4 5 6 7 8 9 10 11 12 13 14 15 16 17 |
|
相关博文:迁入阿里云后遇到的Request.UserHostAddress记录IP地址问题
注意事项:添加该URL重写规则会造成IIS内核模式缓存不工作,详见微软的坑:Url重写竟然会引起IIS内核模式缓存不工作。
6、 设置Cache-Control为public
在web.config中添加如下配置:
|
1 2 3 4 5 6 7 |
|
7、ASP.NET线程设置
在machine.config的<processModel>中添加如下设置:
<processModel enable="true" maxWorkerThreads="100" maxIoThreads="100" minWorkerThreads="50" minIoThreads="50"/>