官网:https://zh-hans.reactjs.org/
一、创建项目
(第一行的 npx 不是拼写错误 —— 它是 npm 5.2+ 附带的 package 运行工具)
npx create-react-app my-app
cd my-app
npm start
二、文件结构
- node_modules -d 存放 第三方下载的 依赖的包
- public -d 资源目录
- favicon.ico - 左上角的图标
- index.html - 项目首页模板
- manifast.json - 如果是一个 app 定义 app 的图标 网址 主题颜色等
- src -d 项目所有的源代码
- index.js - 整个程序的入口 (react 的理念 all in js)
- index.css - 初始化样式
- App.js - 项目
- App.test.js - 自动化测试文件
- App.css - 项目的样式
- logo.svg - 首页 logo
- serviceWorker.js - 将网页存储在浏览器内 如果突然断网了 可以继续访问该网页 (PWD progressive web application 借助写来的 网页 用来做 app)
- .gitignore - 用 git 管理代码 不想 传到 git 上 可以使用
- package.json - node 的包文件 和项目介绍 ( 命令行 命令 ) 等
- README.md - 项目的说明文件
- yarn.lock - 依赖的安装包 (一般不用动)
三、组件创建
import React from 'react';
import ReactDOM from 'react-dom';
import './index.css';

// 1、函数组件,StaticBox自定义的组件名,首字母大写
function StaticBox(props) {
    // class需写为className
    return (
        <div className="blackBorder">
            <h1>子组件1</h1>
        </div>
    )
}

// 2、class组件,需要继承 React.Component
class ChildCom extends React.Component {
    // constructor,如果不初始化 state 或不进行方法绑定,则不需要为 React 组件实现构造函数
    constructor(props) {
        // super(props),调用继承的Component的构造函数
        super(props)
    }
    // render() 方法是 class 组件中唯一必须实现的方法
    render() {
        return (
            <div className="redBorder">
                {/* jsx中的注释方式 */}
                <h1>子组件2</h1>
            </div>
        )
    }
}

class FatherCom extends React.Component {
    constructor(props) {
        super(props)
    }
    render() {
        return (
            <div className="blueBorder">
                <h1 className="red">父组件</h1>
                {/* 组件调用 */}
                <StaticBox></StaticBox>
                <ChildCom></ChildCom>
            </div>
        )
    }
}

// 渲染:ReactDOM.render(组件,节点),ReactDOM.render(element, container[, callback])
ReactDOM.render(<FatherCom />, document.getElementById('root'))
四、组件传参
function StaticBox(props) {
    return (
        <div className="blackBorder">
            <h1>子组件1</h1>
            {/* 接收的父组件参数 */}
            <div>父传子参数:{props.data}</div>
        </div>
    )
}


class ChildCom extends React.Component {
    constructor(props) {
        super(props)
    }
    render() {
        return (
            <div className="redBorder">
                <h1>子组件2</h1>
                <button onClick={this.sendData}>点击向父组件传参</button>
            </div>
        )
    }
    sendData = () => {
        // 子组件向父组件传参步骤1,调用父组件自定义方法更新数据
        this.props.sendFromChild('子组件参数')
    }
}

class FatherCom extends React.Component {
    constructor(props) {
        super(props)
        // state,数据管理
        this.state = {
            value: '父组件参数'
        }
    }
    render() {
        return (
            <div className="blueBorder">
                <h1 className="red">父组件</h1>
                <span>子组件2参数:{this.state.send}</span>
                {/* 父组件向子组件传参,在组件上添加属性即可 */}
                <StaticBox data={this.state.value}></StaticBox>
                {/* 子组件向父组件传参步骤2,父组件自定义方法绑定事件更新数据 */}
                <ChildCom sendFromChild={this.sendData}></ChildCom>
            </div>
        )
    }

    // methods
    sendData = (data) => {
        //  setState,更新state数据
        this.setState({
            send: data
        })
    }
}
五、插槽
class ChildCom extends React.Component {
    constructor(props) {
        super(props)
        console.log(this.props) // this.props.children 为插槽节点的list
    }
    render() {
        // props.children每个item的中可以获取节点属性和内容
        let IndexCom = this.props.children[0].props['data-index'] == 2 ? this.props.children[0] : this.props.children[1]
        return (
            <div className="redBorder">
                <h1>子组件2</h1>
                <div>组件插槽</div>
                {this.props.children}
                <div>具名插槽</div>
                {IndexCom}
            </div>
        )
    }
}

class FatherCom extends React.Component {
    constructor(props) {
        super(props)
    }
    render() {
        return (
            <div className="blueBorder">
                <h1 className="red">父组件</h1>
                <ChildCom>
                    <div data-index="1">插槽1</div>
                    <div data-index="2">插槽2</div>
                </ChildCom>
            </div>
        )
    }
}
六、生命周期
原文:https://blog.csdn.net/LQ271524/article/details/114371811
当组件第一次被渲染到 DOM 中的时候,被称为“挂载(mount)”。
同时,当 DOM 中组件被删除的时候,被称为“卸载(unmount)”。
目前React 16.8+的生命周期分为三个阶段,分别是挂在阶段、更新阶段、卸载阶段
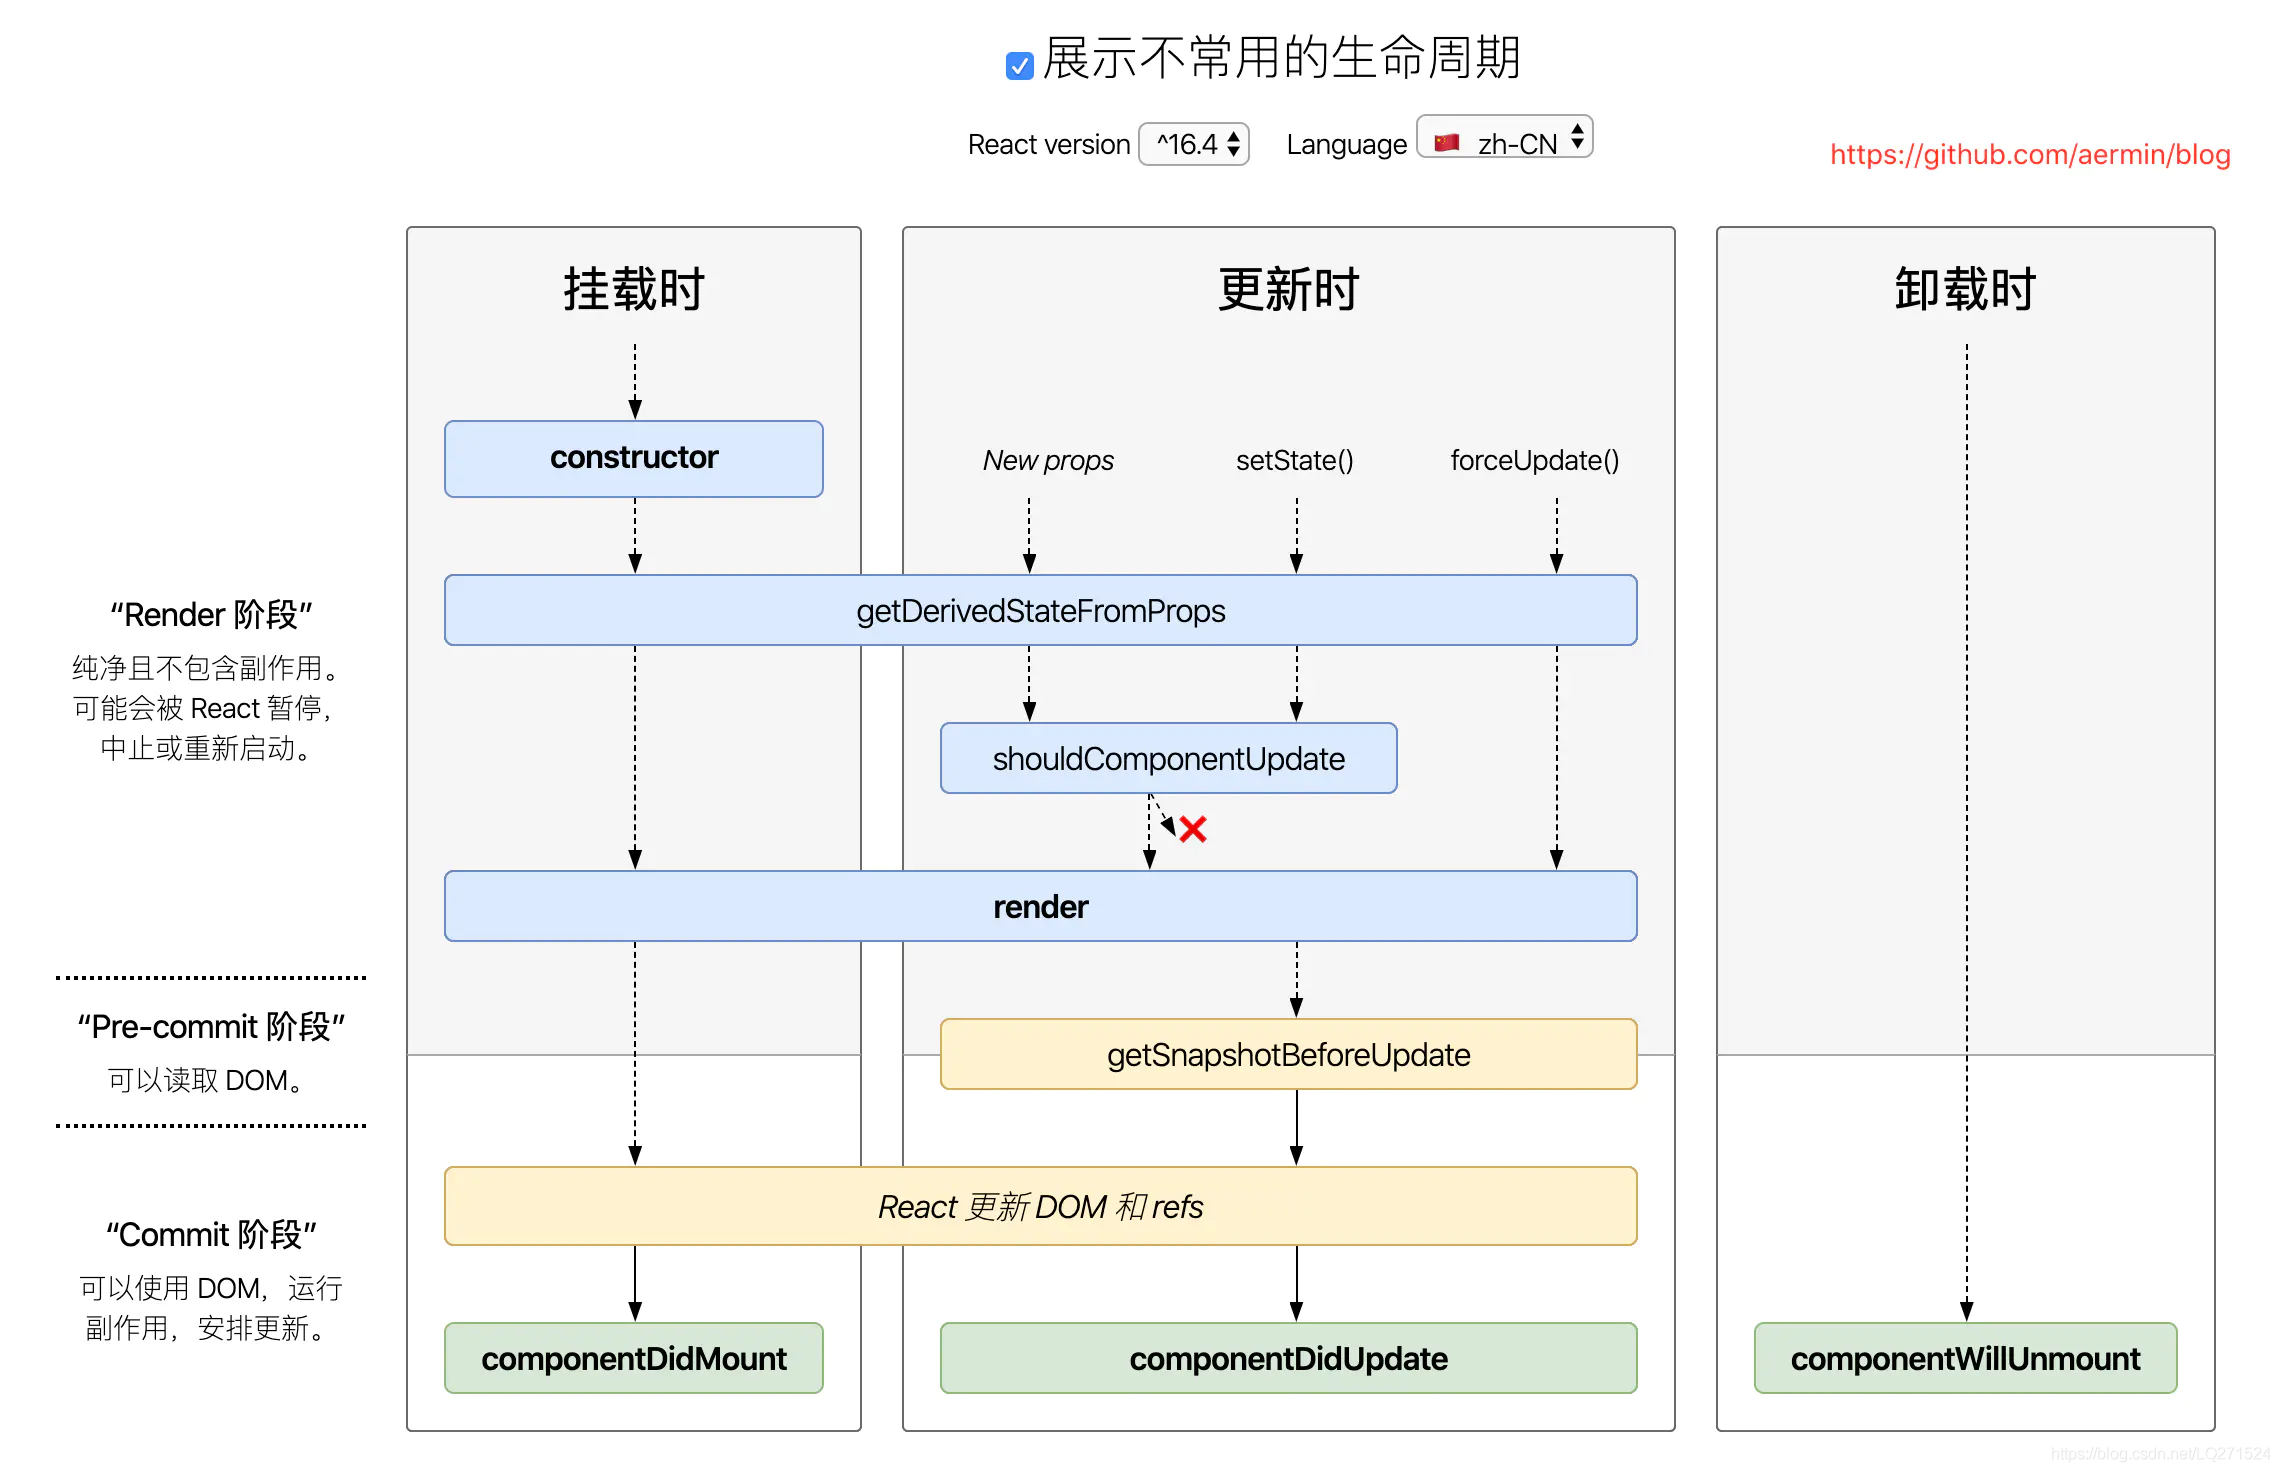
1、挂载阶段
-
- constructor:构造函数,初始化state对象或者给自定义方法绑定this。
- getDerivedStateFromProps(nextProps,prevState),这个是静态方法,当我们接收到新的属性想去修改我们state,可以使用getDerivedStateFromProps(新增生命周期)
- render:render函数是纯函数,只返回需要渲染的内容,不应该包含其它业务逻辑。
- componentDidMount:组件挂载之后调用,此时我们可以获取到DOM节点并操作,比如对canvas,svg的操作,服务器请求,订阅都可以写在这个里面,但是记得在componentWillUnmount中取消订阅。
2、更新阶段
-
- getDerivedStateFromProps:此方法在更新挂载阶段都可能会调用
- shouldComponentUpdate(nextProps,nextState),有两个参数nextProps和nextState,表示新的属性和变化之后的state,返回一个布尔值,true表示会触发重新渲染,false表示不会触发重新渲染,默认返回true,我们通常利用此声明周期来优化React程序性能。
- render:更新阶段也会触发此生命周期
- getSnapshotBeforeUpdate(prevProps,prevState),这个在render方法之后,Update之前调用,有两个参数prevProps,prevState,表示之前的props和之前的state,这个函数有一个返回值,会作为第三个参数传给componentDidUpdate,如果你不想要返回值,可以返回null,此生命周期必须与componentDidUpdate搭配使用(新增生命周期)。
- componentDidUpdate(prevProps,prevState,snapshot),该方法在getSnapshotBeforeUpdate方法之后被调用,有三个参数prevProps,prevState,snapshot,表示之前的props,之前的state,和snapshot。第三个参数是getSnapshotBeforeUpdate返回的,如果触发某些回调函数时需要用到DOM元素的状态,则将对比或计算过程迁移至getSnapshotBeforeUpdate,然后再componentDidUpdate中统一触发回调或更新状态。
3、卸载阶段
-
- componentWillUnmount:当我们的组件被卸载或者销毁了就回调用,我们可以在这个函数里去清除一些定时器,取消网络请求,清理无效的DOM元素等垃圾清理工作。
class FatherCom extends React.Component {
    constructor(props) {
        super(props)
        // state,数据管理
        console.log(1)
    }
    render() {
        console.log(2)
        return (
            <div className="blueBorder">
                <h1 className="red">组件</h1>
            </div>
        )
    }

    componentDidMount() {
        // componentDidMount组件渲染完毕,生命周期
        // 执行顺序,constructor->render->componentDidMount,console结果:1  2  3
        console.log(3)
    }
}