一、SelectOne和自定义方法区别
首先我们来看看我们有两种方式实现Mybatis调用,一种是XML,一种是注解,分别如下:
SqlSession session = sqlSessionFactory.openSession();
try {
    //方式一:mapper配置文件XML配置SQL
    User user = session.selectOne("org.mybatis.example.UserMapper.selectUser", 1);
    System.out.println("user:{}"+user);
} finally {
    session.close();
}

try {
    //方式二:mapper接口中注解配置配置SQL
    UserMapper mapper = session.getMapper(UserMapper.class);
    User user  = mapper.selectUser(1);
} finally {
    session.close();
}
XML配置:
<mapper namespace="org.mybatis.example.UserMapper">
    <select id="selectUser" resultType="com.houjing.mybatis.pojo.User">
    select * from User where id = #{id}
  </select>
</mapper>
<mapper resource="mybatis/UserMapper.xml"/>
注解配置:
public interface UserMapper {
   // @Results({
   //         @Result(property ="name",column = "username")
   // })
   @Select("select id,username as name,age,phone,`desc` from User where id = #{id}")
   public User selectUser(Integer id);
}
<mapper class="com.mybatis.mapper.UserMapper"></mapper>
那么这两种方式有什么区别呢?我们来看看自定义方法selectUser的getMapper源码:
public <T> T getMapper(Class<T> type) {
    return this.configuration.getMapper(type, this);
}
我们可以知道我们会去Configuration中去取出一个Mapper,继续走下去:
public <T> T getMapper(Class<T> type, SqlSession sqlSession) {
    return this.mapperRegistry.getMapper(type, sqlSession);
}
public class MapperRegistry {
    public <T> T getMapper(Class<T> type, SqlSession sqlSession) {
        MapperProxyFactory<T> mapperProxyFactory = (MapperProxyFactory)this.knownMappers.get(type);
        if (mapperProxyFactory == null) {
            throw new BindingException("Type " + type + " is not known to the MapperRegistry.");
        } else {
            try {
                return mapperProxyFactory.newInstance(sqlSession);
            } catch (Exception var5) {
                throw new BindingException("Error getting mapper instance. Cause: " + var5, var5);
            }
        }
    }
}
我们可以看到会用mapperProxyFactory工厂创建一个Proxy,应该可以大致猜到使用到了动态代理,继续走:
public class MapperProxyFactory<T> {protected T newInstance(MapperProxy<T> mapperProxy) {
        return Proxy.newProxyInstance(this.mapperInterface.getClassLoader(), new Class[]{this.mapperInterface}, mapperProxy);
    }

    public T newInstance(SqlSession sqlSession) {
        MapperProxy<T> mapperProxy = new MapperProxy(sqlSession, this.mapperInterface, this.methodCache);
        return this.newInstance(mapperProxy);
    }
}
继续走下去可以看到真的使用Proxy.newProxyInstance这样的方式创建代理。我们来看看MapperProxy类:
public class MapperProxy<T> implements InvocationHandler, Serializable {

    public Object invoke(Object proxy, Method method, Object[] args) throws Throwable {
        try {
            return Object.class.equals(method.getDeclaringClass()) ? method.invoke(this, args)
            : this.cachedInvoker(method).invoke(proxy, method, args, this.sqlSession);
        } catch (Throwable var5) {
            throw ExceptionUtil.unwrapThrowable(var5);
        }
    }

    private MapperProxy.MapperMethodInvoker cachedInvoker(Method method) throws Throwable {
        try {
            return (MapperProxy.MapperMethodInvoker)this.methodCache.computeIfAbsent(method, (m) -> {
                if (m.isDefault()) {
                    try {
                        return privateLookupInMethod == null ? new MapperProxy.DefaultMethodInvoker(this.getMethodHandleJava8(method))
                : new MapperProxy.DefaultMethodInvoker(this.getMethodHandleJava9(method));
                    } catch (InstantiationException | InvocationTargetException | NoSuchMethodException | IllegalAccessException var4) {
                        throw new RuntimeException(var4);
                    }
                } else {
                    return new MapperProxy.PlainMethodInvoker(new MapperMethod(this.mapperInterface, method, this.sqlSession.getConfiguration()));
                }
            });
        } catch (RuntimeException var4) {
            Throwable cause = var4.getCause();
            throw (Throwable)(cause == null ? var4 : cause);
        }
    }

    private static class DefaultMethodInvoker implements MapperProxy.MapperMethodInvoker {
        private final MethodHandle methodHandle;

        public DefaultMethodInvoker(MethodHandle methodHandle) {
            this.methodHandle = methodHandle;
        }

        public Object invoke(Object proxy, Method method, Object[] args, SqlSession sqlSession) throws Throwable {
            return this.methodHandle.bindTo(proxy).invokeWithArguments(args);
        }
    }

    private static class PlainMethodInvoker implements MapperProxy.MapperMethodInvoker {
        private final MapperMethod mapperMethod;

        public PlainMethodInvoker(MapperMethod mapperMethod) {
            this.mapperMethod = mapperMethod;
        }

        public Object invoke(Object proxy, Method method, Object[] args, SqlSession sqlSession) throws Throwable {
            return this.mapperMethod.execute(sqlSession, args);
        }
    }
}
我们看MapperProxy就是一个实现了InvocationHandler接口的动态代理类,当调用这个代理类的invoke方法时,最终会调用到mapperMethod.execute方法:
public Object execute(SqlSession sqlSession, Object[] args) {
    Object result;
    Object param;
    switch(this.command.getType()) {
    case INSERT:
        param = this.method.convertArgsToSqlCommandParam(args);
        result = this.rowCountResult(sqlSession.insert(this.command.getName(), param));
        break;
    case UPDATE:
        param = this.method.convertArgsToSqlCommandParam(args);
        result = this.rowCountResult(sqlSession.update(this.command.getName(), param));
        break;
    case DELETE:
        param = this.method.convertArgsToSqlCommandParam(args);
        result = this.rowCountResult(sqlSession.delete(this.command.getName(), param));
        break;
    case SELECT:
        if (this.method.returnsVoid() && this.method.hasResultHandler()) {
            this.executeWithResultHandler(sqlSession, args);
            result = null;
        } else if (this.method.returnsMany()) {
            result = this.executeForMany(sqlSession, args);
        } else if (this.method.returnsMap()) {
            result = this.executeForMap(sqlSession, args);
        } else if (this.method.returnsCursor()) {
            result = this.executeForCursor(sqlSession, args);
        } else {
            param = this.method.convertArgsToSqlCommandParam(args);
            result = sqlSession.selectOne(this.command.getName(), param);
            if (this.method.returnsOptional() && (result == null || !this.method.getReturnType().equals(result.getClass()))) {
                result = Optional.ofNullable(result);
            }
        }
        break;
    case FLUSH:
        result = sqlSession.flushStatements();
        break;
    default:
        throw new BindingException("Unknown execution method for: " + this.command.getName());
    }

    if (result == null && this.method.getReturnType().isPrimitive() && !this.method.returnsVoid()) {
        throw new BindingException("Mapper method '" + this.command.getName() + " attempted to return null from a method with a primitive return type (" + this.method.getReturnType() + ").");
    } else {
        return result;
    }
}
我们可以看到SELECT方法最终也是调用mybatis的SqlSession的selectOne方法,所以他们底层都是使用selectOne同一个方法,只不过自定义方法是通过动态代理的方式调用自身的方法。至于selectOne的代码的后续逻辑请参考:Mybatis学习之工作流程代码详解
二、Mybatis注解Annotation@Select、@Insert、@Update、@Delete原理
首先我们来看注解:
@Select("select id,username as name,age,phone,`desc` from User where id = #{id}")
public User selectUser(Integer id);
可以看到注解是一个接口:
public @interface Select {
    String[] value();
}
其实注解解析是在这个类:org.apache.ibatis.builder.annotation.MapperAnnotationBuilder,该类中有一个静态方法,包含了所有的注解:
    static {
        SQL_ANNOTATION_TYPES.add(Select.class);
        SQL_ANNOTATION_TYPES.add(Insert.class);
        SQL_ANNOTATION_TYPES.add(Update.class);
        SQL_ANNOTATION_TYPES.add(Delete.class);
        SQL_PROVIDER_ANNOTATION_TYPES.add(SelectProvider.class);
        SQL_PROVIDER_ANNOTATION_TYPES.add(InsertProvider.class);
        SQL_PROVIDER_ANNOTATION_TYPES.add(UpdateProvider.class);
        SQL_PROVIDER_ANNOTATION_TYPES.add(DeleteProvider.class);
    }
然后我们来看看该类的解析注解方法:
public void parse() {
    String resource = this.type.toString();
    if (!this.configuration.isResourceLoaded(resource)) {
        this.loadXmlResource();
        this.configuration.addLoadedResource(resource);
        this.assistant.setCurrentNamespace(this.type.getName());
        this.parseCache();
        this.parseCacheRef();
        Method[] methods = this.type.getMethods();
        Method[] var3 = methods;
        int var4 = methods.length;

        for(int var5 = 0; var5 < var4; ++var5) {
            Method method = var3[var5];

            try {
                if (!method.isBridge()) {
                    this.parseStatement(method);
                }
            } catch (IncompleteElementException var8) {
                this.configuration.addIncompleteMethod(new MethodResolver(this, method));
            }
        }
    }

    this.parsePendingMethods();
}
我先我们看loadXmlResource方法可以看到会去获取XML配置文件,因此可以知道解析是优先解析XML配置文件的,然后才解析注解的。
private void loadXmlResource() {
    if (!this.configuration.isResourceLoaded("namespace:" + this.type.getName())) {
        String xmlResource = this.type.getName().replace('.', '/') + ".xml";
        InputStream inputStream = this.type.getResourceAsStream("/" + xmlResource);
        if (inputStream == null) {
            try {
                inputStream = Resources.getResourceAsStream(this.type.getClassLoader(), xmlResource);
            } catch (IOException var4) {
                ;
            }
        }

        if (inputStream != null) {
            XMLMapperBuilder xmlParser = new XMLMapperBuilder(inputStream, this.assistant.getConfiguration(), xmlResource, this.configuration.getSqlFragments(), this.type.getName());
            xmlParser.parse();
        }
    }
}
此处不再赘述如何解析XML的,可以参考:Mybatis学习之工作流程代码详解。接下来继续回到原先的位置,我们接下来看parseStatement(method)方法,进入到内部:
void parseStatement(Method method) {
    Class<?> parameterTypeClass = this.getParameterType(method);
    LanguageDriver languageDriver = this.getLanguageDriver(method);
    SqlSource sqlSource = this.getSqlSourceFromAnnotations(method, parameterTypeClass, languageDriver);
    if (sqlSource != null) {
        ... ...
    }
}
可以看到有getSqlSourceFromAnnotations这么一个方法,这个方法根据名字就可以看出来是从注解中获取源sql语句,进入:
private SqlSource getSqlSourceFromAnnotations(Method method, Class<?> parameterType, LanguageDriver languageDriver) {
    try {
        Class<? extends Annotation> sqlAnnotationType = this.getSqlAnnotationType(method);
        Class<? extends Annotation> sqlProviderAnnotationType = this.getSqlProviderAnnotationType(method);
        Annotation sqlProviderAnnotation;
        if (sqlAnnotationType != null) {
            if (sqlProviderAnnotationType != null) {
                throw new BindingException("You cannot supply both a static SQL and SqlProvider to method named " + method.getName());
            } else {
                sqlProviderAnnotation = method.getAnnotation(sqlAnnotationType);
                String[] strings = (String[])sqlProviderAnnotation.getClass().getMethod("value").invoke(sqlProviderAnnotation);
                return this.buildSqlSourceFromStrings(strings, parameterType, languageDriver);
            }
        } else if (sqlProviderAnnotationType != null) {
            sqlProviderAnnotation = method.getAnnotation(sqlProviderAnnotationType);
            return new ProviderSqlSource(this.assistant.getConfiguration(), sqlProviderAnnotation, this.type, method);
        } else {
            return null;
        }
    } catch (Exception var8) {
        throw new BuilderException("Could not find value method on SQL annotation.  Cause: " + var8, var8);
    }
}
上文标粗部分可以看出来,第一步是去获取注解类型:Insert、Update、Select、Delete类型,然后第二步就是或者注解类型中的sql语句。那么我们解析的入口parse是什么时候调用的呢?我们可以参考Mybatis学习之工作流程代码详解中就有说过,在我们入口的build方法可以一步步跟代码,走进XMLConfigBuilder类中,有一个mapperElement方法:
private void mapperElement(XNode parent) throws Exception {
    if (parent != null) {
        Iterator var2 = parent.getChildren().iterator();

        while(true) {
            while(var2.hasNext()) {
                XNode child = (XNode)var2.next();
                String resource;
                if ("package".equals(child.getName())) {
                    resource = child.getStringAttribute("name");
                    this.configuration.addMappers(resource);
                } else {
                    resource = child.getStringAttribute("resource");
                    String url = child.getStringAttribute("url");
                    String mapperClass = child.getStringAttribute("class");
                    XMLMapperBuilder mapperParser;
                    InputStream inputStream;
                    if (resource != null && url == null && mapperClass == null) {
                        ErrorContext.instance().resource(resource);
                        inputStream = Resources.getResourceAsStream(resource);
                        mapperParser = new XMLMapperBuilder(inputStream, this.configuration, resource, this.configuration.getSqlFragments());
                        mapperParser.parse();
                    } else if (resource == null && url != null && mapperClass == null) {
                        ErrorContext.instance().resource(url);
                        inputStream = Resources.getUrlAsStream(url);
                        mapperParser = new XMLMapperBuilder(inputStream, this.configuration, url, this.configuration.getSqlFragments());
                        mapperParser.parse();
                    } else {
                        if (resource != null || url != null || mapperClass == null) {
                            throw new BuilderException("A mapper element may only specify a url, resource or class, but not more than one.");
                        }
                        Class<?> mapperInterface = Resources.classForName(mapperClass);
                        this.configuration.addMapper(mapperInterface);
                    }
                }
            }
            return;
        }
    }
}
可以进入到addMapper方法:
    public <T> void addMapper(Class<T> type) {
        this.mapperRegistry.addMapper(type);
    }
public <T> void addMapper(Class<T> type) {
    if (type.isInterface()) {
        if (this.hasMapper(type)) {
            throw new BindingException("Type " + type + " is already known to the MapperRegistry.");
        }
        boolean loadCompleted = false;

        try {
            this.knownMappers.put(type, new MapperProxyFactory(type));
            MapperAnnotationBuilder parser = new MapperAnnotationBuilder(this.config, type);
            parser.parse();
            loadCompleted = true;
        } finally {
            if (!loadCompleted) {
                this.knownMappers.remove(type);
            }

        }
    }

}
因此可以看出一连串下来调用了parse方法,这就是注解如何获取sql实现的整个流程,一条流水线下来就可以看到:
>org.apache.ibatis.session.SqlSessionFactoryBuilder.build(java.io.InputStream)
 >org.apache.ibatis.builder.xml.XMLConfigBuilder
   >org.apache.ibatis.builder.xml.XMLConfigBuilder.mapperElement
       >org.apache.ibatis.session.Configuration#addMapper
        >org.apache.ibatis.binding.MapperRegistry#addMapper
         >org.apache.ibatis.builder.annotation.MapperAnnotationBuilder#parse
          >org.apache.ibatis.builder.annotation.MapperAnnotationBuilder#parseStatement
           >org.apache.ibatis.builder.annotation.MapperAnnotationBuilder#getSqlSourceFromAnnotations
这就是注解SQL实现的原理。
三、SQL语句中#{id}是如何替换成?的
我们都知道SQL语句中不管是注解还是XML,参数都是"#{id}"格式,但是最终使用的时候替换成"?"了:
@Select("select id,username as name,age,phone,`desc` from User where id = #{id}")
<mapper namespace="org.mybatis.example.UserMapper">
    <select id="selectUser" resultType="com.houjing.mybatis.pojo.User">
    select * from User where id = #{id}
  </select>
</mapper>
我们重新回到代码上述的MapperAnnotationBuilder#getSqlSourceFromAnnotations方法,
private SqlSource getSqlSourceFromAnnotations(Method method, Class<?> parameterType, LanguageDriver languageDriver) {
        try {
            Class<? extends Annotation> sqlAnnotationType = this.getSqlAnnotationType(method);
            Class<? extends Annotation> sqlProviderAnnotationType = this.getSqlProviderAnnotationType(method);
            Annotation sqlProviderAnnotation;
            if (sqlAnnotationType != null) {
                if (sqlProviderAnnotationType != null) {
                    throw new BindingException("You cannot supply both a static SQL and SqlProvider to method named " + method.getName());
                } else {
                    sqlProviderAnnotation = method.getAnnotation(sqlAnnotationType);
                    String[] strings = (String[])sqlProviderAnnotation.getClass().getMethod("value").invoke(sqlProviderAnnotation);
                    return this.buildSqlSourceFromStrings(strings, parameterType, languageDriver);
                }
            } else if (sqlProviderAnnotationType != null) {
                sqlProviderAnnotation = method.getAnnotation(sqlProviderAnnotationType);
                return new ProviderSqlSource(this.assistant.getConfiguration(), sqlProviderAnnotation, this.type, method);
            } else {
                return null;
            }
        } catch (Exception var8) {
            throw new BuilderException("Could not find value method on SQL annotation.  Cause: " + var8, var8);
        }
    }
我们看到拿到原始注解sql语句后,会继续调用buildSqlSourceFromString进行进一步处理,进入到此方法:
private SqlSource buildSqlSourceFromStrings(String[] strings, Class<?> parameterTypeClass, LanguageDriver languageDriver) {
    StringBuilder sql = new StringBuilder();
    String[] var5 = strings;
    int var6 = strings.length;

    for(int var7 = 0; var7 < var6; ++var7) {
        String fragment = var5[var7];
        sql.append(fragment);
        sql.append(" ");
    }

    return languageDriver.createSqlSource(this.configuration, sql.toString().trim(), parameterTypeClass);
}
然后进入到org.apache.ibatis.scripting.xmltags.XMLLanguageDriver类中的createSqlSource方法:
public class XMLLanguageDriver implements LanguageDriver {public SqlSource createSqlSource(Configuration configuration, XNode script, Class<?> parameterType) {
        XMLScriptBuilder builder = new XMLScriptBuilder(configuration, script, parameterType);
        return builder.parseScriptNode();
    }

    public SqlSource createSqlSource(Configuration configuration, String script, Class<?> parameterType) {
        if (script.startsWith("<script>")) {
            XPathParser parser = new XPathParser(script, false, configuration.getVariables(), new XMLMapperEntityResolver());
            return this.createSqlSource(configuration, parser.evalNode("/script"), parameterType);
        } else {
            script = PropertyParser.parse(script, configuration.getVariables());
            TextSqlNode textSqlNode = new TextSqlNode(script);
            return (SqlSource)(textSqlNode.isDynamic() ? new DynamicSqlSource(configuration, textSqlNode)
            : new RawSqlSource(configuration, script, parameterType));
        }
    }
}
然后到RawSqlSource类中查看:
public class RawSqlSource implements SqlSource {public RawSqlSource(Configuration configuration, String sql, Class<?> parameterType) {
        SqlSourceBuilder sqlSourceParser = new SqlSourceBuilder(configuration);
        Class<?> clazz = parameterType == null ? Object.class : parameterType;
        this.sqlSource = sqlSourceParser.parse(sql, clazz, new HashMap());
    }

    private static String getSql(Configuration configuration, SqlNode rootSqlNode) {
        DynamicContext context = new DynamicContext(configuration, (Object)null);
        rootSqlNode.apply(context);
        return context.getSql();
    }

    public BoundSql getBoundSql(Object parameterObject) {
        return this.sqlSource.getBoundSql(parameterObject);
  }
}
在parse方法中,我们可以看到:
public class SqlSourceBuilder extends BaseBuilder {
    private static final String PARAMETER_PROPERTIES = "javaType,jdbcType,mode,numericScale,resultMap,typeHandler,jdbcTypeName";
    public SqlSourceBuilder(Configuration configuration) {
        super(configuration);
    }
    public SqlSource parse(String originalSql, Class<?> parameterType, Map<String, Object> additionalParameters) {
        SqlSourceBuilder.ParameterMappingTokenHandler handler = new SqlSourceBuilder.ParameterMappingTokenHandler(this.configuration, parameterType, additionalParameters);
        GenericTokenParser parser = new GenericTokenParser("#{", "}", handler);
        String sql = parser.parse(originalSql);
        return new StaticSqlSource(this.configuration, sql, handler.getParameterMappings());
    }
}
接下来在parse原始sql的时候,代码如下:
public String parse(String text) {
        if (text != null && !text.isEmpty()) {
            int start = text.indexOf(this.openToken);
            if (start == -1) {
                return text;
            } else {
                char[] src = text.toCharArray();
                int offset = 0;
                StringBuilder builder = new StringBuilder();

                for(StringBuilder expression = null; start > -1; start = text.indexOf(this.openToken, offset)) {
                    if (start > 0 && src[start - 1] == '\') {
                        builder.append(src, offset, start - offset - 1).append(this.openToken);
                        offset = start + this.openToken.length();
                    } else {
                        if (expression == null) {
                            expression = new StringBuilder();
                        } else {
                            expression.setLength(0);
                        }

                        builder.append(src, offset, start - offset);
                        offset = start + this.openToken.length();

                        int end;
                        for(end = text.indexOf(this.closeToken, offset); end > -1; end = text.indexOf(this.closeToken, offset)) {
                            if (end <= offset || src[end - 1] != '\') {
                                expression.append(src, offset, end - offset);
                                break;
                            }

                            expression.append(src, offset, end - offset - 1).append(this.closeToken);
                            offset = end + this.closeToken.length();
                        }

                        if (end == -1) {
                            builder.append(src, start, src.length - start);
                            offset = src.length;
                        } else {
                            builder.append(this.handler.handleToken(expression.toString()));
                            offset = end + this.closeToken.length();
                        }
                    }
                }

                if (offset < src.length) {
                    builder.append(src, offset, src.length - offset);
                }

                return builder.toString();
            }
        } else {
            return "";
        }
    }
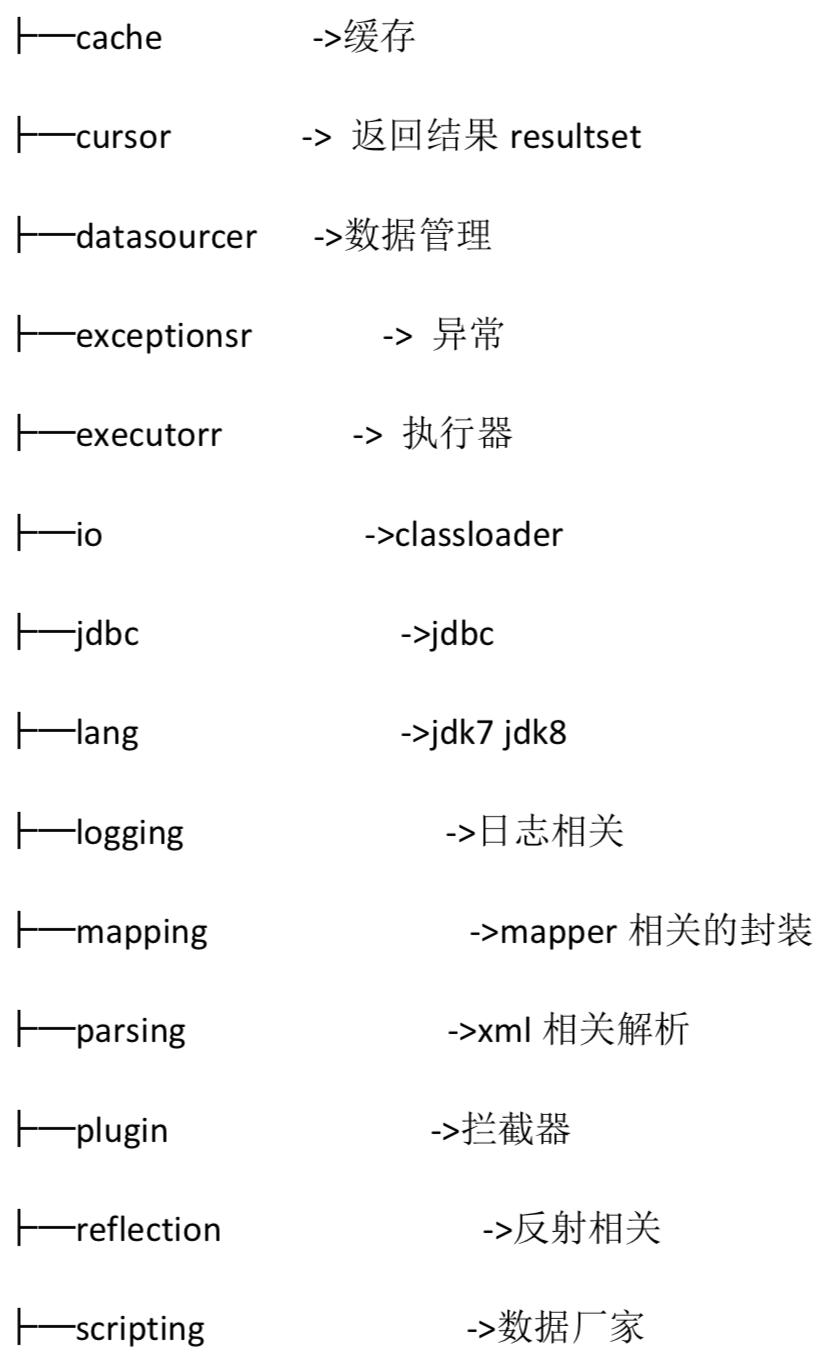
这个方法就会对SQL进行截取,实现替换,代码中this.openToken就是之前传递的" #{ "串。关于具体如何解析SQL此处不再赘述。实际上关于sql解析是有一定规则的,mybatis的sql解析是基于SqlNode接口,如下图所示:
负责解析各种类型的SQL语句。
四、Mybatis执行器原理
我们先来看执行器创建入口:
SqlSession session = sqlSessionFactory.openSession();

public SqlSession openSession() {
    return this.openSessionFromDataSource(this.configuration.getDefaultExecutorType(), (TransactionIsolationLevel)null, false);
}

private SqlSession openSessionFromDataSource(ExecutorType execType, TransactionIsolationLevel level, boolean autoCommit) {
    Transaction tx = null;

    DefaultSqlSession var8;
    try {
        Environment environment = this.configuration.getEnvironment();
        TransactionFactory transactionFactory = this.getTransactionFactoryFromEnvironment(environment);
        tx = transactionFactory.newTransaction(environment.getDataSource(), level, autoCommit);
        Executor executor = this.configuration.newExecutor(tx, execType);
        var8 = new DefaultSqlSession(this.configuration, executor, autoCommit);
    } catch (Exception var12) {
        this.closeTransaction(tx);
        throw ExceptionFactory.wrapException("Error opening session.  Cause: " + var12, var12);
    } finally {
        ErrorContext.instance().reset();
    }

    return var8;
}
其实我们创建执行器的时候有三种执行器类型,其实三种执行器差别不大,内部代码大致一致,一般是用的都是SIMPLE执行器:
public enum ExecutorType {
    SIMPLE,      //基本的简单执行器
    REUSE,       //复用执行器
    BATCH;           //批量执行器

    private ExecutorType() {
    }
}
同时可以通过下述代码看出,默认创建SIMPLE执行器,具体执行器内部如何很简单就不一一示范了,都是调用JDBC的访问数据库接口:
public Executor newExecutor(Transaction transaction, ExecutorType executorType) {
        executorType = executorType == null ? this.defaultExecutorType : executorType;
        executorType = executorType == null ? ExecutorType.SIMPLE : executorType;
        Object executor;
        if (ExecutorType.BATCH == executorType) {
            executor = new BatchExecutor(this, transaction);
        } else if (ExecutorType.REUSE == executorType) {
            executor = new ReuseExecutor(this, transaction);
        } else {
            executor = new SimpleExecutor(this, transaction);
        }
        if (this.cacheEnabled) {
            executor = new CachingExecutor((Executor)executor);
        }

        Executor executor = (Executor)this.interceptorChain.pluginAll(executor);
        return executor;
    }
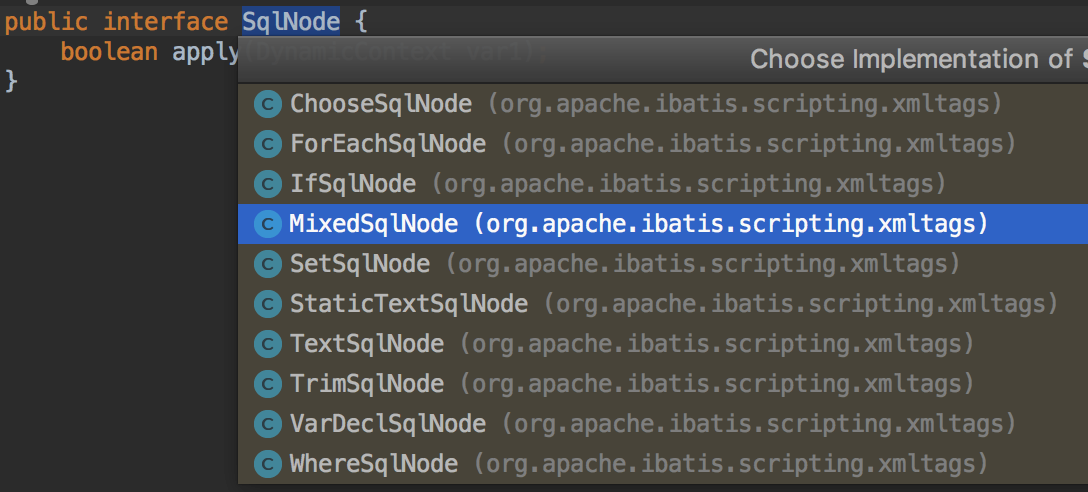
通过代码结构可以看到集中执行引擎关系:
实际上BaseExecutor是一个Abstract类,按照命名应该叫AbstractExecutor,就像AbstractMap一样。
其实CacheingExecutor就是运用了一个包装模式:
public class CachingExecutor implements Executor {
    private final Executor delegate;public CachingExecutor(Executor delegate) {
        this.delegate = delegate;
        delegate.setExecutorWrapper(this);
    }
}
从他的创建也可以看出来,可以传递三种执行器实例进去:
if (this.cacheEnabled) {
    executor = new CachingExecutor((Executor)executor);
}
五、Mybatis插件的原理
从入口的代码省略,时期访问路径就是:
首先我们先看看插件是如何解析的,当我们解析配置文件的时候就会读取插件相关的配置:
<plugins>
    <plugin interceptor="com.mybatis.plugin.SqlPrintInterceptor"></plugin>
    <property name="someProperty" value="100"/>
</plugins>
private void parseConfiguration(XNode root) {
    try {
        this.propertiesElement(root.evalNode("properties"));
        Properties settings = this.settingsAsProperties(root.evalNode("settings"));
        this.loadCustomVfs(settings);
        this.loadCustomLogImpl(settings);
        this.typeAliasesElement(root.evalNode("typeAliases"));
        this.pluginElement(root.evalNode("plugins"));
        this.objectFactoryElement(root.evalNode("objectFactory"));
        this.objectWrapperFactoryElement(root.evalNode("objectWrapperFactory"));
        this.reflectorFactoryElement(root.evalNode("reflectorFactory"));
        this.settingsElement(settings);
        this.environmentsElement(root.evalNode("environments"));
        this.databaseIdProviderElement(root.evalNode("databaseIdProvider"));
        this.typeHandlerElement(root.evalNode("typeHandlers"));
        this.mapperElement(root.evalNode("mappers"));
    } catch (Exception var3) {
        throw new BuilderException("Error parsing SQL Mapper Configuration. Cause: " + var3, var3);
    }
}
private void pluginElement(XNode parent) throws Exception {
    if (parent != null) {
        Iterator var2 = parent.getChildren().iterator();

        while(var2.hasNext()) {
            XNode child = (XNode)var2.next();
            String interceptor = child.getStringAttribute("interceptor");
            Properties properties = child.getChildrenAsProperties();
            Interceptor interceptorInstance = (Interceptor)this.resolveClass(interceptor).getDeclaredConstructor().newInstance();
            interceptorInstance.setProperties(properties);
            this.configuration.addInterceptor(interceptorInstance);
        }
    }

}
可以看到添加到了Configuration类的interceptorChain属性:
    public void addInterceptor(Interceptor interceptor) {
        this.interceptorChain.addInterceptor(interceptor);
    }
最终调用了:
public class InterceptorChain {
    private final List<Interceptor> interceptors = new ArrayList();

    public InterceptorChain() {
    }

    public Object pluginAll(Object target) {
        Interceptor interceptor;
        for(Iterator var2 = this.interceptors.iterator(); var2.hasNext(); target = interceptor.plugin(target)) {
            interceptor = (Interceptor)var2.next();
        }

        return target;
    }

    public void addInterceptor(Interceptor interceptor) {
        this.interceptors.add(interceptor);
    }

    public List<Interceptor> getInterceptors() {
        return Collections.unmodifiableList(this.interceptors);
    }
}
可以看出这是一个责任链设计模式,我们根据配置一次放入了拦截器插件。然后那么怎么去执行的呢?回到执行器创建的地方:
public Executor newExecutor(Transaction transaction, ExecutorType executorType) {
        executorType = executorType == null ? this.defaultExecutorType : executorType;
        executorType = executorType == null ? ExecutorType.SIMPLE : executorType;
        Object executor;
        if (ExecutorType.BATCH == executorType) {
            executor = new BatchExecutor(this, transaction);
        } else if (ExecutorType.REUSE == executorType) {
            executor = new ReuseExecutor(this, transaction);
        } else {
            executor = new SimpleExecutor(this, transaction);
        }
        if (this.cacheEnabled) {
            executor = new CachingExecutor((Executor)executor);
        }

        Executor executor = (Executor)this.interceptorChain.pluginAll(executor);
        return executor;
    }
可以看到会调用拦截器链类的pluginsAll方法,该方法内部会调用拦截器的plugin方法:
public Object pluginAll(Object target) {
    Interceptor interceptor;
    for(Iterator var2 = this.interceptors.iterator(); var2.hasNext(); target = interceptor.plugin(target)) {
        interceptor = (Interceptor)var2.next();
    }

    return target;
}
public interface Interceptor {
    Object intercept(Invocation var1) throws Throwable;

    default Object plugin(Object target) {
        return Plugin.wrap(target, this);
    }

    default void setProperties(Properties properties) {
    }
}
最终会调用如下方法:
public static Object wrap(Object target, Interceptor interceptor) {
    Map<Class<?>, Set<Method>> signatureMap = getSignatureMap(interceptor);
    Class<?> type = target.getClass();
    Class<?>[] interfaces = getAllInterfaces(type, signatureMap);
    return interfaces.length > 0 ? Proxy.newProxyInstance(type.getClassLoader(), interfaces, new Plugin(target, interceptor, signatureMap)) : target;
}
我们首先看到会先拿到SignatureMap,这里面实际上是注解的内容:
private static Map<Class<?>, Set<Method>> getSignatureMap(Interceptor interceptor) {
    Intercepts interceptsAnnotation = (Intercepts)interceptor.getClass().getAnnotation(Intercepts.class);
    if (interceptsAnnotation == null) {
        throw new PluginException("No @Intercepts annotation was found in interceptor " + interceptor.getClass().getName());
    } else {
        Signature[] sigs = interceptsAnnotation.value();
        Map<Class<?>, Set<Method>> signatureMap = new HashMap();
        Signature[] var4 = sigs;
        int var5 = sigs.length;

        for(int var6 = 0; var6 < var5; ++var6) {
            Signature sig = var4[var6];
            Set methods = (Set)signatureMap.computeIfAbsent(sig.type(), (k) -> {
                return new HashSet();
            });

            try {
                Method method = sig.type().getMethod(sig.method(), sig.args());
                methods.add(method);
            } catch (NoSuchMethodException var10) {
                throw new PluginException("Could not find method on " + sig.type() + " named " + sig.method() + ". Cause: " + var10, var10);
            }
        }
        return signatureMap;
    }
}
那么具体是拿到的什么内容呢,实际上就是拦截器类的注解:
@Intercepts
        ({
                @Signature(type = Executor.class, method = "query", args = {MappedStatement.class, Object.class, RowBounds.class, ResultHandler.class}),
                @Signature(type = Executor.class, method = "update", args = {MappedStatement.class, Object.class})
        })
public class SqlPrintInterceptor implements Interceptor{}
拿到注解后会继续后续的执行,通过如下代码可以看出是基于动态代理。因此Plugin是实现了InvocationHandler接口的的动态代理类,最后总会执行invoke方法:
return interfaces.length > 0 ? Proxy.newProxyInstance(type.getClassLoader(), interfaces, new Plugin(target, interceptor, signatureMap)) : target;
public class Plugin implements InvocationHandler {
    public Object invoke(Object proxy, Method method, Object[] args) throws Throwable {
        try {
            Set<Method> methods = (Set)this.signatureMap.get(method.getDeclaringClass());
            return methods != null && methods.contains(method) ? this.interceptor.intercept(new Invocation(this.target, method, args))
                                      : method.invoke(this.target, args);
        } catch (Exception var5) {
            throw ExceptionUtil.unwrapThrowable(var5);
        }
    }
}
因此当signatureMap匹配上后,会去执行Interceptor的intercept方法实现拦截。其整体流程如下:
>org.apache.ibatis.session.SqlSessionFactoryBuilder.build(java.io.InputStream)
 >org.apache.ibatis.builder.xml.XMLConfigBuilder
  >org.apache.ibatis.builder.xml.XMLConfigBuilder.parse
     >org.apache.ibatis.builder.xml.XMLConfigBuilder#parseConfiguration
      >org.apache.ibatis.builder.xml.XMLConfigBuilder#pluginElement
       >org.apache.ibatis.session.Configuration#addInterceptor
           >org.apache.ibatis.plugin.InterceptorChain#addInterceptor
            >org.apache.ibatis.session.Configuration#newExecutor(org.apache.ibatis.transaction.Transaction, org.apache.ibatis.session.ExecutorType) 调用入口
             >org.apache.ibatis.plugin.InterceptorChain#pluginAll
              >org.apache.ibatis.plugin.Interceptor#plugin
               >org.apache.ibatis.plugin.Plugin#wrap
                >org.apache.ibatis.plugin.Plugin#getSignatureMap
                 >org.apache.ibatis.plugin.Plugin#invoke  动态代理
因此Mybatis插件的底层原理就是使用了责任链模式+动态代理实现的。至于责任链模式请参考:设计模式之责任链模式(Chain of Responsibility)详解及代码示例
六、Mybatis缓存的原理
缓存使用情况:
- 缓存里面没有->查询数据库-> 缓存到缓存
- 缓存里面有数据-> 先查缓存的->直接返回
我们以BaseExecutor执行器为例查看query方法:
public <E> List<E> query(MappedStatement ms, Object parameter, RowBounds rowBounds, ResultHandler resultHandler, CacheKey key, BoundSql boundSql)
  throws SQLException {
    ErrorContext.instance().resource(ms.getResource()).activity("executing a query").object(ms.getId());
    if (this.closed) {
        throw new ExecutorException("Executor was closed.");
    } else {
        if (this.queryStack == 0 && ms.isFlushCacheRequired()) {
            this.clearLocalCache();
        }

        List list;
        try {
            ++this.queryStack;
            list = resultHandler == null ? (List)this.localCache.getObject(key) : null;      //查询缓存中是否有此key
            if (list != null) {
                this.handleLocallyCachedOutputParameters(ms, key, parameter, boundSql);    //如果有直接查询缓存
            } else {
                list = this.queryFromDatabase(ms, parameter, rowBounds, resultHandler, key, boundSql);  //第一次查询数据库
            }
        } finally {
            --this.queryStack;
        }
     ... ...return list;
    }
}
那么这个key如何生成的呢:
CacheKey key = this.createCacheKey(ms, parameter, rowBounds, boundSql);
具体代码就在org.apache.ibatis.executor.BaseExecutor#createCacheKey这个方法中了,此处不再赘述,大致Cachekey就是:id+offset+limit+sql+environment,如下处示例:
-2145623548:1474703547:com.mybatis.mapper.UserMapper.selectUser:0:2147483647:select * from User where id = ?:1:development
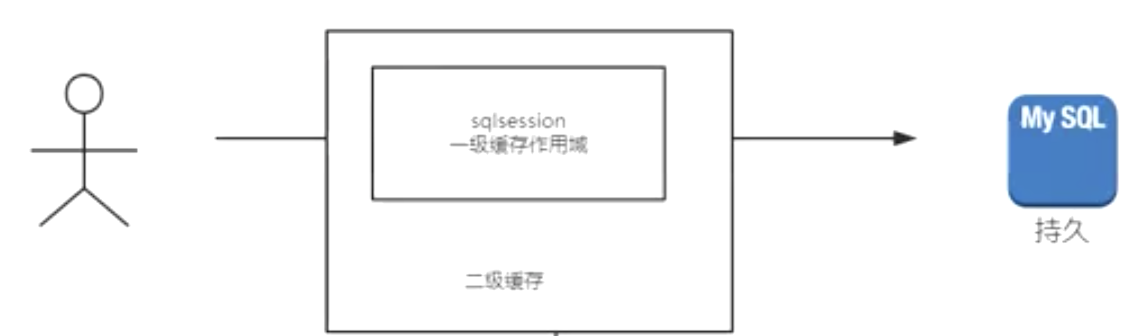
Mybatis缓存是分为一级缓存和二级缓存,默认的作用域是不一样的:
- 一级缓存作用域是sqlsession,不同的SQLSession缓存的是不同的缓存,因为根据key生成的不同SQLSession的id都不一样,默认开启;
- 二级缓存需要进行开关以及缓存策略配置,作用域是全局(可以跨进程),可以和Redis进行配置使用。
如下是二级缓存开关配置:
<settings>
  <setting name="cacheEnabled" value="true" />
</settings>
同时还需要进行缓存策略以及缓存方案配置:
<mapper namespace="com.mybatis.mapper.UserMapper">
    <cache eviction="LRU" type="com.cache.MybatisRedisCache"/>
    <select id="selectUser" resultType="com.User">
        select * from User where id = #{id}
    </select>
</mapper>
七、Mybatis源码涉及的设计模式
Mybatis涉及了大量设计模式的使用,如下图所示:

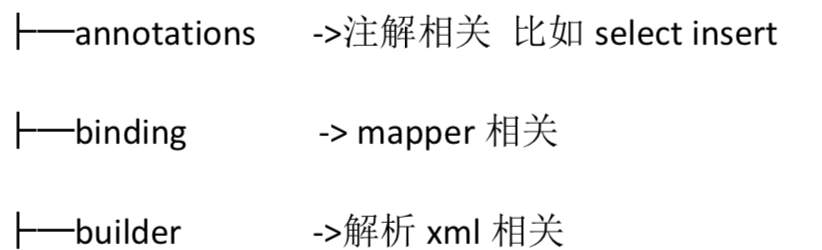
八、Mybatis源码包目录