1、为组件添加样式
import { LitElement, css, html } from 'lit-element';

class MyElement extends LitElement {
  static get styles() {
    return css`
      div { color: red; }
    `;
  }
  render() {
    return html`
      <div>I'm styled!</div>
    `;
  }
}
如同 static get properties()属性一样,这是另一个静态属性 static get styles(),专门用来定义组件的样式属性,css是如同html一样的另一个父类函数
您添加到组件中的样式使用阴影DOM限定范围,不会被用于其他节点。
1.1 单个样式
直接返回模板字符串
static get styles() {
  return css`...`;
}
1.2 多个样式
返回一个数组
static get styles() {
  return [ css`...`, css`...`];
}
2、在样式中使用表达式
就像在html内容中使用属性一样
import { LitElement, html, css } from 'lit-element';

const mainColor = css`red`;

class MyElement extends LitElement {
  static get styles() {
    return css`
      div { color: ${mainColor} }
    `;
  }
  render() {
    return html`<div>Some content in a div</div>`;
  }
}

customElements.define('my-element', MyElement);
3、继承样式
可以从父类继承样式斌不过添加当自己的样式属性
父类:super-element.js
import { LitElement, html, css } from 'lit-element';

export class SuperElement extends LitElement {
  static get styles() {
    return css`
      button {  200px; }
    `;
  }

  render() {
    return html`
      <button>click</button>
    `;
  }
}

customElements.define('super-element', SuperElement);
子类:my-element.js
import { css } from 'lit-element';
import { SuperElement } from './super-element.js';

class MyElement extends SuperElement {
  static get styles() {
    return [
      super.styles,
      css`button { color: red; }`
    ];
  }
}

customElements.define('my-element', MyElement);
4、共享样式
您可以通过创建导出标签样式的模块来在组件之间共享样式:
button-styles.js
import { css } from 'lit-element';

export const buttonStyles = css`
  .blue-button {
    color: white;
    background-color: blue;
  }
  .blue-button:disabled {
    background-color: grey;
  }`;
在其他组件中引用它
import { buttonStyles } from './button-styles.js';

class MyElement extends LitElement {
  static get styles() {
    return [
      buttonStyles,
      css`
        :host { display: block;
          border: 1px solid black;
        }`
    ]
  }
  ...
}
5、Shadow DOM样式概述
本节简要概述了影子DOM样式。
添加到组件的样式可能会影响:
- 阴影树(您组件的渲染模板)。
- 组件本身。
- 组件的子元素。
5.1 设置阴影树的样式
LitElement模板默认情况下渲染到阴影树中。范围限于元素的阴影树的样式不会影响主document或其他阴影树。同样,除了继承的CSS属性外,document级样式不会影响阴影树的内容。
当您使用标准CSS选择器时,它们仅与组件的阴影树中的元素匹配,这就是组件的封装思想之一。
import { LitElement, html, css } from 'lit-element';

class MyElement extends LitElement {
  static get styles() {
    return css`
      * { color: red; }
      p { font-family: sans-serif; }
      .myclass { margin: 100px; }
      #main { padding: 30px; }
      h1 { font-size: 4em; }
    `;
  }
  render() {
    return html`
      <p>Hello World</p>
      <p class="myclass">Hello World</p>
      <p id="main">Hello World</p>
      <h1>Hello World</h1>
    `;
  }
}

customElements.define('my-element', MyElement);
5.2 ::host 设置组件本身的样式
您可以使用特殊的 :host 选择器来设置组件本身的样式。(拥有或“ :hosts ”一个阴影树的元素称为宿主元素。)
要为 host 元素创建默认样式,请使用 :host CSS伪类和 :host()CSS伪类函数。
- :host选择宿主元素。
- :host(selector) 选择宿主元素,但前提是宿主元素与选择器匹配。
my-element.js
import { LitElement, html, css } from 'lit-element';

class MyElement extends LitElement {
  static get styles() {
    return css`
      /* Selects the host */
      :host {
        display: block;
      }

      /* Selects the host element if it is hidden */
      :host([hidden]) {
        display: none;
      }

      /* Selects the host element if it has class "blue" */
      :host(.blue) {
        background-color: aliceblue;
        color: blue;
      }
    `;
  }
  render() {
    return html`
      <p>Hello World</p>
    `;
  }
}

customElements.define('my-element', MyElement);
index.html
<html>
  <head>
    <title>lit-element code sample</title>
    <script type="module" src="./my-element.js"></script>
  </head>
  <body>
    <my-element></my-element>
    <my-element hidden></my-element>
    <my-element class="blue"></my-element>
  </body>
</html>
结果是第一个my-element正常显示,第二个隐藏,第三个以指定颜色显示
请注意,host 元素也可能会受到阴影树外部的样式的影响,因此,您应将在 :host 和 :host() 规则中设置的样式视为可以被用户覆盖的默认样式。例如:
my-element {
  display: inline-block;
}
5.3 ::slotted设置组件子节点的样式
您的组件可以接受子节点(例如<ul>元素可以具有<li>个子节点)。要渲染子节点,模板需要包括一个或多个<slot>元素,如使用slot元素渲染子节点中所述。
使用 ::slotted() CSS伪元素通过<slot> s选择包含在模板中的子节点
- ::slotted(*) 匹配所有slotted 的元素。
- ::slotted(p)匹配slotted <p>标签。
- p ::slotted(*)匹配slotted 元素,其中<slot>是<p>元素的子元素。
例如:
import { LitElement, html, css } from 'lit-element';

class MyElement extends LitElement {
  static get styles() {
    return css`
      ::slotted(*) { font-family: Roboto; }
      ::slotted(p) { color: blue; }
      div ::slotted(*) { color: red; }
    `;
  }
  render() {
    return html`
      <slot></slot>
      <div><slot name="hi"></slot></div>
    `;
  }
}
customElements.define('my-element', MyElement);
html
<html>
  <head>
    <title>lit-element code sample</title>
    <script type="module" src="./my-element.js"></script>
  </head>
  <body>
    <my-element>
      <p>Slotted paragraph</p>
      <span slot="hi">Slotted span inside a div</span>
    </my-element>
  </body>
</html>
第一个匹配所有子元素,第二个匹配 <p>Slotted paragraph</p> 它应该是蓝色,第三个匹配父元素为 div, name= "hi" 的标签,也就是 <span slot="hi">Slotted span inside a div</span>,应该是红色
请注意,只能使用 ::slotted() 设置直接匹配的子元素的样式。
<my-element>
  <div>Stylable with ::slotted()</div>
</my-element>

<my-element>
  <div><p>Not stylable with ::slotted()</p></div>
</my-element>
另外,可以从阴影树之外设置子样式,因此,应将 ::slotted() 样式视为可以覆盖的默认样式。
my-element div {
  // Outside style targetting a slotted child can override ::slotted() styles
}
5.4 具有自定义属性的可配置样式
静态样式每个类评估一次。使用CSS变量和自定义属性来制作可以在运行时配置的样式:
static get styles() {
  return css`
    :host { color: var(--themeColor); }
  `;
}
<style>
  html {
    --themeColor: #123456;
  }
</style>
<my-element></my-element>
6、在模板中定义范围样式
我们建议使用静态样式以获得最佳性能。但是,有时您可能需要在LitElement模板中定义样式。有两种方法可以在模板中添加范围样式:
- 使用<style>元素添加样式。
- 使用外部样式表添加样式。
每种方式分别有其自己的优点和缺点。
6.1 使用style元素
我们建议使用静态样式以获得最佳性能。但是,静态样式每个类解释一次(类属性)。有时,您可能需要解释每个实例的样式(对象属性)。
我们建议使用CSS属性来创建可自定义的样式。但是,您也可以在LitElement模板中包括<style>元素。这些将根据实例进行更新。
render() {
  return html`
    <style>
      /* updated per instance */
    </style>
    <div>template content</div>
  `;
}
6.2 style元素与表达式
直接解释每个实例的样式有一些重要的限制和性能问题。反面例子:
// Anti-pattern!
render() {
  return html`
    <style>
      :host {
        /* Warning: this approach has limitations & performance issues! */
        color: ${myColor}
      }
    </style>
    <div>template content</div>
  `;
}
由于ShadyCSS polyfill的限制,<style>元素内的表达式在ShadyCSS中不会按实例更新。有关更多信息,请参见ShadyCSS。
此外,对<style>元素内部的表达式求值效率低下。当<style>元素内的任何文本更改时,浏览器都必须重新解析整个<style>元素,从而导致不必要的工作。
如果需要计算<style>元素内的表达式,请使用以下策略来避免产生性能问题:
- 将需要按实例解释的样式与不需要按实例解释的样式分开。
- 通过创建一个在完整的<style>块内捕获该属性的表达式来解释每个实例的CSS属性,将其包含在模板中。
例如:
import { LitElement, html } from 'lit-element';

const perClassStyle = html`
  <style>
    :host {
      display: block;
      font-family: Roboto;
      font-size: 14px;
    }
  </style>
`;

const blueText = html`
  <style> :host { color: blue; } </style>
`;

const redText = html`
  <style> :host { color: red; } </style>
`;

class MyElement extends LitElement {
  constructor() {
    super();
    this.perInstanceStyle = redText;
  }
  render() {
    return html`
      ${perClassStyle}
      ${this.perInstanceStyle}
      <div>Hello World</div>
    `;
  }
}

customElements.define('my-element', MyElement);
定义了三个完整的<style>块样式表达式,然后分别作为类样式和实例样式
6.3 引入外部样式表
我们建议您将样式放在静态样式属性中,以获得最佳性能。但是,您可以在模板中使用<link>包含外部样式表:
外部css文件app-styles.css
:host {
  display: block;
  color: blue;
}
div {
  background: aliceblue;
}
button {
  width: 200px;
}
my-element.js
import { LitElement, html } from 'lit-element';

class MyElement extends LitElement {
  render() {
    return html`
      <link rel="stylesheet" href="./app-styles.css">
      <button>a button</button>
      <div>a div</div>
    `;
  }
}

customElements.define('my-element', MyElement);
index.html
<html>
<head>
  <title>lit-element code sample</title>
  <script type="module" src="./my-element.js"></script>
</head>
<body>
  <my-element></my-element>
</body>
</html>
但是,有一些重要警告:
- ShadyCSS polyfill不支持外部样式表。
- 外部样式在加载时可能导致内容未显示样式(FOUC)闪烁。
- href属性中的URL是相对于主文档的。如果您正在构建应用程序并且资源URL是公开,那么毫无问题,但是在构建可重用元素时避免使用外部样式表。
7、动态类和样式
使样式动态化的一种方法是将绑定添加到模板中的 class 或 style 属性。
lit-html库提供了两个指令 classMap 和 styleMap ,以方便地在HTML模板中应用类和样式。
有关这些和其他lit-html指令的更多信息,请参见lit-html内置指令的文档。
要使用 styleMap 或者 classMap:
7.1.导入styleMap 或者 classMap
import { classMap } from 'lit-html/directives/class-map';
import { styleMap } from 'lit-html/directives/style-map';
7.2.在模板中使用styleMap 或者 classMap
import { LitElement, html, css } from 'lit-element';
import { classMap } from 'lit-html/directives/class-map';
import { styleMap } from 'lit-html/directives/style-map';

class MyElement extends LitElement {
  static get properties() {
    return {
      classes: { type: Object },
      styles: { type: Object }
    }
  }
  static get styles() {
    return css`
      .mydiv { background-color: blue; }
      .someclass { border: 1px solid red; }
    `
  }
  constructor() {
    super();
    this.classes = { mydiv: true, someclass: true };
    this.styles = { color: 'green', fontFamily: 'Roboto' };
  }
  render() {
    return html`
      <div class=${classMap(this.classes)} style=${styleMap(this.styles)}>
        Some content
      </div>
    `;
  }
}

customElements.define('my-element', MyElement);
渲染结果是这样
<div class="mydiv someclass" style="color: green; font-family: Roboto;">
    Some content
</div>
7.3 classMap语法
<div class=${classMap({alert:true,info:true})}>Content.</div>
<!-- Equivalent: <div class="alert info">Content.</div> -->
例如:
my-element.js
import { LitElement, html, css } from 'lit-element';
import { classMap } from 'lit-html/directives/class-map';

class MyElement extends LitElement {
  static get styles() {
    return css`
      .alert {
        font-family: Roboto;
        font-size: 16px;
        padding: 24px;
        margin: 12px;
        background-color: whitesmoke;
      }
      .warning {
        color: red;
      }
      .info {
        color: blue;
      }
    `;
  }

  render() {
    return html`
      <div class=${classMap({alert:true,info:true})}>Content.</div>
    `;
  }

  // Equivalent:
  /*
  render() {
    return html`
      <div class="alert info">Content.</div>
    `;
  }
  */

}
customElements.define('my-element', MyElement);
index.html
<html>
  <head>
    <script src="./my-element.js" type="module"></script>
  </head>
  <body>
    <my-element></my-element>
  </body>
</html>
7.4 styleMap语法
styleMap将一组CSS规则应用于HTML元素:
<button style=${styleMap({
  backgroundColor: 'blue',
  border: '1px solid black'
})}>A button</button>

<!-- Equivalent:
  <button style="
    background-color:blue;
    border: 1px solid black;
  ">A button</button>
-->
example:
import { LitElement, html, css } from 'lit-element';
import { styleMap } from 'lit-html/directives/style-map';

class MyButton extends LitElement {
  render() {
    return html`
      <button style=${styleMap({
        backgroundColor: 'blue',
        border: '1px solid black'
      })}>A button</button>
    `;
  }

  //Equivalent:
  /*
  render() {
    return html`
      <button style="
        background-color:blue;
        border:1px solid black
      ">A button</button>
    `;
  }
  */
}
customElements.define('my-button', MyButton);
简而言之,calssMap是通过类选择器绑定样式,而styleMap是行内样式
注意:
- 若要引用带连字符的属性(例如font-family),请使用等效的camelCase(fontFamily)或将带连字符的属性名称加引号('font-family')。
- 要引用自定义CSS属性(例如--custom-color),请将整个属性名称放在引号('--custom-color')中。
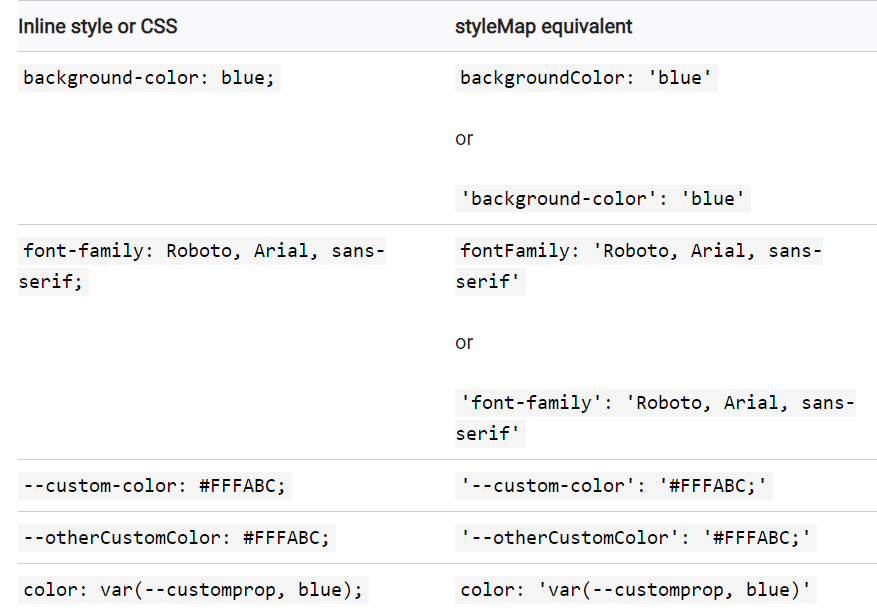
例如,使用内联样式语法:
<div style="
  background-color:blue;
  font-family:Roboto;
  --custom-color:#e26dd2;
  --otherCustomColor:#77e26d;">
</div>
等效的CSS语法:
div {
  background-color: blue;
  font-family: Roboto;
  --custom-color: #e26dd2;
  --otherCustomColor: #77e26d;
}
等效的styleMap语法:
html`
  <div style=${styleMap({
    'background-color': 'blue',
    fontFamily: 'Roboto',
    '--custom-color': '#e26dd2',
    '--otherCustomColor': '#77e26d'
  })}></div>
`
8、主题化
使用CSS继承将样式信息传播到LitElement组件及其呈现的模板。
<style>
  html {
    --themeColor: #123456;
    font-family: Roboto;
  }
</style>

<!-- host inherits `--themeColor` and `font-family` and
     passes these properties to its rendered template -->
<my-element></my-element>
使用CSS变量和自定义属性可按实例配置样式。
<style>
  html {
    --my-element-background-color: /* some color */;
  }
  .stuff {
    --my-element-background-color: /* some other color */;
  }
</style>
<my-element></my-element>
<my-element class="stuff"></my-element>
// MyElement's static styles
static get styles() {
  return css`
    :host {
      background-color: var(--my-element-background-color);
    }
  `;
}
8.1 CSS继承
CSS继承允许父元素和宿主元素将某些CSS属性传播到其后代。
并非所有CSS属性都可被继承。继承的CSS属性包括:
color和background-color
font-family和其他font-*属性- 所有CSS自定义属性(--*)
有关更多信息,请参见MDN上的CSS继承。
您可以使用CSS继承在其后代继承的祖先元素上设置样式:
<style>
html {
  font-family: Roboto;
}
</style>
<div>
  <p>Uses Roboto</p>
</div>
同样,宿主元素将可继承的CSS属性传递给它们的影子树。
<style>
  my-element { font-family: Roboto; }
</style>
<my-element></my-element>
class MyElement extends LitElement {
  render() {
    return html`<p>Uses Roboto</p>`;
  }
}
example:
my-element.js
import { LitElement, html, css } from 'lit-element';

class MyElement extends LitElement {
  render() {
    return html`<p>Will also use Roboto</p>`;
  }
}
customElements.define('my-element', MyElement);
index.html
<html>
  <head>
    <title>lit-element code sample</title>
    <script type="module" src="./my-element.js"></script>
    <style>
      my-element { font-family: Roboto; }
    </style>
  </head>
  <body>
    <my-element></my-element>
  </body>
</html>
您也可以使用 :host CSS伪类从其自己的模板内部设置主体样式:
static get styles() {
  return css`
    :host {
      font-family: Roboto;
    }
  `;
}
render() {
  return html`
    <p>Uses Roboto</p>
  `;
}
注意:元素类型选择器比 :host 伪类选择器有更高的优先级
为自定义元素标签设置的样式将会覆盖通过 :host 和 :host() 设置的
<style>
  my-element { font-family: Courier; }
</style>
<my-element></my-element>
class MyElement extends LitElement {
  static get styles() {
    return css`:host { font-family: Roboto; }`
  }
  render() {
    return html`<p>Will use courier</p>`;
  }
}
8.2 CSS自定义属性
所有的CSS自定义属性(--custom-property-name)都可被继承,你可以通过可配置的方式将外部样式用在你的组件上
以下组件将其背景色设置为CSS变量。使用--my-background值(如果可用),否则默认为黄色:
class MyElement extends LitElement {
  static get styles() {
    return css`
      :host {
        background-color: var(--my-background, yellow);
      }
    `;
  }
  render() {
    return html`<p>Hello world</p>`;
  }
}
使用该组件的使用者可以用my-element标签作为CSS选择器来设置--my-background的值:
<style>
  my-element {
    --my-background: rgb(67, 156, 144);
  }
</style>
<my-element></my-element>
--my-background可根据my-element的每个实例进行配置:
<style>
  my-element {
    --my-background: rgb(67, 156, 144);
  }
  my-element.stuff {
    --my-background: #111111;
  }
</style>
<my-element></my-element>
<my-element class="stuff"></my-element>
如果组件使用者具有现有的应用程序主题,则他们可以轻松地设置组件的可配置属性以使用主题属性:
<html>
  <head>
    <title>lit-element code sample</title>
    <script type="module" src="./my-element.js"></script>
    <style>
      html { --themeColor1: rgb(67, 156, 144); }
      my-element {
        --myBackground: var(--themeColor1);
        --myColor: rgb(156, 67, 152);
      }
    </style>
  </head>
  <body>
    <my-element></my-element>
  </body>
</html>
import { LitElement, html, css } from 'lit-element';

class MyElement extends LitElement {
  static get styles() {
    return css`
      :host {
        background-color: var(--myBackground, yellow);
        color: var(--myColor, black);
        padding: var(--myPadding, 8px);
      }
    `;
  }
  render() {
    return html`<p>Hello world</p>`;
  }
}
customElements.define('my-element', MyElement);
一个简单的示例主题
index.html
<html>
  <head>
    <script type="module" src="./my-element.js"></script>
    <title>lit-element code sample</title>
    <style>
      html {
        --theme-primary: green;
        --theme-secondary: aliceblue;
        --theme-warning: red;
        --theme-font-family: Roboto;
      }
      my-element {
        --my-element-text-color: var(--theme-primary);
        --my-element-background-color: var(--theme-secondary);
        --my-element-font-family: var(--theme-font-family);
      }
      .warning {
        --my-element-text-color: var(--theme-warning);
      }
    </style>
  </head>
  <body>
    <my-element></my-element>
    <my-element class="warning"></my-element>
  </body>
</html>
my-element.js
import { LitElement, html, css } from 'lit-element';

class MyElement extends LitElement {
  static get styles() {
    return css`
      :host {
        display: block;
        color: var(--my-element-text-color, black);
        background: var(--my-element-background-color, white);
        font-family: var(--my-element-font-family, Roboto);
      }
      :host([hidden]) {
        display: none;
      }
    `;
  }
  render() {
    return html`<div>Hello World</div>`;
  }
}
customElements.define('my-element', MyElement);