一. json格式交互(知道)
1 . 回顾ajax基本语法
$.ajax({
    url:"",  // 请求的后台路径
    data:{"":"","":""} // 请求携带的数据
    type:"", // 请求方式
    dataType:"json" //接收后台返回数据的解析方式
    success:function(data){}//请求成功时的回调函数
})
2. 代码
2.1 测试部分代码
前提:环境搭建
创建web项目--->导入需要的jar包---->配置web.xml---->配置用于获取springmvc容器的配置文件(在web.xml中的前端控制器中加载,并放在conf文件夹里)
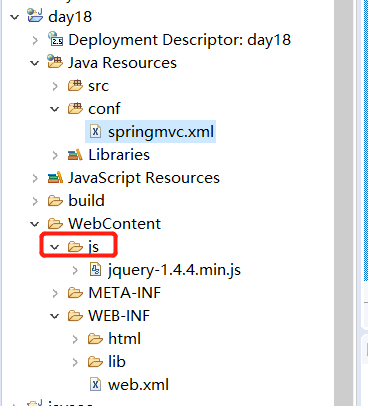
补充知识:web-inf下的静态文件的访问
首先,对于外部访问来说,web-inf下的文件都是不可见的(即不能通过url获得web-info下的任何文件),所以,直接访问jsp是不可能的。这要从web-info文件夹的作用说起:
WEB-INF的存在以及其下的lib和classes目录的作用都是jsp规定的,主要是系统运行的配置信息和环境,用来存储服务端配置文件信息和在服务端运行的类文件,它下面的东西不允许客户端直接访问的,这是jsp环境的规定。
而我们通常是使用view层框架(如struts)来提供jsp服务,此时,我们可以将jsp文件放到web-info下避免客户直接访问到页面,同时使用struts来进行jsp文件提取,并将编译好的结果发送到客户端。
所以,此处的js文件不能放进web-inf中,若想放进去需要进行静态资源的配置
项目结构图:
前端代码


<!DOCTYPE html>
<html>
<head>
<meta charset="UTF-8">
<title>Insert title here</title>
</head>
<script type="text/javascript" src="js/jquery-1.4.4.min.js"></script>
<script type="text/javascript">
$(function(){
    alert("hello")
})
</script>
<body>
</body>
</html>
web.xml文件
<?xml version="1.0" encoding="UTF-8"?>
<web-app xmlns:xsi="http://www.w3.org/2001/XMLSchema-instance" xmlns="http://java.sun.com/xml/ns/javaee" xsi:schemaLocation="http://java.sun.com/xml/ns/javaee http://java.sun.com/xml/ns/javaee/web-app_2_5.xsd" id="WebApp_ID" version="2.5">
  <display-name>day18</display-name>
  <welcome-file-list>
    <welcome-file>index.html</welcome-file>
    <welcome-file>index.htm</welcome-file>
    <welcome-file>index.jsp</welcome-file>
    <welcome-file>default.html</welcome-file>
    <welcome-file>default.htm</welcome-file>
    <welcome-file>default.jsp</welcome-file>
  </welcome-file-list>
  <!-- 配置前端控制器 -->
  <servlet>
    <servlet-name>springmvc</servlet-name>
    <servlet-class>org.springframework.web.servlet.DispatcherServlet</servlet-class>
    <!-- 在创建servlet对象时,初始化其值 -->
    <init-param>
      <!-- 指定springmvc配置文件的路径,如果不指定,则读取web-inf下    servlet的名称-servlet.xml   -->
      <param-name>contextConfigLocation</param-name>
      <param-value>classpath:springmvc.xml</param-value>
    </init-param>
    <!-- 值大于0,就自动创建servlet实例,数字越小越先加载 -->
    <load-on-startup>2</load-on-startup>
  </servlet>
  <servlet-mapping>
    <servlet-name>springmvc</servlet-name>
    <url-pattern>*.do</url-pattern>
  </servlet-mapping>

  <!-- 配置post方式的字符过滤器解决中文乱码问题 -->
    <filter>
        <filter-name>CharacterEncodingFilter</filter-name>
        <filter-class>org.springframework.web.filter.CharacterEncodingFilter</filter-class>
        <init-param>
            <param-name>encoding</param-name>
            <param-value>utf-8</param-value>
        </init-param>
    </filter>
    <filter-mapping>
        <filter-name>CharacterEncodingFilter</filter-name>
        <url-pattern>/*</url-pattern>
    </filter-mapping>
</web-app>
springmvc.xml
<beans xmlns="http://www.springframework.org/schema/beans"
    xmlns:xsi="http://www.w3.org/2001/XMLSchema-instance" xmlns:mvc="http://www.springframework.org/schema/mvc"
    xmlns:context="http://www.springframework.org/schema/context"
    xmlns:aop="http://www.springframework.org/schema/aop" xmlns:tx="http://www.springframework.org/schema/tx"
    xsi:schemaLocation="http://www.springframework.org/schema/beans
        http://www.springframework.org/schema/beans/spring-beans-3.2.xsd
        http://www.springframework.org/schema/mvc
        http://www.springframework.org/schema/mvc/spring-mvc-3.2.xsd
        http://www.springframework.org/schema/context
        http://www.springframework.org/schema/context/spring-context-3.2.xsd
        http://www.springframework.org/schema/aop
        http://www.springframework.org/schema/aop/spring-aop-3.2.xsd
        http://www.springframework.org/schema/tx
        http://www.springframework.org/schema/tx/spring-tx-3.2.xsd ">
    <!--处理器适配器和处理器映射器 json 数据解析组件 -->
    <mvc:annotation-driven />
    <!-- spring的IOC的扫码组件 -->
    <context:component-scan base-package="com._51doit.controller"/>
    <!-- 视图解析器 -->
    <bean class="org.springframework.web.servlet.view.InternalResourceViewResolver">
        <property name="prefix" value="WEB-INF/html/" />
        <property name="suffix" value=".html" />
    </bean>
</beans>
PageController
@Controller
public class PageController {
    @RequestMapping("ajax")
    public String  showAjax() {
        return "ajax_demo";
    }
}
2.2 代码
2.2.1 ajax
发送的是json对象
$(function(){
    // 發送json對象
    $("#btn1").click(function(){
        $.ajax({
            url:"/day18/ajaxDemo.do",
            data:{"name":"小崔","age":54},
            type:"post",
            dataType:"json",
            success:function(data){
                alert(data)
            }
        })
    })
    // 发送json类型的字符串
    $("#btn2").click(function(){
        $.ajax({
            url:"/day18/ajaxDemo2.do",
            data:'{"name":"小崔","age":54}',
            type:"post",
            contentType:"application/json;charset=utf8", // 指定发送的数据格式,否则后台不知道其是json字符串
            dataType:"json",
            success:function(data){
                alert(data.name)
            }
        })
    })
})
2.2.2 后台controller
接受json对象
   @RequestMapping("/ajaxDemo")
    @ResponseBody //表示将对象转换成字符串返回
    public User getAjax(String name , int age) {//此处也可以直接使用(User user),但是user中的属性名要和前台发送的一致
        User user = new User();
        user.setName(name);
        user.setAge(age);
        System.out.println(user);
        return user;
    }
接受json串数据
@RequestMapping("/ajaxDemo2")
    @ResponseBody
    public User getAjax2(@RequestBody User user) { // 指定接收的数据格式为json,不然后台user中的属性接收不到前台传来的数据
        System.out.println(user);
        return user;
    }
总结:1,前台页面发送的是json对象的数据,后台控制器直接根据json的属性名直接接收请求参数
@ResponseBody注解可以将对象转换成接送字符串返回
2. 前台页面发送的是json串的数据, 前台指定数据格式,contentType:"application/json;charset=utf8",后台控制器使用注解@RequestBody接收数据
3. 一般页面的请求数据是json对象 , 常用页面请求的是key/value的请求数据,页面常返回json数据
二. Restful(了解)
三 静态资源

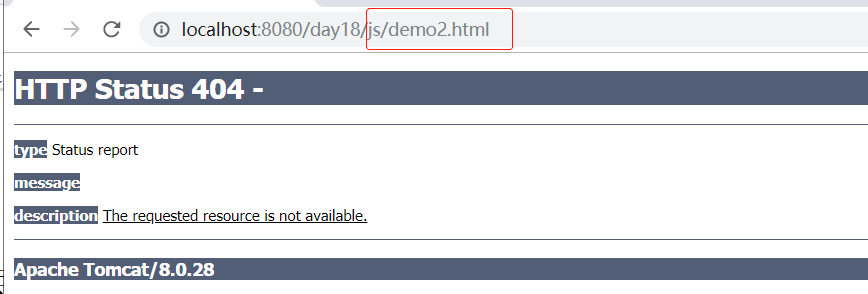
/ :拦截(捕获)所有资源,拦截静态资源(图片,js,css),但不会拦截jsp
/*:拦截所有的资源,包括js,css,图片,jsp 但是springmvc对jsp没有处理
注意:后面在ssm整合代码处的web.xml文件中使用/*去匹配会报404错误
如,当请求js文件夹下的demo2.html,会报404错误,如下图
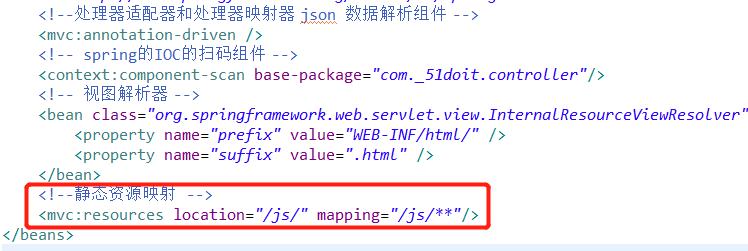
在springmvc容器的配置文件中配置静态资源映射就能请求到这个资源(不会报错)
如果将DispatcherServlet请求映射配置为"/"(如上圈中),则Spring MVC将捕获Web容器所有的请求,包括静态资源的请求,Spring MVC会将它们当成一个普通请求处理,因此找不到对应处理器将导致错误。
如何让Spring框架能够捕获所有URL的请求,同时又将静态资源的请求转由Web容器处理,是可将DispatcherServlet的请求映射配置为"/"的前提。解决:配置静态资源的映射

四 SSM
1. 整合思想:
springmvc:
加载web.xml,创建前端控制器(接收页面请求并返回页面)--->创建spring容器(会自动加载相应的配置文件(application.xml),以前是创建springmvc,此处直接创建spring容器,将springmvc用到的三大组件配置在spring容器中)--->扫描controller,service(在springmvc中是只扫描controller即可),这样就完成了spring和springmvc的整合
spring
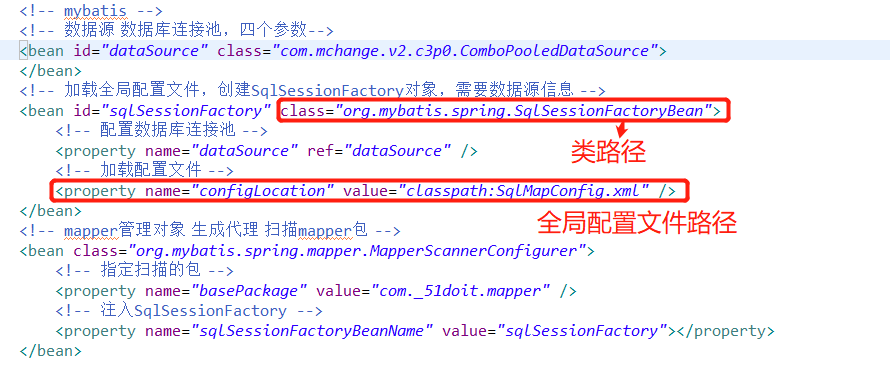
mybatis(全局配置文件和核心映射文件+mapper接口)
(1)全局配置文件:别名 (数据源 mapper,这两个不需要)
创建SqlSessionFactory对象,交给spring管理,其中需要提供数据源对象,以及全局配置文件(通过property给配置路径)
(2)核心映射文件+mapper接口
可以直接创建一个对象去管理核心映射文件+mapper接口,让其生成代理对象
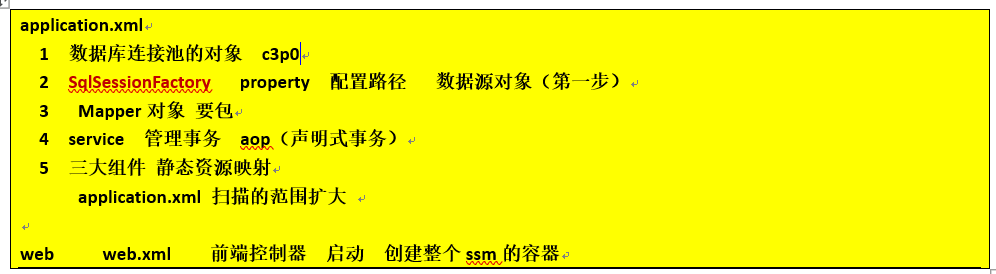
2. application.xml(ssm整合的配置文件
<?xml version="1.0" encoding="UTF-8"?>
<beans xmlns="http://www.springframework.org/schema/beans"
    xmlns:xsi="http://www.w3.org/2001/XMLSchema-instance" xmlns:aop="http://www.springframework.org/schema/aop"
    xmlns:context="http://www.springframework.org/schema/context"
    xmlns:mvc="http://www.springframework.org/schema/mvc" xmlns:tx="http://www.springframework.org/schema/tx"
    xsi:schemaLocation="http://www.springframework.org/schema/beans http://www.springframework.org/schema/beans/spring-beans.xsd
        http://www.springframework.org/schema/aop http://www.springframework.org/schema/aop/spring-aop-4.1.xsd
        http://www.springframework.org/schema/context http://www.springframework.org/schema/context/spring-context-4.1.xsd
        http://www.springframework.org/schema/mvc http://www.springframework.org/schema/mvc/spring-mvc-4.1.xsd
        http://www.springframework.org/schema/tx http://www.springframework.org/schema/tx/spring-tx-4.1.xsd">
    <!-- mybatis -->
    <!-- 数据源 数据库连接池,四个参数-->
    <bean id="dataSource" class="com.mchange.v2.c3p0.ComboPooledDataSource">
    </bean>
    <!-- 加载全局配置文件,创建SqlSessionFactory对象,需要数据源信息 -->
    <bean id="sqlSessionFactory" class="org.mybatis.spring.SqlSessionFactoryBean">
        <!-- 配置数据库连接池 -->
        <property name="dataSource" ref="dataSource" />
        <!-- 加载配置文件 -->
        <property name="configLocation" value="classpath:SqlMapConfig.xml" />
    </bean>
    <!-- mapper管理对象 生成代理 扫描mapper包 -->
    <bean class="org.mybatis.spring.mapper.MapperScannerConfigurer">
        <!-- 指定扫描的包 -->
        <property name="basePackage" value="com._51doit.dao" />
        <!-- 注入SqlSessionFactory -->
        <property name="sqlSessionFactoryBeanName" value="sqlSessionFactory"></property>
    </bean>

    <!-- service层 -->
    <!-- 事务 所有的事务是通过 事务管理器 管理的 在service 业务层的方法上开启或者关闭事务 save(){ 开启 dao.jian()
        dao.jia() 提交 } 方法 dao方法 -->

    <!-- 配置事务 -->
    <!-- 事务管理器,对mybatis操作数据库进行事务控制,此处使用jdbc的事务控制 -->
    <bean id="transactionManager"
        class="org.springframework.jdbc.datasource.DataSourceTransactionManager">
        <!-- 指定要进行事务管理的数据源 -->
        <property name="dataSource" ref="dataSource"></property>
    </bean>
    <!-- 配置切面 -->
     <tx:advice id="transactionAdvice" transaction-manager="transactionManager">
        <tx:attributes>
            <tx:method name="save*" propagation="REQUIRED" />
            <tx:method name="delete*" propagation="REQUIRED" />
            <tx:method name="update*" propagation="REQUIRED" />
            <tx:method name="get*" propagation="SUPPORTS" read-only="true" />
            <tx:method name="find*" propagation="SUPPORTS" read-only="true" />
            <tx:method name="*" propagation="REQUIRED" />
        </tx:attributes>
    </tx:advice>
     <aop:config>
        <!-- execution表达式 -->
        <!-- * 是否有返回值 -->
        <!-- cn.edu360.service..*Impl cn.edu360.service这个包及其子包下的以Impl结尾的类 -->
        <!-- *(..))类下的任务方法 ,是否有参数 -->
        <aop:pointcut id="transactionPointcut"
            expression="execution(* com._51doit.service.*Impl.*(..))" />
        <aop:advisor pointcut-ref="transactionPointcut"
            advice-ref="transactionAdvice" />
    </aop:config>
    <!-- springmvc -->
    <!-- 三大组件 -->
    <mvc:annotation-driven />
    <bean id="viewResolver"
        class="org.springframework.web.servlet.view.InternalResourceViewResolver">
        <property name="prefix" value="/WEB-INF/pages/" />
        <property name="suffix" value=".jsp" />
    </bean>
    <mvc:resources location="/" mapping="/**"></mvc:resources>
    <!-- 包扫描 service controller -->
    <context:component-scan base-package="com._51doit.*" ></context:component-scan>
</beans>
2.1 第一部分:头部信息

这个头部信息表示声明和下面标签的约束
2.2 第二部分:mybatis
2.3 第三部分:service层
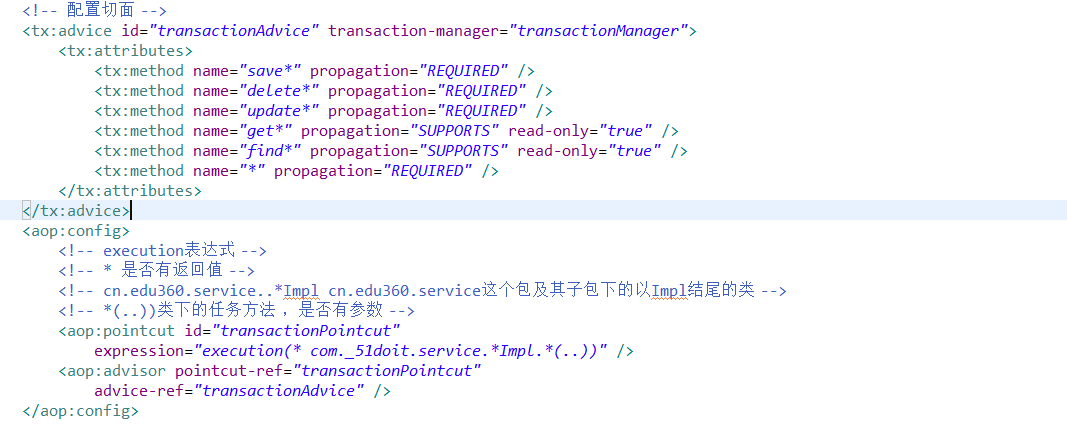
所有的事务是通过事务管理器管理的,在service业务层的方法上开启或者关闭事务
save(){ 开启 dao.jian() dao.jan() 提交 }
(1)配置事务

(2)配置切面
补充知识:<tx:advice><tx:advice />配置详解
http://jinnianshilongnian.iteye.com/blog/1442376(此作者写了声明式非声明式编程,有空可以去学下)
声明式事务管理通过配置<tx:advice><tx:advice />来定义事务属性,配置方式如下
<tx:advice id="……" transaction-manager="……">
<tx:attributes>
    <tx:method name="……"
        propagation=" REQUIRED"
        isolation="READ_COMMITTED"
        timeout="-1"
        read-only="false"
        no-rollback-for=""
        rollback-for=""/>
        ……
    </tx:attributes>
</tx:advice>
(a) <tx:advice>:
id用于指定此通知的名字, transaction-manager用于指定事务管理器,默认的事务管理器名字为“transactionManager”;
(b)< tx:attributes >: 指定具体需要拦截的方法
(c)<tx:method >:用于定义事务属性
name:定义与事务属性相关联的方法名,将对匹配的方法应用定义的事务属性,可以使用“*”通配符来匹配一组或所有方法,如“save*”将匹配以save开头的方法,而“*”将匹配所有方法;
propagation:事务传播行为定义,默认为“REQUIRED”,表示Required,其值可以通过TransactionDefinition的静态传播行为变量的“PROPAGATION_”后边部分指定,如“TransactionDefinition.PROPAGATION_REQUIRED”可以使用“REQUIRED”指定;
isolation:事务隔离级别定义;默认为“DEFAULT”,其值可以通过TransactionDefinition的静态隔离级别变量的“ISOLATION_”后边部分指定,如“TransactionDefinition. ISOLATION_DEFAULT”可以使用“DEFAULT”指定:
timeout:事务超时时间设置,单位为秒,默认-1,表示事务超时将依赖于底层事务系统;
read-only:事务只读设置,默认为false,表示不是只读;
rollback-for:需要触发回滚的异常定义,以“,”分割,默认任何RuntimeException 将导致事务回滚,而任何Checked Exception 将不导致事务回滚;异常名字定义和TransactionProxyFactoryBean中含义一样
no-rollback-for:不被触发进行回滚的 Exception(s);以“,”分割;异常名字定义和TransactionProxyFactoryBean中含义一样;
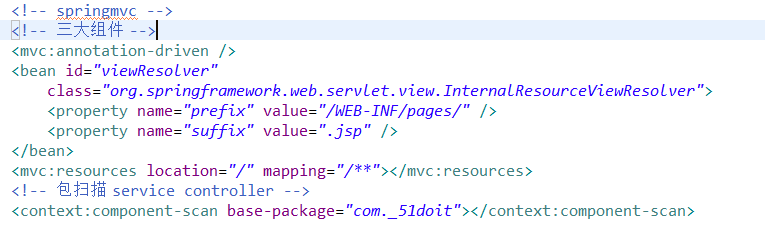
2.4 第四部分:springmvc
3. 整合
(1)导入jar包
(2)配置文件
log4j.properties;SqlMapConfig.xml全局配置文件 只需别名;c3p0.properties;application.xml
(3)持久层(3个bean,数据源,SqlSessionFactory,mapper)
(4)service声明式事务
(5)配置springmvc的三大组件和包扫描(在application.xml中配置)
项目大致框架
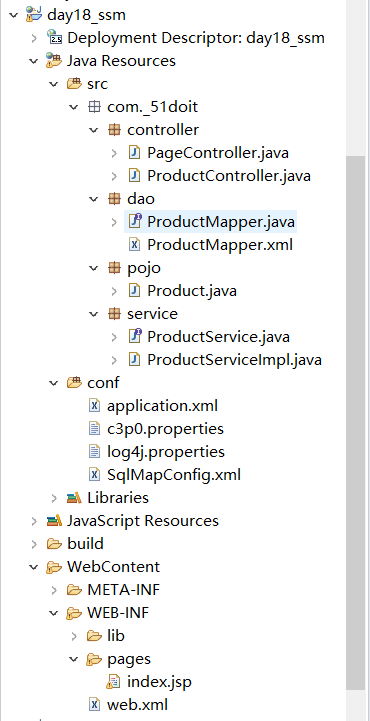
controller层

dao层
ProductMapper
public interface ProductMapper {
    // 获取产品信息
    public  List<Product> getAllProducts();
}
ProductMapper.xml
<?xml version="1.0" encoding="UTF-8" ?>
<!DOCTYPE mapper
PUBLIC "-//mybatis.org//DTD Mapper 3.0//EN"
"http://mybatis.org/dtd/mybatis-3-mapper.dtd">
<mapper namespace="com._51doit.dao.ProductMapper">
<select id="getAllProducts" resultType="product">
select * from products
</select>

</mapper>
pojo
package com._51doit.pojo;

public class Product {
    private int id;
    private String name ;
    private double price ;
    private String category ;
    private int pnum ;
    private String description ;
    public int getId() {
        return id;
    }
    public void setId(int id) {
        this.id = id;
    }
    public String getName() {
        return name;
    }
    public void setName(String name) {
        this.name = name;
    }
    public double getPrice() {
        return price;
    }
    public void setPrice(double price) {
        this.price = price;
    }
    public String getCategory() {
        return category;
    }
    public void setCategory(String category) {
        this.category = category;
    }
    public int getPnum() {
        return pnum;
    }
    public void setPnum(int pnum) {
        this.pnum = pnum;
    }
    public String getDescription() {
        return description;
    }
    public void setDescription(String description) {
        this.description = description;
    }
    @Override
    public String toString() {
        return "Product [id=" + id + ", name=" + name + ", price=" + price + ", category=" + category + ", pnum=" + pnum
                + ", description=" + description + "]";
    }


}
service
注意:此处别忘了在实现类上方加@service
ProductService
public interface ProductService {

    // 从数据库获取信息
    public List<Product> getAllProductfromDb();
}
ProductServiceImpl
@Service
public class ProductServiceImpl implements ProductService{
    @Autowired
    ProductMapper  pMapper ;

    @Override
    public List<Product> getAllProductfromDb() {

        return pMapper.getAllProducts();
    }
}
4. 练习:
使用ssm框架完成增删改查,若没有登录则不能进行增删改查,并登录然后进行相应的操作