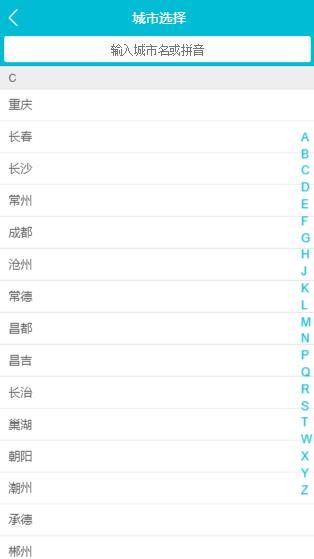
在城市列表页,我们想实现点击右侧的字母表,左侧城市列表会自动的滚动到对应的字母显示区域之中。
创建分支:city-components
拉取到本地并切换分支:
git pull
git checkout city-components
打开Alphabet.vue文件,给li添加一个点击事件:
<li class="item" @click="handleClick"
      v-for="(item, key) in cities" :key="key">{{key}}</li>

<script>
export default {
  name: 'CityAlphabet',
  props: {
    cities: Object
  },
  methods: {
    handleClick (e) {
      console.log(e.target.innerText)
    }
  }
}
</script>
点击字母表后,控制台可以打印出对应的li中内容,也就是说点击字母表c,打印出c。然后需要把这个内容传递到List.vue组件中,让list对应的区块显示出来。这时候要进行兄弟组件之间的传值,Alphabet组件中的值传递给City组件,再由City组件传递给List组件。
handleClick (e) {
      console.log(e.target.innerText)
      this.$emit('change', e.target.innerText)
}
每次点击字母表,都向外处罚一个change事件,内容就是e.target.innerText。
City.vue中添加监听:
<city-alphabet :cities="cities" @change="handleLetterChange"></city-alphabet>

<script>
export default {
  methods: {
    // 监听change事件
    handleLetterChange (letter) {
      console.log(letter)
    }
  }
}
</script>
然后再通过事件的方式传递给子组件List.vue
<city-list :hotCity="hotCity" :cities="cities" :letter="letter"></city-list>

<script>
export default {
  data () {
    return {
      letter: ''
    }
  },
  methods: {
    // 监听change事件
    handleLetterChange (letter) {
      console.log(letter)
      this.letter = letter
    }
  }
}
</script>
List.vue中接收letter:
props: {
    hotCity: Array,
    cities: Object,
    letter: String
},
然后需要添加一个侦听器:
// 侦听器
watch: {
    letter () {
      console.log(this.letter)
    }
}
在list区域添加一个ref引用:
<div class="area" v-for="(item, key) in cities" :key="key" :ref="key">

<script>
import Bscroll from 'better-scroll'
export default {
  // 侦听器
  watch: {
    letter () {
      console.log(this.letter)
      // better-scroll提供的接口
      if (this.letter) {
        const element = this.$refs[this.letter][0]
        console.log(element)
        this.scroll.scrollToElement(element)
      }
    }
  }
}
</script>
这时候点击右侧字母表C,list区域自动滚动到C。
效果图:

下一步我们希望在右侧字母表做上下拖拽的时候,list区域也跟着变化
首先要做字母表滚动事件的监听,打开Alphabet.vue文件:
<li class="item" @click="handleClick"
      @touchstart="handleTouchStart"
      @touchmove="handleTouchMove"
      @touchend="handleTouchEnd"
      v-for="(item, key) in cities" :key="key">{{key}}</li>

<script>
export default {
  name: 'CityAlphabet',
  props: {
    cities: Object
  },
  data () {
    return {
      touchStatus: false // 触摸状态
    }
  },
  methods: {
    handleClick (e) {
      // console.log(e.target.innerText)
      this.$emit('change', e.target.innerText)
    },
    // 触摸开始
    handleTouchStart () {
      this.touchStatus = true
    },
    // 移动
    handleTouchMove () {
      if (this.touchStatus) {

      }
    },
    // 触摸停止
    handleTouchEnd () {
      this.touchStatus = false
    }
  }
}
</script>
下面就要处理:滑动时所处的位置是第几个字母,大概思路是:先获得A字母距离顶部的高度,然后滑动时当前手指所处的字母位置距离顶部的高度,再把两个高度取一个差值,就是当前字母距离A字母的高度。然后除以每个字母的高度,就可以得出处于第几个字母的位置了。再取第几个字母,去触发一个change事件。
添加一个计算属性,把cities对象转换为数组:
computed: {
    letters () {
      const letters = []
      for (let i in this.cities) {
        letters.push(i)
      }
      return letters
    }
}
然后上面的代码也可以调整为:
<li class="item" @click="handleClick"
      @touchstart="handleTouchStart"
      @touchmove="handleTouchMove"
      @touchend="handleTouchEnd"
      v-for="item in letters" :key="item">{{item}}</li>
再给每个li标签加一个ref:
<li class="item" @click="handleClick"
      @touchstart="handleTouchStart"
      @touchmove="handleTouchMove"
      @touchend="handleTouchEnd"
      v-for="item in letters" :key="item" :ref="item">{{item}}</li>
下面继续编辑拖动代码:
handleTouchMove () {
      if (this.touchStatus) {
        const startY = this.$refs['A'][0].offsetTop
        console.log(startY)
      }
},
此时我们上下拖动字母表,可以看到控制台打印出的:74

这个74代表的就是字母表A到搜索框绿色下边的高度 。
然后要计算移动到当前位置到字母A的差值:
handleTouchMove (e) {
      if (this.touchStatus) {
        const startY = this.$refs['A'][0].offsetTop
        // startY 是字母表A到搜索框绿色下边的高度
        // console.log(startY) // 74
        const touchY = e.touches[0].clientY - 79
        // e.touches[0].clientY 这个是当前到屏幕最顶部的距离高度;79是header+搜索框的高度
        // touchY 是当前字母到搜索框绿色下边的高度
        // console.log(touchY)
        const index = Math.floor((touchY - startY) / 20)
        // touchY - startY 是当前字母到字母A的高度;20 是每个字母的告诉
        // index 是数组下标
        console.log(index)
        if (index >= 0 && index < this.letters.length) {
          this.$emit('change', this.letters[index])
        }
      }
    },
OK,此时右侧字母表上下拖拽时,左侧list区域也跟着变化了。
下面对列表切换的性能进一步优化
新定义一个变量 startY,然后写一个updated()生命周期钩子:
data () {
    return {
      startY: 0
    }
},
// 当页面的数据被更新的时候,同时页面完成了字节的渲染之后,updated()这个生命周期钩子就会被执行
updated () {
    this.startY = this.$refs['A'][0].offsetTop // 74
},
methods: {
    // 优化后的代码
    handleTouchMove (e) {
      if (this.touchStatus) {
        const touchY = e.touches[0].clientY - 79
        const index = Math.floor((touchY - this.startY) / 20)
        if (index >= 0 && index < this.letters.length) {
          this.$emit('change', this.letters[index])
        }
      }
    },
},
下步是优化是做一个函数节流,当在右侧上下拖拽字母表时,touchmove执行的频率是非常高的,我们可以通过节流限制一下函数执行的频率:
新建一个变量 timer为null,然后在this.timer为真时,清除timeout,否则创建一个timeout:
data () {
    return {
      touchStatus: false, // 触摸状态
      startY: 0, // 优化新增变量
      timer: null // 节流变量
    }
},
methods: {
    // 优化后的代码
    handleTouchMove (e) {
      if (this.timer) {
        clearTimeout(this.timer)
      }
      this.timer = setTimeout(() => {
        if (this.touchStatus) {
          const touchY = e.touches[0].clientY - 79
          const index = Math.floor((touchY - this.startY) / 20)
          if (index >= 0 && index < this.letters.length) {
            this.$emit('change', this.letters[index])
          }
        }
      }, 16)
    },
},
回到页面刷新在此拖动字母表,效果还是一样的,但是性能却大大节省了。
下面可以提交代码了:
git add .
git commit -m "兄弟组件数据传递及性能优化"
git push

git checkout master
git merge city-components
git push