一、简介
我们可以看到上一篇文章的消费者这边调用Service时比较麻烦,所以我们可以使用Feign来简化这部分操作,它底层也是使用Ribbon实现的只是Ribbon支持HTTP和TCP两种通信协议,而Feign只支持HTTP一种,同样支持负载均衡,所以能满足90%以上的需求了。
二、搭建生产者模块
其实这部分是通用的,对于消费者这边使用什么Client并没有影响,Eureka还是使用之前搭建好的,生产者模块也用搭建好的,我们新建一个controller用于承接service,这边就算完成了

import javademo.tyh.model.hotel.BaseInfoModel; import javademo.tyh.model.hotel.ResponseModel; import javademo.tyh.model.hotel.SearchModel; import javademo.tyh.service.hotel.service.HotelService; import org.springframework.beans.factory.annotation.Autowired; import org.springframework.stereotype.Controller; import org.springframework.web.bind.annotation.RequestBody; import org.springframework.web.bind.annotation.RequestMapping; import org.springframework.web.bind.annotation.RequestParam; import org.springframework.web.bind.annotation.ResponseBody; import javax.servlet.http.HttpServletRequest;
import java.util.List;@Controller
"/api/hotel")
@RequestMapping(
public class HotelController {</span><span style="color: #008000;">//</span><span style="color: #008000;">自动注入请求对象,查看header信息</span>@Autowired
HttpServletRequest request;@Autowired HotelService service; @ResponseBody @RequestMapping(</span>"/test"<span style="color: #000000;">) </span><span style="color: #0000ff;">public</span> <span style="color: #0000ff;">void</span><span style="color: #000000;"> test() { </span><span style="color: #008000;">//</span><span style="color: #008000;">do something...</span>}
@ResponseBody @RequestMapping(</span>"/get"<span style="color: #000000;">) </span><span style="color: #0000ff;">public</span> BaseInfoModel get(@RequestParam(defaultValue = "0") <span style="color: #0000ff;">int</span><span style="color: #000000;"> id) { String tyh </span>= request.getHeader("taiyonghai"<span style="color: #000000;">);<span style="color: #008000;">//获取Header头信息</span> System.out.println(</span>"参数为:" +<span style="color: #000000;"> id); </span><span style="color: #0000ff;">return</span><span style="color: #000000;"> service.get(id); } </span><span style="color: #008000;">//</span><span style="color: #008000;">设置参数为@RequestBody可以自动序列化为对象</span>@ResponseBody
@RequestMapping("/list")
public ResponseModel<List<BaseInfoModel>> list(@RequestBody SearchModel search) {
System.out.println("参数为:" + search.getName());
List<BaseInfoModel> list = service.list();
ResponseModel<List<BaseInfoModel>> respModel = new ResponseModel<>();
respModel.setCode("000000");
respModel.setMsg("操作成功");
respModel.setData(list);
return respModel;
}
}
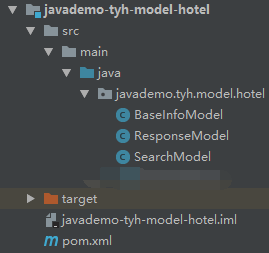
添加通用Model实体,同样不生成get/set方法,自己生成吧
import com.baomidou.mybatisplus.annotations.TableName; import java.time.LocalDateTime;@TableName(
"base_info")
public class BaseInfoModel {
private int id;
private String nickname;
private LocalDateTime updateTime;
}
public class SearchModel {
    private int id;
    private String name;
}
public class ResponseModel<T> {
    private String code;
    private String msg;
    private T data;
}
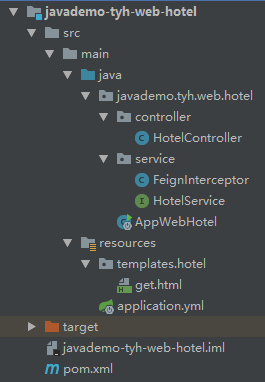
三、搭建消费者模块——Feign
还是创建一个Maven模块,看一下我的项目结构

1、修改pom.xml文件,增加对spring boot、spring cloud、feign的引用
<dependencyManagement> <dependencies> <dependency> <groupId>org.springframework.boot</groupId> <artifactId>spring-boot-dependencies</artifactId> <version>2.0.3.RELEASE</version> <type>pom</type> <scope>import</scope> </dependency> <dependency> <groupId>org.springframework.cloud</groupId> <artifactId>spring-cloud-dependencies</artifactId> <version>Finchley.RELEASE</version> <type>pom</type> <scope>import</scope> </dependency> </dependencies> </dependencyManagement> <dependencies> <!-- import spring boot --> <dependency> <groupId>org.springframework.boot</groupId> <artifactId>spring-boot-starter-thymeleaf</artifactId> </dependency> <dependency> <groupId>org.springframework.boot</groupId> <artifactId>spring-boot-starter-web</artifactId> </dependency> <!-- import openfeign --> <dependency> <groupId>org.springframework.cloud</groupId> <artifactId>spring-cloud-starter-netflix-eureka-client</artifactId> </dependency> <dependency> <groupId>org.springframework.cloud</groupId> <artifactId>spring-cloud-starter-openfeign</artifactId> </dependency> </dependencies><span style="color: #0000ff;"><</span><span style="color: #800000;">build</span><span style="color: #0000ff;">></span> <span style="color: #0000ff;"><</span><span style="color: #800000;">plugins</span><span style="color: #0000ff;">></span> <span style="color: #0000ff;"><</span><span style="color: #800000;">plugin</span><span style="color: #0000ff;">></span> <span style="color: #0000ff;"><</span><span style="color: #800000;">groupId</span><span style="color: #0000ff;">></span>org.springframework.boot<span style="color: #0000ff;"></</span><span style="color: #800000;">groupId</span><span style="color: #0000ff;">></span> <span style="color: #0000ff;"><</span><span style="color: #800000;">artifactId</span><span style="color: #0000ff;">></span>spring-boot-maven-plugin<span style="color: #0000ff;"></</span><span style="color: #800000;">artifactId</span><span style="color: #0000ff;">></span> <span style="color: #0000ff;"></</span><span style="color: #800000;">plugin</span><span style="color: #0000ff;">></span> <span style="color: #0000ff;"></</span><span style="color: #800000;">plugins</span><span style="color: #0000ff;">></span> <span style="color: #0000ff;"></</span><span style="color: #800000;">build</span><span style="color: #0000ff;">></span></pre>
2、新建resources文件夹,新建application.yml配置文件,并修改内容如下
#设置自己的程序名称
spring:
  application:
    name: javademo-tyh-web-hotel
  #thymeleaf 配置
  thymeleaf:
    encoding: UTF-8
    prefix: classpath:/templates
    cache: false
#服务注册中心地址(刚刚搭建的Eureka Server的地址)
eureka:
  client:
    #是否向服务中心注册自己
    register-with-eureka: false
    #设置eureka服务中心的地址
    service-url:
      defaultZone: http://localhost:11000/eureka
#设置自己启动的端口
server:
  port: 13000
3、修改main()方法的类,增加Feign的注解
import org.springframework.boot.SpringApplication;
import org.springframework.boot.autoconfigure.SpringBootApplication;
import org.springframework.cloud.openfeign.EnableFeignClients;
//引入Feign注解

@EnableFeignClients

@SpringBootApplication

public class AppWebHotel {

public static void main(String[] args) {

SpringApplication.run(AppWebHotel.class, args);

}

}
4、新建service文件夹,新建HotelService的Interface用来执行Feign向后端服务生产者的调用,指明服务生产者名称,接口方法指明具体的服务路由,这种方式比Ribbon简单很多,而且更直观更像调用后台方法
import javademo.tyh.model.hotel.BaseInfoModel; import javademo.tyh.model.hotel.ResponseModel; import javademo.tyh.model.hotel.SearchModel; import org.springframework.cloud.openfeign.FeignClient; import org.springframework.stereotype.Service; import org.springframework.web.bind.annotation.RequestBody; import org.springframework.web.bind.annotation.RequestMapping; import org.springframework.web.bind.annotation.RequestParam; import java.util.List;@Service
"javademo-tyh-service-hotel")//指明服务生产者名称
@FeignClient(
@RequestMapping("/api/hotel")//此位置的mapping与controller上的mapping是共享全局唯一的,如果这里的名字和controller的路由相同会报错ambiguous mapping
public interface HotelService {
// //无参数无返回值
// @RequestMapping("/test")
// void test();
//基础类型参数
@RequestMapping("/get")
BaseInfoModel get(@RequestParam("id") int id);</span><span style="color: #008000;">//</span><span style="color: #008000;">自定义类型参数以及泛型返回值</span> @RequestMapping("/list"<span style="color: #000000;">) ResponseModel</span><List<BaseInfoModel>><span style="color: #000000;"> list(@RequestBody SearchModel search);}
5、新建controller文件夹,新建HotelController的class用来接收页面调用
import javademo.tyh.model.hotel.BaseInfoModel; import javademo.tyh.model.hotel.ResponseModel; import javademo.tyh.model.hotel.SearchModel; import javademo.tyh.web.hotel.service.HotelService; import org.springframework.beans.factory.annotation.Autowired; import org.springframework.stereotype.Controller; import org.springframework.ui.Model; import org.springframework.web.bind.annotation.RequestMapping; import org.springframework.web.bind.annotation.ResponseBody; import java.util.List;@Controller
"/hotel")
@RequestMapping(
public class HotelController {</span><span style="color: #008000;">//</span><span style="color: #008000;">自动注入Feign接口对象</span>@Autowired
HotelService service;@RequestMapping(</span>"/get"<span style="color: #000000;">) </span><span style="color: #0000ff;">public</span><span style="color: #000000;"> String get(Model model) { </span><span style="color: #008000;">//</span><span style="color: #008000;">像调用方法一样调用即可实现服务生产者端的调用</span> model.addAttribute("model",service.get(1<span style="color: #000000;">)); </span><span style="color: #0000ff;">return</span> "/hotel/get"<span style="color: #000000;">; } </span><span style="color: #008000;">//</span><span style="color: #008000;">直接返回json不写页面了</span>@ResponseBody
@RequestMapping("/list")
public List<BaseInfoModel> list() {
SearchModel search = new SearchModel();
search.setId(1);
search.setName("taiyonghai");
ResponseModel<List<BaseInfoModel>> result = service.list(search);
return result.getData();
}
}
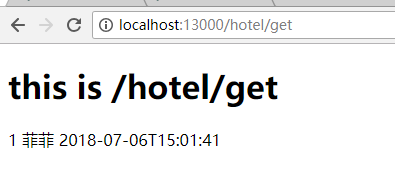
6、在resources文件夹下建立templates及hotel文件夹,新建get.html页面,用来渲染数据
<!DOCTYPE html> <html xmlns:th="http://www.thymeleaf.org"> <head> <meta charset="UTF-8"> <title>Title</title> </head> <body> <h1>this is /hotel/get</h1><label th:text="${model.Id}">id</label>
<label th:text="${model.Nickname}">Nickname</label>
<label th:text="${model.UpdateTime}">UpdateTime</label></body>
</html>
OK,现在启动Eureka注册中心、启动服务生产者、启动服务消费者访问http://localhost:13000/hotel/get就可以看到从service取到的结果了
本应该在这里就完成了,但有时候我们需要在Header头信息中增加些公共内容,在Feign中就可以使用如下方式实现
在消费者这边的service文件夹下新建FeignInterceptor实现RequestInterceptor接口
import feign.RequestInterceptor;
import feign.RequestTemplate;
import org.springframework.stereotype.Component;
//使用拦截器添加Header头信息

@Component

public class FeignInterceptor implements RequestInterceptor {

@Override

public void apply(RequestTemplate requestTemplate) {

System.out.println("调用了FeignInterceptor");

requestTemplate.header("taiyonghai", "1111111111111");

}

}
Feign的简单使用就OK了
原文地址:https://www.cnblogs.com/taiyonghai/p/9306244.html