Openstack 做为流行的开源云计算平台,其最大特性是利用其提供的基础设施API,让我们可以以软件的方式来动态管理IAAS资源。Openstack 提供的api是流行的Rest API.
闲话少说,我们来开始使用Openstack API。
前提:搭建Openstack 环境是必须,可以根据参考资料搭建一个单机虚拟机环境.
假设我们搭建的环境信息为:
物理服务器地址: 192.168.1.1
管理员用户名:admin
管理员密码:password
管理员租户ID:3942bfc544a24f748788c06dbc486ffa
做好环境后,我们先验证一下,API是否正常工作.使用Curl工具验证;
curl -k -X 'POST' -v http://192.168.1.1:5000/v2.0/tokens -d '{"auth":{"passwordCredentials":{"username": "admin", "password":"password"}, "tenantId":"3942bfc544a24f748788c06dbc486ffa"}}' -H 'Content-type: application/json'
返回一串的json字符串:


  1 {
  2   "access" : {
  3     "token" : {
  4       "expires" : "2013-01-23T04:26:01Z",
  5       "id" : "9bc5f651f5ff44329f67a5a33486fcf4",
  6       "tenant" : {
  7         "description" : null,
  8         "enabled" : true,
  9         "id" : "3942bfc544a24f748788c06dbc486ffa",
 10         "name" : "admin"
 11       }
 12     },
 13     "serviceCatalog" : [ {
 14       "endpoints" : [ {
 15         "adminURL" : "http://192.168.1.1:8774/v2/3942bfc544a24f748788c06dbc486ffa",
 16         "region" : "RegionOne",
 17         "internalURL" : "http://192.168.1.1:8774/v2/3942bfc544a24f748788c06dbc486ffa",
 18         "publicURL" : "http://192.168.1.1:8774/v2/3942bfc544a24f748788c06dbc486ffa"
 19       } ],
 20       "endpoints_links" : [ ],
 21       "type" : "compute",
 22       "name" : "nova"
 23     }, {
 24       "endpoints" : [ {
 25         "adminURL" : "http://192.168.1.1:9696/",
 26         "region" : "RegionOne",
 27         "internalURL" : "http://192.168.1.1:9696/",
 28         "publicURL" : "http://192.168.1.1:9696/"
 29       } ],
 30       "endpoints_links" : [ ],
 31       "type" : "network",
 32       "name" : "quantum"
 33     }, {
 34       "endpoints" : [ {
 35         "adminURL" : "http://192.168.1.1:9292/v2",
 36         "region" : "RegionOne",
 37         "internalURL" : "http://192.168.1.1:9292/v2",
 38         "publicURL" : "http://192.168.1.1:9292/v2"
 39       } ],
 40       "endpoints_links" : [ ],
 41       "type" : "image",
 42       "name" : "glance"
 43     }, {
 44       "endpoints" : [ {
 45         "adminURL" : "http://192.168.1.1:8776/v1/3942bfc544a24f748788c06dbc486ffa",
 46         "region" : "RegionOne",
 47         "internalURL" : "http://192.168.1.1:8776/v1/3942bfc544a24f748788c06dbc486ffa",
 48         "publicURL" : "http://192.168.1.1:8776/v1/3942bfc544a24f748788c06dbc486ffa"
 49       } ],
 50       "endpoints_links" : [ ],
 51       "type" : "volume",
 52       "name" : "cinder"
 53     }, {
 54       "endpoints" : [ {
 55         "adminURL" : "http://192.168.1.1:8773/services/Admin",
 56         "region" : "RegionOne",
 57         "internalURL" : "http://192.168.1.1:8773/services/Cloud",
 58         "publicURL" : "http://192.168.1.1:8773/services/Cloud"
 59       } ],
 60       "endpoints_links" : [ ],
 61       "type" : "ec2",
 62       "name" : "ec2"
 63     }, {
 64       "endpoints" : [ {
 65         "adminURL" : "http://192.168.1.1:8080/v1",
 66         "region" : "RegionOne",
 67         "internalURL" : "http://192.168.1.1:8080/v1/AUTH_3942bfc544a24f748788c06dbc486ffa",
 68         "publicURL" : "http://192.168.1.1:8080/v1/AUTH_3942bfc544a24f748788c06dbc486ffa"
 69       } ],
 70       "endpoints_links" : [ ],
 71       "type" : "object-store",
 72       "name" : "swift"
 73     }, {
 74       "endpoints" : [ {
 75         "adminURL" : "http://192.168.1.1:35357/v2.0",
 76         "region" : "RegionOne",
 77         "internalURL" : "http://192.168.1.1:5000/v2.0",
 78         "publicURL" : "http://192.168.1.1:5000/v2.0"
 79       } ],
 80       "endpoints_links" : [ ],
 81       "type" : "identity",
 82       "name" : "keystone"
 83     } ],
 84     "user" : {
 85       "username" : "admin",
 86       "roles_links" : [ ],
 87       "id" : "89b0ec701354421fa2284667d4175af7",
 88       "roles" : [ {
 89         "id" : "12833eaa4ff14e8ea1e1c2f96ea6f18d",
 90         "name" : "KeystoneServiceAdmin"
 91       }, {
 92         "id" : "31e298db6ece43c2b85f21f2a696809e",
 93         "name" : "admin"
 94       }, {
 95         "id" : "8cc376e9218a4068af4cb5a923c0f201",
 96         "name" : "KeystoneAdmin"
 97       }, {
 98         "id" : "bb4d1cf04bcb4be59bb2b78f9a273a9c",
 99         "name" : "ResellerAdmin"
100       } ],
101       "name" : "admin"
102     }
103   }
104 }
需要的是前面几行:
{"access": {"token": {"expires": "2013-01-23T02:22:40Z", "id": "dba0a6722b86483e83b07e5556bafb02"...
其中的ID一项,即为我们以后认证需要的token,记下来:
X-Auth-Token:dba0a6722b86483e83b07e5556bafb02
其它的server 及region信息,是根据你的keystone配置,会将各个服务的访问地址(endpoint)列出来,你可以从这里获得Image,compute,volume等API接口访问地址.
特别提醒:
认证的请求json字符串正确格式为:
{
    "auth":{
        "passwordCredentials":{
            "username":"admin",
            "password":"password"
        },
        "tenantId":"3942bfc544a24f748788c06dbc486ffa"
    }
}
缺少了tenantId选项依然可以获得token ,然而这样的token只能在keystone组件中使用,当使用此token去nova 或者image组件认证时,会失败(401错误)
而截止目前,官方api文档http://api.openstack.org/api-ref.html 为
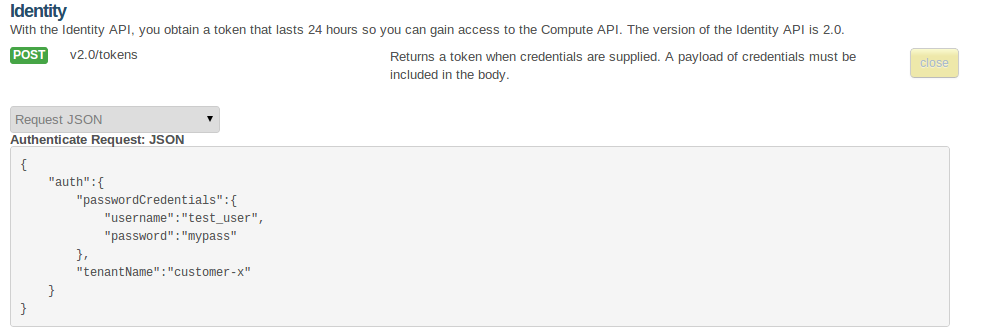
tenantName (可选项),按此文档请求会出现token不能在其它组件中认证的情况.
获得正确的的tokens后,便可以参考官方的api参考页面,测试其它的api了.
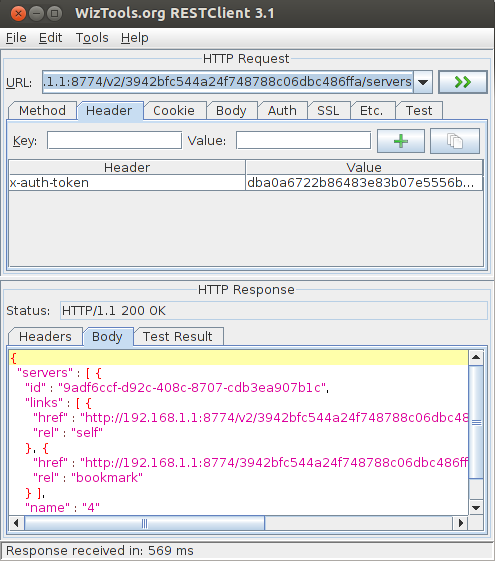
如instance 列表:
curl -v -H "X-Auth-Token:dba0a6722b86483e83b07e5556bafb02" http://192.168.1.1:8774/v2/3942bfc544a24f748788c06dbc486ffa/servers
curl毕竟是命令行,比较麻烦,大家可以使用rest客户端去操作。这里推存一个JAVA的:
下面我们通过API完成创建一个虚拟机的工作.
第一步:获取镜像列表:
协议为 GET http://192.168.1.1:9292/v1/images
这里使用Rest-client提交
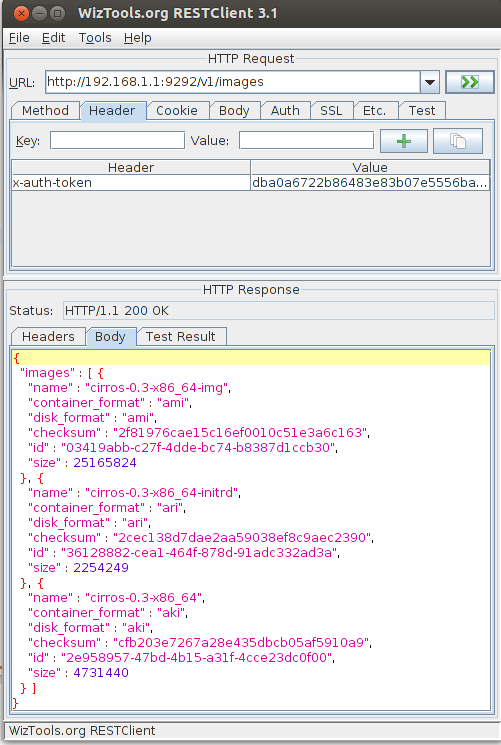
我们选一个镜像id: 03419abb-c27f-4dde-bc74-b8387d1ccb30
第二步:获取虚拟机创建方案.
协议为: GET http://192.168.1.1:8774/v2/3942bfc544a24f748788c06dbc486ffa/flavors
使用rest-client请求:

选取一个flavorid:100
第三步,创建虚拟机
协议:POST http://192.168.1.1:8774/v2/3942bfc544a24f748788c06dbc486ffa/servers
BODY:
{
    "server":{
        "flavorRef":"100",
        "imageRef":"03419abb-c27f-4dde-bc74-b8387d1ccb30",
        "metadata":{
            "My Server Name":"Apache1"
        },
        "name":"new-server-test",
        "personality":[
            {
                "contents":"",
                "path":"/etc/banner.txt"
            }
        ]
    }
}
restclient 请求:
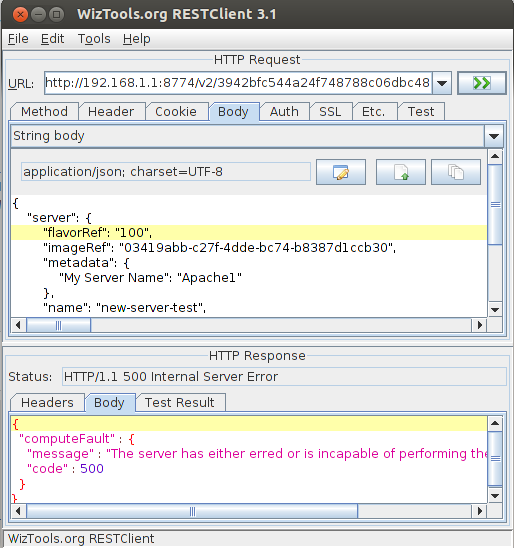
由于我的虚拟机资源用限,超出容量,所以创建失败了。成功的请求是这样的
{
    "server":{
        "adminPass":"MVk5HPrazHcG",
        "id":"5bbcc3c4-1da2-4437-a48a-66f15b1b13f9",
        "links":[
            {
                "href":"http://openstack.example.com/v2/openstack/servers/5bbcc3c4-1da2-4437-a48a-66f15b1b13f9",
                "rel":"self"
            },
            {
                "href":"http://openstack.example.com/openstack/servers/5bbcc3c4-1da2-4437-a48a-66f15b1b13f9",
                "rel":"bookmark"
            }
        ]
    }
}
结果可以登录http://192.168.1.1
用openstack 的Horizon的验证。
其它的api可以参考Openstack的文档完成了 http://api.openstack.org
常用工具
JSON格式化
<http://www.cnblogs.com/biangbiang/archive/2013/01/11/2856431.html>
Java REST Client
<http://rest-client.googlecode.com/>
Groovy RESTCLIENT (groovyx.net.http.RESTClient)
<http://groovy.codehaus.org/modules/http-builder/doc/rest.html>
HttpClient入门
<http://www.ibm.com/developerworks/cn/opensource/os-httpclient/>
<http://www.ibm.com/developerworks/cn/aix/library/au-aix-systemsdirector/section2.html>