Migrations
The Contoso University sample web application demonstrates how to create ASP.NET Core 1.0 MVC web applications using Entity Framework Core 1.0 and Visual Studio 2015. For information about the tutorial series, see the first tutorial in the series.
In this tutorial, you start using the EF Core migrations feature for managing data model changes. In later tutorials, you’ll add more migrations as you change the data model.
在该教程中,你开始使用EF Core迁移功能来处理数据模型的变化。在后续教程中,当改变数据模型时,将会增加更多的迁移。
Sections:
- Introduction to migrations 迁移简介
- Change the connection string 变更连接字符串
- Create an initial migration 创建初始化迁移
- Examine the Up and Down methods 检查上下方法
- Examine the data model snapshot 检查数据模型快照
- Apply the migration to the database 应用数据库的迁移
- Command line interface (CLI) vs. Package Manager Console (PMC) 两种界面的对比
- Summary 总结
Introduction to migrations¶ 迁移简介
When you develop a new application, your data model changes frequently, and each time the model changes, it gets out of sync with the database. You started these tutorials by configuring the Entity Framework to create the database if it doesn’t exist. Then each time you change the data model – add, remove, or change entity classes or change your DbContext class – you can delete the database and EF creates a new one that matches the model, and seeds it with test data.
开发新应用时数据模型是经常变化的,每次变化都会与数据库产生差异。从EF创建新数据库开始本节的教程。然后,每次增加、删除或者改变实体类以及DbContext类时,你可以先删除数据库,然后EF都会创建按照新要求创建一个新数据库,并且用测试数据进行初始化。
This method of keeping the database in sync with the data model works well until you deploy the application to production. When the application is running in production it is usually storing data that you want to keep, and you don’t want to lose everything each time you make a change such as adding a new column. The EF Core Migrations feature solves this problem by enabling EF to update the database schema instead of creating a new database.
直到部署到生产环境前,该方法都会很好地保持数据库与数据模型建的同步。当应用运行到生产环境中时,通常都会存储大量数据,而你会想保留这些数据。例如:当增加一个新列时,你不想失去任何数据。EF Core迁移功能通过升级数据库Schema的方法解决该问题,而不是创建一个新的数据库。
Change the connection string¶ 变更连接字符串
In the appsettings.json file, change the name of the database in the connection string to ContosoUniversity2 or some other name that you haven’t used on the computer you’re using.
在appsettings.json文件中,将连接字符串中的数据库名称变为ContosoUniversity2,或者其他未曾使用过的名称。
{
  "ConnectionStrings": {
    "DefaultConnection": "Server=(localdb)\mssqllocaldb;Database=ContosoUniversity2;Trusted_Connection=True;MultipleActiveResultSets=true"
  },
This change sets up the project so that the first migration will create a new database. This isn’t required for getting started with migrations, but you’ll see later why it’s a good idea.
该变化促成项目初始化时创建一个新数据库。学习迁移时这样做其实并不需要,但后面你将看到这是个不错的主意。
Note
注意
As an alternative to changing the database name, you can delete the database. Use SQL Server Object Explorer (SSOX) or the database drop CLI command:
作为变更数据库名称的可选方法,你也可删除数据库。使用SQL Server Object Explorer(SSOX),CLI命令的database drop:
dotnet ef database drop -c SchoolContext
The following section explains how to run CLI commands.
下面介绍如何运行CLI命令。
Create an initial migration¶ 创建初始迁移
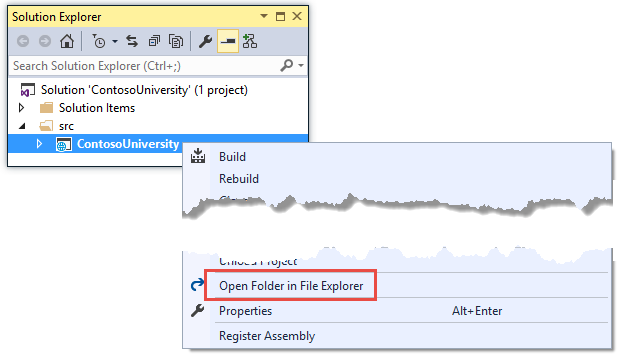
Save your changes and build the project. Then open a command window and navigate to the project folder. Here’s a quick way to do that:
In Solution Explorer, right-click the project and choose Open in File Explorer from the context menu.
-
Hold down the Shift key and right-click the project folder in File Explorer, then choose Open command window here from the context menu.

Before you enter a command, stop IIS Express for the site, or you may get an error message: “cannot access the file ... ContosoUniversity.dll because it is being used by another process.” To stop the site, find the IIS Express icon in the Windows System Tray, and right-click it, then click ContosoUniversity > Stop Site.
键入命令前必须停止网站运行的IIS,否则将会得到错误信息:“cannot access the file ... ContosoUniversity.dll because it is being used by another process.”。停止网站,从系统托盘中找到IIS Express图标,右击,再点击ContosoUniversity > Stop Site。
After you have stopped IIS Express, enter the following command in the command window:
停止IIS Express后,在命令行窗口键入以下命令:
dotnet ef migrations add InitialCreate -c SchoolContext
You see output like the following in the command window:
在命令行窗口会看到下面的输出:
C:ContosoUniversitysrcContosoUniversity>dotnet ef migrations add InitialCreate -c SchoolContext
Project ContosoUniversity (.NETCoreApp,Version=v1.0) was previously compiled. Skipping compilation.

Done.

To undo this action, use 'dotnet ef migrations remove'
You have to include the -c SchoolContext parameter to specify the database context class, because the project has two context classes (the other one is for ASP.NET Identity).
键入的内容必须包括 -c SchoolContext 参数,以便指定数据库上下文类,因为该项目具有两个上下文类(另一个是由ASP.NET Identity使用)。
Examine the Up and Down methods¶ 测试上下方法??
When you executed the migrations add command, EF generated the code that will create the database from scratch. This code is in the Migrations folder, in the file named <timestamp>_InitialCreate.cs. The Up method of the InitialCreate class creates the database tables that correspond to the data model entity sets, and the Down method deletes them, as shown in the following example.
当执行migrations add命令时,EF将从基架生成创建数据库的代码。这些代码位于Migrations文件夹内的<时间戳>_InitialCreate.cs文件内。InitialCreate类的Up方法负责创建与数据模型实体集相关的数据库表,Down方法负责删除这些表,具体代码如下:
public partial class InitialCreate : Migration
{
    protected override void Up(MigrationBuilder migrationBuilder)
    {
        migrationBuilder.CreateTable(
            name: "Student",
            columns: table => new
            {
                ID = table.Column<int>(nullable: false)
                    .Annotation("SqlServer:ValueGenerationStrategy", SqlServerValueGenerationStrategy.IdentityColumn),
                EnrollmentDate = table.Column<DateTime>(nullable: false),
                FirstMidName = table.Column<string>(nullable: true),
                LastName = table.Column<string>(nullable: true)
            },
            constraints: table =>
            {
                table.PrimaryKey("PK_Student", x => x.ID);
            });

        // Additional code not shown
    }

    protected override void Down(MigrationBuilder migrationBuilder)
    {
        migrationBuilder.DropTable(
            name: "Course");
        // Additional code not shown
    }
}
Migrations calls the Up method to implement the data model changes for a migration. When you enter a command to roll back the update, Migrations calls the Down method.
迁移调用Up方法实现数据模型的变化。输入回滚命令时,则调用Down方法。
This code is for the initial migration that was created when you entered the migrations add InitialCreate command. The migration name parameter (“InitialCreate” in the example) is used for the file name and can be whatever you want. It’s best to choose a word or phrase that summarizes what is being done in the migration. For example, you might name a later migration “AddDepartmentTable”.
键入migrations add InitialCreate命令,实现初始化迁移。迁移的名称参数(该例种为“InitialCreate”)用于文件名,改文件名可以改为任何名称。最好是选择一个表明具体作用的词语说明迁移的目的。例如,可以将后面一个迁移命名为“AddDepartmentTable”。
If you created the initial migration when the database already exists, the database creation code is generated but it doesn’t have to run because the database already matches the data model. When you deploy the app to another environment where the database doesn’t exist yet, this code will run to create your database, so it’s a good idea to test it first. That’s why you changed the name of the database in the connection string earlier – so that migrations can create a new one from scratch.
如果创建初始化迁移的时候数据库已经存在了,创建数据库的代码也会生成,但是并没有实际运行,因为数据库已与数据模型相匹配。当向其它环境实际部署应用时,该部分代码将运行创建数据库,所以首先做一个测试是一个好的想法。这就是早前变更连接字符串中数据库名称的原因,这样就可以迁移工作就可以从基架创建一个新的数据库。
Examine the data model snapshot¶ 测试数据模型快照
Migrations also creates a “snapshot” of the current database schema in Migrations/SchoolContextModelSnapshot.cs. Here’s what that code looks like:
迁移同时也创建了一个现有数据库的快照,将数据库的schema存储到Migrations/SchoolContextModelSnapshot.cs中。 相关代码类似于:
[DbContext(typeof(SchoolContext))]
partial class SchoolContextModelSnapshot : ModelSnapshot
{
    protected override void BuildModel(ModelBuilder modelBuilder)
    {
        modelBuilder
            .HasAnnotation("ProductVersion", "1.0.0-rtm-21431")
            .HasAnnotation("SqlServer:ValueGenerationStrategy", SqlServerValueGenerationStrategy.IdentityColumn);

        modelBuilder.Entity("ContosoUniversity.Models.Course", b =>
            {
                b.Property<int>("CourseID");

                b.Property<int>("Credits");

                b.Property<int>("DepartmentID");

                b.Property<string>("Title")
                    .HasAnnotation("MaxLength", 50);

                b.HasKey("CourseID");

                b.HasIndex("DepartmentID");

                b.ToTable("Course");
            });

        // Additional code for Enrollment and Student tables not shown

        modelBuilder.Entity("ContosoUniversity.Models.Enrollment", b =>
            {
                b.HasOne("ContosoUniversity.Models.Course", "Course")
                    .WithMany("Enrollments")
                    .HasForeignKey("CourseID")
                    .OnDelete(DeleteBehavior.Cascade);

                b.HasOne("ContosoUniversity.Models.Student", "Student")
                    .WithMany("Enrollments")
                    .HasForeignKey("StudentID")
                    .OnDelete(DeleteBehavior.Cascade);
            });
    }
}
Because this code has to reflect the database state after the latest migration, you can’t remove a migration just by deleting the file named <timestamp>_<migrationname>.cs. If you delete that file, the remaining migrations will be out of sync with the database snapshot file. To delete the last migration that you added, use the dotnet ef migrations remove command.
因为这些代码反映了最后一次迁移之后的数据库状态,所以不能仅通过删除<timestamp>_<migrationname>.cs文件来取消一个迁移。如果删除了该文件,剩余的迁移将于数据库快照文件失去同步。要删除最后一次迁移,请使用dotnet ef migrations remove命令。
Apply the migration to the database¶ 应用数据库迁移
In the command window, enter the following command to create the database and tables in it.
在命令行窗口键入以下命令来创建数据库和其中的表。
dotnet ef database update -c SchoolContext
The output from the command is similar to the migrations add command.
该命令的输出与migrations add命令的输出相似。
C:ContosoUniversitysrcContosoUniversity>dotnet ef database update -c SchoolContext
Project ContosoUniversity (.NETCoreApp,Version=v1.0) was previously compiled. Skipping compilation.

Done.
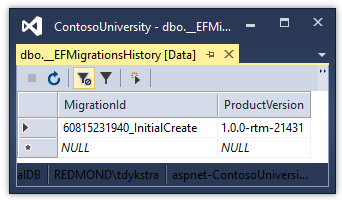
Use SQL Server Object Explorer to inspect the database as you did in the first tutorial. You’ll notice the addition of an __EFMigrationsHistory table that keeps track of which migrations have been applied to the database. View the data in that table and you’ll see one entry for the first migration.
如同在第一个教程中做的一样,使用SQL Server Object Explorer来查看数据库。你会注意到还有一个__EFMigrationsHistory表,该表保存了数据库迁移的踪迹。查看看该表的数据,你将会看到第一次迁移的入口。
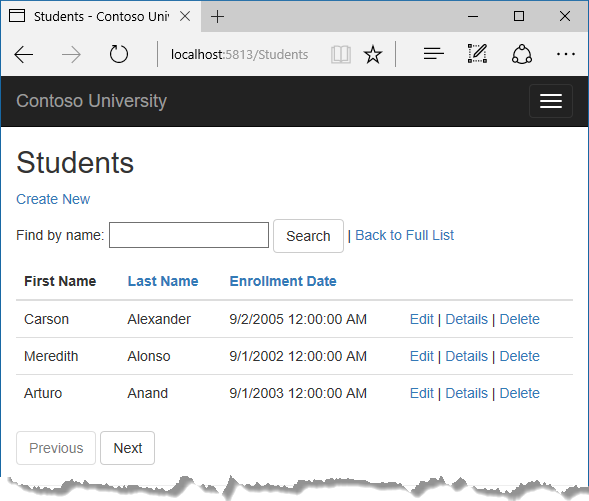
Run the application to verify that everything still works the same as before.
运行应用以测试是否工作如前。
Command line interface (CLI) vs. Package Manager Console (PMC)¶ 命令行界面(CLI)与程序包控制台(PMC)的对比
The EF tooling for managing migrations is available from .NET Core CLI commands or from PowerShell cmdlets in the Visual Studio Package Manager Console (PMC) window. In this preview version of the tooling, the CLI commands are more stable than the PMC cmdlets, so this tutorial shows how to use the .NET Core CLI commands.
在.NET Core CLI和VS PMC中的PowerShell cmdlets中都可以使用管理迁移的EF工具。在预览版的工具中,使用CLI命令较后者更稳定,所以该教程展示如何使用前者。
For more information about the CLI commands, see .NET Core CLI. For information about the PMC commands, see Package Manager Console (Visual Studio).
更多关于CLI命令的信息,请参看.NET Core CLI。更多关于PMC命令,请参看Package Manager Console (Visual Studio)。
Summary¶ 总结
In this tutorial, you’ve seen how to create and apply your first migration. In the next tutorial, you’ll begin looking at more advanced topics by expanding the data model. Along the way you’ll create and apply additional migrations.
在本教程中,你已经看到如何创建并应用第一次迁移。在后续教程中,你将开始看到关于数据模型更高级的主题。后续,你将创建并应用其他的迁移。