《基于qml创建最简单的图像处理程序》系列课程及配套代码
基于qml创建最简单的图像处理程序(1)-基于qml创建界面
http://www.cnblogs.com/jsxyhelu/p/8343310.html
课程1附件
https://files.cnblogs.com/files/jsxyhelu/%E9%98%B6%E6%AE%B5%E4%BB%A3%E7%A0%811.zip
基于qml创建最简单的图像处理程序(2)-使用c++&qml进行图像处理
http://www.cnblogs.com/jsxyhelu/p/8361441.html
课程2附件
https://files.cnblogs.com/files/jsxyhelu/%E9%98%B6%E6%AE%B5%E4%BB%A3%E7%A0%812.zip
基于qml创建最简单的图像处理程序(3)-使用opencv&qml进行图像处理
http://www.cnblogs.com/jsxyhelu/p/8361443.html
课程3附件
https://files.cnblogs.com/files/jsxyhelu/%E9%98%B6%E6%AE%B5%E4%BB%A3%E7%A0%813.zip
qml实现了不错的界面,但是图像处理这块不是它强项,它能够提供的就是qimage这样的图像,对像素的处理就是对图像的处理,而最简单、最直接的方法就是使用c++的代码进行像素处理。
这里就涉及到c++&qml联合程序设计的具体内容了。这方面涉及到的东西有点多,首先我们需要解决的是qml和c++的联合问题。当然我们在搭建这个框架的时候,可能会有比较多一些的问题—另一个方面,当框架搭建好了以后,使用起来会比较方便。
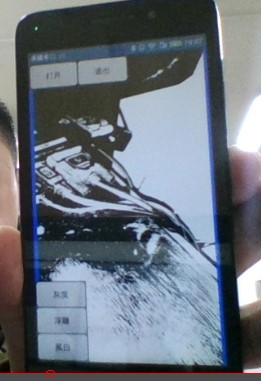
一、编写按钮触发事件
现有的例子,已经实现了qml的界面,并且能够打开、显示一个新的图像;我们甚至为后面的图像处理预留了几个按钮的位置,下面我们首先就是要触发这些按钮的事件。
//灰度效果d
Button {
text: "灰度";
style: btnStyle;
onPressedChanged: {
busy.running = true;
// processor.process(fileDialog.fileUrl, ImageProcessor.Gray);
}
}
//浮雕效果
Button {
text: "浮雕";
style: btnStyle;
onPressedChanged: {
busy.running = true;
// processor.process(fileDialog.fileUrl, ImageProcessor.Emboss);
}
}
//黑白效果
Button {
text: "黑白";
style: btnStyle;
onPressedChanged: {
busy.running = true;
// processor.process(fileDialog.fileUrl, ImageProcessor.Binarize);
}
}
Button {
text: "灰度";
style: btnStyle;
onPressedChanged: {
busy.running = true;
// processor.process(fileDialog.fileUrl, ImageProcessor.Gray);
}
}
//浮雕效果
Button {
text: "浮雕";
style: btnStyle;
onPressedChanged: {
busy.running = true;
// processor.process(fileDialog.fileUrl, ImageProcessor.Emboss);
}
}
//黑白效果
Button {
text: "黑白";
style: btnStyle;
onPressedChanged: {
busy.running = true;
// processor.process(fileDialog.fileUrl, ImageProcessor.Binarize);
}
}
这个地方有一个小细节,那就是
onPressedChanged()
和
onClick()
的区别。这两者表示的都是“按下”这个事件,他们的不同在于onClick()要多了一个“按下后抬起”的动作。所以一般来说,对于桌面运用,click用的多一点,而对于Android,onPressedChanged多一点。
二、触发图像处理算法
我们可以看到上面代码中,每一种处理后面,都有一行注释,调用的是processor对象的一个函数,那么这个函数是从哪里来的了?它的定义来自这里
//需要特别注意,这个组件来自imageprocessor这个类,通过这种方法进行集成
ImageProcessor {
id: processor;
onFinished: {
imageViewer.source = "file:///" +newFile;
}
}
ImageProcessor {
id: processor;
onFinished: {
imageViewer.source = "file:///" +newFile;
}
}
它的意思是processor对象是ImageProcessor类的一个实例,那么ImageProcessor又是从哪里来的了?
它的定义来自于
中
//将c++中定义的类给接过来,在这个定义中,ImageProcessor是c++中函数名,GO.ImageProcessor是你在qml中使用的名称
qmlRegisterType<ImageProcessor>("GO.ImageProcessor", 1, 0,"ImageProcessor");
qmlRegisterType<ImageProcessor>("GO.ImageProcessor", 1, 0,"ImageProcessor");
其中qmlRegisterType是类的引入,类似dllimport之类,而
<ImageProcessor>
和
"ImageProcessor"
一般来说,都是来自于你的c++的函数名称;而
"GO.ImageProcessor"
是你在qml中的头文件.
此外,1,0是你的版本号。
所以这个地方有两个头文件,在main.cpp中,引入
#include "imageProcessor.h"
而在qml中,这样引入
import GO.ImageProcessor 1.0
那么我们在这里主要讨论的就是如何从c++中将行数引接过来的。
三、C++中具体算法实现
那我们就来看c++类中的ImageProcessor 是如何实现的,它的代码地址来自:
它的原型为:
void process(QString sourceFile, ImageProcessor::ImageAlgorithm algorithm)
{
QFileInfo fi(sourceFile);
QString destFile = QString("%1/%2_%3").arg(m_tempPath).arg((int)algorithm).arg(fi.fileName());
AlgorithmRunnable *r = new AlgorithmRunnable(sourceFile,destFile,algorithm,this);
m_runnables.append(r);
r->setAutoDelete(false);
QThreadPool::globalInstance()->start(r);
}
{
QFileInfo fi(sourceFile);
QString destFile = QString("%1/%2_%3").arg(m_tempPath).arg((int)algorithm).arg(fi.fileName());
AlgorithmRunnable *r = new AlgorithmRunnable(sourceFile,destFile,algorithm,this);
m_runnables.append(r);
r->setAutoDelete(false);
QThreadPool::globalInstance()->start(r);
}
它设定了一系列参数,主要是创建了AlgorithmRunnalbe,然后通过QThreadPool打开新线程运行算法。那么主要的函数体在AlgorithmRunnable中的。由于涉及到较多的具体内容,这里不展开说明,大家可以参考全部代码。
我们关注的是图像处理函数,在这个项目中实现了以下内容:
//具体的图像处理算法,注意图片处理的结果直接保存到了destFile中去//
static void _gray(QString sourceFile, QString destFile)
{
QImage image(sourceFile);
if(image.isNull())
{
qDebug() << "load " << sourceFile << " failed! ";
return;
}
qDebug() << "depth - " << image.depth();
int width = image.width();
int height = image.height();
QRgb color;
int gray;
for(int i = 0; i < width; i++)
{
for(int j= 0; j < height; j++)
{
color = image.pixel(i, j);
gray = qGray(color);
image.setPixel(i, j, qRgba(gray, gray, gray, qAlpha(color)));
}
}
image.save(destFile);
}
static void _binarize(QString sourceFile, QString destFile)
{
QImage image(sourceFile);
if(image.isNull())
{
qDebug() << "load " << sourceFile << " failed! ";
return;
}
int width = image.width();
int height = image.height();
QRgb color;
QRgb avg;
QRgb black = qRgb(0, 0, 0);
QRgb white = qRgb(255, 255, 255);
for(int i = 0; i < width; i++)
{
for(int j= 0; j < height; j++)
{
color = image.pixel(i, j);
avg = (qRed(color) + qGreen(color) + qBlue(color))/3;
image.setPixel(i, j, avg >= 128 ? white : black);
}
}
image.save(destFile);
}
static void _emboss(QString sourceFile, QString destFile)
{
QImage image(sourceFile);
if(image.isNull())
{
qDebug() << "load " << sourceFile << " failed! ";
return;
}
int width = image.width();
int height = image.height();
QRgb color;
QRgb preColor = 0;
QRgb newColor;
int gray, r, g, b, a;
for(int i = 0; i < width; i++)
{
for(int j= 0; j < height; j++)
{
color = image.pixel(i, j);
r = qRed(color) - qRed(preColor) + 128;
g = qGreen(color) - qGreen(preColor) + 128;
b = qBlue(color) - qBlue(preColor) + 128;
a = qAlpha(color);
gray = qGray(r, g, b);
newColor = qRgba(gray, gray, gray, a);
image.setPixel(i, j, newColor);
preColor = newColor;
}
}
image.save(destFile);
}
//END 具体的图像处理算法,注意图片处理的结果直接保存到了destFile中去//
甚至不用去看算法的实现(因为最后我们肯定是要使用OpenCV来做图像处理的),这3个图像处理的函数都是非常统一的
static void _binarize(QString sourceFile, QString destFile)
比如返回类型为void,第一个参数为输入图像,第二个参数为输出图片。从这里也可以看出,在我们这个项目中,是通过地址(而不是内存)来传递数据的。如果我们想要添加新的算法,修改现有算法,直接修改这几个函数、添加相关界面就可以。
而下一步,最关键的一步,也是原书例子没有实现的,就是添加OpenCV的代码,使用它来替代进行图像处理。