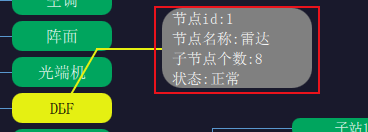
1、效果

2、自定义路径qml
import QtQuick 2.0

Item {
    property point startPoint: Qt.point(0, 0)
    property point endPoint: Qt.point(0, 0)
    property var lineColor: "#E5F012"
    property var lineWidth: 2

    //斜线长度
    property var oblLineLength: 0
    //水平线长度
    property var horLineLength: 0

    function drawCala() {
        oblLine.visible = true;
        horLine.visible = true;
        //相对角度
        var angle= 0

        //实际角度值
        var realAngle = 0;

        var newOblLeng = 0;
        var newHorLeng = 0;

        var tmpx = Math.abs(startPoint.x - endPoint.x);
        var tmpy = Math.abs(startPoint.y - endPoint.y);

        //情况1 30°夹角
        if (tmpx >= Math.floor((Math.sqrt(3) / 3) * tmpy))
        {
            newOblLeng = Math.floor(tmpy / (Math.sqrt(3) / 2));
            newHorLeng = tmpx - Math.floor((Math.floor((Math.sqrt(3) / 3) * tmpy)));
            angle = 60;
        }
        //情况2 垂线和直线配合
        else
        {
            newOblLeng = tmpy;
            newHorLeng = tmpx;
            angle = 90;
        }

        //水平线的Y坐标 和结束点Y坐标相同
        horLine.y = endPoint.y;

        //结束的点在起始点的左上方
        if ((startPoint.x >= endPoint.x) && (startPoint.y >= endPoint.y))
        {
            realAngle = 180 + angle;
            horLine.x = endPoint.x + newHorLeng;
            horLine.rotation = 180;
        }
        //结束的点在起始点的右上方
        else if ((startPoint.x <= endPoint.x) && (startPoint.y >= endPoint.y))
        {
            realAngle = -angle;
            horLine.x = endPoint.x - newHorLeng;
            horLine.rotation = 0;
        }
        //结束的点在起始点的右下方
        else if ((startPoint.x <= endPoint.x) && (startPoint.y <= endPoint.y))
        {
            realAngle = angle;
            horLine.x = endPoint.x - newHorLeng;
            horLine.rotation = 0;
        }
        //结束的点在起始点的左下方
        else if ((startPoint.x >= endPoint.x) && (startPoint.y <= endPoint.y))
        {
            realAngle = 180 - angle;
            horLine.x = endPoint.x + newHorLeng;
            horLine.rotation = 180;
        }

        oblLine.x = startPoint.x;
        oblLine.y = startPoint.y;
        oblLine.rotation = realAngle
        oblLineLength = newOblLeng;
        horLineLength = newHorLeng;

        if (oblLineLength > 0)
        {
            oblAnimation.restart();
        }
        else
        {
            //当使用垂线时斜线长度清零
            oblLine.width = oblLineLength;
            //直接进行水平延伸
            horLine.visible = true;
            horAnimation.restart();
        }
    }

    function init()
    {
        oblLine.visible = true;
        horLine.visible = true;
    }

    function clear()
    {
        oblLine.visible = false;
        horLine.visible = false;
        oblAnimation.stop();
        horAnimation.stop();
    }

    Rectangle{
        id: oblLine

        antialiasing: true
        height: lineWidth
        color: lineColor
        transformOrigin: Item.TopLeft
    }

    Rectangle{
        id: horLine

        antialiasing: true
        height: lineWidth
        color: lineColor
        transformOrigin: Item.TopLeft
    }

    PropertyAnimation {
        id: oblAnimation
        target: oblLine
        property: "width"
        duration: 200
        from: 0
        to: oblLineLength
        onStopped: {
            if (horLineLength > 0)
            {
                horLine.visible = true
                horAnimation.restart()
            }
        }
        onStarted: {
            horLine.visible = false
        }
    }
    PropertyAnimation {
        id: horAnimation
        target: horLine
        property: "width"
        duration: 400
        from: 0
        to: horLineLength
    }
}
原理就是动态生成2个rectangle,然后设置其中一个的角度
3、使用
signal itemClick(int node_id);//节点发出的信号
signal itemEnter(int node_id);
signal itemExit();

//初始化
Component.onCompleted: {
    itemEnter.connect(root.showPopInfo);
    itemExit.connect(root.hidePopInfo);
}

//显示悬浮信息
function showPopInfo(node_id)
{
    var list = root.children;
    var x,y;
    for ( var i in list) {
        if(list[i].node_id === node_id)
        {
            x = list[i].x+list[i].width/2;
            y = list[i].y+list[i].height/2;
            break;
        }
    }
    pop.x = x+100;
    pop.y = y-100;
    if(pop.y-pop.height <= 0)
    {
        pop.y = 10;
    }
    if(pop.x+pop.width >= root.width)
    {
        pop.x = root.width/2+30;
    }
    pop.visible = true;
    myTagLine.startPoint = Qt.point(x, y);
    myTagLine.endPoint = Qt.point(pop.x+pop.width/2, pop.y+pop.height/2);
    myTagLine.drawCala();
    pop_anni.start();
}

//隐藏悬浮信息
function hidePopInfo(node_id)
{
    pop_anni.stop();
    pop.visible = false;
    myTagLine.clear();
}//实时数据orBIT
Text {
    id: state_txt;
    anchors.top: rdImg.bottom;
    anchors.topMargin: 10;
    anchors.horizontalCenter: rdImg.horizontalCenter
    color: "white";
    font.pixelSize: 25;
    text: qsTr("实时数据框图");
}
//通道信息悬浮框
Rectangle {
    id: pop;
    z: 2;
    width: 150;
    height: 80;
    radius: 20;
    color: "gray";
    opacity: 0.9;
    visible: false;
    Text {
        id: name1;
        anchors.top: parent.top;
        anchors.topMargin: 3;
        anchors.left: parent.left;
        anchors.leftMargin: 10;
        color: "white";
        font.pixelSize: 15;
        text: qsTr("节点id:1");
    }
    Text {
        id: name2;
        anchors.top: name1.bottom;
        anchors.topMargin: 5;
        anchors.left: parent.left;
        anchors.leftMargin: 10;
        color: "white";
        font.pixelSize: name1.font.pixelSize;
        text: qsTr("节点名称:雷达");
    }
    Text {
        id: name3;
        anchors.top: name2.bottom;
        anchors.topMargin: 5;
        anchors.left: parent.left;
        anchors.leftMargin: 10;
        color: "white";
        font.pixelSize: name1.font.pixelSize;
        text: qsTr("子节点个数:8");
    }
    Text {
        id: name4;
        anchors.top: name3.bottom;
        anchors.topMargin: 5;
        anchors.left: parent.left;
        anchors.leftMargin: 10;
        color: "white";
        font.pixelSize: name1.font.pixelSize;
        text: qsTr("状态:正常");
    }
}
//标注线
TagLine {
    z: 1;
    id: myTagLine;
}//修改通道信息悬浮框动画
PropertyAnimation{
    id: pop_anni;
    target: pop;
    properties:"opacity";
    from: 0;
    to: 1;
    duration: 1000;
    running: false;
}