https://blog.csdn.net/huobanjishijian/article/details/63685503
前面我们已经学了一些OpenCV中基本的图片处理的知识,可以拿来做一些小应用。比如怎样从一张图片中,把文字圈出来。这一步骤对OCR(Optical Character Recognition)非常有用,因为一般的OCR引擎只是拿来识别文字,并没有对图片做预处理,因此精度可能会收到图片质量影响。
当然,我们这里只是粗略的查找文字区域,并没有进一步地处理图片。而且对背景复杂,或者文字旋转角度过于倾斜的情况也无法自适应,因此只能给大家做参考。若要实用到项目中,还有很多工作要做。
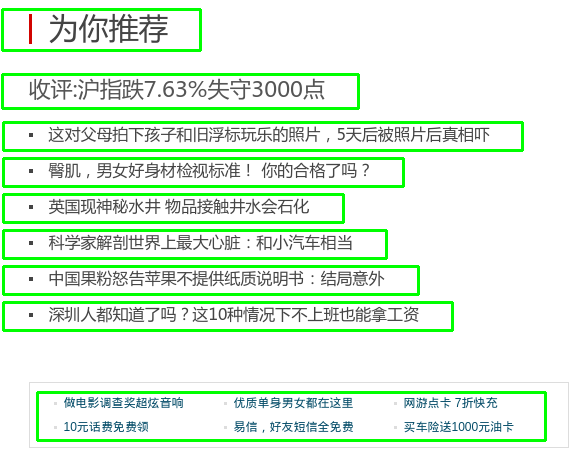
效果图
比如我们有下面的一篇文章的截图,想把其中的文字区域全部找出来。
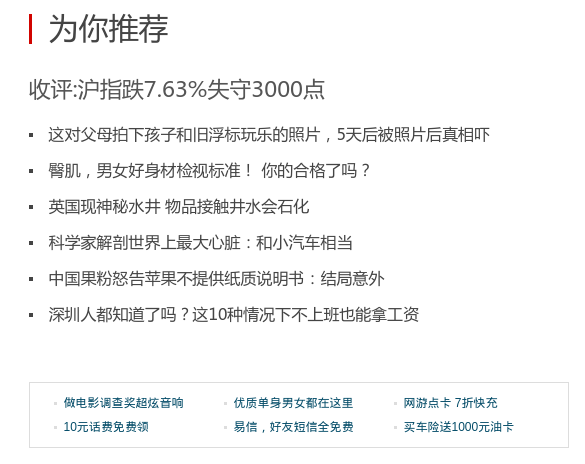
当然这里的截图只有文字和白花花的背景,效果会非常好。绿色的的矩形框的是我们根据检测到的文字区域,手动画出来的。
原理
那么我们是怎么做到检测到区域的呢?
首先,我们会注意到,文字区域和其他的图片背景很不一样。我们用膨胀处理图片,让文字变成一块块大区域,然后识别整块的轮廓,用矩形去框住这个轮廓。
这个程序分三个子函数,detect(检测),preprocess(图片预处理),findTextRegion(查找和筛选文字区域)。即main函数调用detect函数去实际完成文字区域检测。detect函数又分成preprocess和findTextRegion两个步骤来做。
见下面的序列图,可能会清晰点。
1. Detect
先来看main函数和Detect函数
def detect(img):
    # 1.  转化成灰度图
    gray = cv2.cvtColor(img, cv2.COLOR_BGR2GRAY)

    # 2. 形态学变换的预处理,得到可以查找矩形的图片
    dilation = preprocess(gray)

    # 3. 查找和筛选文字区域
    region = findTextRegion(dilation)

    # 4. 用绿线画出这些找到的轮廓
    for box in region:
        cv2.drawContours(img, [box], 0, (0, 255, 0), 2)

    cv2.namedWindow("img", cv2.WINDOW_NORMAL)
    cv2.imshow("img", img)

    # 带轮廓的图片
    cv2.imwrite("contours.png", img)

    cv2.waitKey(0)
    cv2.destroyAllWindows()


if __name__ == '__main__':
    # 读取文件
    imagePath = sys.argv[1]
    img = cv2.imread(imagePath)
detect(img)- 1
- 2
- 3
- 4
- 5
- 6
- 7
- 8
- 9
- 10
- 11
- 12
- 13
- 14
- 15
- 16
- 17
- 18
- 19
- 20
- 21
- 22
- 23
- 24
- 25
- 26
- 27
- 28
- 29
- 1
- 2
- 3
- 4
- 5
- 6
- 7
- 8
- 9
- 10
- 11
- 12
- 13
- 14
- 15
- 16
- 17
- 18
- 19
- 20
- 21
- 22
- 23
- 24
- 25
- 26
- 27
- 28
- 29
- 1
- 2
- 3
- 4
- 5
- 6
- 7
- 8
- 9
- 10
- 11
- 12
- 13
- 14
- 15
- 16
- 17
- 18
- 19
- 20
- 21
- 22
- 23
- 24
- 25
- 26
- 27
- 28
- 29
2. Preprocess
利用数学形态学(Morphology)进行预处理。
这个过程很重要,是文字区域检测效果好坏的核心代码,尤其是一下几个参数:
- 膨胀的核函数大小,这里用了
30 x 9,可以调节 - 腐蚀的核函数大小,这里用了
24 x 6,可以调节
def preprocess(gray):
    # 1. Sobel算子,x方向求梯度
    sobel = cv2.Sobel(gray, cv2.CV_8U, 1, 0, ksize = 3)
    # 2. 二值化
    ret, binary = cv2.threshold(sobel, 0, 255, cv2.THRESH_OTSU+cv2.THRESH_BINARY)

    # 3. 膨胀和腐蚀操作的核函数
    element1 = cv2.getStructuringElement(cv2.MORPH_RECT, (30, 9))
    element2 = cv2.getStructuringElement(cv2.MORPH_RECT, (24, 6))

    # 4. 膨胀一次,让轮廓突出
    dilation = cv2.dilate(binary, element2, iterations = 1)

    # 5. 腐蚀一次,去掉细节,如表格线等。注意这里去掉的是竖直的线
    erosion = cv2.erode(dilation, element1, iterations = 1)

    # 6. 再次膨胀,让轮廓明显一些
    dilation2 = cv2.dilate(erosion, element2, iterations = 3)

    # 7. 存储中间图片
    cv2.imwrite("binary.png", binary)
    cv2.imwrite("dilation.png", dilation)
    cv2.imwrite("erosion.png", erosion)
    cv2.imwrite("dilation2.png", dilation2)

    return dilation2
- 1
- 2
- 3
- 4
- 5
- 6
- 7
- 8
- 9
- 10
- 11
- 12
- 13
- 14
- 15
- 16
- 17
- 18
- 19
- 20
- 21
- 22
- 23
- 24
- 25
- 26
- 27
- 1
- 2
- 3
- 4
- 5
- 6
- 7
- 8
- 9
- 10
- 11
- 12
- 13
- 14
- 15
- 16
- 17
- 18
- 19
- 20
- 21
- 22
- 23
- 24
- 25
- 26
- 27
- 1
- 2
- 3
- 4
- 5
- 6
- 7
- 8
- 9
- 10
- 11
- 12
- 13
- 14
- 15
- 16
- 17
- 18
- 19
- 20
- 21
- 22
- 23
- 24
- 25
- 26
- 27
3. findTextRegion
def findTextRegion(img):
    region = []

    # 1. 查找轮廓
    contours, hierarchy = cv2.findContours(img, cv2.RETR_TREE, cv2.CHAIN_APPROX_SIMPLE)

    # 2. 筛选那些面积小的
    for i in range(len(contours)):
        cnt = contours[i]
        # 计算该轮廓的面积
        area = cv2.contourArea(cnt)

        # 面积小的都筛选掉
        if(area < 1000):
            continue

        # 轮廓近似,作用很小
        epsilon = 0.001 * cv2.arcLength(cnt, True)
        approx = cv2.approxPolyDP(cnt, epsilon, True)

        # 找到最小的矩形,该矩形可能有方向
        rect = cv2.minAreaRect(cnt)
        print "rect is: "
        print rect

        # box是四个点的坐标
        box = cv2.cv.BoxPoints(rect)
        box = np.int0(box)

        # 计算高和宽
        height = abs(box[0][1] - box[2][1])
        width = abs(box[0][0] - box[2][0])

        # 筛选那些太细的矩形,留下扁的
        if(height > width * 1.2):
            continue

        region.append(box)

    return region
- 1
- 2
- 3
- 4
- 5
- 6
- 7
- 8
- 9
- 10
- 11
- 12
- 13
- 14
- 15
- 16
- 17
- 18
- 19
- 20
- 21
- 22
- 23
- 24
- 25
- 26
- 27
- 28
- 29
- 30
- 31
- 32
- 33
- 34
- 35
- 36
- 37
- 38
- 39
- 40
- 41
- 1
- 2
- 3
- 4
- 5
- 6
- 7
- 8
- 9
- 10
- 11
- 12
- 13
- 14
- 15
- 16
- 17
- 18
- 19
- 20
- 21
- 22
- 23
- 24
- 25
- 26
- 27
- 28
- 29
- 30
- 31
- 32
- 33
- 34
- 35
- 36
- 37
- 38
- 39
- 40
- 41
- 1
- 2
- 3
- 4
- 5
- 6
- 7
- 8
- 9
- 10
- 11
- 12
- 13
- 14
- 15
- 16
- 17
- 18
- 19
- 20
- 21
- 22
- 23
- 24
- 25
- 26
- 27
- 28
- 29
- 30
- 31
- 32
- 33
- 34
- 35
- 36
- 37
- 38
- 39
- 40
- 41
完整代码
加上头文件,把几个函数合并以后,贴在这里。注意开头要写明用utf8编码,不然中文注释可能不会被系统识别。而且Python没有花括号来控制流程,所以对看不见的Tab缩进很敏感,写代码的时候要规范。
直接在终端里敲下面的命令,既可以运行
python textDetection.py ./pic/1.png
代码:textDetection.py
# coding:utf8

import sys

import cv2
import numpy as np

def preprocess(gray):
    # 1. Sobel算子,x方向求梯度
    sobel = cv2.Sobel(gray, cv2.CV_8U, 1, 0, ksize = 3)
    # 2. 二值化
    ret, binary = cv2.threshold(sobel, 0, 255, cv2.THRESH_OTSU+cv2.THRESH_BINARY)

    # 3. 膨胀和腐蚀操作的核函数
    element1 = cv2.getStructuringElement(cv2.MORPH_RECT, (30, 9))
    element2 = cv2.getStructuringElement(cv2.MORPH_RECT, (24, 6))

    # 4. 膨胀一次,让轮廓突出
    dilation = cv2.dilate(binary, element2, iterations = 1)

    # 5. 腐蚀一次,去掉细节,如表格线等。注意这里去掉的是竖直的线
    erosion = cv2.erode(dilation, element1, iterations = 1)

    # 6. 再次膨胀,让轮廓明显一些
    dilation2 = cv2.dilate(erosion, element2, iterations = 3)

    # 7. 存储中间图片
    cv2.imwrite("binary.png", binary)
    cv2.imwrite("dilation.png", dilation)
    cv2.imwrite("erosion.png", erosion)
    cv2.imwrite("dilation2.png", dilation2)

    return dilation2


def findTextRegion(img):
    region = []

    # 1. 查找轮廓
    contours, hierarchy = cv2.findContours(img, cv2.RETR_TREE, cv2.CHAIN_APPROX_SIMPLE)

    # 2. 筛选那些面积小的
    for i in range(len(contours)):
        cnt = contours[i]
        # 计算该轮廓的面积
        area = cv2.contourArea(cnt)

        # 面积小的都筛选掉
        if(area < 1000):
            continue

        # 轮廓近似,作用很小
        epsilon = 0.001 * cv2.arcLength(cnt, True)
        approx = cv2.approxPolyDP(cnt, epsilon, True)

        # 找到最小的矩形,该矩形可能有方向
        rect = cv2.minAreaRect(cnt)
        print "rect is: "
        print rect

        # box是四个点的坐标
        box = cv2.cv.BoxPoints(rect)
        box = np.int0(box)

        # 计算高和宽
        height = abs(box[0][1] - box[2][1])
        width = abs(box[0][0] - box[2][0])

        # 筛选那些太细的矩形,留下扁的
        if(height > width * 1.2):
            continue

        region.append(box)

    return region


def detect(img):
    # 1.  转化成灰度图
    gray = cv2.cvtColor(img, cv2.COLOR_BGR2GRAY)

    # 2. 形态学变换的预处理,得到可以查找矩形的图片
    dilation = preprocess(gray)

    # 3. 查找和筛选文字区域
    region = findTextRegion(dilation)

    # 4. 用绿线画出这些找到的轮廓
    for box in region:
        cv2.drawContours(img, [box], 0, (0, 255, 0), 2)

    cv2.namedWindow("img", cv2.WINDOW_NORMAL)
    cv2.imshow("img", img)

    # 带轮廓的图片
    cv2.imwrite("contours.png", img)

    cv2.waitKey(0)
    cv2.destroyAllWindows()


if __name__ == '__main__':
    # 读取文件
    imagePath = sys.argv[1]
    img = cv2.imread(imagePath)
    detect(img)
- 1
- 2
- 3
- 4
- 5
- 6
- 7
- 8
- 9
- 10
- 11
- 12
- 13
- 14
- 15
- 16
- 17
- 18
- 19
- 20
- 21
- 22
- 23
- 24
- 25
- 26
- 27
- 28
- 29
- 30
- 31
- 32
- 33
- 34
- 35
- 36
- 37
- 38
- 39
- 40
- 41
- 42
- 43
- 44
- 45
- 46
- 47
- 48
- 49
- 50
- 51
- 52
- 53
- 54
- 55
- 56
- 57
- 58
- 59
- 60
- 61
- 62
- 63
- 64
- 65
- 66
- 67
- 68
- 69
- 70
- 71
- 72
- 73
- 74
- 75
- 76
- 77
- 78
- 79
- 80
- 81
- 82
- 83
- 84
- 85
- 86
- 87
- 88
- 89
- 90
- 91
- 92
- 93
- 94
- 95
- 96
- 97
- 98
- 99
- 100
- 101
- 102
- 103
- 104
- 105
- 106
- 107
- 108
- 1
- 2
- 3
- 4
- 5
- 6
- 7
- 8
- 9
- 10
- 11
- 12
- 13
- 14
- 15
- 16
- 17
- 18
- 19
- 20
- 21
- 22
- 23
- 24
- 25
- 26
- 27
- 28
- 29
- 30
- 31
- 32
- 33
- 34
- 35
- 36
- 37
- 38
- 39
- 40
- 41
- 42
- 43
- 44
- 45
- 46
- 47
- 48
- 49
- 50
- 51
- 52
- 53
- 54
- 55
- 56
- 57
- 58
- 59
- 60
- 61
- 62
- 63
- 64
- 65
- 66
- 67
- 68
- 69
- 70
- 71
- 72
- 73
- 74
- 75
- 76
- 77
- 78
- 79
- 80
- 81
- 82
- 83
- 84
- 85
- 86
- 87
- 88
- 89
- 90
- 91
- 92
- 93
- 94
- 95
- 96
- 97
- 98
- 99
- 100
- 101
- 102
- 103
- 104
- 105
- 106
- 107
- 10