一:介绍
1.概述
-》flume的三大功能
collecting, aggregating, and moving
收集 聚合 移动
数据源:web service RDBMS
采集: shell flume sqoop
清洗:mapreduce,hive
数据的保存:sqoop
监控与调度:hue,oozie
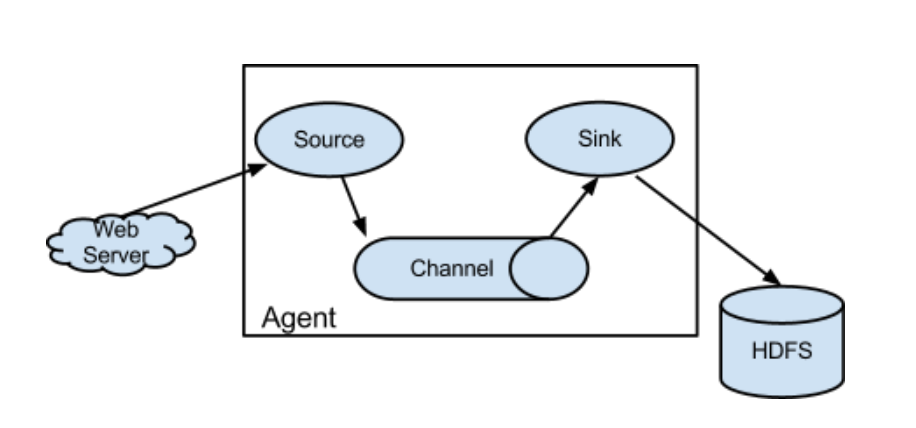
2.框图
3.架构特点
-》on streaming data flows
基于流式的数据
数据流:job-》不断获取数据
任务流:job1->job2->job3&job4
-》for online analytic application.
时时的分析工具
-》Flume仅仅运行在linux环境下
-》非常简单
写一个配置文件,运行这个配置文件
source、channel、sink
-》实时架构
flume+kafka spark/storm impala
-》agent三大部分
-》source:采集数据,并发送给channel
是产生数据流的地方,同时,source会将产生的数据流传输到channel、
-》channel:管道,用于连接source和sink的
保证数据的完整性,同时,可以减低网络的IO流。
-》sink:写数据,同时,采集channel中的数据
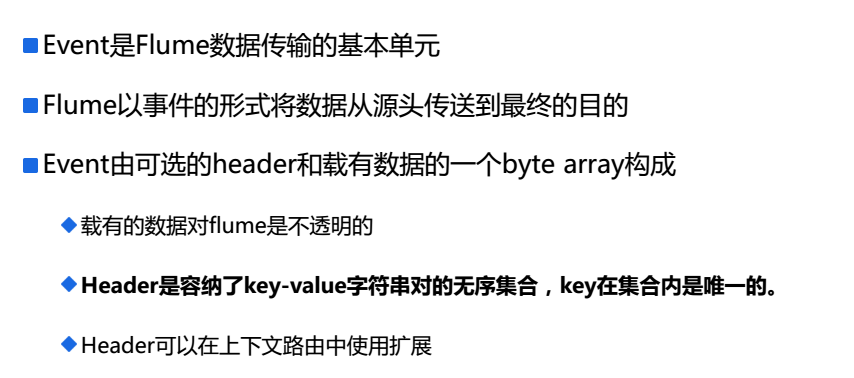
4.Event
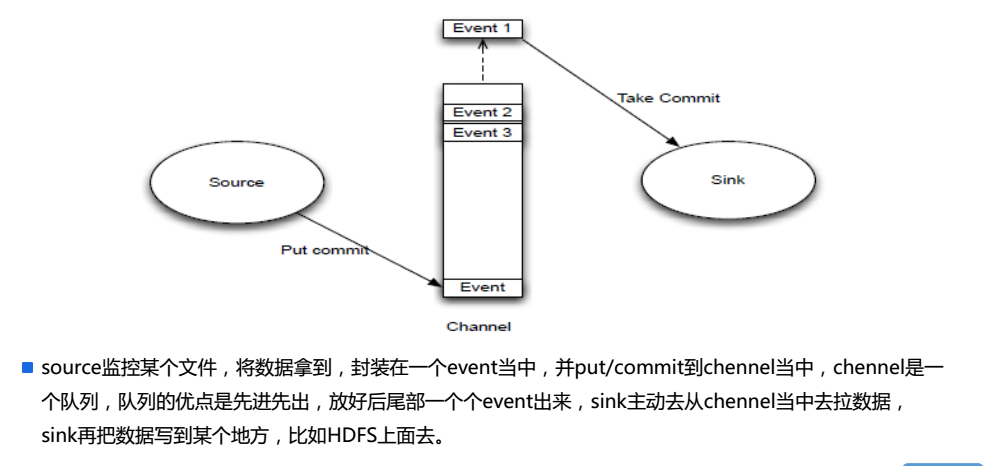
5.Source/Channel/Sink
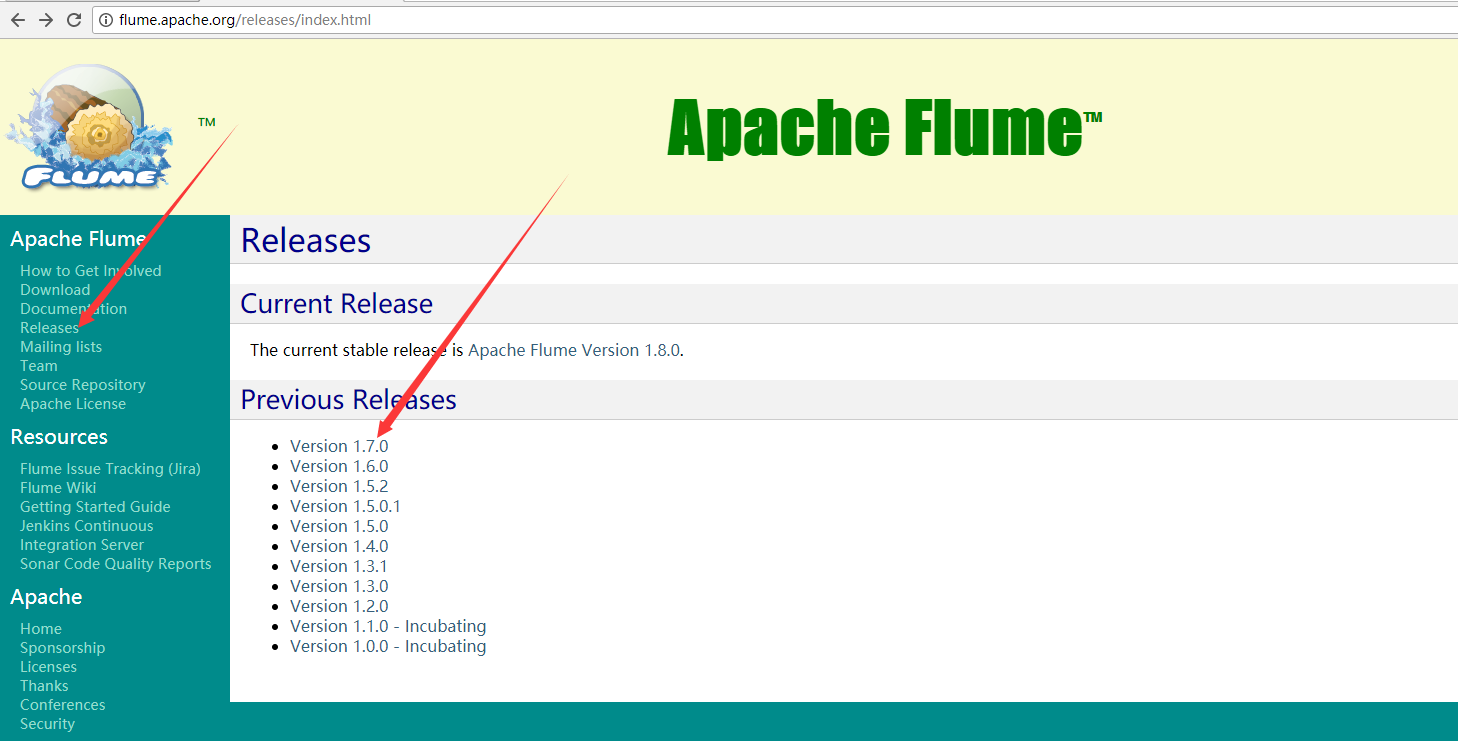
6.官网文档
7.配置source,channel,sink
二:配置
1.下载解压
下载的是Flume版本1.5.0

2.启用flume-env.sh

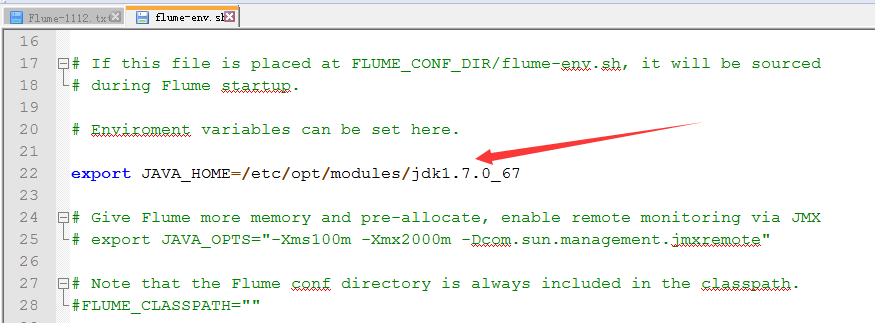
3.修改flume-env.sh
4.增加HADOOP_HOME
因为在env.sh中没有配置,选择的方式是将hdfs的配置放到conf目录下,主要有core,hdfs-site.xml。
全局查找HADOOP_HOME。
将hdfs的配置文件放到conf下。
在agent的配置文件中配置写明HDFS的绝对路径。

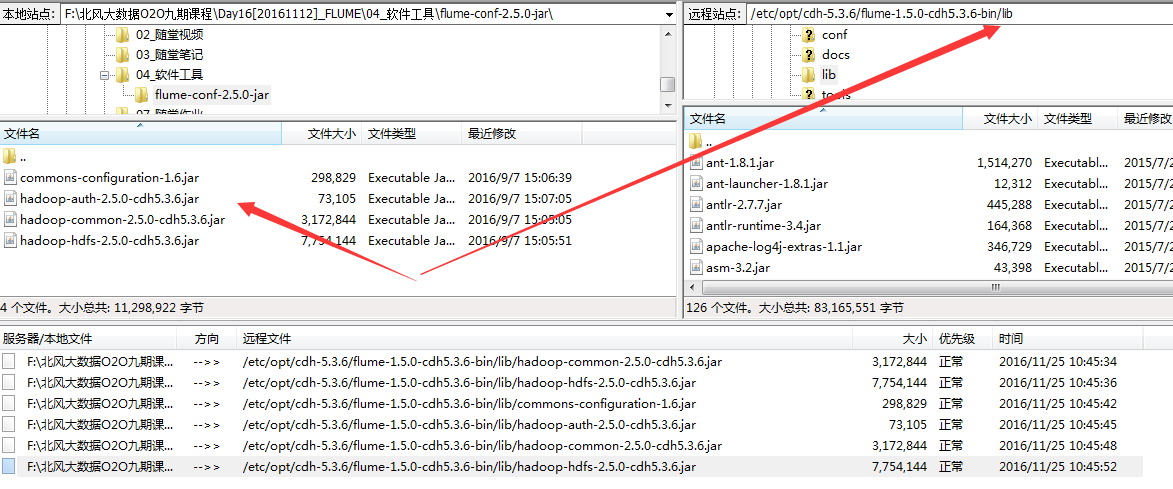
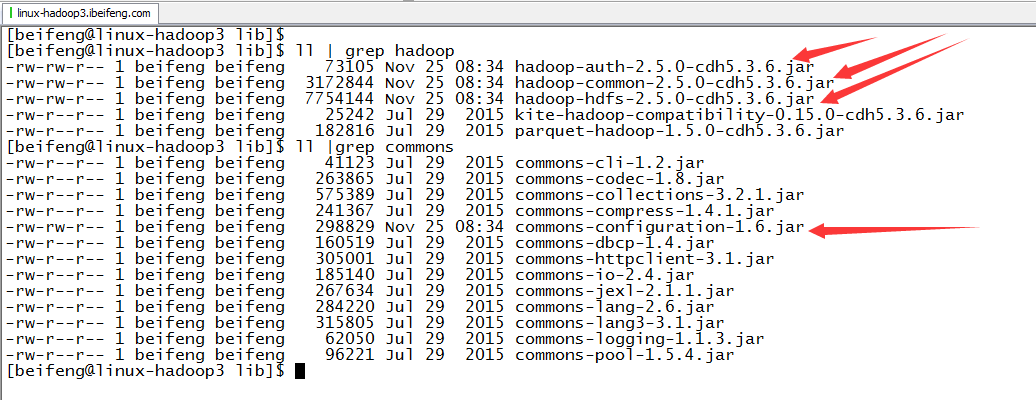
5.放入jar包
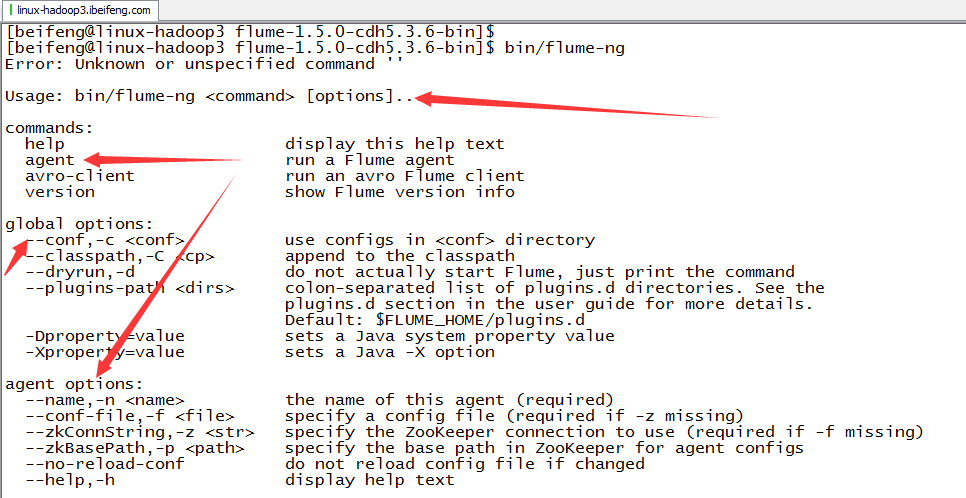
6.验证
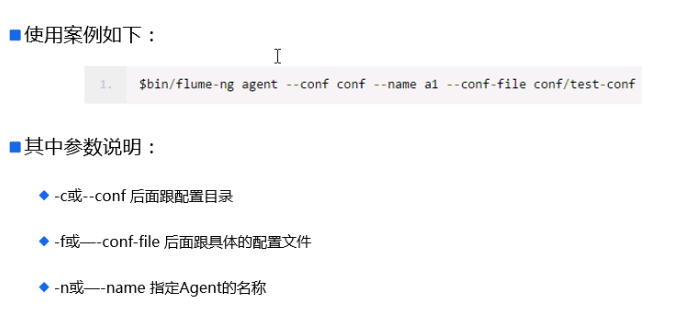
7.用法
三:Flume的使用(hive-memory-logger)
1.案例1
source:hive.log channel:mem sink:logger
2.配置
cp flume-conf.properties.template hive-mem-log.properties
3.配置hive-mem-log.properties
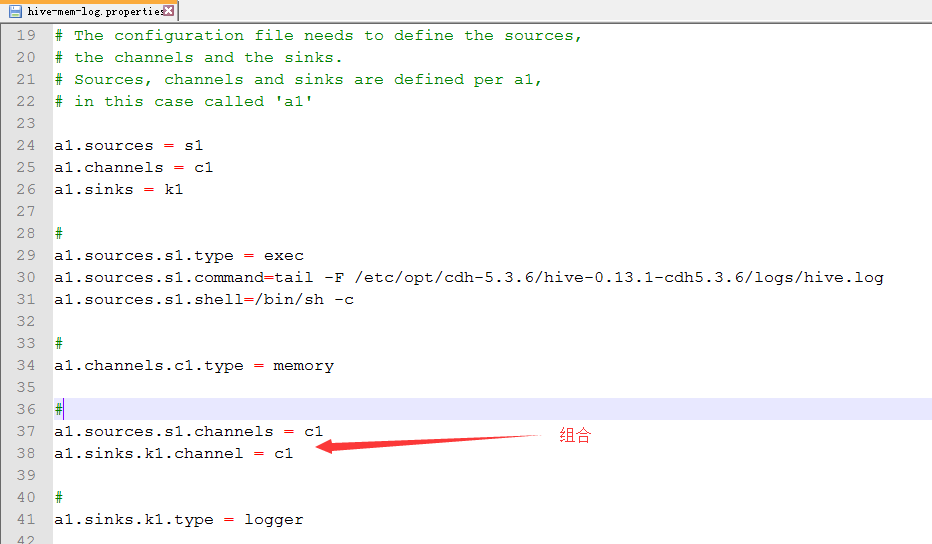
4.运行
那边是日志级别
bin/flume-ng agent -c conf/ -n a1 -f conf/hive-mem-log.properties -Dflume.root.logger=INFO,console

5.注意点
这边的属于实时采集,所以在控制台上的信息随着hive.log的变化在变化

6.源配置文件
 1 a1.sources = s1
 2 a1.channels = c1
 3 a1.sinks = k1
 4
 5 # For each one of the sources, the type is defined
 6 a1.sources.s1.type = exec
 7 a1.sources.s1.command = tail -f /opt/cdh-5.3.6/hive-0.13.1-cdh5.3.6/logs/hive.log
 8 a1.sources.s1.shell = /bin/sh -c
 9
10
11 # Each channel's type is defined.
12 a1.channels.c1.type = memory
13
14
15 # Each sink's type must be defined
16 a1.sinks.k1.type = logger
17
18 # The channel can be defined as follows.
19 a1.sources.s1.channels = c1
20 #Specify the channel the sink should use
21 a1.sinks.k1.channel = c1
22
23 # Other config values specific to each type of channel(sink or source)
24 # can be defined as well
25 # In this case, it specifies the capacity of the memory channel
26 a1.channels.c1.capacity = 100
四:Flume的使用(hive-file-logger)
1.案例二
source:hive.log channel:file sink:logger
2.配置
cp hive-mem-log.properties hive-file-log.properties
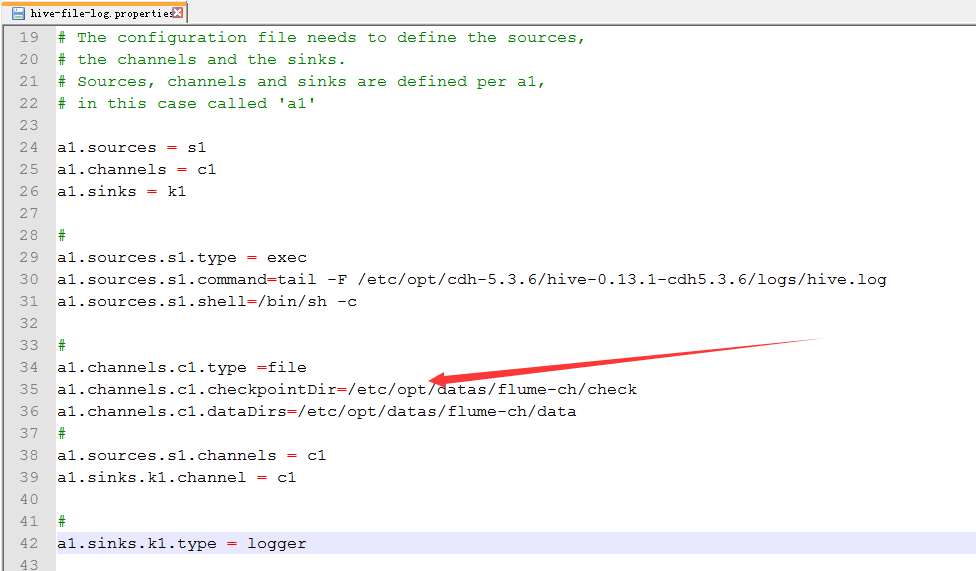
3.配置hive-file-log.properties
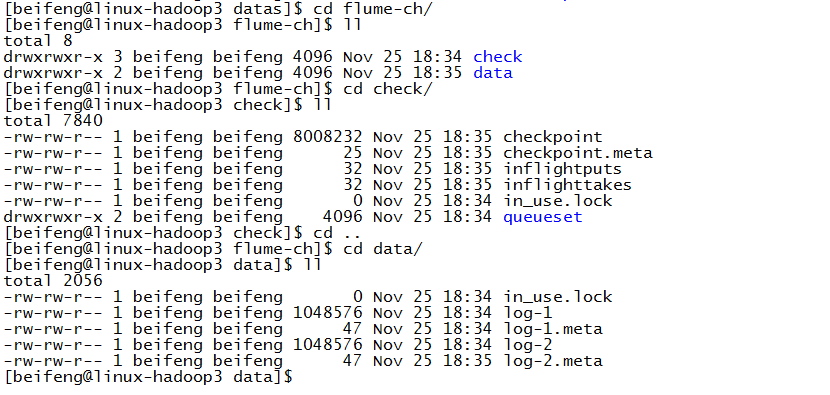
新建file的目录

配置
4.运行
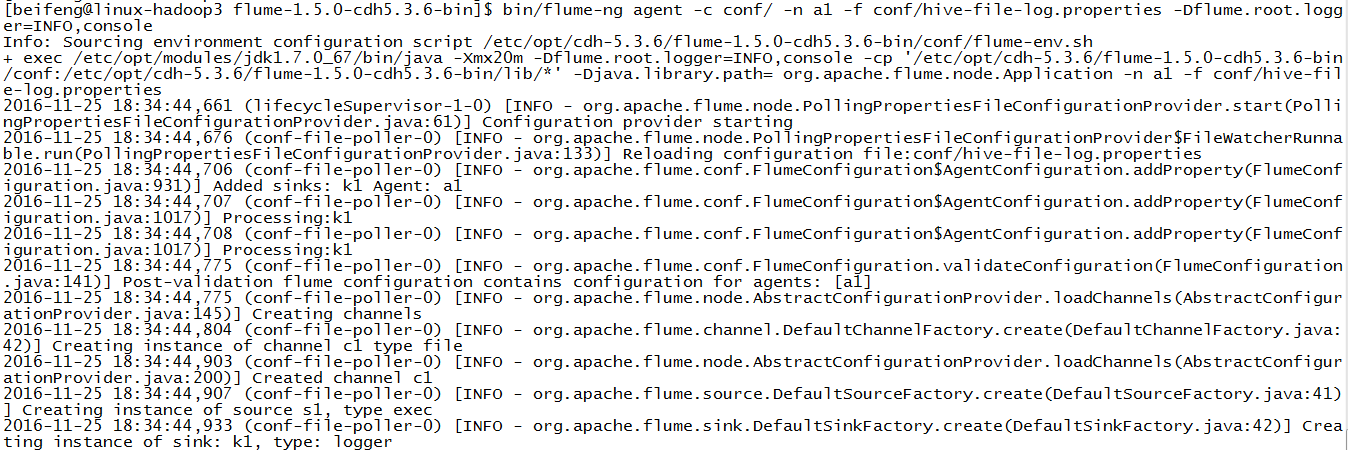
bin/flume-ng agent -c conf/ -n a1 -f conf/hive-file-log.properties -Dflume.root.logger=INFO,console
5.结果
6.源配置文件
 1 a1.sources = s1
 2 a1.channels = c1
 3 a1.sinks = k1
 4
 5 # For each one of the sources, the type is defined
 6 a1.sources.s1.type = exec
 7 a1.sources.s1.command = tail -f /opt/cdh-5.3.6/hive-0.13.1-cdh5.3.6/logs/hive.log
 8 a1.sources.s1.shell = /bin/sh -c
 9
10
11 # Each channel's type is defined.
12 a1.channels.c1.type = file
13 a1.channels.c1.checkpointDir = /opt/datas/flume-ch/check
14 a1.channels.c1.dataDirs = /opt/datas/flume-ch/data
15
16
17 # Each sink's type must be defined
18 a1.sinks.k1.type = logger
19
20 # The channel can be defined as follows.
21 a1.sources.s1.channels = c1
22 #Specify the channel the sink should use
23 a1.sinks.k1.channel = c1
24
25 # Other config values specific to each type of channel(sink or source)
26 # can be defined as well
27 # In this case, it specifies the capacity of the memory channel
五:Flume的使用(hive-mem-hdfs)
1.案例三
source:hive.log channel:mem sink:hdfs
2.配置
cp hive-mem-log.properties hive-mem-hdfs.properties
3.配置hive-mem-hdfs.properties
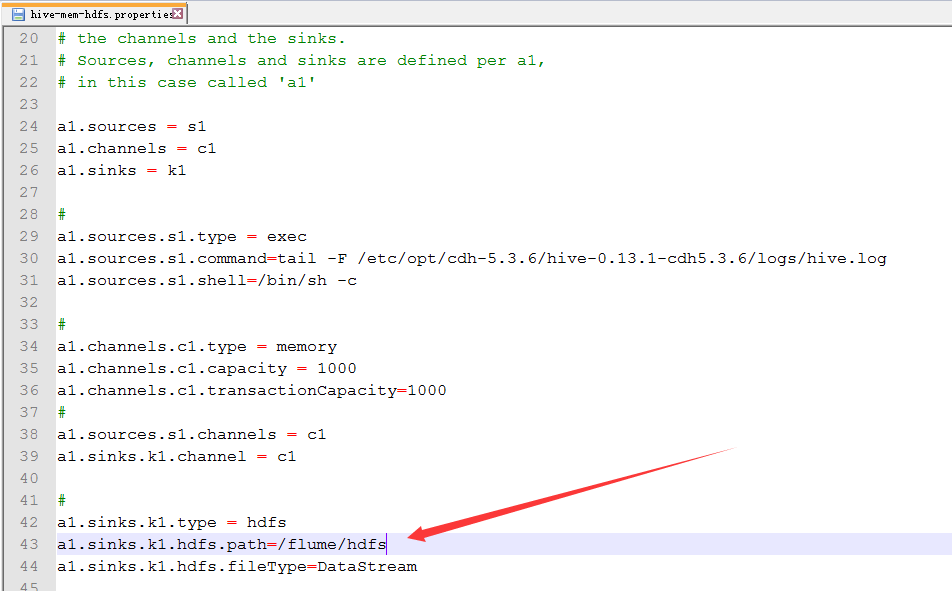
4.运行
bin/flume-ng agent -c conf/ -n a1 -f conf/hive-mem-hdfs.properties -Dflume.root.logger=INFO,console

验证了,在配置文件中不需要有这个目录,会自动产生。
5.源文件
 1 a1.sources = s1
 2 a1.channels = c1
 3 a1.sinks = k1
 4
 5 # For each one of the sources, the type is defined
 6 a1.sources.s1.type = exec
 7 a1.sources.s1.command = tail -f /opt/cdh-5.3.6/hive-0.13.1-cdh5.3.6/logs/hive.log
 8 a1.sources.s1.shell = /bin/sh -c
 9
10
11 # Each channel's type is defined.
12 a1.channels.c1.type = memory
13
14
15 # Each sink's type must be defined
16 a1.sinks.k1.type = hdfs
17 a1.sinks.k1.hdfs.path = /flume/hdfs
18
19 # The channel can be defined as follows.
20 a1.sources.s1.channels = c1
21 #Specify the channel the sink should use
22 a1.sinks.k1.channel = c1
23
24 # Other config values specific to each type of channel(sink or source)
25 # can be defined as well
26 # In this case, it specifies the capacity of the memory channel
27 a1.channels.c1.capacity = 100
六:企业思考一
1.案例四(文件的大小与个数)
因为在hdfs上会生成许多小文件,文件的大小的设置。
2.配置
cp hive-mem-hdfs.properties hive-mem-size.properties
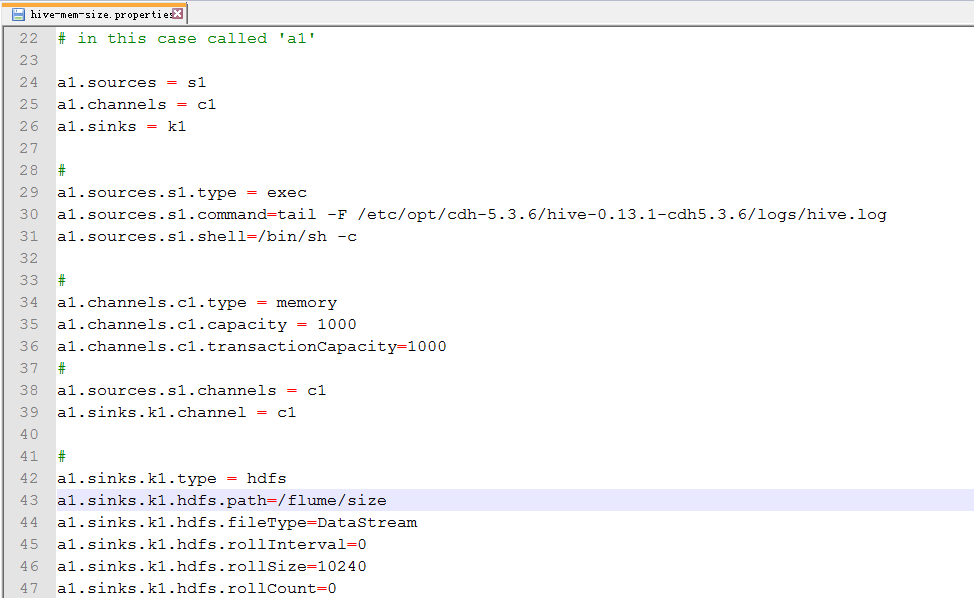
3.配置hive-mem-size.properties
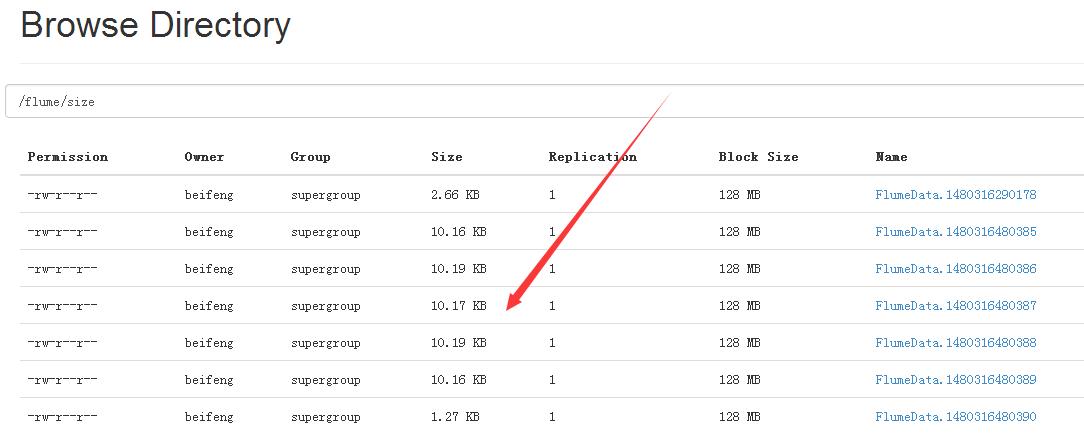
默认的文件大小是1024byte,就是1KB。
=0,表示不启用。
4.运行
bin/flume-ng agent -c conf/ -n a1 -f conf/hive-mem-size.properties -Dflume.root.logger=INFO,console
5.结果
6.源文件
 1 a1.sources = s1
 2 a1.channels = c1
 3 a1.sinks = k1
 4
 5 # For each one of the sources, the type is defined
 6 a1.sources.s1.type = exec
 7 a1.sources.s1.command = tail -f /opt/cdh-5.3.6/hive-0.13.1-cdh5.3.6/logs/hive.log
 8 a1.sources.s1.shell = /bin/sh -c
 9
10
11 # Each channel's type is defined.
12 a1.channels.c1.type = memory
13
14
15 # Each sink's type must be defined
16 a1.sinks.k1.type = hdfs
17 a1.sinks.k1.hdfs.path = /flume/size
18 a1.sinks.k1.hdfs.rollInterval = 0
19 a1.sinks.k1.hdfs.rollSize = 10240
20 a1.sinks.k1.hdfs.rollCount = 0
21
22 # The channel can be defined as follows.
23 a1.sources.s1.channels = c1
24 #Specify the channel the sink should use
25 a1.sinks.k1.channel = c1
26
27 # Other config values specific to each type of channel(sink or source)
28 # can be defined as well
29 # In this case, it specifies the capacity of the memory channel
30 a1.channels.c1.capacity = 100
七:企业思考一
1.案例五
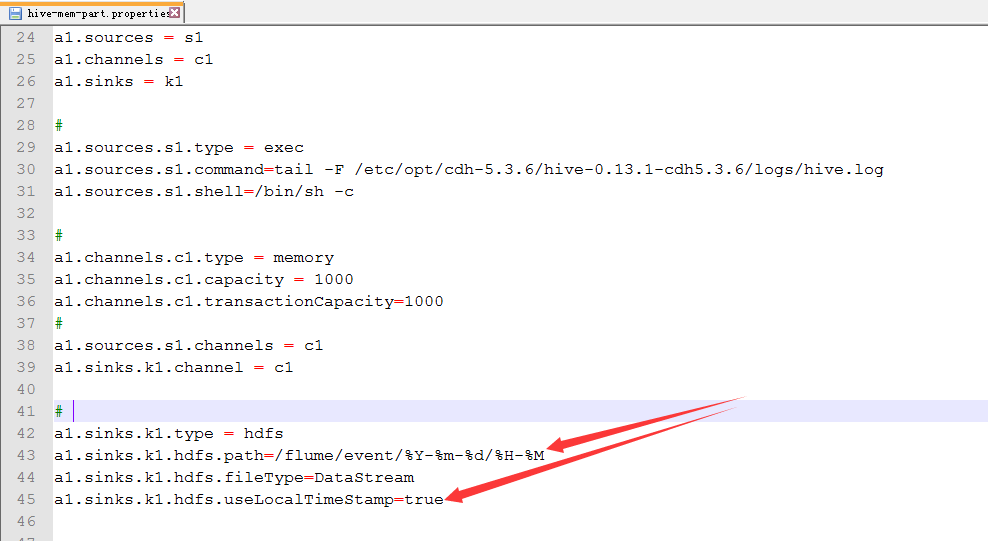
按时间进行分区
2.配置
cp hive-mem-hdfs.properties hive-mem-part.properties
3.配置hive-mem-part.properties
4.运行
bin/flume-ng agent -c conf/ -n a1 -f conf/hive-mem-part.properties -Dflume.root.logger=INFO,console
5.运行结果

6.注意点
Note
For all of the time related escape sequences, a header with the key “timestamp” must exist among the headers of the event (unless hdfs.useLocalTimeStamp is set to true). One way to add this automatically is to use the TimestampInterceptor.
需要添加时间戳。
八:企业思考一
1.案例六
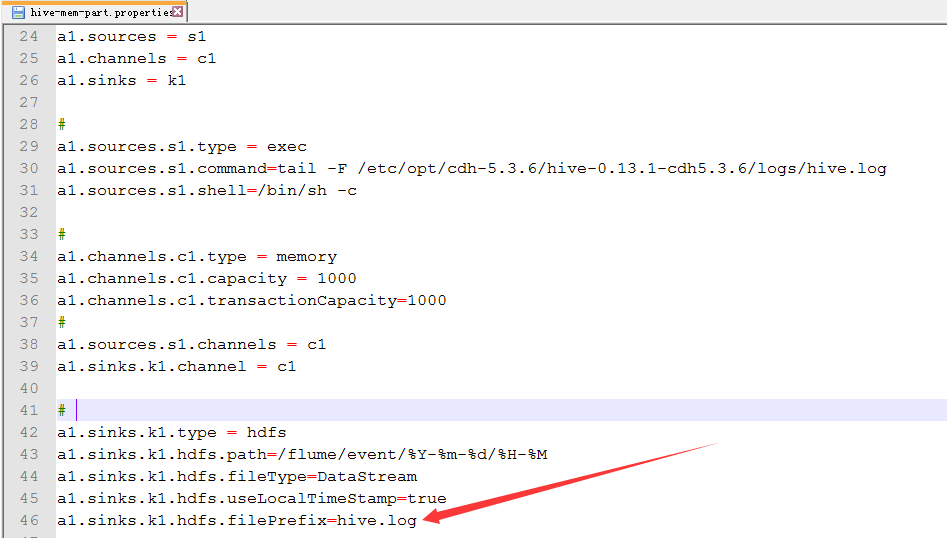
自定义文件开头
2.配置hive-mem-part.properties
默认的文件开头是FlumeData。
3.运行效果
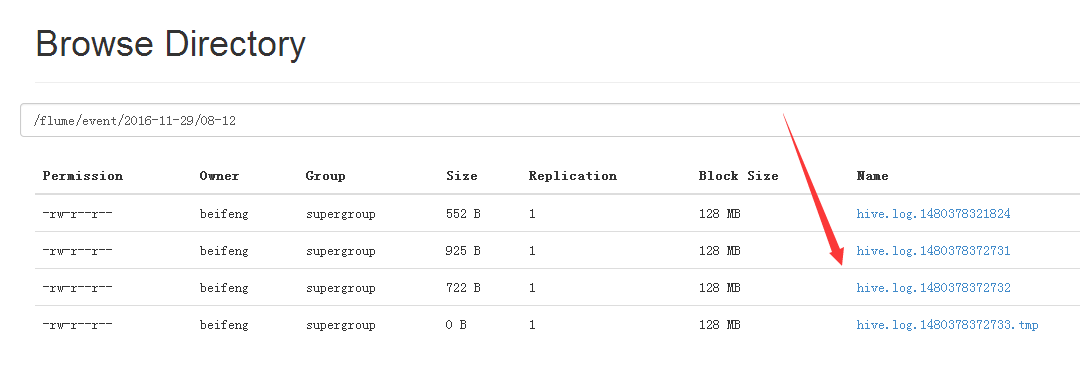
九:数据仓库的架构
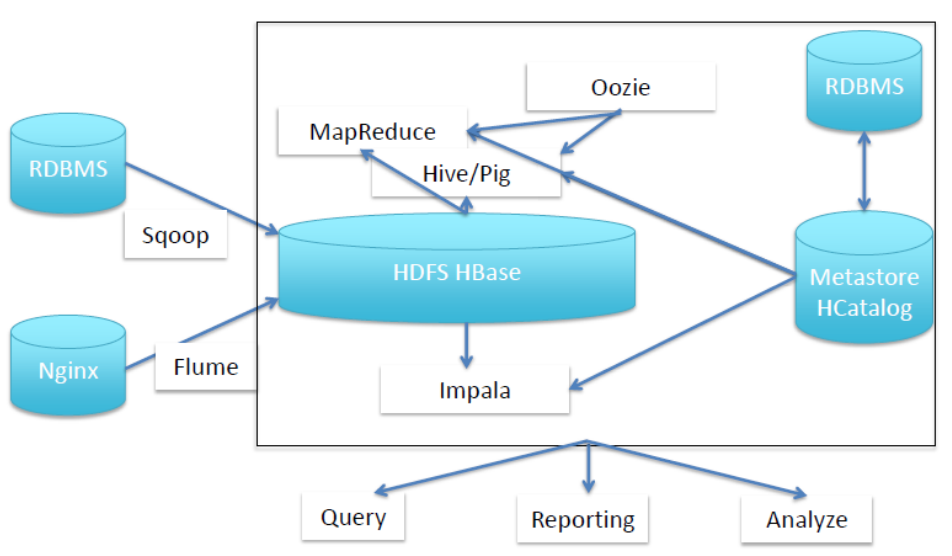
1.结构
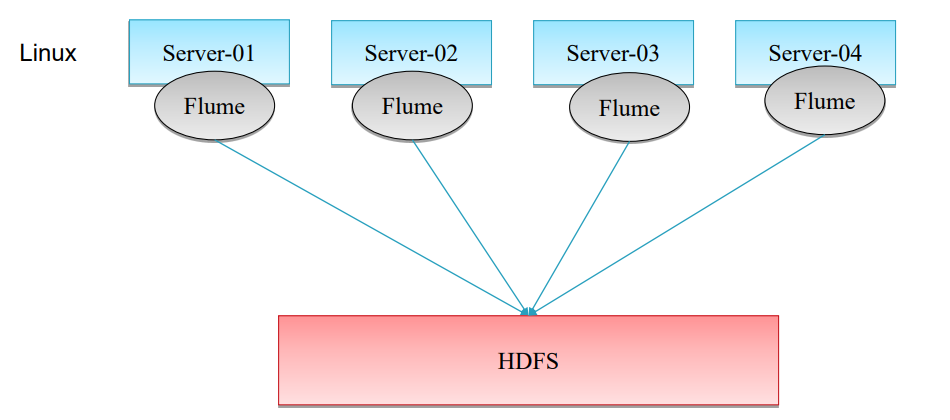
2.普通的采集架构
但是IO过大。
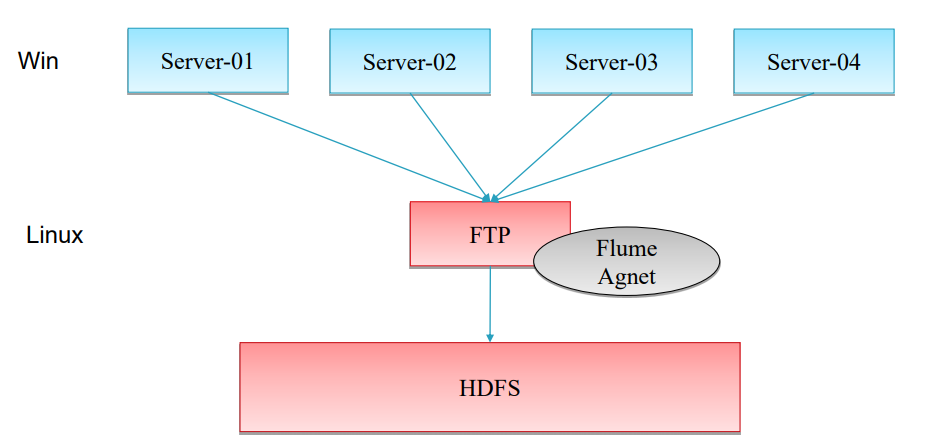
3.服务器在window上的解决方式
Flume只能挂在linux上,如果日志在windows下,使用下面的解决方式。
搭建nfs。
十:企业思考二
1.案例七
source:用来监控文件夹
文件中先存在.tmp
到第二日出现新的.tmp文件。前一天的.tmp马上变成log结尾,这时监控文件夹时,马上发现出现一个新的文件,就被上传进HDFS
2.配置
cp hive-mem-hdfs.properties dir-mem-hdfs.properties
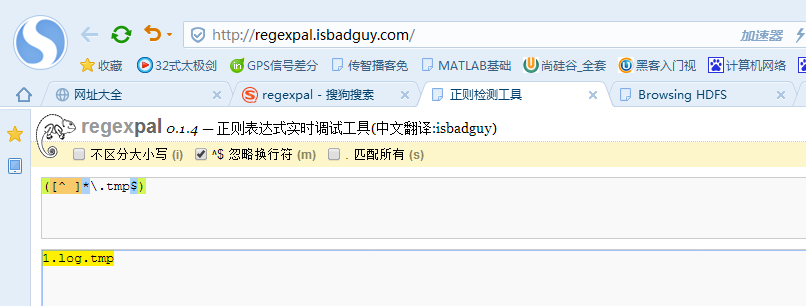
3.正则表达式忽略上传的.tmp文件
因为,企业刚生成是.tmp。
所以,先过滤掉tmp,先不上传。
3.配置dir-mem-hdfs.properties
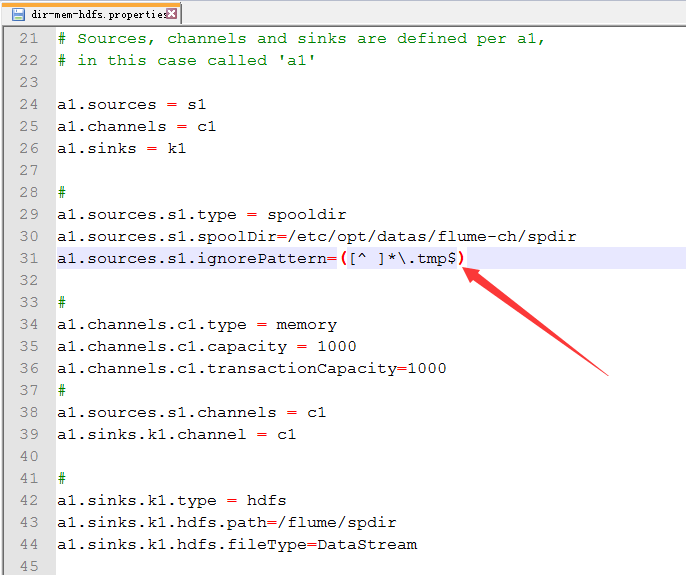
新建文件夹

配置
4.观察结果
成功上传之后,文件的名字转为COMPLETED。

十一:企业思考二
1.案例二
source:监控文件夹下文件一次性写好文件名,日志只是不断动态追加
这个配置将在下面讲解
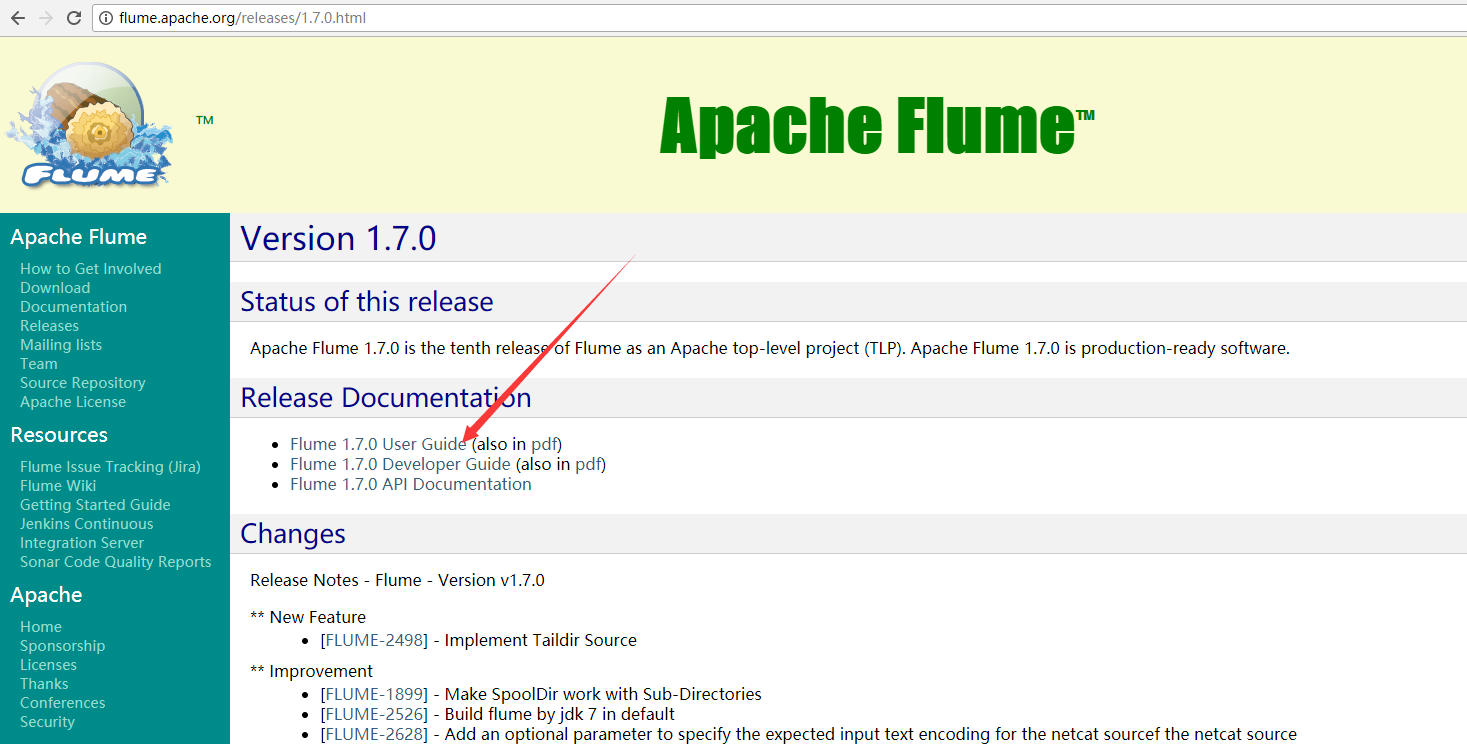
这个功能在1.7版本才有,所以在1.5上没有,所以需要自己编译去实现。
十二:企业实际架构
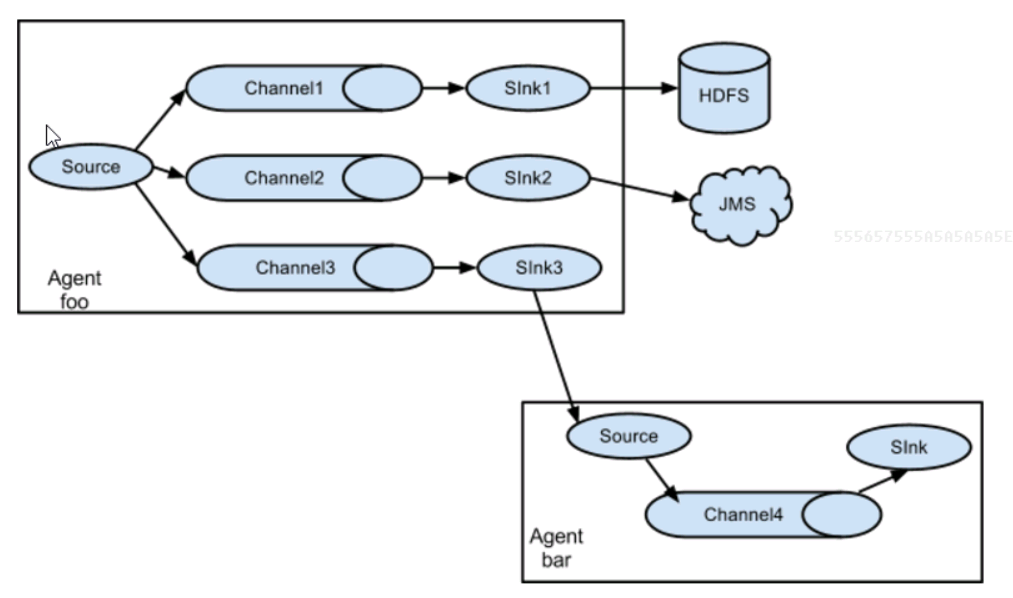
1.flume多sink
同一份数据采集到不同的框架
采集source:一份数据
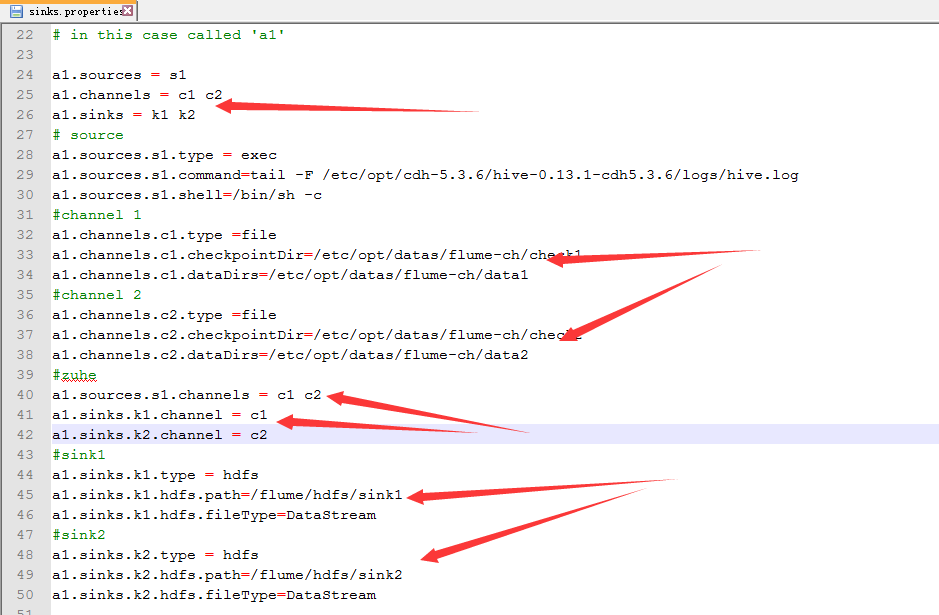
管道channel:案例中使用两个管道
目标sink:多个针对于多个channel
2.案例
source:hive.log channel:file sink:hdfs
3.配置
cp hive-mem-hdfs.properties sinks.properties
4.配置sink.properties
新建存储的文件

配置
5.效果

十三:企业实际架构
1.flume的collect
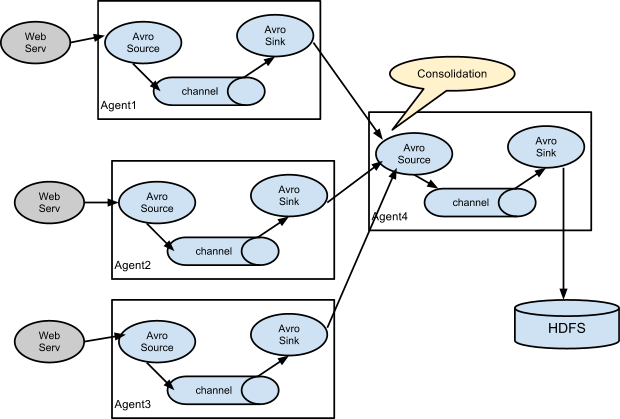
主要解决多台flume对HDFS的写入,会造成IO,所以多出一个collect agent进行一个收集其他的agent的数据,然后再写入HDFS上。
Avro Source与Avro Sink是成对出现的,因为Avro Sink的数据有Avro Source进行采集。
2.案例
启动三台机器,其中两台为agent,一台collect。
192.168.134.241:collect
192.168.134.242:agent
192.168.134.243:agent
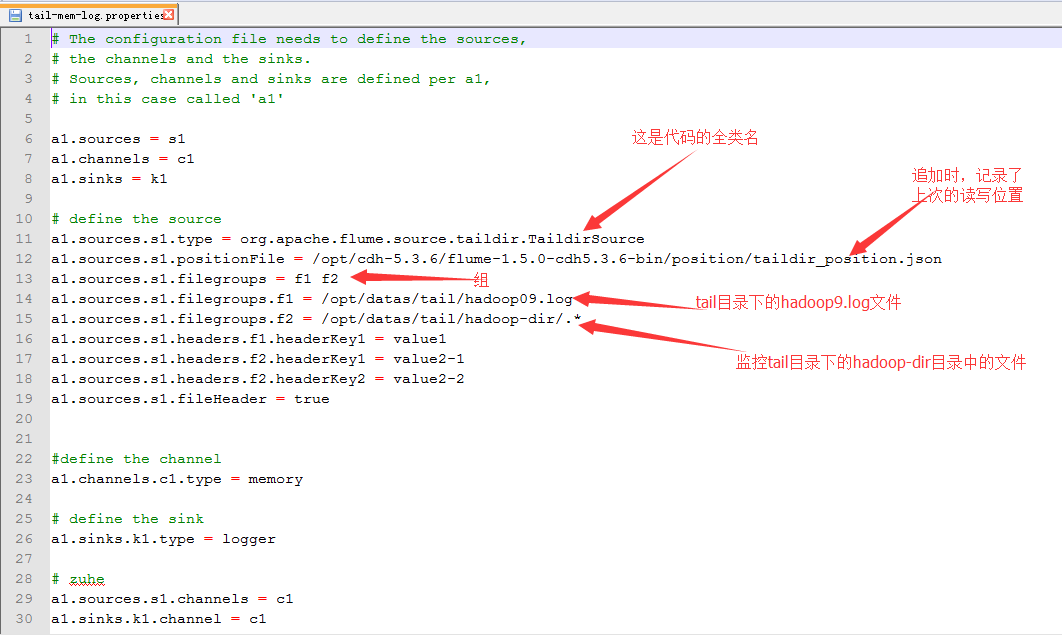
3.arvo-agent.properties
这个源文件的功能是将源日志发送到collect agent。
 1 # The configuration file needs to define the sources,
 2 # the channels and the sinks.
 3 # Sources, channels and sinks are defined per a1,
 4 # in this case called 'a1'
 5
 6 a1.sources = s1
 7 a1.channels = c1
 8 a1.sinks = k1
 9
10 # define source
11 a1.sources.s1.type = exec
12 a1.sources.s1.command = tail -F /opt/cdh-5.3.6/hive-0.13.1-cdh5.3.6/logs/hive.log
13 a1.sources.s1.shell = /bin/sh -c
14
15
16 #define channel
17 a1.channels.c1.type = memory
18 a1.channels.c1.capacity = 1000
19 a1.channels.c1.transactionCapacity = 1000
20
21 #define  sinks
22 a1.sinks.k1.type = avro
23 a1.sinks.k1.hostname = 192.168.134.241
24 a1.sinks.k1.port = 50505
25
26 # zuhe
27 a1.sources.s1.channels = c1
28 a1.sinks.k1.channel = c1
4.操作
因为242与243的都是讲hive.log发送到241的机器,所以,直接将在242上刚写的文件avro-agent拷贝到243的flume的conf中即可。
5.avro-collect.properties
bind的意思是,取数据的ip。其实,别的机器都发送到241,所以取数据还是在241上取数据。
 1 # The configuration file needs to define the sources,
 2 # the channels and the sinks.
 3 # Sources, channels and sinks are defined per a1,
 4 # in this case called 'a1'
 5
 6 a1.sources = s1
 7 a1.channels = c1
 8 a1.sinks = k1
 9
10 # define source
11 a1.sources.s1.type = avro
12 a1.sources.s1.bind = 192.168.134.241
13 a1.sources.s1.port = 50505
14
15
16 #define channel
17 a1.channels.c1.type = memory
18 a1.channels.c1.capacity = 1000
19 a1.channels.c1.transactionCapacity = 1000
20
21 #define  sinks
22 a1.sinks.k1.type = hdfs
23 a1.sinks.k1.hdfs.path = /flume/hdfs
24 a1.sinks.k1.hdfs.fileType = DataStream
25 a1.sinks.k1.hdfs.filePrefix = avro
26
27 # zuhe
28 a1.sources.s1.channels = c1
29 a1.sinks.k1.channel = c1
6.运行
运行:collect
bin/flume-ng agent -c conf/ -n a1 -f conf/avro-collect.properties -Dflume.root.logger=INFO,console
运行:agent
bin/flume-ng agent -c conf/ -n a1 -f conf/avro-agent.properties -Dflume.root.logger=INFO,console
十四:关于文件夹中文件处于追加的监控的处理
1.安装git
2.新建一个文件下
3.在git bash 中进入目录
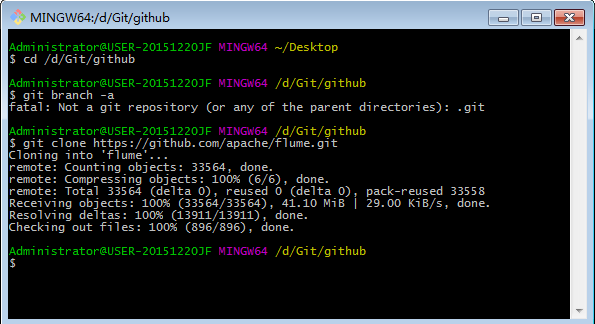
4.在此目录下下载源码
5.进入flume目录
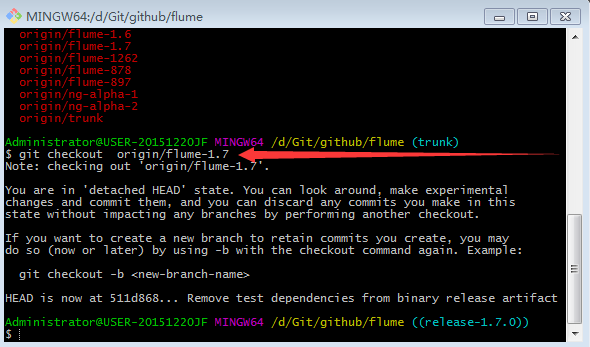
6.查看源码有哪些分支

7.切换分支
8.复制出flume-taildir-source
九。编译
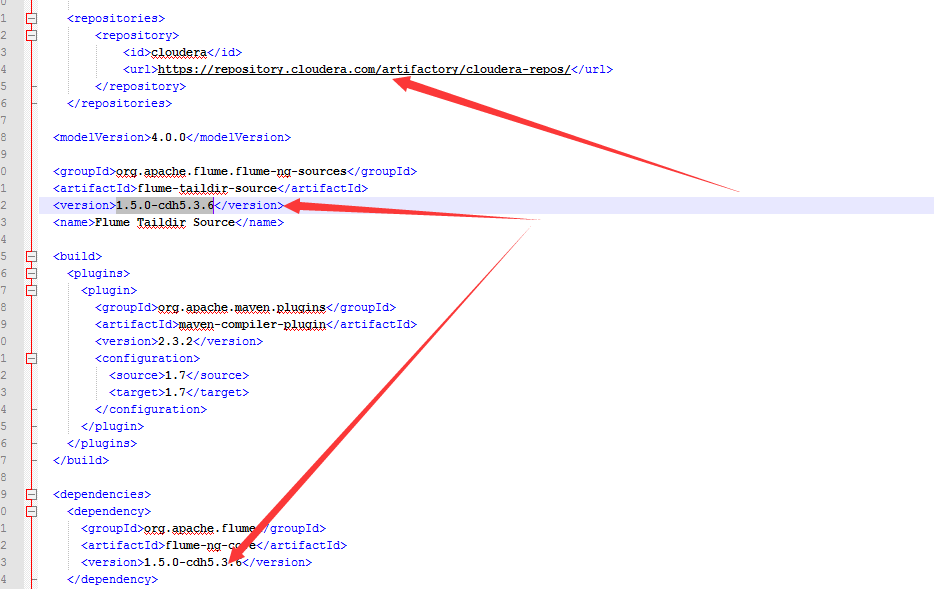
1.pom文件
配置maven源,修改版本
2.在1.5.0中添加一个1.7.0中的类
PollableSourceConstants
3.删除override

4.编译
run as -> maven build
goals -> skip testf

5.将jar包放在flume的lib目录下
6.使用
因为这是1.7.0的源码,所以在1.5的文档中没有。
所以:可以看源码
或者看1.7.0的参考文档关于Tail的介绍案例
flumeflume-ng-docsphinxFlumeUserGuide
7.配置
