一:helloworld程序
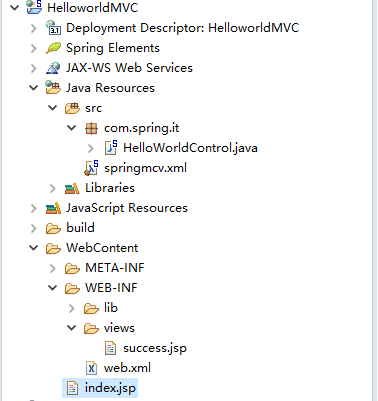
1.结构目录

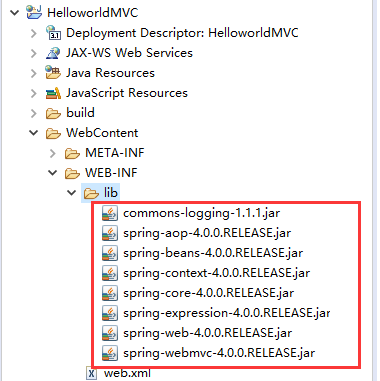
2.添加lib包

3.在web.xml中配置DispatchServlet
这个就是主servlet。
 1 <?xml version="1.0" encoding="UTF-8"?>
 2 <web-app xmlns:xsi="http://www.w3.org/2001/XMLSchema-instance"
 3     xmlns="http://xmlns.jcp.org/xml/ns/javaee"
 4     xsi:schemaLocation="http://xmlns.jcp.org/xml/ns/javaee http://xmlns.jcp.org/xml/ns/javaee/web-app_3_1.xsd"
 5     id="WebApp_ID" version="3.1">
 6     <servlet>
 7         <servlet-name>DispatchServlet</servlet-name>
 8         <servlet-class>org.springframework.web.servlet.DispatcherServlet</servlet-class>
 9         <init-param>
10             <param-name>contextConfigLocation</param-name>
11             <param-value>classpath:springmcv.xml</param-value>
12         </init-param>
13         <load-on-startup>1</load-on-startup>
14     </servlet>
15     <servlet-mapping>
16         <servlet-name>DispatchServlet</servlet-name>
17         <url-pattern>/</url-pattern>
18     </servlet-mapping>
19
20 </web-app>
4.加入mvc配置文件
这个有一个地方要注意一下,context:component-san是扫描包,要写包名。
同时要写关于视图的解析器。
 1 <?xml version="1.0" encoding="UTF-8"?>
 2 <beans xmlns="http://www.springframework.org/schema/beans"
 3     xmlns:context="http://www.springframework.org/schema/context"
 4     xmlns:xsi="http://www.w3.org/2001/XMLSchema-instance"
 5     xsi:schemaLocation="http://www.springframework.org/schema/beans
 6                        http://www.springframework.org/schema/beans/spring-beans-3.0.xsd
 7                        http://www.springframework.org/schema/context
 8                        http://www.springframework.org/schema/context/spring-context-3.0.xsd">
 9     <!-- 配置自定义扫描的包 -->
10     <context:component-scan base-package="com.spring.it" ></context:component-scan>
11
12     <!-- 配置视图解析器 -->
13     <bean class="org.springframework.web.servlet.view.InternalResourceViewResolver">
14         <property name="prefix" value="/WEB-INF/views/" />
15           <property name="suffix" value=".jsp" />
16     </bean>
17
18 </beans>
5.写一个控制器
使用RequestMapping来映射请求的URL。
 1 package com.spring.it;
 2
 3 import org.springframework.stereotype.Controller;
 4 import org.springframework.web.bind.annotation.RequestMapping;
 5
 6 @Controller
 7 public class HelloWorldControl {
 8     @RequestMapping("/helloworld")
 9     public String hello() {
10         System.out.println("hello world*");
11         return "success";
12     }
13 }
6.写一个应答请求的index.jsp
 1 <%@ page language="java" contentType="text/html; charset=ISO-8859-1"
 2     pageEncoding="ISO-8859-1"%>
 3 <!DOCTYPE html PUBLIC "-//W3C//DTD HTML 4.01 Transitional//EN" "http://www.w3.org/TR/html4/loose.dtd">
 4 <html>
 5 <head>
 6 <meta http-equiv="Content-Type" content="text/html; charset=ISO-8859-1">
 7 <title>Insert title here</title>
 8 </head>
 9 <body>
10     <a href="helloworld">Hello world</a>
11 </body>
12 </html>
7.视图
 1 <%@ page language="java" contentType="text/html; charset=ISO-8859-1"
 2     pageEncoding="ISO-8859-1"%>
 3 <!DOCTYPE html PUBLIC "-//W3C//DTD HTML 4.01 Transitional//EN" "http://www.w3.org/TR/html4/loose.dtd">
 4 <html>
 5 <head>
 6 <meta http-equiv="Content-Type" content="text/html; charset=ISO-8859-1">
 7 <title>Insert title here</title>
 8 </head>
 9 <body>
10     success page
11 </body>
12 </html>
8.效果

-------

二:一些细节问题
1.关于init-param的问题
上面使用的是contextConfigLocation来配置SpringMVC的配置文件springmvc.xml,现在说一下使用别的方式:默认的方式。
默认的文件为:/WEB-INF/<servlet-name>-servlet.xml
所以:
将上文的springmvc.xml拷贝到WEB-INF下,并改名为DispatchServlet-servlet.xml,这样的效果是一样的。