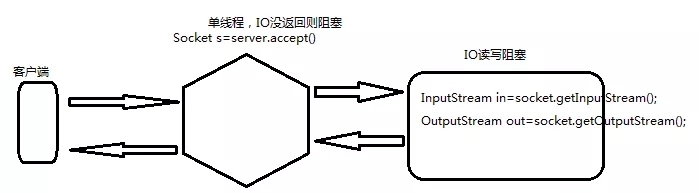
一、思路
1. 监听端口:在服务器端创建一个ServerSocket对象,去监听某个端口
2. 创建连接:通过serverSocket.accept() 创建一个Socket对象,等待客户端连接,当有客户端连接到这个端口,Socket对象就创建成功
3. 接收消息:client.getInputStream() 阻塞式接收客户端往这个端口发送的消息
二、简单代码实现
public static void main(String[] args) throws IOException {

        int port = 8234;

        // 1. 创建ServerSocket对象,去监听端口号
        try (ServerSocket serverSocket = new ServerSocket(port)) {

            System.out.println("启动程序监听8234端口...");

            Socket client = null;

            Boolean flag = true;

            while (flag) {
                // 2. 创建Socket对象去等待客户端连接
                client = serverSocket.accept();
                System.out.println("客户端" + client.getInetAddress().getHostAddress() + "连接到服务器...");

                // 3. 当客户端连接上之后,创建一个线程去处理这个客户端发送的数据,然后等待下一个客户端的连接
                new Thread(new ProcessDataThread(client)).start();
            }

            client.close();
            System.out.println("服务器关闭");
        }
    }
public class ProcessDataThread implements Runnable {

    private Socket client;

    public ProcessDataThread(Socket socket) {
        this.client = socket;
    }

    @Override
    public void run() {
        try {
            // 1. 获取客户端发送过来的消息,此时是通过二进制流获取,也可以用InputStreamReader通过字符串接收
            try (InputStream in = client.getInputStream()) {
                byte[] buffer = new byte[1024];
                while ((in.read(buffer)) != -1) {
                    try {
                        // 2. 处理数据,如果处理发生异常,不影响下次接收数据
                    } catch (Exception ex) {
                        System.out.println("处理数据发生异常:" + ex);
                    }
                }
            }
        } catch (Exception ex) {
            System.out.println("客户端连接发生异常:" + ex);
        }
    }
}
三、NIO优化,但强烈不建议使用Java原生的NIO
1. 单线程
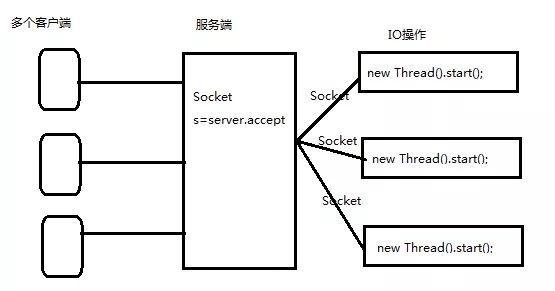
2. 多线程优化,对应上面的代码
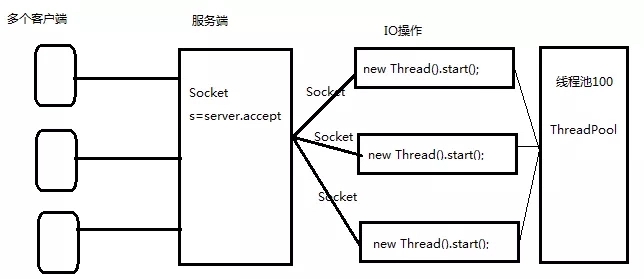
3. 线程池优化
对于每一个请求,单独开一个线程进行相应的逻辑处理,如果客户端的数据传递是断断续续的,相应的线程需要I/O等待(有阻塞),并进行上线文切换(耗资源)
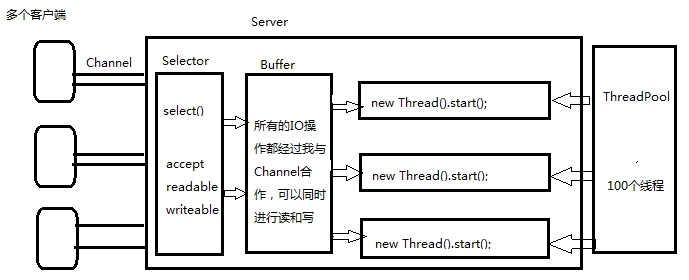
4. 使用NIO的Selector机制,提升程序并发效率
a. Channel用于连接和传输
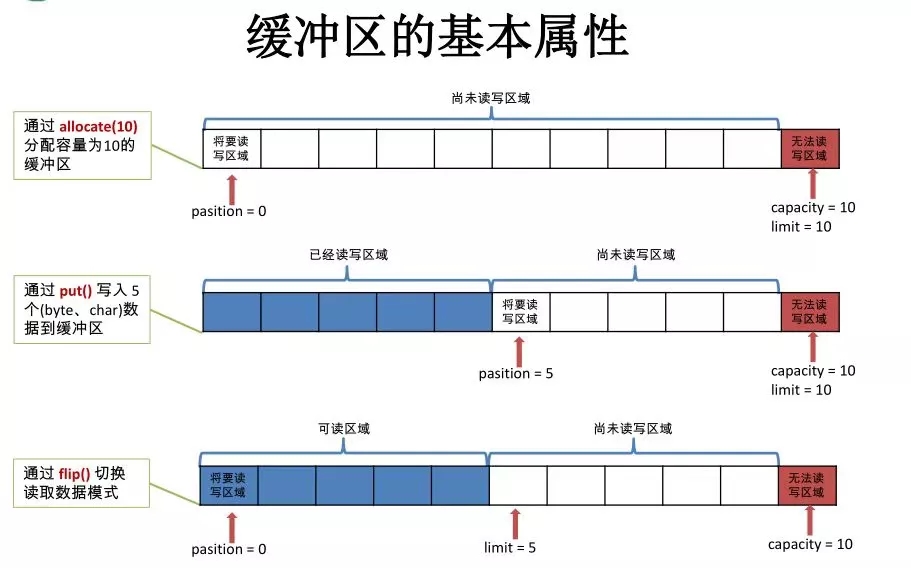
b. Buffer 用于存储
c. 用于管理请求
四、Netty优化
1. Netty是对NIO的进一步封装
2. Netty代码
<dependency>
        <groupId>io.netty</groupId>
        <artifactId>netty-all</artifactId>
        <version>4.1.6.Final</version>
</dependency>
public class NettyServer {
    public static void main(String[] args) {
        ServerBootstrap serverBootstrap = new ServerBootstrap();

        NioEventLoopGroup boos = new NioEventLoopGroup();
        NioEventLoopGroup worker = new NioEventLoopGroup();
        serverBootstrap
                .group(boos, worker)
                .channel(NioServerSocketChannel.class)
                .childHandler(new ChannelInitializer<NioSocketChannel>() {
                    protected void initChannel(NioSocketChannel ch) {
                        ch.pipeline().addLast(new StringDecoder());
                        ch.pipeline().addLast(new SimpleChannelInboundHandler<String>() {
                            @Override
                            protected void channelRead0(ChannelHandlerContext ctx, String msg) {
                                System.out.println(msg);
                            }
                        });
                    }
                })
                .bind(8000);
    }
}
public class NettyClient {
    public static void main(String[] args) throws InterruptedException {
        Bootstrap bootstrap = new Bootstrap();
        NioEventLoopGroup group = new NioEventLoopGroup();

        bootstrap.group(group)
                .channel(NioSocketChannel.class)
                .handler(new ChannelInitializer<Channel>() {
                    @Override
                    protected void initChannel(Channel ch) {
                        ch.pipeline().addLast(new StringEncoder());
                    }
                });

        Channel channel = bootstrap.connect("127.0.0.1", 8000).channel();

        while (true) {
            channel.writeAndFlush(new Date() + ": hello world!");
            Thread.sleep(2000);
        }
    }
}
参考: