Xib调整使用
1.新建xib文件
New File-->User Interface-->Empty

2.打开新建的xib文件,出现可视化窗口
(1)拖入一个UIView (不是UIViewController)
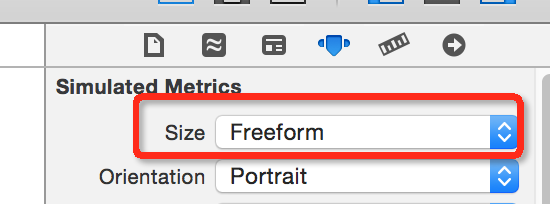
(2)设置大小:要想随意调整xib中view的尺寸,首先要设置size为Freeform
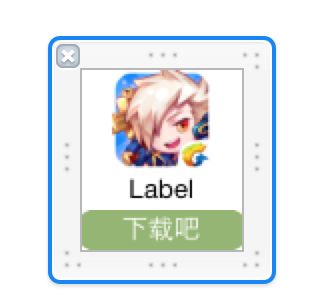
3.拖入图标图片、名字、下载按钮,调整设置,设置图片为本身尺寸Aspect Fit

4.代码修改为:
- (void)viewDidLoad
{
    [super viewDidLoad];

    //计算边距
    CGFloat marginX=(self.view.bounds.size.width-kColCount * kAppViewW)/(kColCount +1 );
    CGFloat marginY=10;

    for (int i=0; i<self.appList.count; i++) {

        UYAppInfo *appData=self.appList[i];
        // 行
        // 0, 1, 2 => 0
        // 3, 4, 5 => 1
        int row = i / kColCount;

        // 列
        // 0, 3, 6 => 0
        // 1, 4, 7 => 1
        // 2, 5, 8 => 2
        int col = i % kColCount;

        CGFloat x=marginX +col*(marginX+kAppViewW);
        CGFloat y=kStartY+marginY+row*(marginY+kAppViewH);

        UIView *appView=[[[NSBundle mainBundle] loadNibNamed:@"UYAppView" owner:nil options:nil] lastObject];
        //设置视图的位置
        appView.frame=CGRectMake(x, y, kAppViewW, kAppViewH);
        [self.view addSubview:appView];


        // 1> UIImageView
        UIImageView *icon = appView.subviews[0]; //[[UIImageView alloc] initWithFrame:CGRectMake(0, 0, kAppViewW, 50)];
        // 设置图像
        icon.image = [UIImage imageNamed:appData.icon];

        // 2> UILabel -> 应用程序名称
        UILabel *lable =appView.subviews[1];
        lable.text = appData.name;

        // 3> UIButton -> 下载按钮
        UIButton *button = appView.subviews[2];
        // 给按钮添加监听方法
        button.tag = i;
        [button addTarget:self action:@selector(click:) forControlEvents:UIControlEventTouchUpInside];
    }
}
从上面,会看到,代码量已经少了很多了。
在代码中获取xib中的view的方法
方法一:
     // 1.获取xib中的view, xib中可以同时定义多个view,注意名字不带扩展名
         NSArray *viewArray = [[NSBundle mainBundle] loadNibNamed:@"UYAppView" owner:nil options:nil];
         UIView *appView = [viewArray lastObject];
方法二(bundle参数可以为nil,默认就是main bundle):
         UINib *nib = [UINib nibWithNibName:@"app" bundle:[NSBundle mainBundle]];
         NSArray *viewArray = [nib instantiateWithOwner:nil options:nil];
         UIView *appView = [viewArray lastObject];
Xib和storyboard对比
共同点
- 都用来描述软件界面
- 都用Interface Builder工具来编辑
不同点
- Xib是轻量级的,用来描述局部的UI界面
- Storyboard是重量级的,用来描述整个软件的多个界面,并且能展示多个界面之间的跳转关系
使用代理重构
这部分的代码,为了MVC分开,相互之间不依赖,可以通过代理的方式。
模型
MJApp.h
#import <Foundation/Foundation.h>

/**
 copy : NSString
 strong: 一般对象
 weak: UI控件
 assign:基本数据类型
 */

@interface MJApp : NSObject
/**
 *  名称
 */
@property (nonatomic, copy) NSString *name;
/**
 *  图标
 */
@property (nonatomic, copy) NSString *icon;

/**
 *  通过字典来初始化模型对象
 *
 *  @param dict 字典对象
 *
 *  @return 已经初始化完毕的模型对象
 */
- (instancetype)initWithDict:(NSDictionary *)dict;

+ (instancetype)appWithDict:(NSDictionary *)dict;
@end
MJApp.m
#import "MJApp.h"

@implementation MJApp
- (instancetype)initWithDict:(NSDictionary *)dict
{
    if (self = [super init]) {
        self.name = dict[@"name"];
        self.icon = dict[@"icon"];
    }
    return self;
}

+ (instancetype)appWithDict:(NSDictionary *)dict
{
    return [[self alloc] initWithDict:dict];
}
@end
视图
MJAppView.h
#import <UIKit/UIKit.h>

@class MJApp, MJAppView;

// 声明一个协议
@protocol MJAppViewDelegate <NSObject>
@optional
- (void)appViewClickedDownloadButton:(MJAppView *)appView;
@end

// 耦合性
@interface MJAppView : UIView

/**
 *  代理
 */
@property (nonatomic, weak) id<MJAppViewDelegate> delegate;

//@property (weak, nonatomic) IBOutlet UIButton *downloadBtn;

//@property (nonatomic, weak) UIView *vcView;
/**
 *  模型数据
 */
@property (nonatomic, strong) MJApp *app;

+ (instancetype)appView;

/**
 *  通过模型数据来创建一个view
 */
+ (instancetype)appViewWithApp:(MJApp *)app;

@end
MJAppView.m
#import "MJAppView.h"
#import "MJApp.h"

@interface MJAppView()
@property (weak, nonatomic) IBOutlet UIImageView *iconView;
@property (weak, nonatomic) IBOutlet UILabel *nameLabel;
- (IBAction)download:(UIButton *)sender;
@end

@implementation MJAppView

+ (instancetype)appViewWithApp:(MJApp *)app
{
    NSBundle *bundle = [NSBundle mainBundle];
    // 读取xib文件(会创建xib中的描述的所有对象,并且按顺序放到数组中返回)
    NSArray *objs = [bundle loadNibNamed:@"MJAppView" owner:nil options:nil];
    MJAppView *appView = [objs lastObject];
    appView.app = app;
    return appView;
}

+ (instancetype)appView
{
    return [self appViewWithApp:nil];
}

- (void)setApp:(MJApp *)app
{
    _app = app;

    // 1.设置图标
    self.iconView.image = [UIImage imageNamed:app.icon];

    // 2.设置名称
    self.nameLabel.text = app.name;
}

/**
 *  下载
 */
- (IBAction)download:(UIButton *)btn {
    // 1.让按钮失效(文字变为"已下载")
    btn.enabled = NO;

    // 2.通知代理
//    [self.delegate appViewClickedDownloadButton:self];
    if ([self.delegate respondsToSelector:@selector(appViewClickedDownloadButton:)]) {
        [self.delegate appViewClickedDownloadButton:self];
    }
}
@end
控制器
MJViewController.h
#import <UIKit/UIKit.h>

@interface MJViewController : UIViewController

@end
MJViewController.m
#import "MJViewController.h"
#import "MJApp.h"
#import "MJAppView.h"

@interface MJViewController () <MJAppViewDelegate>
/** 存放应用信息 */
@property (nonatomic, strong) NSArray *apps;
@end

@implementation MJViewController

- (void)viewDidLoad
{
    [super viewDidLoad];

    // 添加应用信息

    // 0.总列数(一行最多3列)
    int totalColumns = 3;

    // 1.应用的尺寸
    CGFloat appW = 85;
    CGFloat appH = 90;

    // 2.间隙 = (控制器view的宽度 - 3 * 应用宽度) / 4
    CGFloat marginX = (self.view.frame.size.width - totalColumns * appW) / (totalColumns + 1);
    CGFloat marginY = 15;

    // 3.根据应用个数创建对应的框框(index 0 ~ 11)
    for (int index = 0; index<self.apps.count; index++) {
        // 3.1.创建view
        MJAppView *appView = [MJAppView appViewWithApp:self.apps[index]];

        appView.delegate = self;

//        appView.downloadBtn.tag = index;
//        [appView.downloadBtn addTarget:self action:@selector(download:) forControlEvents:UIControlEventTouchUpInside];
//        appView.vcView = self.view;

        // 3.2.添加view
        [self.view addSubview:appView];

        // 3.3.设置frame
        int row = index / totalColumns;
        int col = index % totalColumns;
        // 计算x和y
        CGFloat appX = marginX + col * (appW + marginX);
        CGFloat appY = 30 + row * (appH + marginY);
        appView.frame = CGRectMake(appX, appY, appW, appH);

        // 3.4.设置数据
//        appView.app = self.apps[index];
    }
}

/**
 *  当点击下载按钮时就会调用
 */
- (void)appViewClickedDownloadButton:(MJAppView *)appView
{
    // 1.取出模型
    MJApp *app = appView.app;

    // 2.添加标签
    UILabel *label = [[UILabel alloc] init];
    label.text = [NSString stringWithFormat:@"成功下载%@", app.name];
    label.font = [UIFont systemFontOfSize:12];
    label.textAlignment = NSTextAlignmentCenter;
    label.textColor = [UIColor whiteColor];
    label.backgroundColor = [UIColor blackColor];
    label.frame = CGRectMake(0, 0, 150, 25);
    label.center = CGPointMake(160, 240);
    label.alpha = 0.0;
    label.layer.cornerRadius = 5;
    label.clipsToBounds = YES;
    [self.view addSubview:label];

    // 3.动画
    [UIView animateWithDuration:1.0 animations:^{
        label.alpha = 0.5;
    } completion:^(BOOL finished) {
        [UIView animateWithDuration:1.0 delay:1.0 options:UIViewAnimationOptionCurveLinear animations:^{
            label.alpha = 0.0;
        } completion:^(BOOL finished) {
            [label removeFromSuperview];
        }];
    }];
}

- (NSArray *)apps
{
    if (_apps == nil) {
        // 初始化

        // 1.获得plist的全路径
        NSString *path = [[NSBundle mainBundle] pathForResource:@"app.plist" ofType:nil];

        // 2.加载数组
        NSArray *dictArray = [NSArray arrayWithContentsOfFile:path];

        // 3.将dictArray里面的所有字典转成模型对象,放到新的数组中
        NSMutableArray *appArray = [NSMutableArray array];
        for (NSDictionary *dict in dictArray) {
            // 3.1.创建模型对象
            MJApp *app = [MJApp appWithDict:dict];

            // 3.2.添加模型对象到数组中
            [appArray addObject:app];
        }

        // 4.赋值
        _apps = appArray;
    }
    return _apps;
}

@end