作者丨Mitsuyuki Shiiba
原文链接:
https://dev.to/bufferings/tried-k8s-istio-in-my-local-machine-with-k3d-52gg
在之前的文章里我们介绍了如何使用k3d创建k3s集群,并且了解到k3d能为我们搭建本地k3s环境提供非常大的便利。本文将探索k3d的另一种使用方式,将Istio安装在k3d上,并在本地环境中使用。
本文为社区用户一个简短的实践记录,其需求是在本地机器上运行Kubernetes以方便检查某些东西。他之前一直在使用minikube和Docker Desktop的方案,偶然发现了k3d这个工具,于是将其实践过程记录了下来。
也欢迎大家向我们踊跃投稿自己的相关实践,添加k3s小助手微信(k3s2019)即可投稿。
安装并配置k3d
Github链接:https://github.com/rancher/k3d
正如之前的文章所介绍的,k3d的原理就是在容器里面运行k3s。接下来,我就开始进行操作了。我的笔记本电脑使用的是Ubuntu系统。首先,我先使用以下命令安装k3d:
$ curl -s https://raw.githubusercontent.com/rancher/k3d/master/install.sh | bash
然后创建一个集群并为kubectl设置配置:
$ k3d create
$ export KUBECONFIG=$(k3d get-kubeconfig)
成功了!
$ kubectl get pods -A
NAMESPACE     NAME                                      READY   STATUS      RESTARTS   AGE
kube-system   local-path-provisioner-58fb86bdfd-kvmdh   1/1     Running     0          3m40s
kube-system   coredns-57d8bbb86-grbbr                   1/1     Running     0          3m40s
kube-system   helm-install-traefik-4qr7t                0/1     Completed   0          3m40s
kube-system   svclb-traefik-j8c49                       3/3     Running     0          3m5s
kube-system   traefik-65bccdc4bd-vtk9r                  1/1     Running     0          3m5s

$ kubectl get svc -A
NAMESPACE     NAME         TYPE           CLUSTER-IP     EXTERNAL-IP    PORT(S)                                     AGE
default       kubernetes   ClusterIP      10.43.0.1      <none>         443/TCP                                     5m57s
kube-system   kube-dns     ClusterIP      10.43.0.10     <none>         53/UDP,53/TCP,9153/TCP                      5m56s
kube-system   traefik      LoadBalancer   10.43.80.235   192.168.48.2   80:30107/TCP,443:31822/TCP,8080:31373/TCP   5m5s
由上面的代码可以看出来,k3d使用的是traefik来进行LoadBalancer服务。
在k3d上可以安装Istio吗?
此时,我脑袋里冒出了一个想法,是否能将Istio运行在上面呢。然后,我找到了这个issue:
https://github.com/rancher/k3d/issues/104
根据这个issue的描述,在关闭了traefik以避免端口冲突之后,即可在上面成功运行Istio。
接下来,我来试试看。
创建没有traefik的k3d集群
# Delete the previous cluster
$ k3d delete

# Create a cluster without traefik
$ k3d create --server-arg --no-deploy --server-arg traefik

# Generate config
$ export KUBECONFIG=$(k3d get-kubeconfig)

# Check
$ kubectl get pod,svc -A
NAMESPACE     NAME                                          READY   STATUS    RESTARTS   AGE
kube-system   pod/local-path-provisioner-58fb86bdfd-h6npn   1/1     Running   0          13m
kube-system   pod/coredns-57d8bbb86-zkjkq                   1/1     Running   0          13m

NAMESPACE     NAME                 TYPE        CLUSTER-IP   EXTERNAL-IP   PORT(S)                  AGE
default       service/kubernetes   ClusterIP   10.43.0.1    <none>        443/TCP                  13m
kube-system   service/kube-dns     ClusterIP   10.43.0.10   <none>        53/UDP,53/TCP,9153/TCP   13m
现在,我已经准备好在上面安装Istio了。
安装Istio
在本文成文时Istio 1.4刚刚发布不久,因此我先使用Istio 1.3进行尝试。
从下方链接中可以下载Istio:
https://github.com/istio/istio/releases/tag/1.3.5
我根据官网文档上的步骤来安装Istio:
https://istio.io/docs/setup/install/helm/
因为我已经在我的笔记本上安装了Helm,所以在安装过程中我选择helm template的选项:
# Create a namespace for Istio
$ kubectl create namespace istio-system

# Install CRDs
$ helm template install/kubernetes/helm/istio-init --name istio-init --namespace istio-system | kubectl apply -f -

# Wait for the generation of the CRDs
$ kubectl -n istio-system wait --for=condition=complete job --all
我发现命令已经更改。之前,要检查是否创建了23个CRD通常使用wc命令,但现在它使用的是kubectl wait –for。
$ helm template install/kubernetes/helm/istio --name istio --namespace istio-system | kubectl apply -f -
出乎意料的是,在整个过程中没有出现error。这也许是我第一次如此顺利地安装Istio。
kubectl get svc,pod -n istio-system
NAME                             TYPE           CLUSTER-IP      EXTERNAL-IP    PORT(S)                                                                                                                                      AGE
service/istio-galley             ClusterIP      10.43.10.191    <none>         443/TCP,15014/TCP,9901/TCP                                                                                                                   2m21s
service/istio-policy             ClusterIP      10.43.86.131    <none>         9091/TCP,15004/TCP,15014/TCP                                                                                                                 2m21s
service/istio-telemetry          ClusterIP      10.43.11.107    <none>         9091/TCP,15004/TCP,15014/TCP,42422/TCP                                                                                                       2m21s
service/istio-pilot              ClusterIP      10.43.126.19    <none>         15010/TCP,15011/TCP,8080/TCP,15014/TCP                                                                                                       2m21s
service/prometheus               ClusterIP      10.43.41.148    <none>         9090/TCP                                                                                                                                     2m21s
service/istio-citadel            ClusterIP      10.43.91.217    <none>         8060/TCP,15014/TCP                                                                                                                           2m21s
service/istio-sidecar-injector   ClusterIP      10.43.117.133   <none>         443/TCP,15014/TCP                                                                                                                            2m21s
service/istio-ingressgateway     LoadBalancer   10.43.69.0      192.168.96.2   15020:30845/TCP,80:31380/TCP,443:31390/TCP,31400:31400/TCP,15029:31842/TCP,15030:32247/TCP,15031:32685/TCP,15032:31093/TCP,15443:30499/TCP   2m21s

NAME                                          READY   STATUS      RESTARTS   AGE
pod/istio-init-crd-10-1.3.5-28hj7             0/1     Completed   0          5m40s
pod/istio-init-crd-11-1.3.5-vmwmw             0/1     Completed   0          5m40s
pod/istio-init-crd-12-1.3.5-84q77             0/1     Completed   0          5m40s
pod/istio-security-post-install-1.3.5-jb66j   0/1     Completed   0          2m21s
pod/svclb-istio-ingressgateway-ww22d          9/9     Running     0          2m21s
pod/istio-citadel-5c67db5cb-hmhvb             1/1     Running     0          2m20s
pod/prometheus-6f74d6f76d-tpjpc               1/1     Running     0          2m20s
pod/istio-policy-66d87c756b-hf4wx             2/2     Running     3          2m21s
pod/istio-galley-56b9fb859d-7jmsq             1/1     Running     0          2m21s
pod/istio-sidecar-injector-5d65cfcd79-lhh6k   1/1     Running     0          2m20s
pod/istio-pilot-64478c6886-9xm7b              2/2     Running     0          2m20s
pod/istio-telemetry-5d4c4bfbbf-g4ccz          2/2     Running     4          2m20s
pod/istio-ingressgateway-7b766b6685-5vwg5     1/1     Running     0          2m21s
接下来,我将尝试在Istio上运行一个示例应用程序。
部署bookinfo示例应用程序
为了能够检查其能否正常运行,我部署了一个bookinfo示例应用程序到Istio中:
https://istio.io/docs/examples/bookinfo/
# Enable automatic sidecar injection
$ kubectl label namespace default istio-injection=enabled

# Deploy apps
$ kubectl apply -f samples/bookinfo/platform/kube/bookinfo.yaml

# Wait for the deployment finished for example using watch
$ kubectl get pods -w
NAME                              READY   STATUS            RESTARTS   AGE
details-v1-78d78fbddf-5db8b       0/2     PodInitializing   0          37s
reviews-v1-7bb8ffd9b6-rdgjc       0/2     PodInitializing   0          37s
ratings-v1-6c9dbf6b45-p7567       0/2     PodInitializing   0          36s
productpage-v1-596598f447-nj6wx   0/2     PodInitializing   0          36s
reviews-v3-68964bc4c8-qrhc4       0/2     PodInitializing   0          37s
reviews-v2-d7d75fff8-65f4q        0/2     PodInitializing   0          37s

# Create ingress gateway for bookinfo
$ kubectl apply -f samples/bookinfo/networking/bookinfo-gateway.yaml
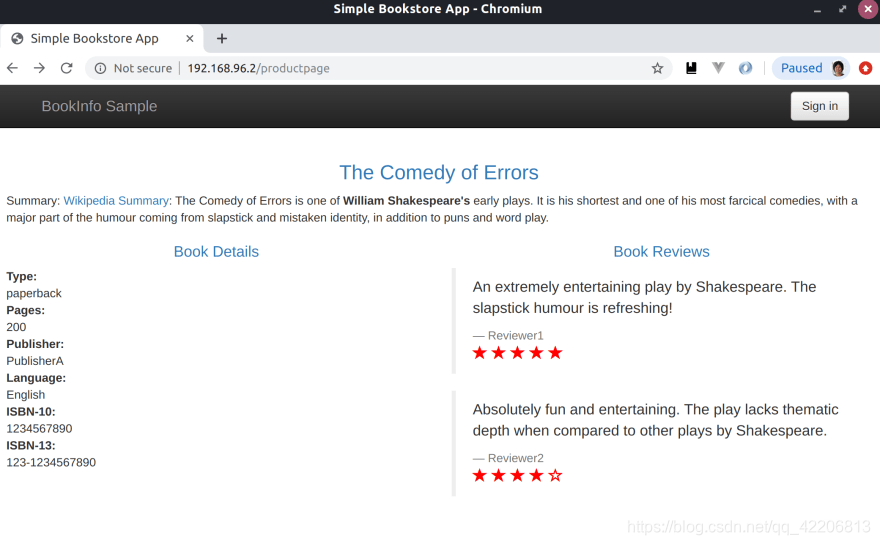
然后,确认LoadBalancer服务的外部IP:
$ kubectl get svc  -n istio-system istio-ingressgateway -o jsonpath='{.status.loadBalancer.ingress[0].ip}'
192.168.96.2
并使用该IP打开以下URL:
http://{The IP Address}/productpage
成功了!
Bookinfo容器的内存使用量约为2GB:
$ docker stats --no-stream
CONTAINER ID        NAME                     CPU %               MEM USAGE / LIMIT    MEM %               NET I/O             BLOCK I/O           PIDS
598bd6d07c85        k3d-k3s-default-server   52.24%              1.909GiB / 15.4GiB   12.40%              819MB / 21.7MB      1.41MB / 818MB      899
经过以上实践可知,使用k3d在本地运行Kubernetes极为方便,它为研发侧提供了极为便捷的Kubernetes基础设施。
正如你所知,k3d是k3s周边工具中的一个,通过本文我们已经体会到其带来的便捷之处。如果你还想更深入地了解k3d或了解k3s其他周边工具,欢迎预约今天晚上的直播课程。预约链接:http://z-mz.cn/Pmxd