导航:
(一)Electron跑起来
(二)从零搭建Vue全家桶+webpack项目框架
(三)Electron+Vue+Webpack,联合调试整个项目
(四)Electron配置润色
(五)预加载及自动更新
(六)构建、发布整个项目(包括client和web)
摘要:上篇文章说到了如何新建工程,并启动一个最简单的Electron应用。“跑起来”了Electron,那就接着把Vue“跑起来”吧。有一点需要说明的是,webpack是贯穿这个系列始终的,我也是本着学习的态度,去介绍、总结一些常用到的配置及思路,有不恰当的地方,或者待优化的地方,欢迎留言。项目完整代码:https://github.com/luohao8023/electron-vue-template
下面开始~~~

import Vue from 'vue';
import index from './views/index.vue';

//取消 Vue 所有的日志与警告
Vue.config.silent = true;
new Vue({
    el: '#app',
    render: h => h(index)
});
2、编写根组件,render>views>index.vue
<template>
    <div class="content">
        <h1>Welcome to electron-vue-template!</h1>
    </div>
</template>

<script>
export default {}
</script>
<style></style>
3、编写html模板文件,render>index.ejs,webpack解析、打包vue文件时,以此模板生成html文件
<!DOCTYPE html>
<html lang="zh-CN">
<!--template for 2019年10月30日-->
<!--<%= new Date().getFullYear()+'/'+(new Date().getMonth()+1)+'/'+new Date().getDate()+' '+new Date().getHours()+':'+new Date().getMinutes() %>-->
<head>
    <meta charset="UTF-8">
    <title>模板文件</title>
    <meta name="viewport" content="width=device-width,initial-scale=1.0,maximum-scale=1.0,user-scalable=0">
    <meta HTTP-EQUIV="pragma" CONTENT="no-cache">
    <meta HTTP-EQUIV="Cache-Control" CONTENT="no-store, must-revalidate">
    <meta HTTP-EQUIV="expires" CONTENT="Wed, 26 Feb 1997 08:21:57 GMT">
    <meta HTTP-EQUIV="expires" CONTENT="0">
</head>
<body>
    <div id="app"></div>
</body>
</html>
4、编写webpack配置文件,builder>webpack.render.config.js,建议按照本文这种方式,把配置文件单独抽出来,这样的话,本地调试和打包可以共用一套配置,只需要传递不同参数就可以了,不要把所有的配置和打包逻辑写在一个文件里,太长、太乱、太难维护
/*
Name:    渲染进程配置
Author: haoluo
Date:   2019-10-30
 */
const path = require('path');
const HtmlWebpackPlugin = require('html-webpack-plugin');
const devMode = process.env.NODE_ENV === 'development';

module.exports = {
    mode: devMode ? 'development' : 'production',
    entry: {
        main: './src/render/index.js'
    },
    output: {
        path: path.join(__dirname, '../app/'),
        publicPath: devMode ? '/' : '',
        filename: './js/[name].[hash:8].js'
    },
    module: {
        rules: [
            {
                test: /.vue$/,
                exclude: /node_modules/,
                loader: 'vue-loader'
            }
        ]
    },
    plugins: [
        new HtmlWebpackPlugin({
            template: './src/render/index.ejs',
            filename: './index.html',
            title: 'electron-vue-template',
            inject: false,
            hash: true,
            mode: devMode
        })
    ]
}
适当解释一下:
mode:环境参数,针对不同的环境,webpack内部有一些不同的机制,并对相应环境做相应的优化
entry:入口,webpack执行构建的第一步将从入口文件开始,递归查询并解析所有依赖的模块。配置方式有多种,可参考webpack文档,这里我们配置的路径是'./src/render/index.js',意思是src目录下,render文件夹下的index.js,而webpack配置文件是在builder文件夹下,那这个“./”的相对路径到底是相对于谁呢?这就得说一下webpack中的路径问题了,context 是 webpack 编译时的基础目录,入口起点(entry)会相对于此目录查找,那这个context又是个什么东西?webpack源码有关默认配置中有这么一句话
this.set("context", process.cwd());
这就是context的默认值,工程的根目录,那这个entry的配置就很好理解了。
output:打包的输入配置,路径建议设置为绝对路径。
module和plugins就不多说了。
5、编写本地调试脚本
/**
* Tip:    调试渲染进程
* Author: haoluo
* Data:   2019-10-30
**/
process.env.NODE_ENV = 'development';
const webpack = require('webpack');
const WebpackDevServer = require('webpack-dev-server');
const webpackHotMiddleware = require('webpack-hot-middleware');
const chalk = require('chalk');
const http = require('http');
function devRender() {
    console.log('启动渲染进程调试......');
    const webpackDevConfig = require('./webpack.render.config.js');
    const compiler = webpack(webpackDevConfig);
    new WebpackDevServer(
        compiler, {
            contentBase: webpackDevConfig.output.path,
            publicPath: webpackDevConfig.output.publicPath,
            open: true,//打开默认浏览器
            inline: true,//刷新模式
            hot: true,//热更新
            quiet: true,//除第一次编译外,其余不显示编译信息
            progress: true,//显示打包进度
            setup(app) {
                app.use(webpackHotMiddleware(compiler));
                app.use('*', (req, res, next) => {
                    if (String(req.originalUrl).indexOf('.html') > 0) {
                        getHtml(res);
                    } else {
                        next();
                    }
                });
            }
        }
    ).listen(8099, function(err) {
        if (err) return console.log(err);
        console.log(`Listening at http://localhost:8099`);
    });
    compiler.hooks.done.tap('doneCallback', (stats) => {
        const compilation = stats.compilation;
        Object.keys(compilation.assets).forEach(key => console.log(chalk.blue(key)));
        compilation.warnings.forEach(key => console.log(chalk.yellow(key)));
        compilation.errors.forEach(key => console.log(chalk.red(`${key}:${stats.compilation.errors[key]}`)));
        console.log(chalk.green(`${chalk.white('渲染进程调试完毕
')}time:${(stats.endTime-stats.startTime)/1000} s`));
    });
}

function getHtml(res) {
    http.get(`http://localhost:8099`, (response) => {
        response.pipe(res);
    }).on('error', (err) => {
        console.log(err);
    });
}

devRender();
都是一些常规操作,可以阅读一下代码。
6、配置启动命令,在package.json中新增dev命令,启动本地调试(先起了再说,报错什么的,见招拆招)
  "scripts": {
    "start": "electron ./src/main/main.js",
    "dev": "node ./builder/dev.js"
  },
然后命令行运行npm run dev。。。。。。反正我这儿是报错了。。。说是找不到html-webpack-plugin模块,那就运行npm i html-webpack-plugin -D安装一下,如果步骤一没有做的话,后面可能还会遇到很多模块找不到的情况,解决方法很简单,缺什么安装什么就好了。安装完所有的模块之后,启动,还是报错了。。。。。。
ModuleNotFoundError: Module not found: Error: Can't resolve 'vue' in ...
ModuleNotFoundError: Module not found: Error: Can't resolve 'vue-loader' in ...
检查了下package.json文件和node_modules,发现我的vue-loader没有装,然后就是装一下(如果没有遇到这个步骤,可以忽略)
再次运行

这个报错就很友好了吗,就是vue-loader告诉你,必须安装vue-template-compiler插件,不然就不工作,那就装一下。
接着运行,就知道没那么容易成功
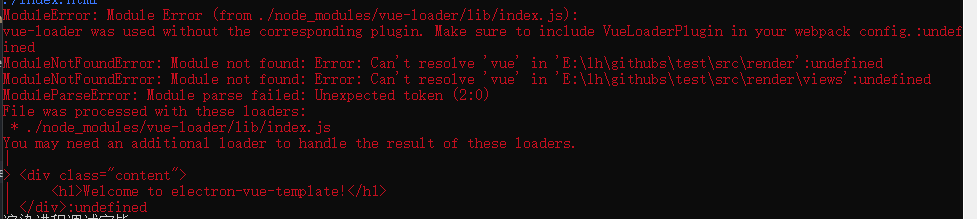
vue-loader报错说缺少了插件,让检查是否配置了VueLoaderPlugin插件,搜一下这是个什么鬼,看这里,15+版本的vue-loader需要配合VueLoaderPlugin使用,然后看了一下我使用的vue-loader版本15.7.1,那就配一下这个东西。


接着运行,终于没有报错了,但是页面为啥子是白的,我的h1标签呢?冷静下来分析一下问题,页面没有东西说明我打包时生成的html文件有问题(devServer会把打包出来的静态文件保存在内存里),而html文件是根据ejs模板生成的,那会不会是模板配置有问题?

看一下我们的模板,结构是没什么问题啊,但是,没有引用css和js文件啊,也就是我们辛辛苦苦解析vue文件,打包css和js,最后却没有引用。。。好吧,那就再配置一下ejs模板,把相应的文件引入一下
<!DOCTYPE html>
<html lang="zh-CN">
<!--template for 2019年10月30日-->
<!--<%= new Date().getFullYear()+'/'+(new Date().getMonth()+1)+'/'+new Date().getDate()+' '+new Date().getHours()+':'+new Date().getMinutes() %>-->
<%
function getFilePath(filename,libsPath){
    let _filenameSearchIndex=filename.indexOf("?");
    let _libsPathSearchIndex=libsPath.indexOf("?");
    let _filename=filename.substr(0,_filenameSearchIndex<1?filename.length:_filenameSearchIndex);
    let _libsPath=libsPath.substr(0,_libsPathSearchIndex<1?libsPath.length:_libsPathSearchIndex);
    let htmlfilename=path.relative(_filename,_libsPath);
    return libsPath;
}
let path = require('path'),jsArr = [],cssArr = [];
let filename="./index.html";
    //修正目录结构
    for(let i=0;i<htmlWebpackPlugin.files.css.length;i++){
        let name=getFilePath(filename,String(htmlWebpackPlugin.files.css[i]));
        cssArr.push(name);
    }
    for(let i=0;i<htmlWebpackPlugin.files.js.length;i++){
        let name=getFilePath(filename,String(htmlWebpackPlugin.files.js[i]));
        jsArr.push(name);
    }
%>
<head>
    <meta charset="UTF-8">
    <title><%= htmlWebpackPlugin.options.title %></title>
    <meta name="viewport" content="width=device-width,initial-scale=1.0,maximum-scale=1.0,user-scalable=0">
    <meta HTTP-EQUIV="pragma" CONTENT="no-cache">
    <meta HTTP-EQUIV="Cache-Control" CONTENT="no-store, must-revalidate">
    <meta HTTP-EQUIV="expires" CONTENT="Wed, 26 Feb 1997 08:21:57 GMT">
    <meta HTTP-EQUIV="expires" CONTENT="0">
    <% cssArr.forEach(css=>{ %><link rel="stylesheet" href="<%= css %>" />
    <% }) %>
</head>
<body>
    <div id="app"></div>
    <% jsArr.forEach(js=>{ %><script type="text/javascript" src="<%= js %>"></script>
    <% }) %>
</body>
</html>
我们可以在ejs中拿到html-webpack-plugin插件的一些信息,比如插件配置、生成的文件等,然后拿到js和css文件,并引入进来,这里建议看一下ejs模板语法。
我们接着运行,终于出来了。

7、配置打包脚本
在builder文件夹下新建build.js,引入配置,直接运行webpack打包即可,不需要devServer。
/**
* Tip:    打包
* Author: haoluo
* Data:   2019-10-30
**/
process.env.NODE_ENV = 'production';
const chalk = require("chalk");
const del = require("del");
const webpack = require('webpack');
const renderConfig = require('./webpack.render.config.js');

del(["./app/*"]); //删除历史打包数据

viewBuilder().then(data => {
    console.log("打包输出===>", data)
}).catch(err => {
    console.error("打包出错,输出===>", err);
    process.exit(1);
});

function viewBuilder() {
    return new Promise((resolve, reject) => {
        console.log("打包渲染进程......");
        const renderCompiler = webpack(renderConfig);
        renderCompiler.run((err, stats) => {
            if (err) {
                console.log("打包渲染进程遇到Error!");
                reject(chalk.red(err));
            } else {
                let log = "";
                stats.compilation.errors.forEach(key => {
                    log += chalk.red(`${key}:${stats.compilation.errors[key]}`) + "
";
                })
                stats.compilation.warnings.forEach(key => {
                    log += chalk.yellow(key) + "
";
                })
                Object.keys(stats.compilation.assets).forEach(key => {
                    log += chalk.blue(key) + "
";
                })
                log += chalk.green(`time:${(stats.endTime-stats.startTime)/1000} s
`) + "
";
                resolve(`${log}`);
            }
        })
    })
}
在package.json中新增打包命令
"scripts": {
    "start": "electron ./src/main/main.js",
    "dev": "node ./builder/dev.js",
    "build": "node ./builder/build.js"
  },
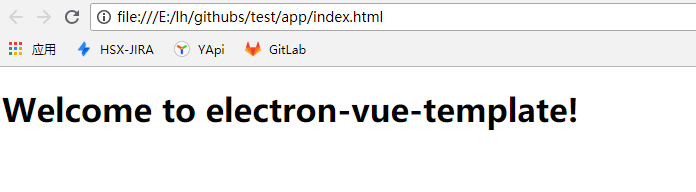
npm run build执行打包,这次还真是出奇的顺利啊,看一下app文件夹,已经生成了静态文件,然后直接在浏览器打开index.html文件,正常显示。
四、使用vuex,vue-router,axios
说好的全家桶呢,这里我们不用vue-resource了,使用axios。
1、使用vuex
安装vuex依赖,在src>render文件夹下新建store文件夹,并在store文件夹下新增:
actions.js
export default {}
index.js
import Vue from 'vue';
import Vuex from 'vuex';
import actions from './actions.js';
import mutations from './mutations.js';
Vue.use(Vuex);
// 这里为全局的,模块内的请在模块内动态注册
const store = new Vuex.Store({
    strict: true,
    state: {
        userInfo: {
            name: 'haoluo',
            address: 'beijing'
        }
    },
    getters: {},
    mutations,
    actions
});
export default store;
mutations.js
export default {
    //设置用户信息
    setUserInfo(state, config) {
        if (!config) {
            state.userInfo = {};
        }
        for (var objName in config) {
            state.userInfo[objName] = config[objName];
        }
    }
}
以上三个文件的实力代码,比官网教程还简单,可以自行研究一下文档。
文件建好之后,需要把store挂载到vue实例上,找到vue工程的入口文件,src>render>index.js
import Vue from 'vue';
import store from './store/index.js';
import index from './views/index.vue';

//取消 Vue 所有的日志与警告
Vue.config.silent = true;
new Vue({
    el: '#app',
    store: store,
    render: h => h(index)
});
然后我们就可以使用啦,找到根组件,src>render>views>index.vue
<template>
    <div class="content">
        <h1>Welcome to electron-vue-template!</h1>
        <h2>name:{{userInfo.name}}</h2>
        <h2>address:{{userInfo.address}}</h2>
    </div>
</template>

<script>
import {mapState} from 'vuex';
export default {
    computed: {
        ...mapState(['userInfo'])
    }
}
</script>
<style></style>
mapState是state的辅助函数,是个语法糖,借助mapState我们可以更方面的获取属性,而不需要写一堆啰里吧嗦的东西,通过计算属性computed接收userInfo,然后就可以使用啦,运行本地调试,发现页面上已经可以正常显示了

属性有了之后我们可以使用,但如果想要改变vuex中存储的属性呢?为了保证单向数据流以及方便对数据的追踪等一些其他原因,不建议直接修改vuex的属性,而是需要通过mutations,这里也有一个辅助函数mapMutations,用法同mapState类似,只不过需要用methods去接收,作为一个全局方法使用
<!-- render>views>index.vue -->
<template>
    <div class="content">
        <h1>Welcome to electron-vue-template!</h1>
        <h2>name:{{userInfo.name}}</h2>
        <h2>address:{{userInfo.address}}</h2>
        <button @click="changeAddress">设置address为tianjin</button>
    </div>
</template>

<script>
import {mapState,mapMutations} from 'vuex';
export default {
    computed: {
        ...mapState(['userInfo'])
    },
    methods: {
        ...mapMutations(['setUserInfo']),
        changeAddress() {
            this.setUserInfo({
                address: 'tianjin'
            });
        }
    }
}
</script>
<style></style>
当点击按钮的时候。userInfo中的address被修改了,页面渲染的值也相应的改变了

2、使用vue-router
安装vue-router依赖,在render文件夹下新增router文件夹,并在其中新增index.js
module.exports = [
    {
        path: '/index.html',
        name: 'index',
        meta: {
            title: '首页',
            author: '--',
            parentRouter: '--'
        },
        component: (resolve) => {
            require.ensure([], () => {
                return resolve(require('../views/index.vue'))
            }, "index")
        },
        children: []
    }
];
在入口文件render>index.js中引入并挂载
// render>index.js
import Vue from 'vue';
import VueRouter from 'vue-router';
import store from './store/index.js';
import routers from './router/index.js';
import index from './views/index.vue';

Vue.use(VueRouter);

let router = new VueRouter({
    routes: routers
})

//取消 Vue 所有的日志与警告
Vue.config.silent = true;
new Vue({
    el: '#app',
    router: router,
    store: store,
    render: h => h(index)
});
运行一下,页面可以正常显示,在地址栏输入http://localhost:8099/index.html时,也是没有问题的,现在新增加一个页面,订单页
<template>
    <div class="content">
        <h1>order page!</h1>
    </div>
</template>

<script>
export default {}
</script>
<style></style>
再配置下路由
module.exports = [
    {
        path: '/index.html',
        name: 'index',
        meta: {
            title: '首页',
            author: '--',
            parentRouter: '--'
        },
        component: (resolve) => {
            require.ensure([], () => {
                return resolve(require('../views/index.vue'))
            }, "index")
        },
        children: []
    },
    {
        path: '/order.html',
        name: 'order',
        meta: {
            title: '订单页',
            author: '--',
            parentRouter: '--'
        },
        component: (resolve) => {
            require.ensure([], () => {
                return resolve(require('../views/order.vue'))
            }, "order")
        },
        children: []
    }
];
并在首页index.vue中增加跳转按钮,运行之后,发现跳不过去,尴尬~~~,路由跳转,需要有<router-view></router-view>去接收才行啊
改造一下吧,views下新增home.vue,把index.vue中的内容拷贝过去,index.vue改为下面这样
<!-- render>views>index.vue -->
<template>
    <div>
        <router-view></router-view>
    </div>
</template>

<script>
export default {
    methods: {},
    mounted() {
        this.$router.push({
            name: 'home'
        });
    }
}
</script>
<style></style>
router文件改为下面这样
module.exports = [
    {
        path: '/index.html',
        name: 'index',
        meta: {
            title: '首页',
            author: '--',
            parentRouter: '--'
        },
        component: (resolve) => {
            require.ensure([], () => {
                return resolve(require('../views/index.vue'))
            }, "index")
        },
        children: [
            {
                path: '/home.html',
                name: 'home',
                meta: {
                    title: 'home页',
                    author: '--',
                    parentRouter: '--'
                },
                component: (resolve) => {
                    require.ensure([], () => {
                        return resolve(require('../views/home.vue'))
                    }, "home")
                },
                children: []
            },
            {
                path: '/order.html',
                name: 'order',
                meta: {
                    title: '订单页',
                    author: '--',
                    parentRouter: '--'
                },
                component: (resolve) => {
                    require.ensure([], () => {
                        return resolve(require('../views/order.vue'))
                    }, "order")
                },
                children: []
            }
        ]
    }
];
再次运行,页面已经可以正常跳转了。
3、axios,这里暂时不说,后续electron和vue联调的时候会补上。
几点说明:
1、截止目前,webpack配置以及dev和build脚本仅仅是调通大致的流程,还有很多可优化可考究的地方,后续完善项目的过程中会对打包流程逐渐润色;
2、vue全家桶在实际项目中高级用法很多,细节也很多,这里只是最简单的用法,如若用到实际项目中,还要基于目前情况再做细化;
3、本系列文章旨在记录、回顾整个项目框架搭建流程,把握整体结构,很多地方需要根据实际项目再做处理;
4、如有错误或不当的地方,欢迎指出,共同进步!