先不谈Spring,首先试着用最简易的方式将Shiro集成到web应用。 即使用一些Servlet ContextListener、Filter、ini这些简单的配置完成与web应用的集成。
web.xml:
<listener>
    <listener-class>org.apache.shiro.web.env.EnvironmentLoaderListener</listener-class>
</listener>
<context-param>
    <param-name>shiroEnvironmentClass</param-name>
    <param-value>org.apache.shiro.web.env.IniWebEnvironment</param-value>
</context-param>
<context-param>
    <param-name>shiroConfigLocations</param-name>
    <param-value>classpath:shiro_web.ini</param-value>
</context-param>
上面的配置中我注册了一个Listener——org.apache.shiro.web.env.EnvironmentLoaderListener。
该类的意义主要是为了实现ServletContextListener,将WebEnvironment随着ServletContext事件进行创建和销毁。
对WebEnvironment的处理逻辑全部在其父类——EnvironmentLoader中。
WebEnvironment的类关系图:

如果想获取WebEnvironment则可以试试以下方法:
WebUtils.getRequiredWebEnvironment(servletContext);
上面的配置中用到了两个参数(事实上EnvironmentLoader也只有这两个参数)。
- shiroEnvironmentClass
- shiroConfigLocations
shiroEnvironmentClass用于指定使用的WebEnvironment实现类,缺省值为org.apache.shiro.web.env.IniWebEnvironment。
IniWebEnvironment根据设置的.ini配置文件的路径创建ini实例,如果无法获得.ini配置文件则抛出ConfigurationException。
当然,如果有需要(比如换个配置格式、解析方法什么的...),我们也可以自己实现一个WebEnvirontment,并通过shiroEnvironmentClass属性来进行注册。
而shiroConfigLocations则是指定.ini配置文件的路径的参数。
如果没有进行手动指定,他会尝试在以下两个路径中寻找:
public static final String DEFAULT_WEB_INI_RESOURCE_PATH = "/WEB-INF/shiro.ini";
public static final String DEFAULT_INI_RESOURCE_PATH = "classpath:shiro.ini";
顺便记录,IniWebEnvironment查找.ini配置时使用ResourceUtils,见:
private Ini convertPathToIni(String path, boolean required) {

    //TODO - this logic is ugly - it'd be ideal if we had a Resource API to polymorphically encaspulate this behavior

    Ini ini = null;

    if (StringUtils.hasText(path)) {
        InputStream is = null;

        //SHIRO-178: Check for servlet context resource and not only resource paths:
        if (!ResourceUtils.hasResourcePrefix(path)) {
            is = getServletContextResourceStream(path);
        } else {
            try {
                is = ResourceUtils.getInputStreamForPath(path);
            } catch (IOException e) {
                if (required) {
                    throw new ConfigurationException(e);
                } else {
                    if (log.isDebugEnabled()) {
                        log.debug("Unable to load optional path '" + path + "'.", e);
                    }
                }
            }
        }
        if (is != null) {
            ini = new Ini();
            ini.load(is);
        } else {
            if (required) {
                throw new ConfigurationException("Unable to load resource path '" + path + "'");
            }
        }
    }

    return ini;
}
该方法首先调用ResourceUtils.hasResourcePrefix(path)检查路径前缀是否符合以下三种之一:
public static final String CLASSPATH_PREFIX = "classpath:";
public static final String URL_PREFIX = "url:";
public static final String FILE_PREFIX = "file:";
如果不符合这三种前缀则在Servlet Context进行查找。
如果符合三种前缀之一,则调用ResourceUtils.getInputStreamForPath(path),根据path及其不同的前缀以不同的方式获取输入流。
对于classpath,调用ClassUtils.getResourceAsStream(path);,通过ClassLoader实例调用getResourceAsStream(name);
对于url,则是返回url.openStream();
对于file,返回new FileInputStream(path);
继续配置web.xml,这次添加一个Filter:
<filter>
    <filter-name>ShiroFilter</filter-name>
        <filter-class>org.apache.shiro.web.servlet.ShiroFilter</filter-class>
</filter>
<filter-mapping>
        <filter-name>ShiroFilter</filter-name>
        <url-pattern>/*</url-pattern>
    <dispatcher>REQUEST</dispatcher>
        <dispatcher>FORWARD</dispatcher>
        <dispatcher>INCLUDE</dispatcher>
            <dispatcher>ERROR</dispatcher>
    </filter-mapping>
这是基于当前的WebEnvironment实例配置的Filter,即单独存在没什么意义。
ShiroFilter用WebEnvironment实例对所有被过滤的请求进行安全处理。
Shiro提供的一些Filter实现:
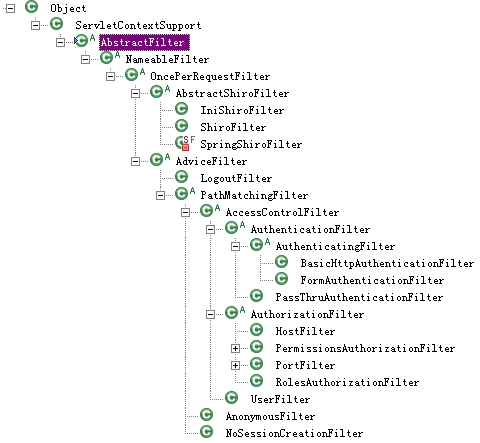
暂且不论AdviceFilter,我们使用的ShiroFilter在AbstractShiroFilter下。
其中IniShiroFilter从1.2开始已deprecated了,但这个东西用起来还是有点意思的,只不过没什么意义。
IniShiroFilter不需要同时配置EnvironmentLoaderListener,也就是说这里面没有WebEnvironment对象,他本身就是一个简易的Environment。
有意思的地方就是这点,他可以把.ini中的配置直接写到web.xml,比如这样:
<filter>
    <filter-name>ShiroFilter</filter-name>
    <filter-class>org.apache.shiro.web.servlet.IniShiroFilter</filter-class>
    <init-param>
        <param-name>config</param-name>
        <param-value>
        [urls]
        /main/logout = logout
        /main/loginPage = anon
        /** = user
        [main]
        user.loginUrl = /main/login
        authc.successUrl = /main/welcome
        myRealm=pac.king.common.security.realm.MainRealm
        securityManager.realms=$myRealm
        </param-value>
    </init-param>
</filter>
<filter-mapping>
    <filter-name>ShiroFilter</filter-name>
    <url-pattern>/*</url-pattern>
    <dispatcher>REQUEST</dispatcher>
    <dispatcher>FORWARD</dispatcher>
    <dispatcher>INCLUDE</dispatcher>
    <dispatcher>ERROR</dispatcher>
</filter-mapping>
有意思,但没什么意义。
Shiro也建议用户们不要这样配置,对此他们给出了几个理由:
- 安全配置可能会经常变化,而我们不想总是修改web.xml。
- 安全配置可能会越来越庞大,这会影响web.xml的可读性。
- 我们尽量保证安全配置不会散落在各个地方。
无论如何,这取决于用户和项目。
另外说说web应用相关的ini配置。
之前几篇中用过[main]、[users]、[roles]等片段,在web应用中我们可以试试[urls]。
[urls]也是Shiro的一大卖点(文档提供人说根本没见过其他web framework也能做到这点)。
就是为每个URL配置专有的filter chain!!
[urls]的格式如下:
URL_Ant_Path_Expression = Path_Specific_Filter_Chain[optional_config]
左侧使用Ant风格的表达式描述URL;
右侧则是用逗号分隔的过滤器链;
最后的optional_config则是一些附加属性,比如描述对用户资源有删除操作的权限perms["user:delete"]。
配置[urls],官网上的例子:
[urls]
/index.html = anon
/user/create = anon
/user/** = authc
/admin/** = authc, roles[administrator]
/rest/** = authc, rest
/remoting/rpc/** = authc, perms["remote:invoke"]
URL是相对路径,即使部署的时候换了个域名也没有问题。
注意!URL配置的顺序对filter chain是有影响的!他是FIRST MATCH WINS。
比如下面的例子中,第二行配置就不会生效。
/user/** = authc
/user/list = anon
默认的Filter,比如anon,authc,users等等,他们是由哪些类来实现的?
| Filter Name | Class |
| anon | org.apache.shiro.web.filter.authc.AnonymousFilter |
| authc | org.apache.shiro.web.filter.authc.FormAuthenticationFilter |
| authcBasic | org.apache.shiro.web.filter.authc.BasicHttpAuthenticationFilter |
| logout | org.apache.shiro.web.filter.authc.LogoutFilter |
| noSessionCreation | org.apache.shiro.web.filter.session.NoSessionCreationFilter |
| perms | org.apache.shiro.web.filter.authz.PermissionsAuthorizationFilter |
| port | org.apache.shiro.web.filter.authz.PortFilter |
| rest | org.apache.shiro.web.filter.authz.HttpMethodPermissionFilterv |
| roles | org.apache.shiro.web.filter.authz.RolesAuthorizationFilter |
| ssl | org.apache.shiro.web.filter.authz.SslFilter |
| user | org.apache.shiro.web.filter.authc.UserFilter |
应用启动时,将默认Filter全部加载。
默认Filter的定义见enum类DefaultFilter。
pool of Filters则定义在DefaultFilterChainManager中,用LinkedHashMap维护。DefaultFilterChainManager在constructor中调用void addDefaultFilters(boolean init)将Filters放入Map中。
随着应用做得越来越大,这些URL会变得越来越难以管理。
当然,我们也可以把这些URL放在数据库里管理,但总是有个别的URL需要特殊配置Filter。
就以我现在工作中的应用为例,我们将大多数URL放到数据库管理,并全部采用authc+perms过滤器,perms的options也是该URL。
即有该URL权限的用户可以访问该URL。
但总有那么些例外的、奇怪的东西,除了数据库里的URL,我又在.ini中写了差不多30个URL,再配上各种各样的Filter,当然还要注意顺序的影响。
随着开发、测试、生产环境的切换,这些filters也需要可以进行启用/禁用。
我总不把filter能一个个删掉再一个个写回去...
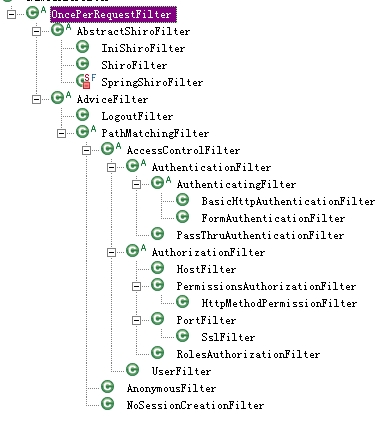
见OncePerRequestFilter有个field:
private boolean enabled = true;
而且所有的default filters都继承了OncePerRequestFilter!!
于是我可以直接在ini文件中直接进行启用/禁用,比如这样:
user.enabled=false
当然,我们也可以试着自定义一个Filter(比如根据判断具体的请求或者路径,动态将所有filter启用/禁用),并在[main]注册。
另外,上面的类关系图中AccessControlFilter有一个field为loginUrl,其默认值为:
public static final String DEFAULT_LOGIN_URL = "/login.jsp";
我们经常使用的filter中的authc(FormAuthenticationFilter)中存在以下属性:
public static final String DEFAULT_USERNAME_PARAM = "username";
public static final String DEFAULT_PASSWORD_PARAM = "password";
public static final String DEFAULT_REMEMBER_ME_PARAM = "rememberMe";

private String usernameParam = DEFAULT_USERNAME_PARAM;
private String passwordParam = DEFAULT_PASSWORD_PARAM;
private String rememberMeParam = DEFAULT_REMEMBER_ME_PARAM;
我们可以在表单中使用这些属性,让其进行认证+remember me。
当然,这些值也是可以改变的,比如:
[main]authc.loginUrl = /main/loginauthc.usernameParam = userNameauthc.passwordParam = pwdauthc.rememberMeParam = rememberCookie
说到remember me,其实现是有RememberMeManager提供,默认实现是基于Cookie的。
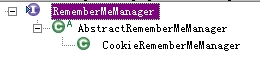
比如DefaultWebSecurityManager的constructor中将CookieRememberMeManager设为默认(field定义于其父类DefaultSecurityManager):
public DefaultWebSecurityManager() {
    super();
    ((DefaultSubjectDAO) this.subjectDAO).setSessionStorageEvaluator(new DefaultWebSessionStorageEvaluator());
    this.sessionMode = HTTP_SESSION_MODE;
    setSubjectFactory(new DefaultWebSubjectFactory());
    setRememberMeManager(new CookieRememberMeManager());
    setSessionManager(new ServletContainerSessionManager());
}
看起来不错,那我就一步步detect看看RememberMeManager是怎么manage的。
用户登录时我们调用Subject.login(token)
以DelegaingSubject为例,第一步直接将验证工作委托给securityManager。
工作中一步步进行委托,securityManager -> authenticator -> realm...
验证通过后将AuthenticationInfo结果返回到securityManager,securityManager将结果传递给RememberMeManager,委托rememberMe的工作。
参考AbstractRememberMeManager中的method:
public void onSuccessfulLogin(Subject subject, AuthenticationToken token, AuthenticationInfo info) {
    //always clear any previous identity:
    forgetIdentity(subject);

    //now save the new identity:
    if (isRememberMe(token)) {
        rememberIdentity(subject, token, info);
    } else {
        if (log.isDebugEnabled()) {
            log.debug("AuthenticationToken did not indicate RememberMe is requested.  " +
                    "RememberMe functionality will not be executed for corresponding account.");
        }
    }
}
第一步:先将Cookie移除,Shiro默认使用的Cookie是自己的SimpleCookie,调用其removeFrom方法将Cookie"移除"。
第二步:检查token是否是RememberMeAuthenticationToken的实例并是否设置了rememberMe=true。
第三步:进行rememberMe的具体工作,这个工作由AbstractRememberMeManager的子类进行。
以CookieRememberMeManager为例:
protected void rememberSerializedIdentity(Subject subject, byte[] serialized) {

    if (!WebUtils.isHttp(subject)) {
        if (log.isDebugEnabled()) {
            String msg = "Subject argument is not an HTTP-aware instance.  This is required to obtain a servlet " +
                    "request and response in order to set the rememberMe cookie. Returning immediately and " +
                    "ignoring rememberMe operation.";
            log.debug(msg);
        }
        return;
    }


    HttpServletRequest request = WebUtils.getHttpRequest(subject);
    HttpServletResponse response = WebUtils.getHttpResponse(subject);

    //base 64 encode it and store as a cookie:
    String base64 = Base64.encodeToString(serialized);

    Cookie template = getCookie(); //the class attribute is really a template for the outgoing cookies
    Cookie cookie = new SimpleCookie(template);
    cookie.setValue(base64);
    cookie.saveTo(request, response);
}
代码非常简单,接着转到SimpleCookie:
public void saveTo(HttpServletRequest request, HttpServletResponse response) {

    String name = getName();
    String value = getValue();
    String comment = getComment();
    String domain = getDomain();
    String path = calculatePath(request);
    int maxAge = getMaxAge();
    int version = getVersion();
    boolean secure = isSecure();
    boolean httpOnly = isHttpOnly();

    addCookieHeader(response, name, value, comment, domain, path, maxAge, version, secure, httpOnly);
}

private void addCookieHeader(HttpServletResponse response, String name, String value, String comment,
                             String domain, String path, int maxAge, int version,
                             boolean secure, boolean httpOnly) {

    String headerValue = buildHeaderValue(name, value, comment, domain, path, maxAge, version, secure, httpOnly);
    response.addHeader(COOKIE_HEADER_NAME, headerValue);

    if (log.isDebugEnabled()) {
        log.debug("Added HttpServletResponse Cookie [{}]", headerValue);
    }
}
但毕竟很多人不喜欢cookie...我们也可以自己去实现RememberMeManager,并进行注册(仍然是注入到securityManger):
rememberMeManager = com.my.impl.RememberMeManager
securityManager.rememberMeManager = $rememberMeManager
我们使用的UsernamePasswordToken继承的RememberMeAuthenticationToken提供rememberMe特性。
boolean isRememberMe();
比如我们可以Realm的验证方法中这样使用:
UsernamePasswordToken uToken = (UsernamePasswordToken)token;
uToken.setRememberMe(true);