一、前言
Linux操作系统至1991年10月5日诞生以来,就其开源性和自由性得到了很多技术大牛的青睐,每个Linux爱好者都为其贡献了自己的一份力,不管是在Linux内核还是开源软件等方面,都为我们后来人提供了一个良好的学习和研究环境。
本文主要通过裁剪现有Linux系统,根据自己的需要,打造一个属于自己的Linux小系统,让其能够具备Linux的一些常用小功能。
二、原理
启动流程介绍:
制作Linux小系统之前,我们有必要再了解一下Linux的启动流程:
1、首先Linux要通过POST自检,检查硬件设备有没有故障
2、如果有多块启动盘的话,需要在BIOS中选择启动磁盘
3、启动MBR中的bootloader引导程序
4、加载内核文件
5、执行所有进程的父进程、老祖宗init
6、打印欢迎界面
在Linux的启动流程中,加载内核文件时还需要借助别外两个文件:
1)initrd,是CentOS5上用内存模拟的磁盘设备
2)initramfs,是CentOS6上用内存模拟的文件系统
在启程的流程中,init主要是用来做哪些操作的呢?
init通过调用/etc/inittab这个配置文件,然后再去执行/etc/rc.d/rc.sysinit的系统初始化脚本
好啦,原理我们已经知道了,接下来我们来看看具体的思路吧(〃'▽'〃)
三、思路
1、我们要在一个现有的Linux系统上加一块硬盘/dev/sdb,在硬盘上分两个分区,一个是/boot,一个是/,并将其格式化。当然,我们需要明确的概念是,我们现在加的这个硬盘在现有的Linux系统中是/dev/sdb,但是,当我们把东西全部设置好时,我们就需要把这个硬盘拔除,放在我们的新系统上,此时,他就是/dev/sda啦。
2、在/dev/sdb这个硬盘上,我们要将其打造成一个独立的Linux系统,里面的所有文件是需要我们一个一个拷贝进去的。而且,作为一个将来要当/dev/sda的硬盘,里面一定要有grub文件诺~所以我们要安装grub文件。
3、同时,作为一个能独立运行的Linux系统,内核是一定不能少的!所以,我们要把内核文件和initramfs文件也一起拷到我们的/dev/sdb上。
4、现在我们系统已经初具规模了,接下来就是需要程序了0.0关于程序的拷贝我们可以通过一个脚本来实现。具体的脚本在下文中会给大家说到。
以上步骤完成,我们的自制Linux就完成啦~我们的思路就是这么回事,接下来,我们就开始吧( ̄▽ ̄)~*
四、操作步骤
本次实验我们以centos6.9为例~
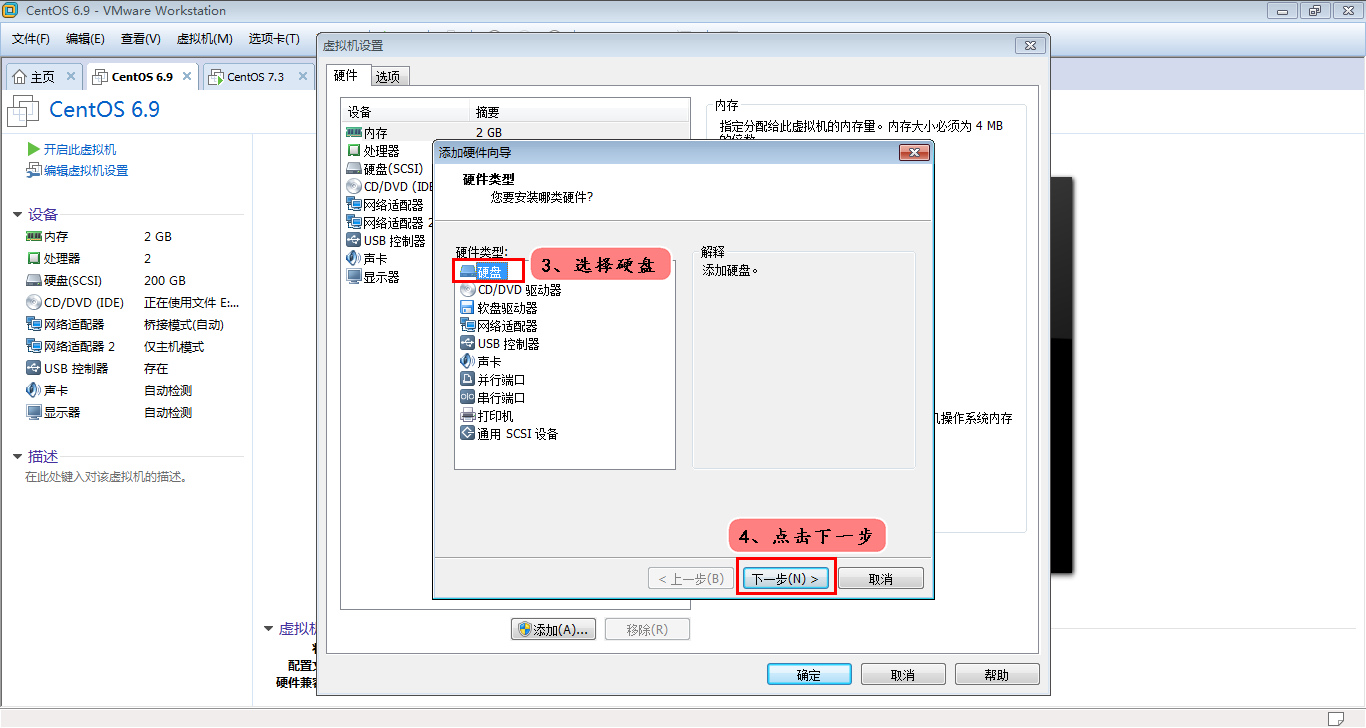
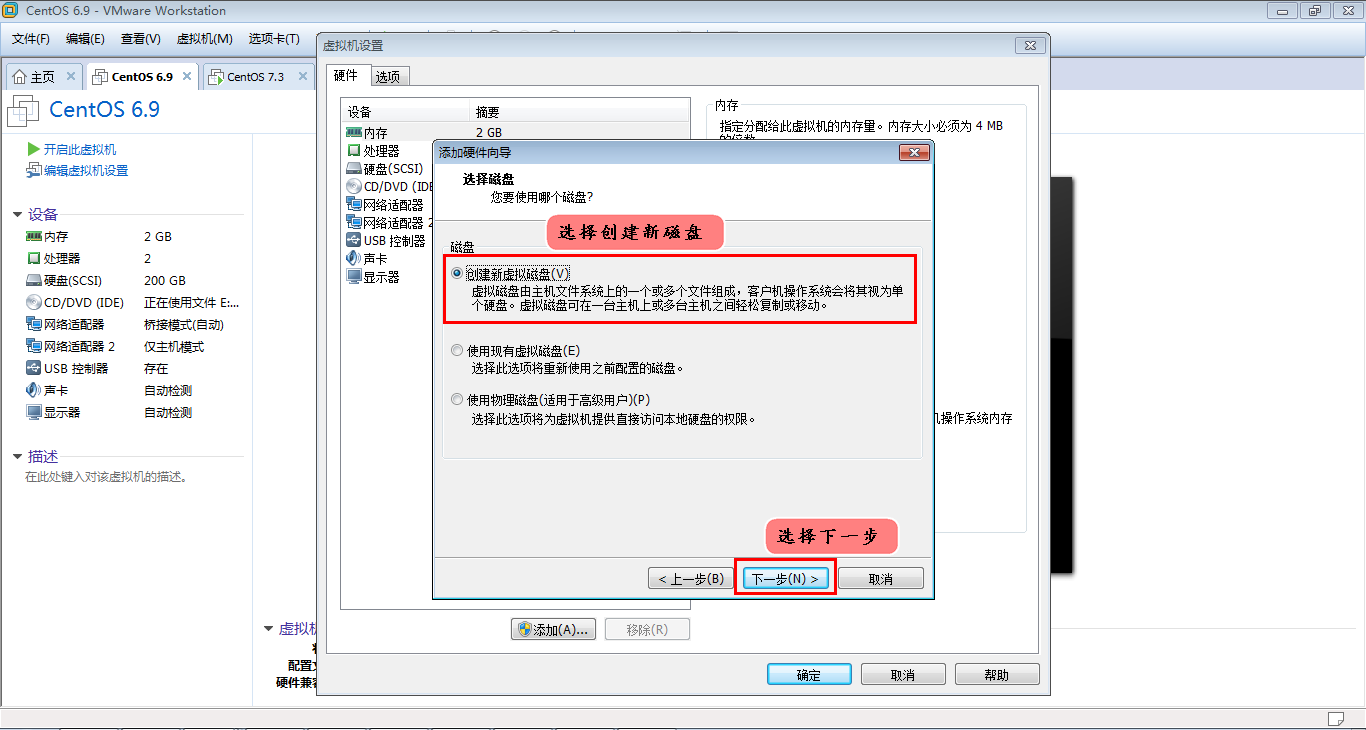
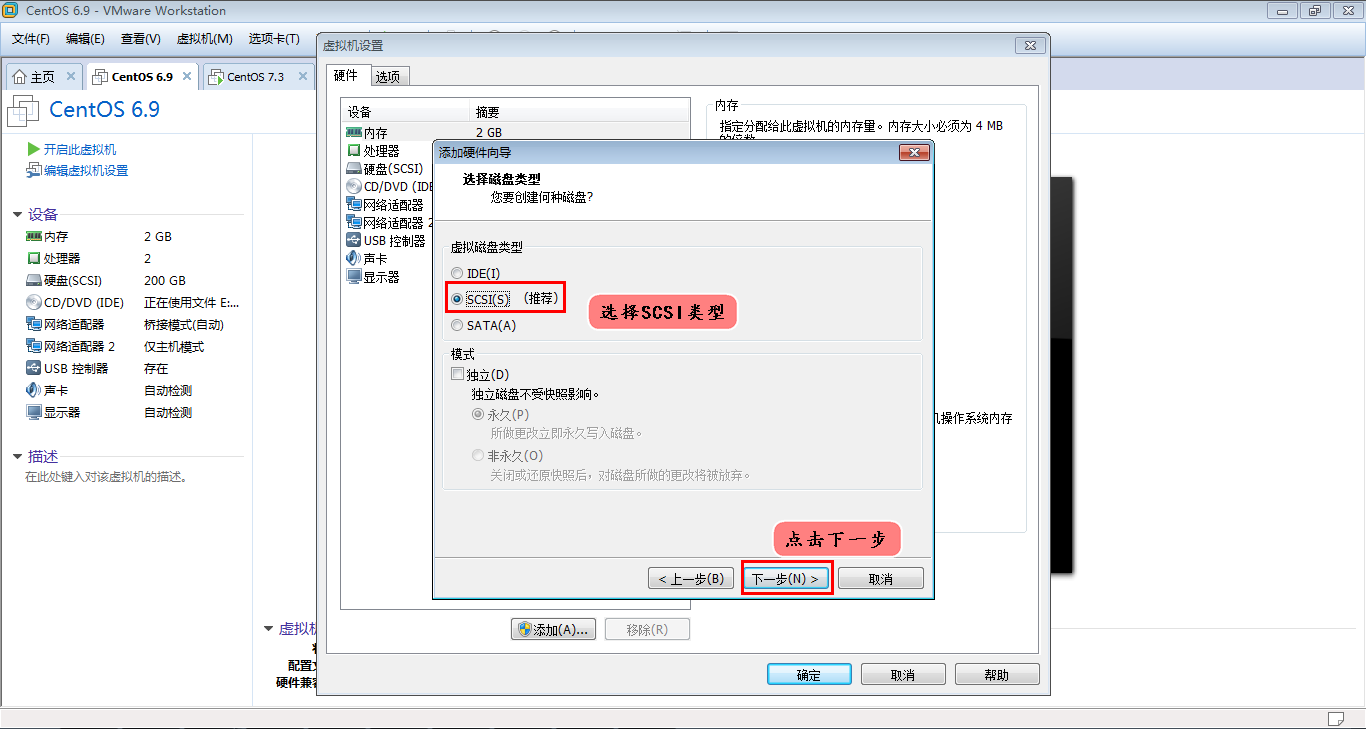
1、目标磁盘分区
首先,我们在宿主机上添加一块大小为20G的硬盘:
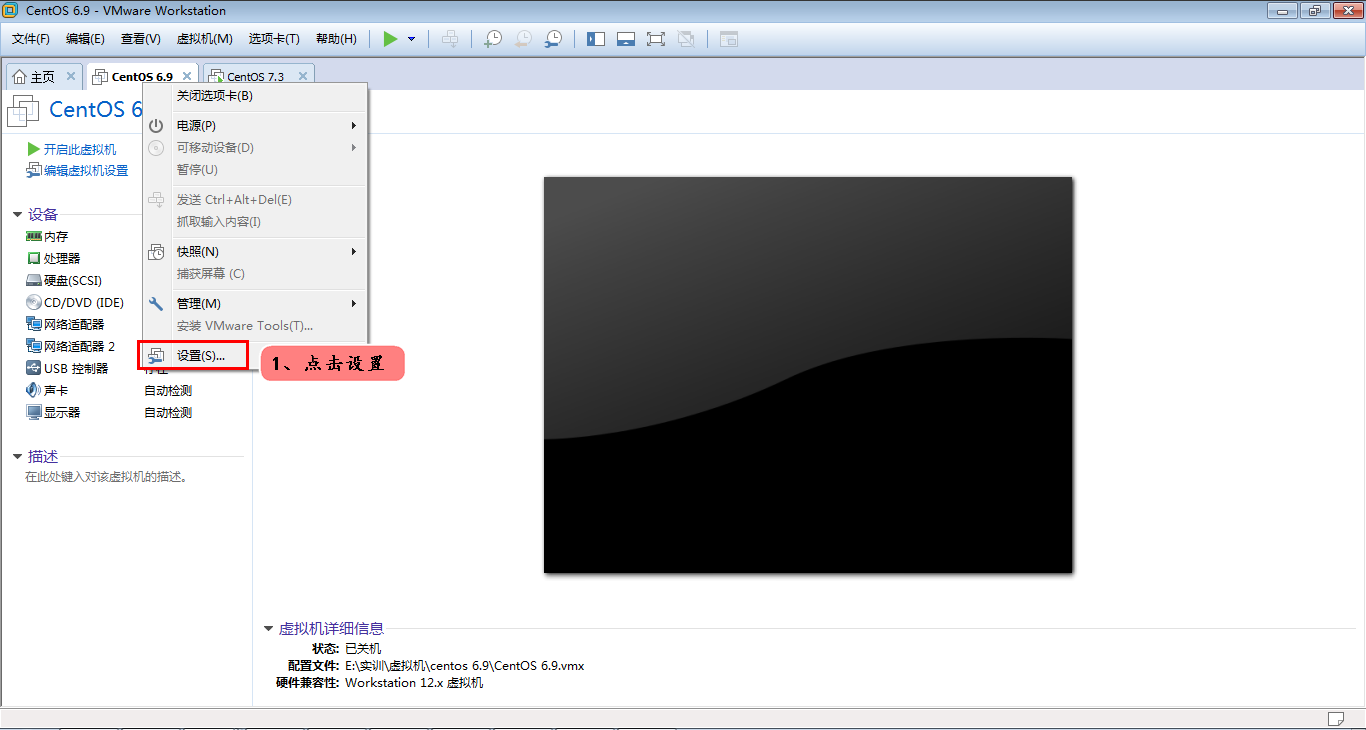

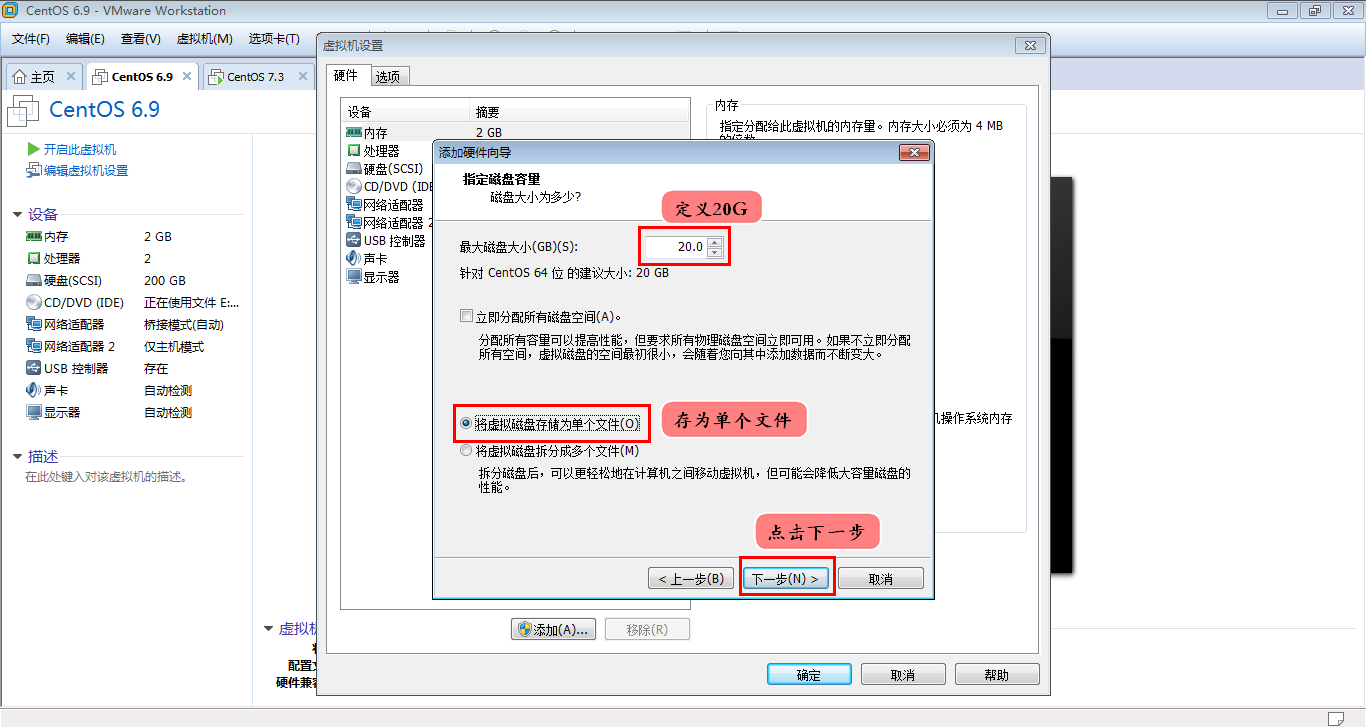

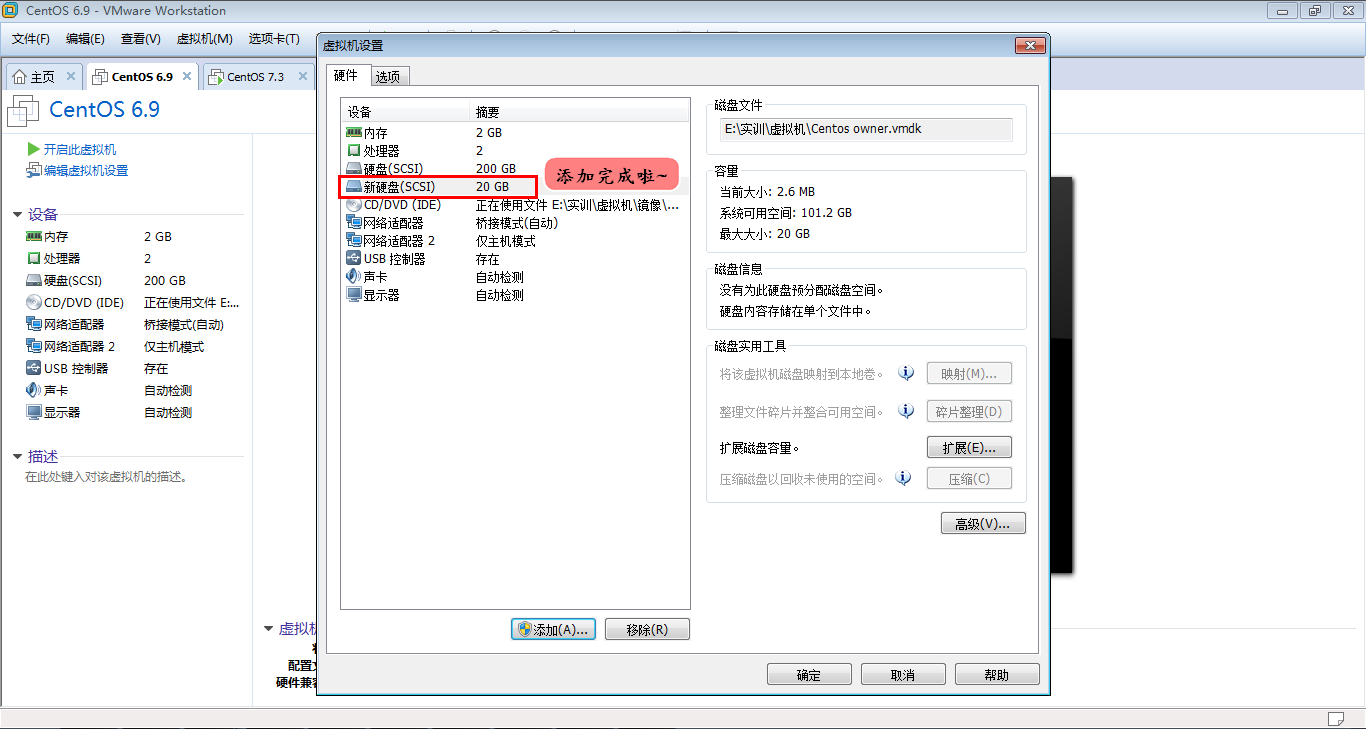
添加完成后,点击确定,然后我们打开宿主机。 通过fdisk来给我们的/dev/sdb进行分区:
 1 [root@localhost ~]# fdisk /dev/sdb
 2 Device contains neither a valid DOS partition table, nor Sun, SGI or OSF disklabel
 3 Building a new DOS disklabel with disk identifier 0x4fde4cd0.
 4 Changes will remain in memory only, until you decide to write them.
 5 After that, of course, the previous content won't be recoverable.
 6
 7
 8 Warning: invalid flag 0x0000 of partition table 4 will be corrected by w(rite)
 9
10
11 WARNING: DOS-compatible mode is deprecated. It's strongly recommended to
12 switch off the mode (command 'c') and change display units to
13 sectors (command 'u').
14
15
16 Command (m for help): n
17 Command action
18 e extended
19 p primary partition (1-4)
20 p
21 Partition number (1-4): 1
22 First cylinder (1-2610, default 1):
23 Using default value 1
24 Last cylinder, +cylinders or +size{K,M,G} (1-2610, default 2610): +100M
25
26
27 Command (m for help): n
28 Command action
29 e extended
30 p primary partition (1-4)
31 p
32 Partition number (1-4): 2
33 First cylinder (15-2610, default 15):
34 Using default value 15
35 Last cylinder, +cylinders or +size{K,M,G} (15-2610, default 2610):
36 Using default value 2610
37 #查看分区
38 Command (m for help): p
39
40
41 Disk /dev/sdb: 21.5 GB, 21474836480 bytes
42 255 heads, 63 sectors/track, 2610 cylinders
43 Units = cylinders of 16065 * 512 = 8225280 bytes
44 Sector size (logical/physical): 512 bytes / 512 bytes
45 I/O size (minimum/optimal): 512 bytes / 512 bytes
46 Disk identifier: 0x4fde4cd0
47
48
49 Device Boot Start End Blocks Id System
50 /dev/sdb1 1 14 112423+ 83 Linux
51 /dev/sdb2 15 2610 20852370 83 Linux
52 #保存并退出
53 Command (m for help): w
54 The partition table has been altered!
接下来,我们对/dev/sdb的分区进行格式化:
1 [root@localhost ~]# mkfs.ext4 /dev/sdb1
2 [root@localhost ~]# mkfs.ext4 /dev/sdb2
格式化完成后,我们创建一个文件夹。进行挂载:
1 [root@localhost ~]# mkdir -p /mnt/boot
2 [root@localhost ~]# mount /dev/sdb1 /mnt/boot/
注意:新建的文件夹必须是/mnt/boot
2、安装grub至目标磁盘
我们直接用grub-install --root-directory=/mnt命令来安装。用这个命令会安装grub引导第二阶段的文件。
 1 [root@localhost ~]# grub-install --root-directory=/mnt /dev/sdb
 2 Probing devices to guess BIOS drives. This may take a long time.
 3 Installation finished. No error reported.
 4 This is the contents of the device map /mnt/boot/grub/device.map.
 5 Check if this is correct or not. If any of the lines is incorrect,
 6 fix it and re-run the script `grub-install'.
 7
 8
 9 (fd0)    /dev/fd0
10 (hd0)    /dev/sda
11 (hd1)    /dev/sdb
12 [root@localhost ~]# cd /mnt/boot
13 [root@localhost boot]# ls
14 grub lost+found
15 [root@localhost boot]# cd grub/
16 [root@localhost grub]# ls
17 device.map fat_stage1_5 iso9660_stage1_5 minix_stage1_5 stage1 ufs2_stage1_5
18 xfs_stage1_5 e2fs_stage1_5 ffs_stage1_5 jfs_stage1_5 reiserfs_stage1_5 stage2 vstafs_stage1_5
我们可以来看一下二进制确认我们是否安装成功:
 1 [root@localhost ~]# hexdump -C -n 512 /dev/sdb
 2 00000000 eb 48 90 00 00 00 00 00 00 00 00 00 00 00 00 00 |.H..............|
 3 00000010 00 00 00 00 00 00 00 00 00 00 00 00 00 00 00 00 |................|
 4 *
 5 00000030 00 00 00 00 00 00 00 00 00 00 00 00 00 00 03 02 |................|
 6 00000040 ff 00 00 20 01 00 00 00 00 02 fa 90 90 f6 c2 80 |... ............|
 7 00000050 75 02 b2 80 ea 59 7c 00 00 31 c0 8e d8 8e d0 bc |u....Y|..1......|
 8 00000060 00 20 fb a0 40 7c 3c ff 74 02 88 c2 52 f6 c2 80 |. ..@|<.t...R...|
 9 00000070 74 54 b4 41 bb aa 55 cd 13 5a 52 72 49 81 fb 55 |tT.A..U..ZRrI..U|
10 00000080 aa 75 43 a0 41 7c 84 c0 75 05 83 e1 01 74 37 66 |.uC.A|..u....t7f|
11 00000090 8b 4c 10 be 05 7c c6 44 ff 01 66 8b 1e 44 7c c7 |.L...|.D..f..D|.|
12 000000a0 04 10 00 c7 44 02 01 00 66 89 5c 08 c7 44 06 00 |....D...f...D..|
13 000000b0 70 66 31 c0 89 44 04 66 89 44 0c b4 42 cd 13 72 |pf1..D.f.D..B..r|
14 000000c0 05 bb 00 70 eb 7d b4 08 cd 13 73 0a f6 c2 80 0f |...p.}....s.....|
15 000000d0 84 f0 00 e9 8d 00 be 05 7c c6 44 ff 00 66 31 c0 |........|.D..f1.|
16 000000e0 88 f0 40 66 89 44 04 31 d2 88 ca c1 e2 02 88 e8 |..@f.D.1........|
17 000000f0 88 f4 40 89 44 08 31 c0 88 d0 c0 e8 02 66 89 04 |..@.D.1......f..|
18 00000100 66 a1 44 7c 66 31 d2 66 f7 34 88 54 0a 66 31 d2 |f.D|f1.f.4.T.f1.|
19 00000110 66 f7 74 04 88 54 0b 89 44 0c 3b 44 08 7d 3c 8a |f.t..T..D.;D.}<.|
20 00000120 54 0d c0 e2 06 8a 4c 0a fe c1 08 d1 8a 6c 0c 5a |T.....L......l.Z|
21 00000130 8a 74 0b bb 00 70 8e c3 31 db b8 01 02 cd 13 72 |.t...p..1......r|
22 00000140 2a 8c c3 8e 06 48 7c 60 1e b9 00 01 8e db 31 f6 |*....H|`......1.|
23 00000150 31 ff fc f3 a5 1f 61 ff 26 42 7c be 7f 7d e8 40 |1.....a.&B|..}.@|
24 00000160 00 eb 0e be 84 7d e8 38 00 eb 06 be 8e 7d e8 30 |.....}.8.....}.0|
25 00000170 00 be 93 7d e8 2a 00 eb fe 47 52 55 42 20 00 47 |...}.*...GRUB .G|
26 00000180 65 6f 6d 00 48 61 72 64 20 44 69 73 6b 00 52 65 |eom.Hard Disk.Re|
27 00000190 61 64 00 20 45 72 72 6f 72 00 bb 01 00 b4 0e cd |ad. Error.......|
28 000001a0 10 ac 3c 00 75 f4 c3 00 00 00 00 00 00 00 00 00 |..<.u...........|
29 000001b0 00 00 00 00 00 00 00 00 d0 4c de 4f 00 00 00 01 |.........L.O....|
30 000001c0 01 00 83 fe 3f 0d 3f 00 00 00 4f 6e 03 00 00 00 |....?.?...On....|
31 000001d0 01 0e 83 fe ff ff 8e 6e 03 00 24 5d 7c 02 00 00 |.......n..$]|...|
32 000001e0 00 00 00 00 00 00 00 00 00 00 00 00 00 00 00 00 |................|
33 000001f0 00 00 00 00 00 00 00 00 00 00 00 00 00 00 55 aa |..............U.|
34 00000200
安装成功。
3、复制内核文件和initrd文件
将内核文件和initrd文件复制到/dev/sdb下的boot目录中:
1 [root@localhost ~]# cp /boot/vmlinuz-2.6.32-696.el6.x86_64 /mnt/boot/
2 [root@localhost ~]# cp /boot/initramfs-2.6.32-696.el6.x86_64.img /mnt/boot/
4、建立grub.conf文件
上面我们已经移植了内核和initrd文件,我们可以根据其版本来编写grub.conf文件:
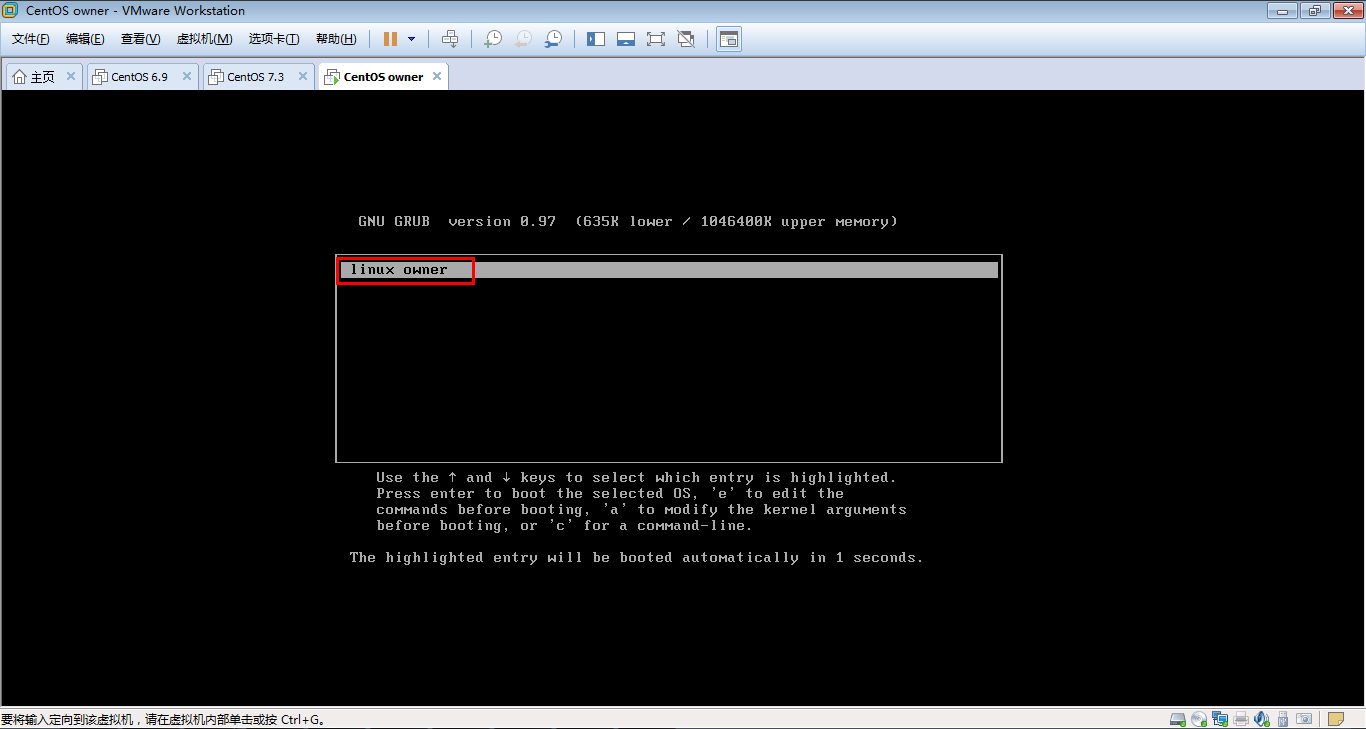
1 [root@localhost ~]# vim /mnt/boot/grub/grub.conf
2 default=0
3 timeout=3
4 title linux owner
5 kernel /vmlinuz-2.6.32-696.el6.x86_64 root=UUID=1feac471-08c5-4b5b-aaff-bb6a1da60e26 selinux=0 init=/bin/bash
6 initrd /initramfs-2.6.32-696.el6.x86_64.img
注意,我们要把selinux给关掉,同时设定一下init,告诉内核不要再去找这个程序了,不然开机的时候会出现错误的~
5、创建一级目录并复制文件
至此,我们就缺目录和文件了~
创建开机后的一级目录,同时把/dev/sdb2挂载至/mnt/sysroot,使该目录作为根目录:
 1 [root@localhost ~]# mkdir /mnt/sysroot
 2 [root@localhost ~]# mkdir -pv /mnt/sysroot/{etc,tmp,var,usr,sys,proc,opt,home,root,dev,mnt,media}
 3 mkdir: created directory `/mnt/sysroot/etc'
 4 mkdir: created directory `/mnt/sysroot/tmp'
 5 mkdir: created directory `/mnt/sysroot/var'
 6 mkdir: created directory `/mnt/sysroot/usr'
 7 mkdir: created directory `/mnt/sysroot/sys'
 8 mkdir: created directory `/mnt/sysroot/proc'
 9 mkdir: created directory `/mnt/sysroot/opt'
10 mkdir: created directory `/mnt/sysroot/home'
11 mkdir: created directory `/mnt/sysroot/root'
12 mkdir: created directory `/mnt/sysroot/dev'
13 mkdir: created directory `/mnt/sysroot/mnt'
14 mkdir: created directory `/mnt/sysroot/media'
复制文件,复制文件我们通过脚本执行,复制我们平时常用的命令即可,小编这里复制了ls,ifconfig,bash,reboot,rm,modprobe,mount,ip,mkdir,touch,cat,vi,less,shutdown,insmod。我们可以用tree查看一下这些命令的复制情况:
 1 [root@localhost sysroot]# tree /mnt/sysroot/
 2 /mnt/sysroot/
 3 ├── bin
 4 │   ├── bash
 5 │   ├── cat
 6 │   ├── ls
 7 │   ├── mkdir
 8 │   ├── mount
 9 │   ├── rm
10 │   └── touch
11 ├── dev
12 ├── etc
13 ├── home
14 ├── lib64
15 │   ├── ld-linux-x86-64.so.2
16 │   ├── libacl.so.1
17 │   ├── libattr.so.1
18 │   ├── libaudit.so.1
19 │   ├── libblkid.so.1
20 │   ├── libcap.so.2
21 │   ├── libcrypt.so.1
22 │   ├── libc.so.6
23 │   ├── libdbus-1.so.3
24 │   ├── libdl.so.2
25 │   ├── libfreebl3.so
26 │   ├── libgcc_s.so.1
27 │   ├── libm.so.6
28 │   ├── libnih-dbus.so.1
29 │   ├── libnih.so.1
30 │   ├── libnsl.so.1
31 │   ├── libpcre.so.0
32 │   ├── libpthread.so.0
33 │   ├── libresolv.so.2
34 │   ├── librt.so.1
35 │   ├── libselinux.so.1
36 │   ├── libsepol.so.1
37 │   ├── libtinfo.so.5
38 │   ├── libutil.so.1
39 │   └── libuuid.so.1
40 ├── lost+found
41 ├── media
42 ├── mnt
43 ├── opt
44 ├── proc
45 ├── root
46 ├── sbin
47 │   ├── ifconfig
48 │   ├── insmod
49 │   ├── ip
50 │   ├── modprobe
51 │   ├── reboot
52 │   └── shutdown
53 ├── sys
54 ├── tmp
55 ├── usr
56 │   ├── bin
57 │   │   ├── less
58 │   │   └── vim
59 │   └── lib64
60 │   ├── libgpm.so.2
61 │   └── perl5
62 │   └── CORE
63 │   └── libperl.so
64 └── var
65
66 20 directories, 42 files
很明显我们都复制成功了~
附:复制命令的脚本源代码
 1 #!/bin/base
 2 #----------------------------------
 3 #Filename:copycmd.sh
 4 #Revision:1.0
 5 #Date:2017-09-14
 6 #Author:Keer
 7 #Email:893348728@qq.com
 8 #Website:http://www.cnblogs.com/keerya/
 9 #Description:复制命令到指定目录
10 #----------------------------------
11
12 #定义变量
13 destdir=/mnt/sysroot
14 SETCOLOR_FAILURE="echo -en \033[1;35;5m"
15 SETCOLOR_NORMAL="echo -en \033[0m"
16
17 echo_jiantou() {
18 echo -en \033[40G
19 $SETCOLOR_FAILURE
20 }
21
22 echo_copy() {
23 echo -en \033[80G
24 $SETCOLOR_FAILURE
25 echo -n $"复制完成!"
26 $SETCOLOR_NORMAL
27 }
28
29 #定义函数
30 #复制命令
31 copy_cmd(){
32 #       定义变量
33         local cmd_path=`which --skip-alias $cmd`
34         local cmd_dir=`dirname $cmd_path`
35         local cmd_destdir=$destdir$cmd_dir
36         if [ ! -d $cmd_destdir ] ;then
37                 mkdir -pv $cmd_destdir &> /dev/null
38         fi
39         cp $cmd_path $cmd_destdir &> /dev/null
40         echo -e "	$cmd_path `echo_jiantou` 	 $cmd_destdir `echo_copy` "
41 }
42 #复制库文件 判断库文件是否存在,若存在,跳过该次循环;如不存在,判断库文件所在目录是否存在,若存在,复制库文件;若不存在,则新建目录并复制库文件43 copy_libfile(){
44         local cmd_path=`which --skip-alias $cmd`
45         local lib_list=`ldd $cmd_path |egrep -o "/.* " `
46         for i in  $lib_list ;do
47                 local lib_dir=$destdir$i
48                 local lib_destdir=$destdir`dirname $i`
49                 echo -e "	$i `echo_jiantou` 	 $lib_destdir `echo_copy` "
50                 if [ -e $lib_dir ];then
51                         continue
52                 elif [ -d $lib_destdir ];then
53                         cp  $i $lib_destdir
54                 else
55                         mkdir -pv $lib_destdir &> /dev/null
56                         cp  $i $lib_destdir
57                 fi
58         done
59 }
60 #若/mnt/sysroot不存在,则创建
61 if [ ! d $destdir ];then
62         mkdir $destdir
63 fi
64
65 #死循环,清空屏幕
66 while true ; do
67         tput clear
68 #正式:
69 cat <<-EOF
70 **********************************************************************
71 ***                      命令复制脚本                                ***
72 ***                     请输入一个命令                               ***
73 ***                   按q或quit退出脚本                              ***
74 **********************************************************************
75 EOF
76
77         read -p "Please input a execute command:" cmd
78         if [ "$cmd" == 'q' -o "$cmd" == 'quit' ];then
79                 unset cmd destdir
80                 break
81         fi
82 #       判断输入的命令是否存在
83         if [ -n "$cmd" ];then
84                 which --skip-alias "$cmd" &> /dev/null
85                 if [ $? -eq 0 ];then
86                         copy_cmd $cmd
87                         copy_libfile $cmd
88                 else
89                         echo "$cmd is not exist"
90                 fi
91         else
92                 echo "Please enter at leastone command"
93         fi
94         echo -e "Please enter \033[31;1menter\033[0m and we continue"
95         read input
96
97 done
6、复制网卡驱动
我们基本工作已经完成了,如果想使这个虚拟机带有网卡功能,我们就必须把网卡驱动拷过来,具体操作如下:
1)查询网卡详细信息:
 1 [root@localhost sysroot]# modinfo e1000
 2 filename: /lib/modules/2.6.32-696.el6.x86_64/kernel/drivers/net/e1000/e1000.ko
 3 version: 7.3.21-k8-NAPI
 4 license: GPL
 5 description: Intel(R) PRO/1000 Network Driver
 6 author: Intel Corporation, <linux.nics@intel.com>
 7 srcversion: A911791C4EFC2A93BCFCF6A
 8 alias: pci:v00008086d00002E6Esv*sd*bc*sc*i*
 9 alias: pci:v00008086d000010B5sv*sd*bc*sc*i*
10 alias: pci:v00008086d00001099sv*sd*bc*sc*i*
11 alias: pci:v00008086d0000108Asv*sd*bc*sc*i*
12 alias: pci:v00008086d0000107Csv*sd*bc*sc*i*
13 alias: pci:v00008086d0000107Bsv*sd*bc*sc*i*
14 ……
2)把网卡模块的路径复制到/mnt/sysroot的库文件下:
1 [root@localhost sysroot]# cp /lib/modules/2.6.32-696.el6.x86_64/kernel/drivers/net/e1000/e1000.ko /mnt/sysroot/lib64/
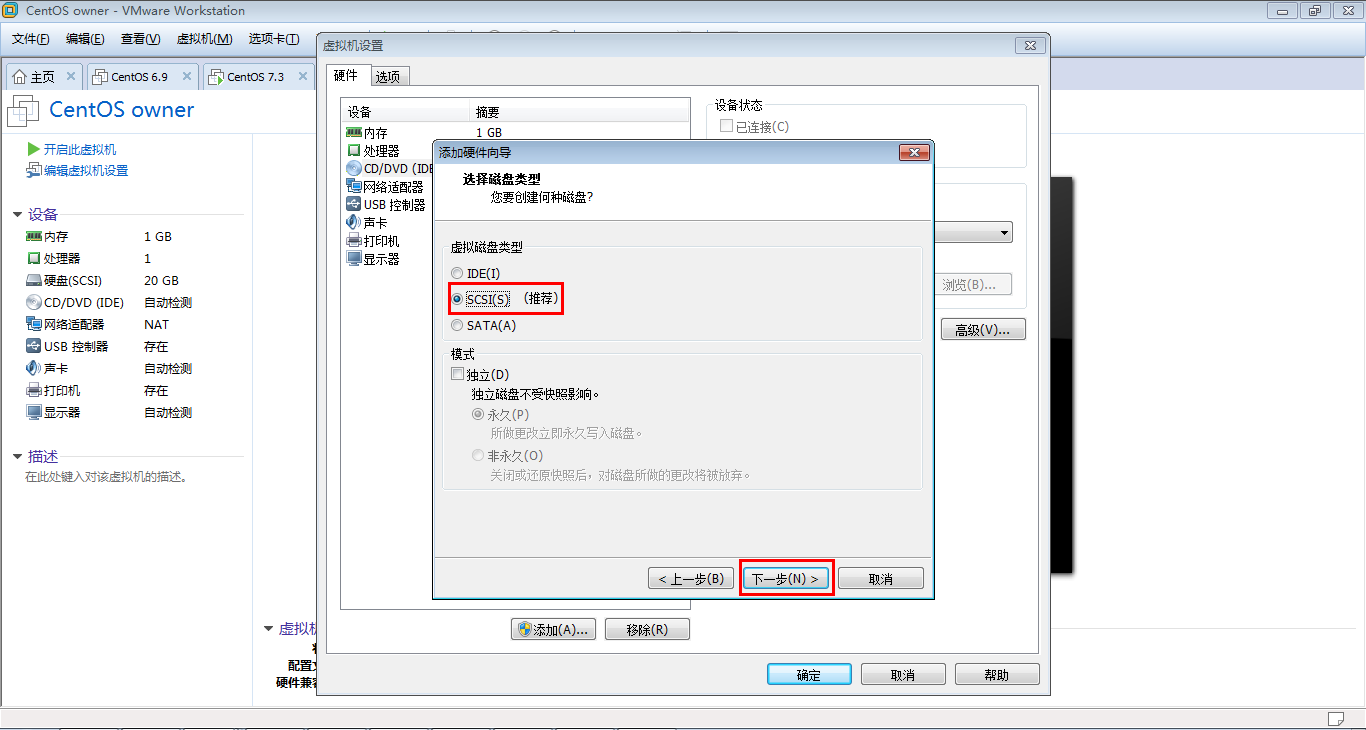
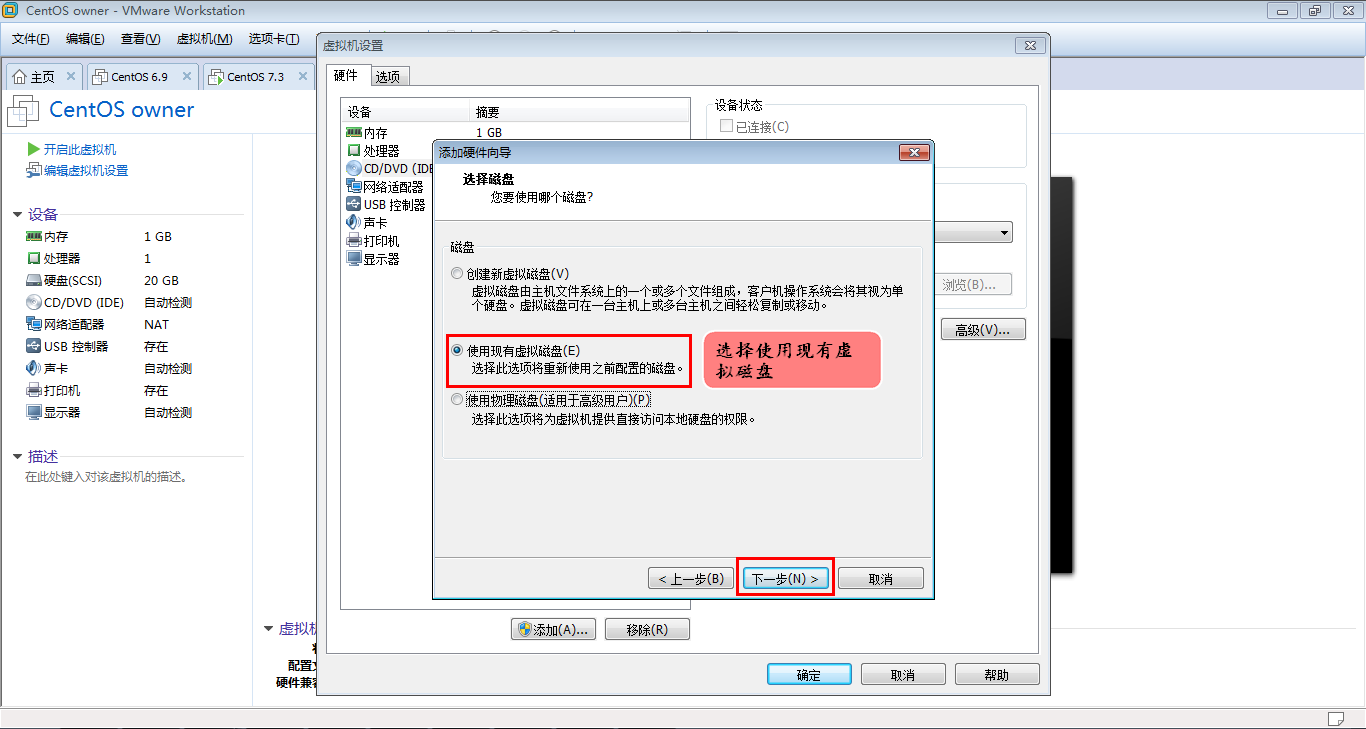
以上,我们的操作全部完成。现在我们就可以关机,然后把/dev/sdb这个硬盘拆下来,放到新的虚拟机上运行了~
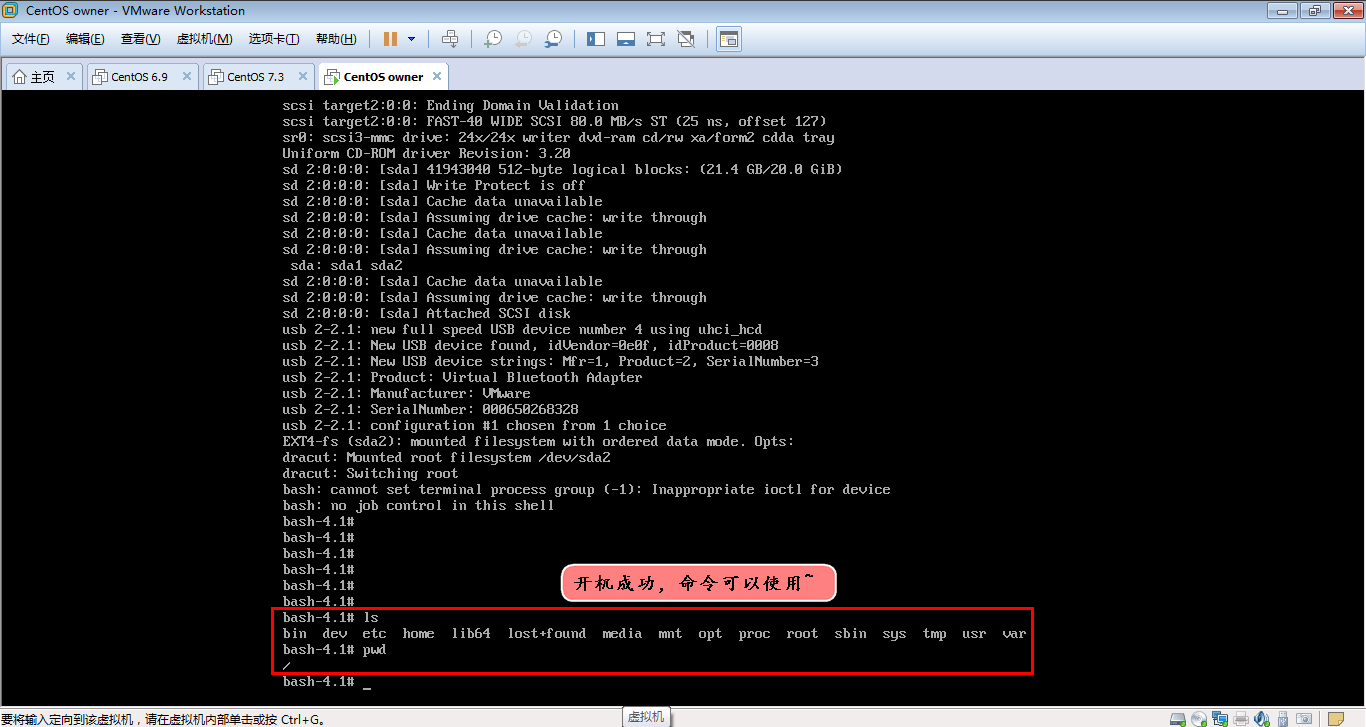
五、测试开机
我们创建一个新的虚拟机,启动的时候会带一个硬盘,我们不用它的,删掉再把我们自己定义的硬盘加进去:
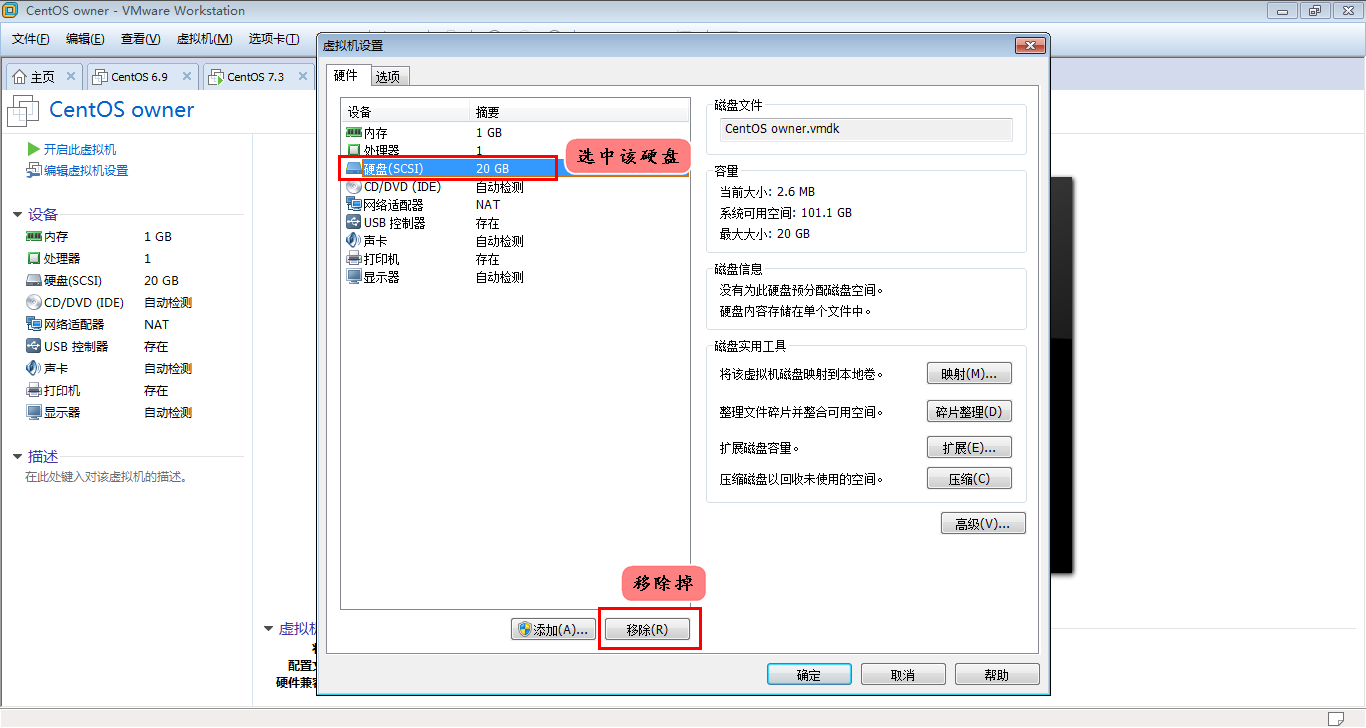
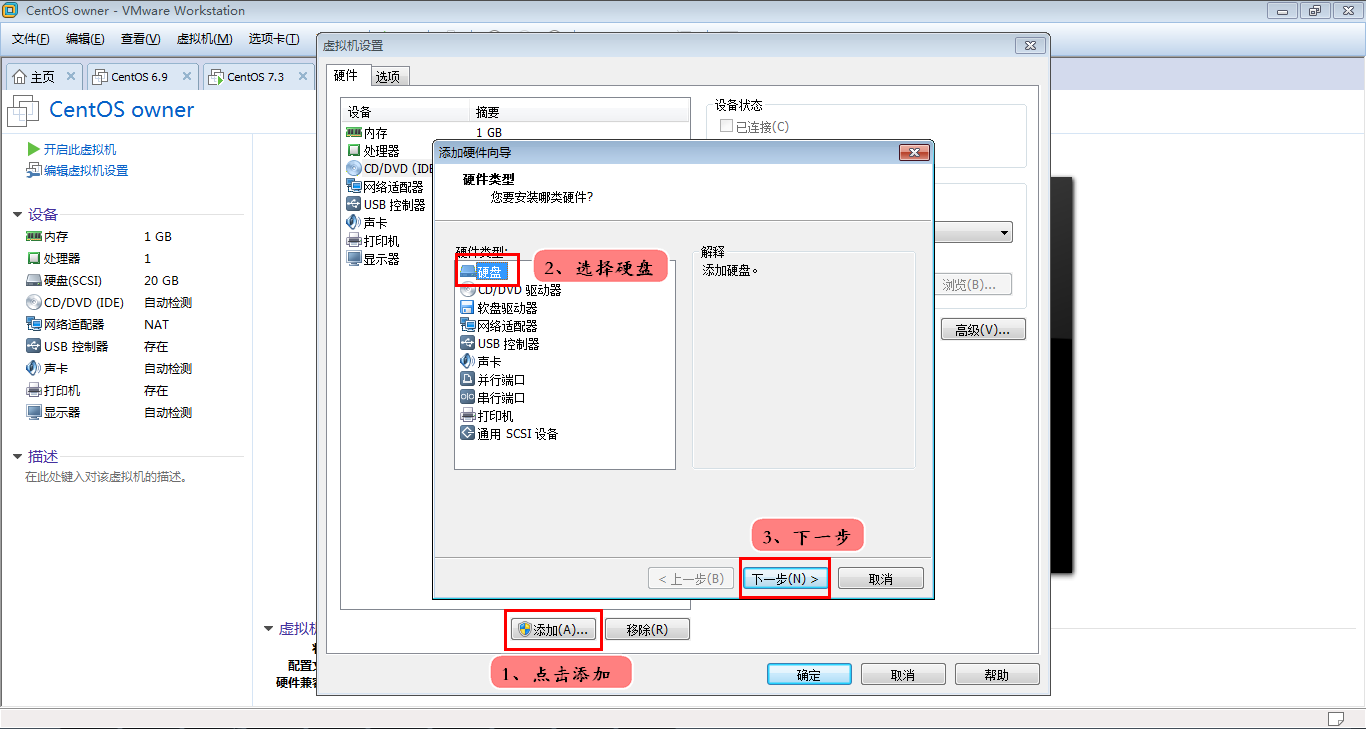
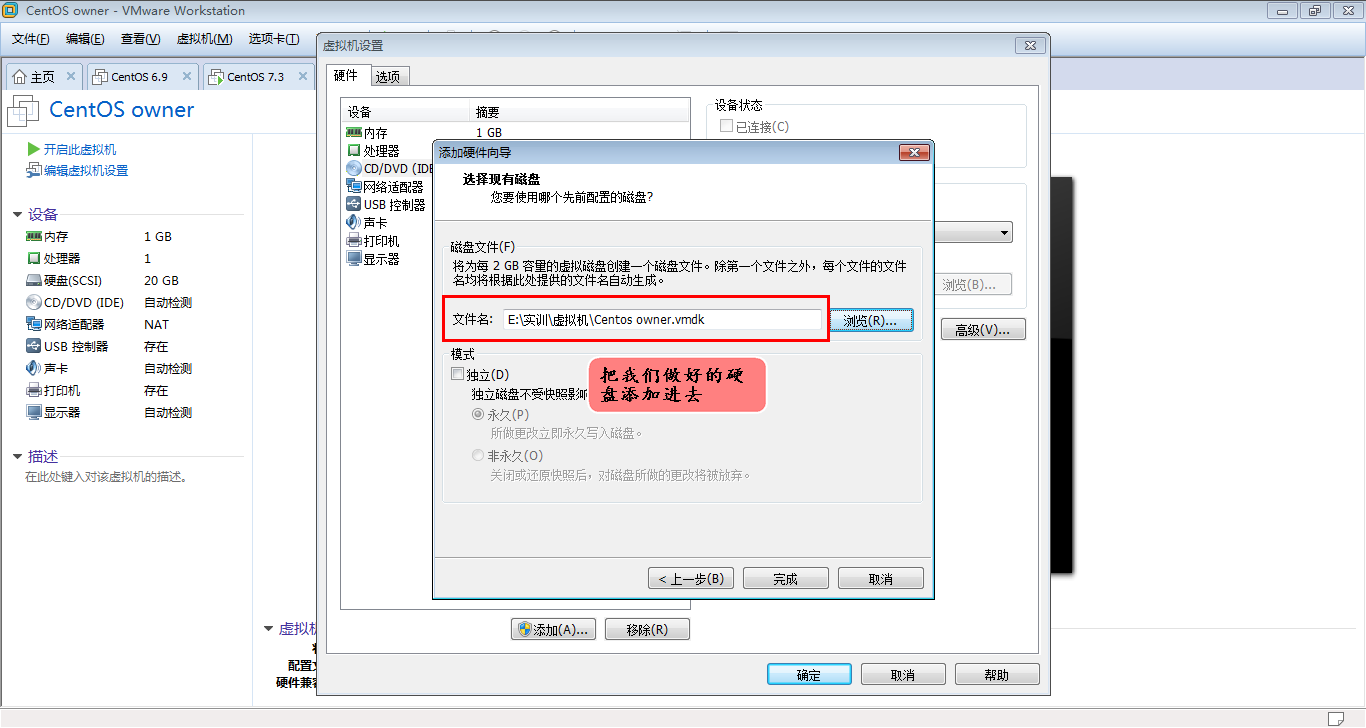

此时,我们做好的硬盘已经加进去了。我们可以试试能不能启动了,如果虚拟机可以正常开启,就说明我们的实验成功~
六、实现网络功能
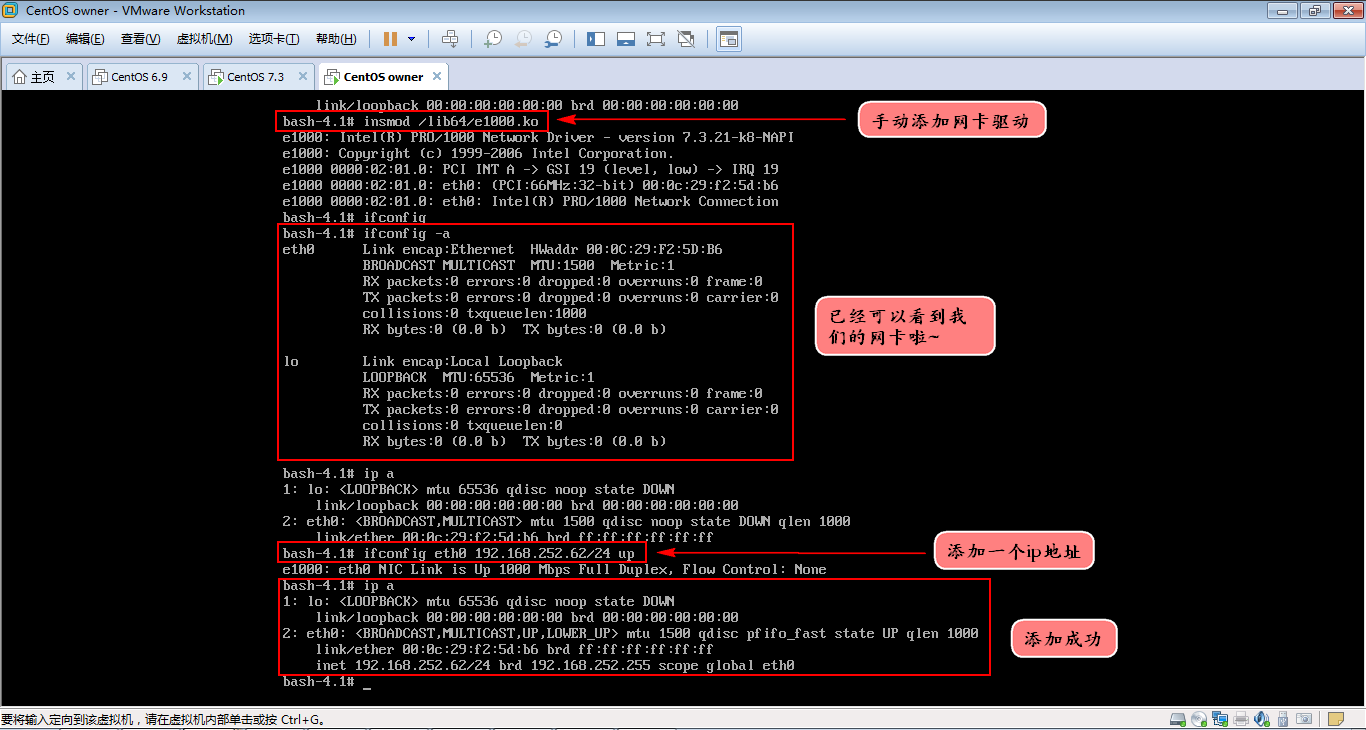
由于图片可能会看不清楚,现把代码标出如下:
 1 #手动添加网卡驱动
 2 insmod /lib64/e1000.ko
 3
 4 #查看ip
 5 ip a
 6
 7 #添加IP地址
 8 ifconfig eth0 192.168.252.62/24 up
 9
10 #查看ip
11 ip a
由于复制命令的时候忘记复制ping了……所以我们用另一台机器来ping一下这个ip地址:

可以ping通~
至此,我们已经完成了私人订制Linux的全部操作,同时我们的自制Linux也可以联网啦~
所有实验圆满成功!撒花✿✿ヽ(°▽°)ノ✿