
官网API:http://arduino-esp8266.readthedocs.io/en/latest/esp8266wifi/readme.html
STA (客户端)手机连接路由器

S1 *简单的连接WIFI
自己当手机,连接wifi
#include <ESP8266WiFi.h>

void setup()
{
  Serial.begin(115200);
  Serial.println();

  WiFi.begin("network-name", "pass-to-network");

  Serial.print("Connecting");
  while (WiFi.status() != WL_CONNECTED)
  {
    delay(500);
    Serial.print(".");
  }
  Serial.println();

  Serial.print("Connected, IP address: ");
  Serial.println(WiFi.localIP());
}

void loop() {}
S2 *添加WIFI备用,自动连接
/*
 *  This sketch trys to Connect to the best AP based on a given list
 *
 */

#include <ESP8266WiFi.h>
#include <ESP8266WiFiMulti.h>

ESP8266WiFiMulti wifiMulti;

void setup() {
    Serial.begin(115200);
    Serial.setDebugOutput(true);
    Serial.println();
    delay(10);

    wifiMulti.addAP("dongdong", "dongdong");
    wifiMulti.addAP("ssid_from_AP_2", "your_password_for_AP_2");
    wifiMulti.addAP("ssid_from_AP_3", "your_password_for_AP_3");

    Serial.println("Connecting Wifi...");
    if(wifiMulti.run() == WL_CONNECTED) {
        Serial.println("");
        Serial.println("WiFi connected");
        Serial.println("IP address: ");
        Serial.println(WiFi.localIP());
    }
}

void loop() {
    if(wifiMulti.run() != WL_CONNECTED) {
        Serial.println("WiFi not connected!");
        delay(1000);
    }
}
S3 连接WIFI,主动设置静态地址
#include <ESP8266WiFi.h>
const char* ssid = "dongdong";
const char* password = "dongdong";
String name="DD_Station_01";
IPAddress staticIP(192,168,1,22);
IPAddress gateway(192,168,1,9);
IPAddress subnet(255,255,255,0);
void setup(void)
{
  Serial.begin(115200);
  Serial.println();
  Serial.printf("Connecting to %s
", ssid);
  WiFi.begin(ssid, password);
  WiFi.config(staticIP, gateway, subnet);
  // 修改主机名
  WiFi.hostname(name);
  Serial.printf("New hostname: %s
", WiFi.hostname().c_str());
  while (WiFi.status() != WL_CONNECTED)
  {
    delay(500);
    Serial.print(".");
  }
  Serial.println();
  Serial.print("Connected, IP address: ");
  Serial.println(WiFi.localIP());   // 分配的动态地址&自己设置的静态地址
  Serial.printf("SSID: %s
", WiFi.SSID().c_str());// 连接的WIFI名
}
void loop() {}
S4 http连接网络,访问网页
/*
 *  This sketch sends data via HTTP GET requests to data.sparkfun.com service.
 *
 *  You need to get streamId and privateKey at data.sparkfun.com and paste them
 *  below. Or just customize this script to talk to other HTTP servers.
 *
 */
#include <ESP8266WiFi.h>

const char* ssid     = "Doit";
const char* password = "doit3305";

const char* host = "data.sparkfun.com";
const char* streamId   = "ESPDUINO_STA";
const char* privateKey = "pzRb9dawqocbP9n0K0M9";

void setup() {
  Serial.begin(115200);
  delay(10);
  // We start by connecting to a WiFi network
  Serial.println();
  Serial.println();
  Serial.print("Connecting to ");
  Serial.println(ssid);
  WiFi.begin(ssid, password);
  while (WiFi.status() != WL_CONNECTED) {
  delay(500);
  Serial.print(".");
  }
  Serial.println("");
  Serial.println("WiFi connected");
  Serial.println("IP address: ");
  Serial.println(WiFi.localIP());
}

int value = 0;

void loop() {
  delay(5000);
  ++value;
  Serial.print("connecting to ");
  Serial.println(host);
  // Use WiFiClient class to create TCP connections
  WiFiClient client;
  const int httpPort = 80;
  if (!client.connect(host, httpPort)) {
    Serial.println("connection failed");
    return;
  }
  // We now create a URI for the request
  String url = "/input/";
  url += streamId;
  url += "?private_key=";
  url += privateKey;
  url += "&value=";
  url += value;
  Serial.print("Requesting URL: ");
  Serial.println(url);
  // This will send the request to the server
  client.print(String("GET ") + url + " HTTP/1.1
" +"Host: " + host + "
" + "Connection: close

");
  delay(10);
  // Read all the lines of the reply from server and print them to Serial

  while(client.available()){
    String line = client.readStringUntil('
');
    Serial.print(line);
  }

  Serial.println();
  Serial.println("closing connection");

}
AP(服务器) 自己当WIFI
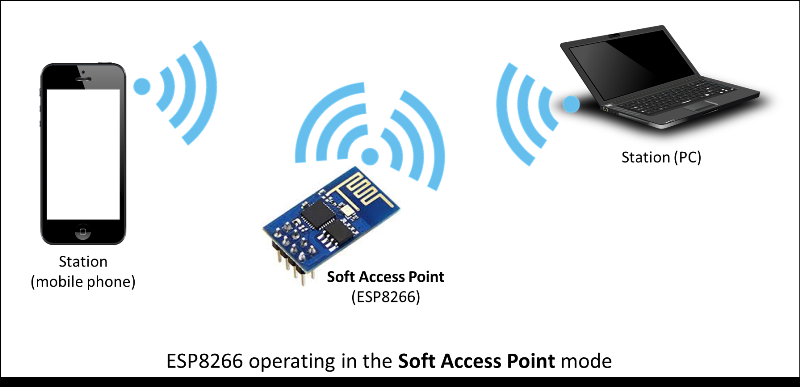
A1 自己当WIFI wifi名称+密码+ IP 不提供服务
#include <ESP8266WiFi.h>
const char *ssid = "Charlie Testing AP";
const char *password = "12345678";
void setup()
{
  Serial.begin(115200);
  Serial.println();
  Serial.print("Setting soft-AP ... ");

IPAddress softLocal(192,168,128,1);
IPAddress softGateway(192,168,128,1);
IPAddress softSubnet(255,255,255,0);
WiFi.softAPConfig(softLocal, softGateway, softSubnet);
    WiFi.softAP(ssid, password);

   IPAddress myIP = WiFi.softAPIP();
  Serial.print("AP IP address: ");
  Serial.println(myIP);

}
void loop()
{
  delay(3000);
}
A2 1主动设置自己的WIFI wifi名称+密码+ IP 2建立一个服务接收手机的请求和信息 3网页返回给手机
#include <ESP8266WiFi.h>

const char *ssid = "Charlie Testing AP";
const char *password = "12345678";
WiFiServer server(80);
void setup()
{
  Serial.begin(115200);
  Serial.println();

  Serial.print("Setting soft-AP ... ");

IPAddress softLocal(192,168,128,1);
IPAddress softGateway(192,168,128,1);
IPAddress softSubnet(255,255,255,0);

WiFi.softAPConfig(softLocal, softGateway, softSubnet);

    WiFi.softAP(ssid, password);

   IPAddress myIP = WiFi.softAPIP();
  Serial.print("AP IP address: ");
  Serial.println(myIP);
 server.begin();
 Serial.printf("Web server started, open %s in a web browser
", WiFi.localIP().toString().c_str());

}

void loop()
{
 WiFiClient client = server.available();
 if (client)
  {
    Serial.println("
[Client connected]");
    while (client.connected())
    {
      // read line by line what the client (web browser) is requesting
      if (client.available())
      {
        String line = client.readStringUntil('
');
        Serial.print(line);
        // wait for end of client's request, that is marked with an empty line
        if (line.length() == 1 && line[0] == '
')
        {
          client.println(prepareHtmlPage());


          break;
        }
      }
    }
    delay(1); // give the web browser time to receive the data

    // close the connection:
    client.stop();
    Serial.println("[Client disonnected]");
  }


}

// prepare a web page to be send to a client (web browser)
String prepareHtmlPage()
{
  String htmlPage =
     String("HTTP/1.1 200 OK
") +
            "Content-Type: text/html
" +
            "Connection: close
" +  // the connection will be closed after completion of the response
            "Refresh: 5
" +  // refresh the page automatically every 5 sec
            "
" +
            "<!DOCTYPE HTML>" +
            "<html>" +
            "Analog input:  " + String(analogRead(A0)) +
            "</html>" +
            "
";
  return htmlPage;
}
STA (客户端)+ AP(服务器)
#include <ESP8266WiFi.h>

#include <WiFiUdp.h>


/******************* STA 当手机 *****************************/
//设置STA网络参数
IPAddress sip(192, 168, 1, 29);//本地IP
IPAddress sip1(192, 168, 1, 1);//本地网关
IPAddress sip2(255, 255, 255, 0);//本地子网掩码

//设置STA
const char *ssid = "Netcore_wsn";
const char *password = "99325408322";
/**********************************************************/

/******************* AP 当wifi *****************************/
IPAddress xip(192, 168,2, 2);//下位远程IP
//设置AP网络参数
IPAddress lxip(192, 168,2, 1);//AP端IP
IPAddress lxip1(192, 168,2, 1);//AP端网关
IPAddress lxip2(255, 255,255, 0);//AP端子网掩码

//设置AP账号密码
const char *ssid1 = "Netcore_wsn1";//AP  wifi名
const char *password1 = "99325408322";//AP  wifi密码
/**********************************************************/

IPAddress Serverip(192, 168, 1, 4);//上位机远程IP
unsigned int localPort = 9999;//本地端口
unsigned int remoteport = 9999;//远程端口

WiFiUDP udp;
char packetBuffer[255];//收发缓冲区

void setup() {

Serial.begin(115200);//初始化串口波特率
delay(5000);//延时5S

WiFi.mode(WIFI_AP_STA);//设置模式为AP+STA

/******************* AP 当WIFI  *****************************/
WiFi.softAPConfig(lxip,lxip1,lxip2);//设置AP网络参数
WiFi.softAP(ssid1,password1,1);//设置AP账号密码
/******************************************************************/

Serial.print("apip:");
Serial.println(WiFi.softAPIP());// AP 自己当WIFI 自己设置的内网地址


/******************* STA 当手机连接WIFI *****************************/
WiFi.begin(ssid,password);//连接指定路由
WiFi.config(sip,sip1,sip2);//设置本地网络参数

Serial.print("Is connection routing, please wait");

while(WiFi.status()!=WL_CONNECTED)//等待路由连接
{
delay(500);
Serial.print(".");
}

/******************************************************************/

Serial.println(" ");
udp.begin(localPort);//监听指定端口
Serial.print("ip:");
Serial.println(WiFi.localIP());// STA 当手机连接WIFI 自己设置的静态地址


}

void loop()
{
if(udp.parsePacket())
{
udp.read(packetBuffer,255);//读取数据
udp.beginPacket(Serverip,remoteport);
udp.write(packetBuffer,255);
udp.endPacket();

Serial.println(packetBuffer);

udp.beginPacket(xip,remoteport);
udp.write(packetBuffer,255);
udp.endPacket();
memset(packetBuffer, 0, 255);//清除缓冲器数值

}
}