一种错误的观念:
子类继承父类,只把父类的公有成员继承下来,私有的不会继承。
事实上无论是如何继承,都会把父类的所有成员继承下来。


 1 #include<iostream>
 2 using namespace std;
 3
 4 class Base {
 5 private:
 6     int x;
 7 };
 8
 9 class D :private Base{
10 public:
11     int y;
12 };
13
14 int main()
15 {
16     cout << sizeof(Base) << endl;
17     cout << sizeof(D) << endl;
18     return 0;
19 }
输出结果:4 8
继承关系要看2点,见下图
对于继承关键字,我门只需要写一次,但是用的时候却要看2次。见上图2个小人,一个看子类内部通过继承关键字如何看代父类。一个是子类对象通过继承关键字如何看代父类。
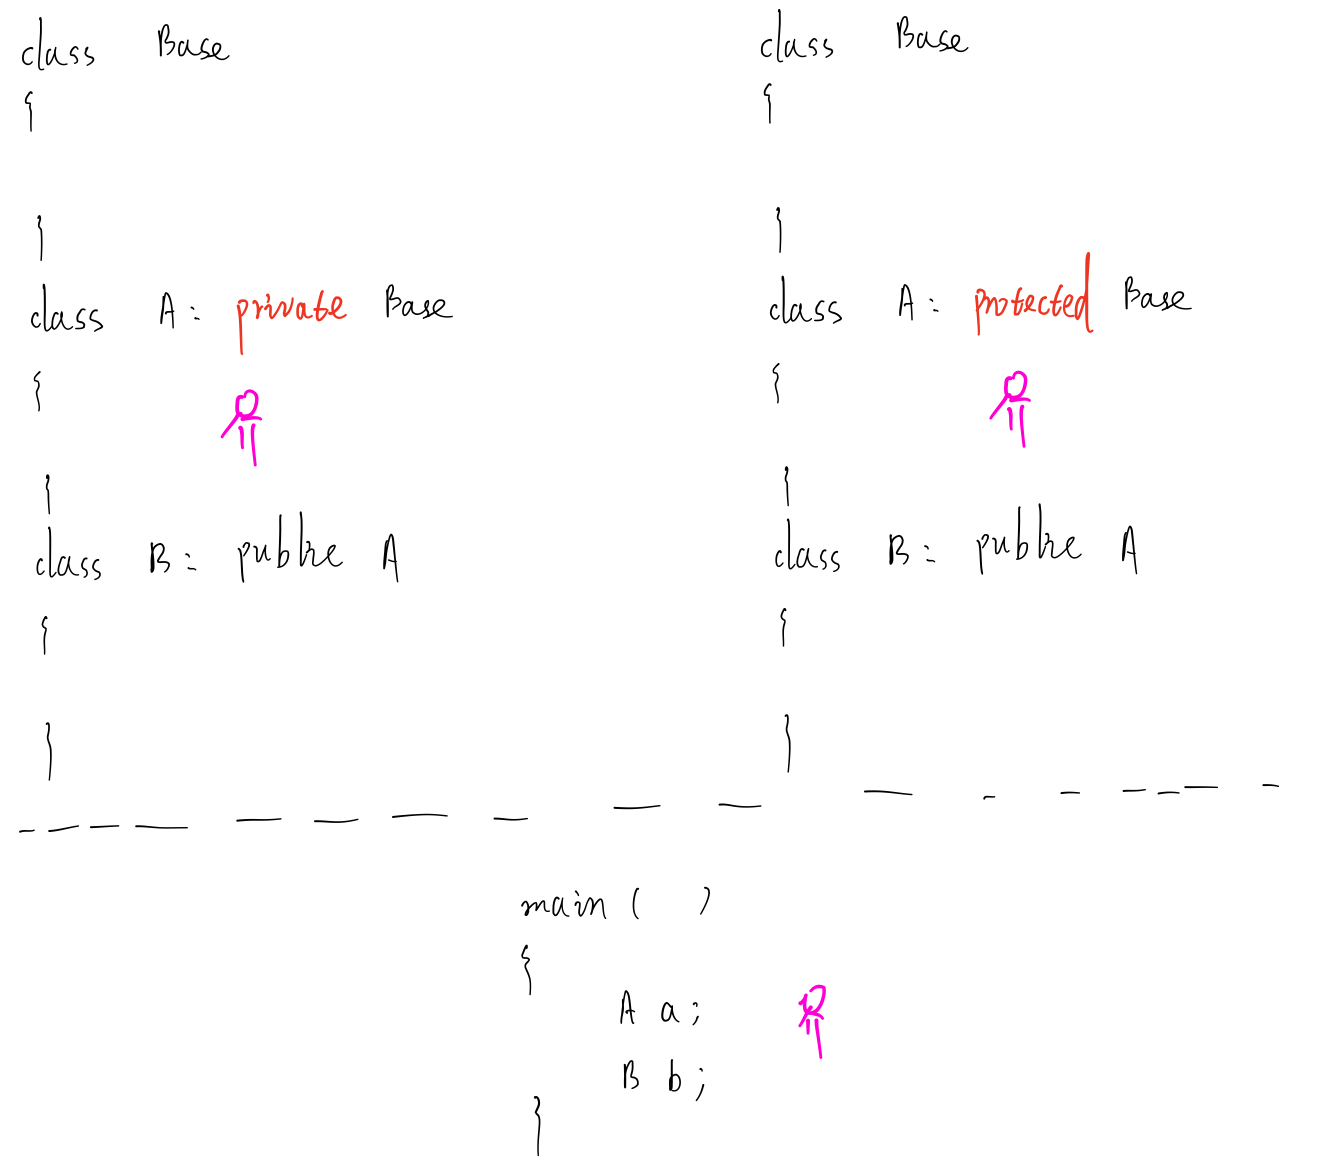
不管使用何种继承方式,父类私有数据成员,子类内部都是不能直接访问的。可以通过父类的共有方法间接访问父类私有数据。这里有一点需要注意,假如是private继承父类,父类里面protected数据或方法、public数据或方法、private方法都是可以直接访问的。 这时候如果站在子类内部那个小人的角度看问题,private和protected表现行为差不多。那protected和private区别在哪?
区别在孙子类那里,如果是private继承,Base父类在儿子A那里都是私有的,到了孙子B那里父类无论是数据还是方法都访问不了了。相当于private关键字割断了继承关系,整个继承家族到儿子辈就绝后了。如果是protected就可以保障继承关系不断。
private指定的属性 或 方法,将不能被继承。
protected指定的属性 或 方法,将在类外部不可见,但可以被继承。
派生类的构造函数与析构函数调用顺序

注:图片中 同名覆盖改为同名隐藏
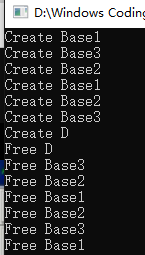
#include<iostream>
using namespace std;

class Base1
{
public:
    Base1()
    {
        cout << "Create Base1" << endl;
    }
    ~Base1()
    {
        cout << "Free Base1" << endl;
    }
};

class Base2
{
public:
    Base2()
    {
        cout << "Create Base2" << endl;
    }
    ~Base2()
    {
        cout << "Free Base2" << endl;
    }
};

class Base3
{
public:
    Base3()
    {
        cout << "Create Base3" << endl;
    }
    ~Base3()
    {
        cout << "Free Base3" << endl;
    }
};

class D :public Base2, public Base1, public Base3
{
public:
    D()
    {
        cout << "Create D" << endl;
    }
    ~D()
    {
        cout << "Free D" << endl;
    }
private:
    Base1 b1;
    Base2 b2;
    Base3 b3;
};

int main(int argc, char *argv[])
{
    D d;
    return 0;
}
如果你继承的父类不提供默认或者缺省的构造函数,我们就必须使用参数列表的形式对父类进行构造。参数列表相当于再调用父类的构造函数。
千万不要把参数列表那里的父类构造函数放到子类构造函数里面,那样代表先完成子类构造再完成父类构造。爸爸还没生出来来,怎么会有儿子呢?
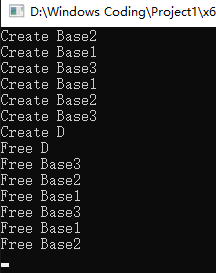
#include<iostream>
using namespace std;

class Base1
{
public:
    Base1(int d=0):x(d)
    {
        cout << "Create Base1" << endl;
    }
    ~Base1()
    {
        cout << "Free Base1" << endl;
    }
private:
    int x;
};

class Base2
{
public:
    Base2(int d = 0):y(d)
    {
        cout << "Create Base2" << endl;
    }
    ~Base2()
    {
        cout << "Free Base2" << endl;
    }
private:
    int y;
};

class Base3
{
public:
    Base3(int d = 0):z(d)
    {
        cout << "Create Base3" << endl;
    }
    ~Base3()
    {
        cout << "Free Base3" << endl;
    }
private:
    int z;
};

class D :public Base2, public Base1, public Base3
{
public:
    D(int data):Base1(data), Base2(data), Base3(data),b1(data), b2(data), b3(data)
    {
        cout << "Create D" << endl;
    }
    ~D()
    {
        cout << "Free D" << endl;
    }
private:
    Base1 b1;
    Base2 b2;
    Base3 b3;
};

int main(int argc, char *argv[])
{
    D d(10);
    return 0;
}
参数列表那里的构造函数顺序任意写。决定构造函数顺序只有2处:①继承声明时的顺序②类内部数据成员的顺序。
对于多继承,某一数据成员可能在多个父亲中存在定义。在子类中访问父类数据成员时会存在二义性。下面代码演示,这段代码编译不过
#include<iostream>
using namespace std;

class B1
{
public:
    B1(int d=0):n(d)
    {}
    ~B1()
    {}
public:
    int n;
};

class B2
{
public:
    B2(int d = 0):n(d)
    {}
    ~B2()
    {}
public:
    int n;
};

class D :public B2, public B1
{
public:
    D():x(0)
    {}
    ~D()
    {}
private:
    int x;
};

int main(int argc, char *argv[])
{
    D d;
    d.n=10;
    return 0;
}
这种情况需要指明到底是哪个父类的数据成员
#include<iostream>
using namespace std;

class B1
{
public:
    B1(int d=0):n(d)
    {}
    ~B1()
    {}
public:
    int n;
};

class B2
{
public:
    B2(int d = 0):n(d)
    {}
    ~B2()
    {}
public:
    int n;
};

class D :public B2, public B1
{
public:
    D():x(0)
    {}
    ~D()
    {}
private:
    int x;
};

int main(int argc, char *argv[])
{
    D d;
    d.B1::n=10;
    return 0;
}
钻石继承
#include<iostream>
using namespace std;

class B0
{
public:
    B0(int d=0):m(d)
    {}
    ~B0()
    {}
public:
    int m;
};

class B1:public B0
{
public:
    B1(int d = 0):n(d)
    {}
    ~B1()
    {}
public:
    int n;
};

class B2 :public B0
{
public:
    B2(int d = 0) :n(d)
    {}
    ~B2()
    {}
public:
    int n;
};

class D :public B2, public B1
{
public:
    D():x(0)
    {}
    ~D()
    {}
private:
    int x;
};

int main(int argc, char *argv[])
{
    D d;
    d.B1::n=10;
    d.B1::m = 20;
    return 0;
}
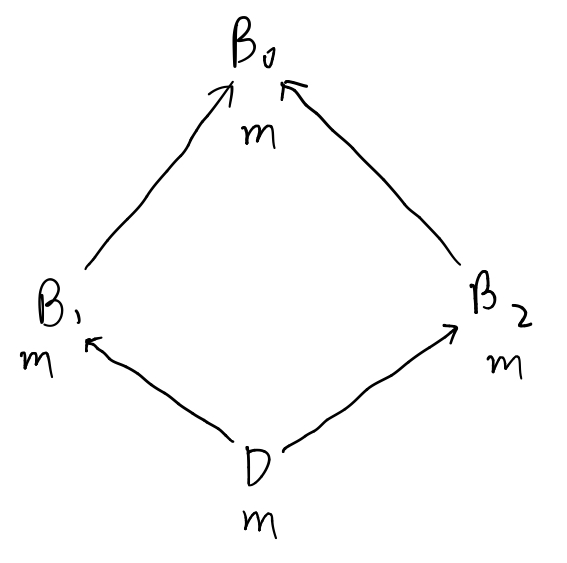

类B1,B2都有m,所以D中要想使用m必须指定具体是哪个类的m
使用virtual关键字,让整个钻石继承使用一个数据成员。这种继承叫虚拟继承
#include<iostream>
using namespace std;

class B0
{
public:
    B0(int d=0):m(d)
    {}
    ~B0()
    {}
public:
    int m;
};

class B1: virtual public B0
{
public:
    B1(int d = 0):n(d)
    {}
    ~B1()
    {}
public:
    int n;
};

class B2 : virtual public B0
{
public:
    B2(int d = 0) :n(d)
    {}
    ~B2()
    {}
public:
    int n;
};

class D :public B2, public B1
{
public:
    D():x(0)
    {}
    ~D()
    {}
private:
    int x;
};

int main(int argc, char *argv[])
{
    D d;
    d.B1::n=10;
    d.m = 20;
    return 0;
}
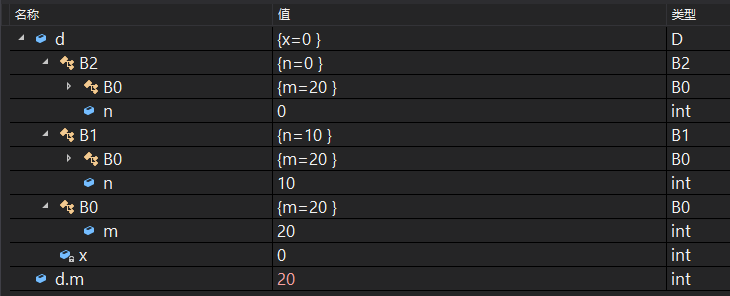
在派生类对象的创建中,首先是虚基类的构造函数并按它们声明的顺序构造。第二批是非虚基类的构造函数按它们声明的顺序调用。第三批是成员对象的构造函数。最后是派生类自己的构造函数被调用
#include<iostream>
using namespace std;

class Base1
{
public:
    Base1()
    {
        cout << "Create Base1" << endl;
    }
    ~Base1()
    {
        cout << "Free Base1" << endl;
    }
};

class Base2
{
public:
    Base2()
    {
        cout << "Create Base2" << endl;
    }
    ~Base2()
    {
        cout << "Free Base2" << endl;
    }
};

class Base3
{
public:
    Base3()
    {
        cout << "Create Base3" << endl;
    }
    ~Base3()
    {
        cout << "Free Base3" << endl;
    }
};

class D :public Base2, virtual public Base1, virtual public Base3
{
public:
    D()
    {
        cout << "Create D" << endl;
    }
    ~D()
    {
        cout << "Free D" << endl;
    }
private:
    Base1 b1;
    Base2 b2;
    Base3 b3;
};

int main(int argc, char *argv[])
{
    D d;
    return 0;
}