secret
应用启动过程中可能需要一些敏感信息,比如访问数据库的用户名密码或者秘钥。将这些信息直接保存在容器镜像中显然不妥,Kubernetes 提供的解决方案是 Secret。
Secret 会以密文的方式存储数据,避免了直接在配置文件中保存敏感信息。Secret 会以 Volume 的形式被 mount 到 Pod,容器可通过文件的方式使用 Secret 中的敏感数据;此外,容器也可以环境变量的方式使用这些数据。
Secret 可通过命令行或 YAML 创建。比如希望 Secret 中包含如下信息:
用户名 admin
密码 123456
创建 Secret
有四种方法创建 Secret:
1. 通过 --from-literal:
kubectl create secret generic mysecret --from-literal=username=admin --from-literal=password=123456
每个 --from-literal 对应一个信息条目。
2. 通过 --from-file:
echo -n admin > ./username
echo -n 123456 > ./password
kubectl create secret generic mysecret --from-file=./username --from-file=./password
每个文件内容对应一个信息条目。
3. 通过 --from-env-file:
cat << EOF > env.txt
username=admin
password=123456
EOF
kubectl create secret generic mysecret --from-env-file=env.txt
文件 env.txt 中每行 Key=Value 对应一个信息条目。
4. 通过 YAML 配置文件:
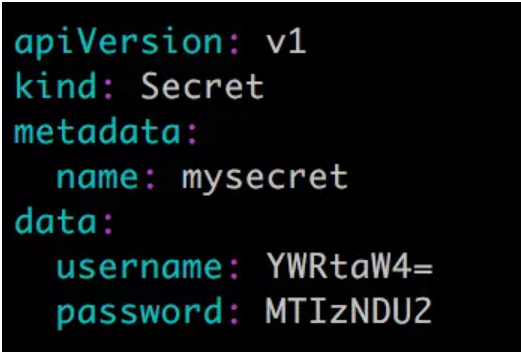
文件中的敏感数据必须是通过 base64 编码后的结果。
[root@ken ~]# echo -n admin | base64
YWRtaW4=
[root@ken ~]# echo -n 123456 | base64
MTIzNDU2
执行 kubectl apply 创建 Secret:
[root@ken ~]# kubectl apply -f mysecret.yml
secret/mysecret created
查看secret
第一步:通过kubectl get secret查看
[root@ken ~]# kubectl get secret mysecret
NAME       TYPE     DATA   AGE
mysecret   Opaque   2      99s
第二步:显示有两个数据条目,kubectl describe secret 查看条目的 Key:
[root@ken ~]# kubectl describe secret mysecret
Name:         mysecret
Namespace:    default
Labels:       <none>
Annotations:
Type:         Opaque

Data
====
password:  6 bytes
username:  5 bytes
第三步:如果还想查看 Value,可以用 kubectl edit secret mysecret:
[root@ken ~]# kubectl edit secret mysecret
# Please edit the object below. Lines beginning with a '#' will be ignored,
# and an empty file will abort the edit. If an error occurs while saving this file will be
# reopened with the relevant failures.
#
apiVersion: v1
data:
  password: MTIzNDU2
  username: YWRtaW4=
kind: Secret
metadata:
  annotations:
    kubectl.kubernetes.io/last-applied-configuration: |
      {"apiVersion":"v1","data":{"password":"MTIzNDU2","username":"YWRtaW4="},"kind":"Secret","metadata":{"annotations":{},"name":"mysecret","namespace":"default"}}
  creationTimestamp: "2019-01-30T12:28:34Z"
  name: mysecret
  namespace: default
  resourceVersion: "111466"
  selfLink: /api/v1/namespaces/default/secrets/mysecret
  uid: 8f86e1f4-248a-11e9-9172-000c292d5bb8
type: Opaque
第四步:然后通过 base64 将 Value 反编码:
[root@ken ~]# echo -n MTIzNDU2 | base64 --decode
123456

[root@ken ~]# echo -n YWRtaW4= | base64 --decode
admin
volume 方式使用 Secret
Pod 可以通过 Volume 或者环境变量的方式使用 Secret
第一步:Pod 的配置文件如下所示:
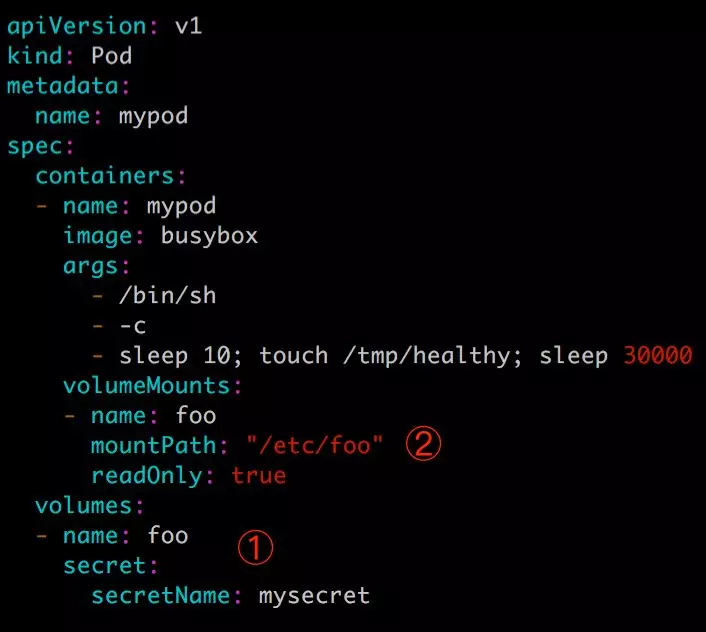
① 定义 volume foo,来源为 secret mysecret。
② 将 foo mount 到容器路径 /etc/foo,可指定读写权限为 readOnly。
第二步:创建 Pod 并在容器中读取 Secret:
[root@ken ~]# kubectl apply -f mypod.yml
pod/mypod created
[root@ken ~]# kubectl exec -it mypod sh
/ # ls /etc/foo
password  username
/ # cat /etc/foo/password
/ # cat /etc/foo/password
123456/ #
/ # cat /etc/foo/username
admin/ #
可以看到,Kubernetes 会在指定的路径 /etc/foo 下为每条敏感数据创建一个文件,文件名就是数据条目的 Key,这里是 /etc/foo/username 和 /etc/foo/password,Value 则以明文存放在文件中。
第三步:我们也可以自定义存放数据的文件名,比如将配置文件改为:
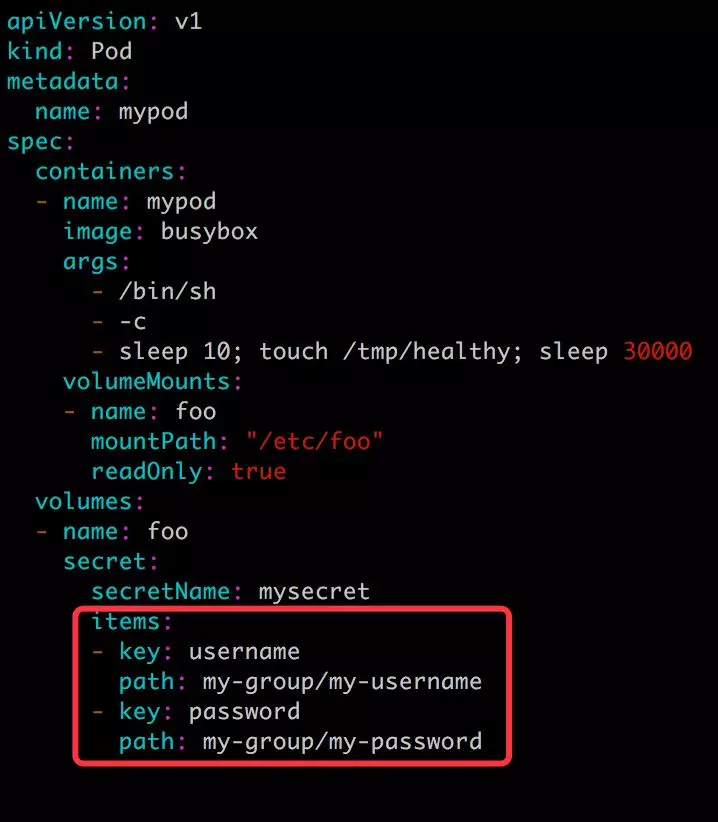
这时数据将分别存放在 /etc/foo/my-group/my-username 和 /etc/foo/my-group/my-password 中。
以 Volume 方式使用的 Secret 支持动态更新:Secret 更新后,容器中的数据也会更新。
第四步:将 password 更新为 abcdef,base64 编码为 YWJjZGVm

更新 Secret。
[root@ken ~]# kubectl apply -f mysecret.yml
secret/mysecret configured
第五步:几秒钟后,新的 password 会同步到容器。
[root@ken ~]# kubectl exec -it mypod sh
/ # ls /etc/foo
password  username

/ # cat /etc/foo/password
abcdef/ #
ConfigMap 管理配置
Secret 可以为 Pod 提供密码、Token、私钥等敏感数据;对于一些非敏感数据,比如应用的配置信息,则可以用 ConfigMap。
ConfigMap 的创建和使用方式与 Secret 非常类似,主要的不同是数据以明文的形式存放。
与 Secret 一样,ConfigMap 也支持四种创建方式:
1. 通过 --from-literal:
kubectl create configmap myconfigmap --from-literal=config1=xxx --from-literal=config2=yyy
每个 --from-literal 对应一个信息条目。
2. 通过 --from-file:
echo -n xxx > ./config1
echo -n yyy > ./config2
kubectl create configmap myconfigmap --from-file=./config1 --from-file=./config2
每个文件内容对应一个信息条目。
3. 通过 --from-env-file:
cat << EOF > env.txt
config1=xxx
config2=yyy
EOF
kubectl create configmap myconfigmap --from-env-file=env.txt
文件 env.txt 中每行 Key=Value 对应一个信息条目。
4. 通过 YAML 配置文件: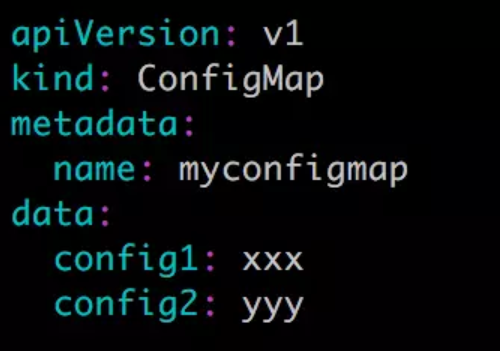
文件中的数据直接以明文输入。
与 Secret 一样,Pod 也可以通过 Volume 或者环境变量的方式使用 Secret。
Volume 方式: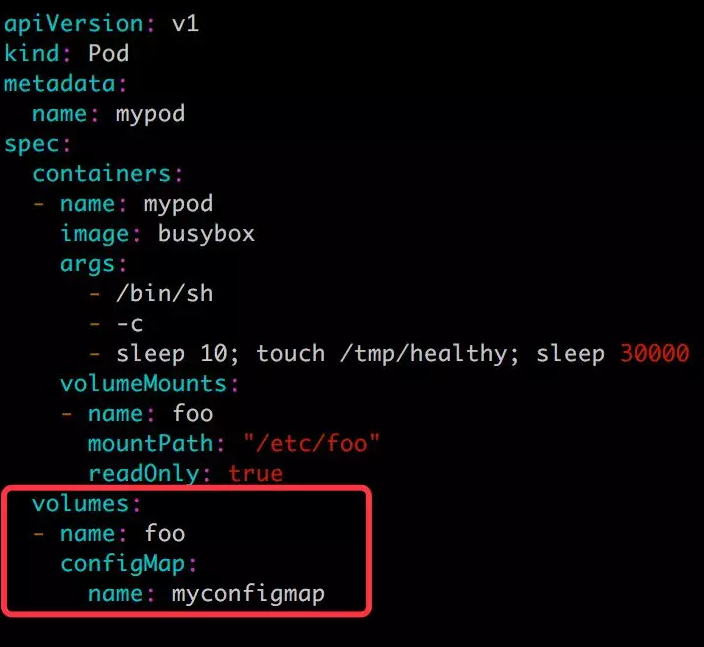
大多数情况下,配置信息都以文件形式提供,所以在创建 ConfigMap 时通常采用 --from-file 或 YAML 方式,读取 ConfigMap 时通常采用 Volume 方式。
与 Secret 一样,Volume 形式的 ConfigMap 也支持动态更新。