在Spring Boot自动配置中我们讲解了SpringBoot的自动配置,其实就是讲SpringBoot如何自动加载一个个starter,在这一篇文章,我们来看看如何自定义一个starter
1.引用starter
我们首先新建一个authentication-service,在这个项目中我们将会引用我们自定义的starter
pom.xml
  1 <?xml version="1.0" encoding="UTF-8"?>
  2 <project xmlns="http://maven.apache.org/POM/4.0.0" xmlns:xsi="http://www.w3.org/2001/XMLSchema-instance"
  3          xsi:schemaLocation="http://maven.apache.org/POM/4.0.0 https://maven.apache.org/xsd/maven-4.0.0.xsd">
  4     <modelVersion>4.0.0</modelVersion>
  5     <parent>
  6         <groupId>org.springframework.boot</groupId>
  7         <artifactId>spring-boot-starter-parent</artifactId>
  8         <version>2.2.5.RELEASE</version>
  9         <relativePath/> <!-- lookup parent from repository -->
 10     </parent>
 11     <groupId>com.tsystems.aviation.shaesb</groupId>
 12     <artifactId>management</artifactId>
 13     <version>0.0.1-SNAPSHOT</version>
 14     <name>management</name>
 15
 16     <properties>
 17         <java.version>1.8</java.version>
 18     </properties>
 19
 20     <dependencies>
 21         <dependency>
 22             <groupId>org.springframework.boot</groupId>
 23             <artifactId>spring-boot-starter-web</artifactId>
 24         </dependency>
 25
 26         <dependency>
 27             <groupId>org.mybatis.spring.boot</groupId>
 28             <artifactId>mybatis-spring-boot-starter</artifactId>
 29             <version>2.1.2</version>
 30         </dependency>
 31
 32         <!--引入mybatis plus-->
 33         <dependency>
 34             <groupId>com.baomidou</groupId>
 35             <artifactId>mybatis-plus-boot-starter</artifactId>
 36             <version>3.3.1.tmp</version>
 37         </dependency>
 38
 39         <!--引入mybatis plus 代码生成器-->
 40         <dependency>
 41             <groupId>com.baomidou</groupId>
 42             <artifactId>mybatis-plus-generator</artifactId>
 43             <version>3.3.1.tmp</version>
 44         </dependency>
 45
 46         <!--自定义starter-->
 47         <dependency>
 48             <groupId>com.suns.starter.test</groupId>
 49             <artifactId>starter-test</artifactId>
 50             <version>0.0.1-SNAPSHOT</version>
 51         </dependency>
 52
 53         <dependency>
 54             <groupId>mysql</groupId>
 55             <artifactId>mysql-connector-java</artifactId>
 56             <scope>runtime</scope>
 57         </dependency>
 58
 59         <dependency>
 60             <groupId>org.projectlombok</groupId>
 61             <artifactId>lombok</artifactId>
 62             <optional>true</optional>
 63         </dependency>
 64
 65         <!--swagger-->
 66         <dependency>
 67             <groupId>io.springfox</groupId>
 68             <artifactId>springfox-swagger2</artifactId>
 69             <version>2.6.1</version>
 70         </dependency>
 71
 72         <!--swagger接口API生成html文档-->
 73         <dependency>
 74             <groupId>io.springfox</groupId>
 75             <artifactId>springfox-swagger-ui</artifactId>
 76             <version>2.6.1</version>
 77         </dependency>
 78
 79         <dependency>
 80             <groupId>cn.hutool</groupId>
 81             <artifactId>hutool-all</artifactId>
 82             <version>4.1.8</version>
 83         </dependency>
 84
 85         <dependency>
 86             <groupId>org.springframework.boot</groupId>
 87             <artifactId>spring-boot-starter-test</artifactId>
 88             <scope>test</scope>
 89             <exclusions>
 90                 <exclusion>
 91                     <groupId>org.junit.vintage</groupId>
 92                     <artifactId>junit-vintage-engine</artifactId>
 93                 </exclusion>
 94             </exclusions>
 95         </dependency>
 96
 97         <dependency>
 98             <groupId>org.freemarker</groupId>
 99             <artifactId>freemarker</artifactId>
100             <version>2.3.30</version>
101         </dependency>
102
103         <dependency>
104             <groupId>junit</groupId>
105             <artifactId>junit</artifactId>
106             <scope>test</scope>
107         </dependency>
108
109     </dependencies>
110
111     <build>
112         <plugins>
113             <plugin>
114                 <groupId>org.springframework.boot</groupId>
115                 <artifactId>spring-boot-maven-plugin</artifactId>
116             </plugin>
117         </plugins>
118     </build>
119
120 </project>
application.yml
 1 server:
 2   port: 8081
 3
 4 spring:
 5   mvc:
 6     servlet:
 7       path: /authentication-service
 8   application:
 9     name: AUTHENTICATION-SERVICE
10   profiles:
11     active: dev
12   jackson:
13     date-format: yyyy-MM-dd HH:mm:ss
14     time-zone: GMT+8
15     deserialization:
16       FAIL_ON_UNKNOWN_PROPERTIES: false
17   session:
18     store-type: none
19 # Logger Config
20 logging:
21   level:
22     com.baomidou.mybatisplus.samples: debug
application-dev.yml
1 spring:
2   datasource:
3     driver-class-name: com.mysql.cj.jdbc.Driver
4     url: jdbc:mysql://localhost:3306/test?useUnicode=true&characterEncoding=utf-8&useSSL=false
5     username: test
6     password: 123456
7 #自定义starter用到的参数
8 helloworld:
9   words: springboot
ManagementApplication.java
 1 package com.tsystems.aviation.shaesb.management;
 2
 3 import org.springframework.boot.SpringApplication;
 4 import org.springframework.boot.autoconfigure.SpringBootApplication;
 5
 6 @SpringBootApplication
 7 public class ManagementApplication {
 8
 9     public static void main(String[] args) {
10         SpringApplication.run(ManagementApplication.class, args);
11     }
12
13 }
UserController.java
 1 package com.tsystems.aviation.shaesb.management.controller;
 2
 3
 4 import com.suns.starter.test.startertest.HelloworldService;
 5 import org.springframework.beans.factory.annotation.Autowired;
 6 import org.springframework.web.bind.annotation.GetMapping;
 7
 8 import org.springframework.web.bind.annotation.RestController;
 9
10 @RestController
11 @RequestMapping("/management/user")
12 public class UserController {
13
14     @Autowired
15     private HelloworldService helloworldService;
16
17     @GetMapping("/starter")
18     public String getStarter() {
19         return helloworldService.sayHello();
20     }
21
22
23 }
自定义starter
为了方便引入starter,我们就在authentication-service下面新建一个module叫starter-test
1.在pom文件中引入autoconfigure
 1 <?xml version="1.0" encoding="UTF-8"?>
 2 <project xmlns="http://maven.apache.org/POM/4.0.0" xmlns:xsi="http://www.w3.org/2001/XMLSchema-instance"
 3          xsi:schemaLocation="http://maven.apache.org/POM/4.0.0 https://maven.apache.org/xsd/maven-4.0.0.xsd">
 4     <modelVersion>4.0.0</modelVersion>
 5     <groupId>com.suns.starter.test</groupId>
 6     <artifactId>starter-test</artifactId>
 7     <version>0.0.1-SNAPSHOT</version>
 8     <name>starter-test</name>
 9     <description>Demo project for Spring Boot</description>
10
11     <properties>
12         <java.version>1.8</java.version>
13     </properties>
14
15     <dependencies>
16         <dependency>
17             <groupId>org.springframework.boot</groupId>
18             <artifactId>spring-boot-autoconfigure</artifactId>
19             <version>2.2.6.RELEASE</version>
20         </dependency>
21     </dependencies>
22
23     <build>
24         <plugins>
25             <plugin>
26                 <groupId>org.springframework.boot</groupId>
27                 <artifactId>spring-boot-maven-plugin</artifactId>
28             </plugin>
29         </plugins>
30     </build>
31
32 </project>
2.在resources下面创建一个文件夹META-INF,在META-INF下新建spring.factories。这里springboot启动过程中会扫描所有jar包下面的spring.factories,然后根据相关条件把spring.factories中配置的类注入到容器。
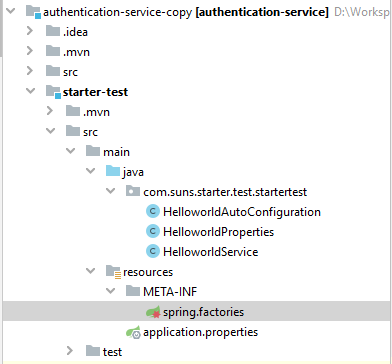
spring.factories
# Auto Configure
org.springframework.boot.autoconfigure.EnableAutoConfiguration=com.suns.starter.test.startertest.HelloworldAutoConfiguration
3.新建一个Property类,来接收authentication-service配置文件yml中的helloworld.words参数,类中words值会设置成"springboot"
 1 package com.suns.starter.test.startertest;
 2
 3 import org.springframework.boot.context.properties.ConfigurationProperties;
 4
 5 @ConfigurationProperties(prefix = "helloworld")
 6 public class HelloworldProperties {
 7     public static final String DEFAULT_WORDS = "world";
 8
 9     private String words = DEFAULT_WORDS;
10
11     public String getWords() {
12         return words;
13     }
14
15     public void setWords(String words) {
16         this.words = words;
17     }
18 }
4.创建HelloworldAutoConfiguration
 1 package com.suns.starter.test.startertest;
 2
 3 import org.springframework.beans.factory.annotation.Autowired;
 4 import org.springframework.boot.autoconfigure.condition.ConditionalOnClass;
 5 import org.springframework.boot.autoconfigure.condition.ConditionalOnMissingBean;
 6 import org.springframework.boot.context.properties.EnableConfigurationProperties;
 7 import org.springframework.context.annotation.Bean;
 8 import org.springframework.context.annotation.Configuration;
 9
10 // 配置类
11 @Configuration
12 // 当类路径下有 HelloworldService则把HelloworldAutoConfiguration注入到spring容器
13 @ConditionalOnClass({HelloworldService.class})
14 // 将 application.properties 的相关的属性字段与该类一一对应,并生成 Bean
15 @EnableConfigurationProperties(HelloworldProperties.class)
16 public class HelloworldAutoConfiguration {
17
18     // 注入属性类
19     @Autowired
20     private HelloworldProperties hellowordProperties;
21
22     @Bean
23     // 当容器没有HelloworldService这个 Bean 的时候才创建
24     @ConditionalOnMissingBean(HelloworldService.class)
25     public HelloworldService helloworldService() {
26         HelloworldService helloworldService = new HelloworldService();
27         helloworldService.setWords(hellowordProperties.getWords());
28         return helloworldService;
29     }
30 }
5.创建该starter业务处理类
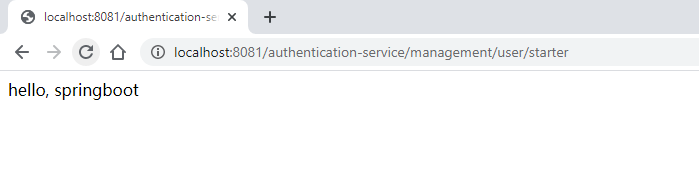
package com.suns.starter.test.startertest;

public class HelloworldService {
    private String words;

    private String getWords() {
        return words;
    }

    public void setWords(String words) {
        this.words = words;
    }

    public String sayHello() {
        return "hello, " + words;
    }
}
6.通过maven install命令把starter-test打包并添加到代码库,然后通过maven package打包authentication-service。最后启动authentication-service,访问http://localhost:8081/authentication-service/management/user/starter。