sendmail是linux系统中一个邮箱系统,如果我们在系统中配置好sendmail就可以直接使用它来发送邮箱。
sendmail的配置文件
/etc/mail/sendmail.cf :Sendmail的主配置文件;
/etc/mail/access :中继访问控制;
/etc/mail/domaintable ;域名映射;
/etc/mail/local-host-names ;本地主机别名;
/etc/mail/mailertable :为特定的域指定特殊的路由规则;
/etc/mail/virtusertable :虚拟域配置。
中继的配置
是指一台服务器接受并传递源地址和目的地址都不是本服务器的邮件。
在两个文件中进行设置:
/etc/mail/relay-domains
/etc/mail/access。
废话不多说了,下面分享下sendmail在linux系统下的安装部署记录:
一、安装软件
[root@slave-node ~]# yum install -y sendmail
[root@slave-node ~]# yum install -y sendmail-cf
启动saslauthd服务进行SMTP验证(默认是安装的,如果没有,就手动安装)
[root@slave-node ~]# service saslauthd start
Starting saslauthd: [ OK ]
二、邮件服务配置(iptables防火墙关闭)
1)配置Senmail的SMTP认证
将下面两行内容前面的dnl去掉。在sendmail文件中,dnl表示该行为注释行,是无效的,因此通过去除行首的dnl字符串可以开启相应的设置行。
[root@slave-node ~]# vim /etc/mail/sendmail.mc
......
TRUST_AUTH_MECH(`EXTERNAL DIGEST-MD5 CRAM-MD5 LOGIN PLAIN')dnl
define(`confAUTH_MECHANISMS', `EXTERNAL GSSAPI DIGEST-MD5 CRAM-MD5 LOGIN PLAIN')dnl
2) 设置Sendmail服务的网络访问权限(如果是直接本机调用,可以不用操作,采用默认的127.0.0.1。不过最后还是改成0.0.0.0)
将127.0.0.1改为0.0.0.0,意思是任何主机都可以访问Sendmail服务。
如果仅让某一个网段能够访问到Sendmail服务,将127.0.0.1改为形如192.168.1.0/24的一个特定网段地址。
[root@slave-node ~]# vim /etc/mail/sendmail.mc
......
DAEMON_OPTIONS(`Port=smtp,Addr=0.0.0.0, Name=MTA')dnl
3)生成配置文件
Sendmail的配置文件由m4来生成,m4工具在sendmail-cf包中。如果系统无法识别m4命令,说明sendmail-cf软件包没有安装
[root@slave-node ~]# m4 /etc/mail/sendmail.mc > /etc/mail/sendmail.cf
4)启动服务(如果发现sendmail dead but subsys locked,那就执行"service postfix status"查看postfix是否默认开启了,如果开启的话,就关闭postfix,然后再启动或重启sendmail服务即可。)
[root@slave-node ~]# service sendmail start
Starting sendmail: [ OK ]
Starting sm-client: [ OK ]
[root@slave-node ~]# service saslauthd restart
Stopping saslauthd: [ OK ]
Starting saslauthd: [ OK ]
将服务加入自启行列
[root@slave-node ~]# chkconfig sendmail on
[root@slave-node ~]# chkconfig saslauthd on
[root@slave-node ~]# chkconfig --list |grep sendmail
sendmail 0:off 1:off 2:on 3:on 4:on 5:on 6:off
[root@slave-node ~]# chkconfig --list |grep saslauthd
saslauthd 0:off 1:off 2:on 3:on 4:on 5:on 6:off
三、测试发送邮箱
(1)第一种方式:安装sendmail即可使用。
[root@slave-node ~]# yum -y install mailx
创建一个邮件内容文件,然后发邮件(注意-s参数后的邮件标题要用单引号,不能使用双引号,否则发邮件会失败!)
[root@slave-node ~]# echo 'This is test mail'>/root/content.txt
[root@slave-node ~]# cat /root/content.txt
This is test mail
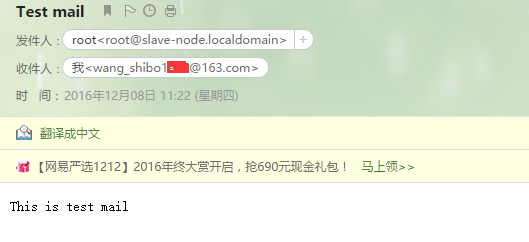
[root@slave-node ~]# mail -s 'Test mail' wang_shibo***@163.com < /root/content.txt
查看已收到邮件:

如果不想通过文件发送邮件内容也可以这么发送,也可以使用管道符直接发送邮件内容,效果同文件发送邮件内容一样
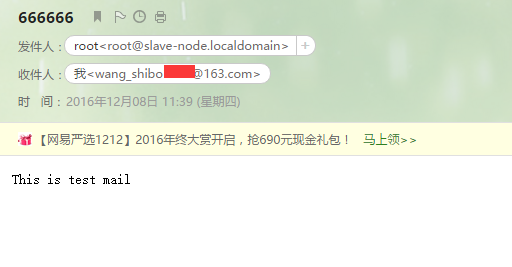
[root@slave-node ~]# echo "This is test mail" | mail -s '666666' wang_shibo***@163.com
查看已收到邮件:

如果是发送给多个邮件,就使用-c参数,如下:
[root@slave-node ~]# echo "This is test mail" | mail -s 'test' -c wang_shibo***@sina.com wang_shibo***@163.com
如遇下面报错,解决办法:
发送邮件:
[root@mail-server ~]# echo "This is test mail" | mail -s '666666' wangshibo@kevin.com

发现收不到邮件,查看sendmail日志,报错信息如下:
[root@mail-server ~]# tail -f /var/log/maillog
.......
Feb 12 03:35:13 mail-server sendmail[21905]: My unqualified host name (mail-server) unknown; sleeping for retry
Feb 12 03:37:12 mail-server sendmail[22061]: w1BJb8KM022059: to=<wangshibo@kevin.com>, ctladdr=<root@mail-server> (0/0), delay=00:00:03, xdelay=00:00:03,
mailer=esmtp, pri=120476, relay=mx1.kevin.com. [128.1.41.15], dsn=4.0.0, stat=Deferred: 450 Requested mail action not taken: Invalid sender

分析原因:
这是由于主机名没有正确解析导致的。
[root@mail-server ~]# cat /etc/hosts
127.0.0.1   localhost localhost.localdomain localhost4 localhost4.localdomain4
::1         localhost localhost.localdomain localhost6 localhost6.localdomain6
192.168.10.202 mail-server

[root@mail-server ~]# cat /etc/sysconfig/network
NETWORKING=yes
HOSTNAME=mail-server

解决办法:
[root@mail-server ~]# cat /etc/hosts
127.0.0.1   localhost localhost.localdomain localhost4 localhost4.localdomain4
::1         localhost localhost.localdomain localhost6 localhost6.localdomain6
192.168.10.202 mail-server.localdomain mail-server
[root@mail-server ~]# cat /etc/sysconfig/network
NETWORKING=yes
HOSTNAME=mail-server

[root@mail-server ~]# rm -rf /var/spool/mqueue/*
[root@mail-server ~]# /etc/init.d/sendmail restart
Shutting down sm-client:                                   [  OK  ]
Shutting down sendmail:                                    [  OK  ]
Starting sendmail:                                         [  OK  ]
Starting sm-client:                                        [  OK  ]

再次使用mail发送邮件就正确了!
[root@mail-server ~]# echo "This is test mail" | mail -s '666666' wangshibo@kevin.com
[root@mail-server ~]# tail -f /var/log/maillog
.......
Feb 12 03:42:31 mail-server sendmail[22293]: STARTTLS=client, relay=mx1.kevin.com., version=TLSv1/SSLv3, verify=FAIL, cipher=AES256-GCM-SHA384, bits=256/256
Feb 12 03:42:31 mail-server sendmail[22299]: STARTTLS=client, relay=mx1.kevin.com., version=TLSv1/SSLv3, verify=FAIL, cipher=AES256-GCM-SHA384, bits=256/256
Feb 12 03:42:31 mail-server sendmail[22302]: STARTTLS=client, relay=mx1.kevin.com., version=TLSv1/SSLv3, verify=FAIL, cipher=AES256-GCM-SHA384, bits=256/256
Feb 12 03:42:33 mail-server sendmail[22284]: STARTTLS=client, relay=mx1.kevin.com., version=TLSv1/SSLv3, verify=FAIL, cipher=AES256-GCM-SHA384, bits=256/256
Feb 12 03:42:34 mail-server sendmail[22293]: w1BJgTcF022288: to=<wangshibo@kevin.com>, ctladdr=<root@mail-server.localdomain> (0/0), delay=00:00:05, xdelay=00:00:05, mailer=esmtp, pri=120510, relay=mx1.kevin.com. [116.115.114.9], dsn=2.0.0, stat=Sent (Mail OK queued as AQAAfwB3EaEnDYFaHrpiAA--.12694S3)
Feb 12 03:42:35 mail-server sendmail[22302]: w1BJgUPI022300: to=<wangshibo@kevin.com>, ctladdr=<root@mail-server.localdomain> (0/0), delay=00:00:05, xdelay=00:00:05, mailer=esmtp, pri=120510, relay=mx1.kevin.com. [115.123.124.105], dsn=2.0.0, stat=Sent (Mail OK queued as AQAAfwDXQD0oDYFaoMJxAA--.21712S3)
Feb 12 03:42:36 mail-server sendmail[22299]: w1BJgToO022294: to=<wangshibo@kevin.com>, ctladdr=<root@mail-server.localdomain> (0/0), delay=00:00:06, xdelay=00:00:06, mailer=esmtp, pri=120510, relay=mx1.kevin.com. [115.123.124.105], dsn=2.0.0, stat=Sent (Mail OK queued as AQAAfwB3HTonDYFancJxAA--.21596S3)
Feb 12 03:42:40 mail-server sendmail[22284]: w1BJgSAl022282: to=<wangshibo@kevin.com>, ctladdr=<root@mail-server.localdomain> (0/0), delay=00:00:12, xdelay=00:00:12, mailer=esmtp, pri=120510, relay=mx1.kevin.com. [139.162.158.182], dsn=2.0.0, stat=Sent (Mail OK queued as AQAAfwDHp2QmDYFayl55AA--.6056S3)
(2)第二种方式:利用外部的smpt服务器
上面第一种方式中,/bin/mail命令会默认使用本地sendmail发送邮件,这样要求本地的机器必须安装和启动Sendmail服务,配置非常麻烦,而且会带来不必要的资源占用。
而通过修改配置文件可以使用外部SMTP服务器,可以达到不使用sendmail而用外部的smtp服务器发送邮件的目的。
修改/etc/mail.rc文件(有的版本叫/etc/nail.rc,添加下面内容:
set from=fromUser@domain.com smtp=smtp.domain.comset smtp-auth-user=username smtp-auth-password=passwordset smtp-auth=login
参数说明:
from是发送的邮件地址
smtp是发生的外部smtp服务器的地址
smtp-auth-user是外部smtp服务器认证的用户名。注意一定要填写邮件全称!!
smtp-auth-password是外部smtp服务器认证的用户密码
smtp-auth是邮件认证的方式
配置完成后,就可以正常发送邮件了,如下
[root@slave-node ~]# vim /etc/mail.rc //在文件底部添加
set from=ops@kevin.com smtp=smtp.kevin.com smtp-auth-user=ops@kevin.com smtp-auth-password=zh@123bj smtp-auth=login
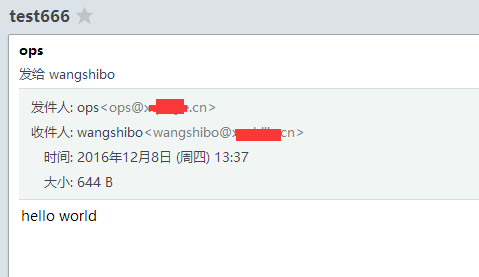
现在开始发邮件:
[root@slave-node ~]# echo "hello world" |mail -s 'test666' wangshibo@huanqiu.cn
