总所周知,MongoDB是一个NoSQL非数据库系统,即一个数据库可以包含多个集合(Collection),每个集合对应于关系数据库中的表;而每个集合中可以存储一组由列标识的记录,列是可以自由定义的,非常灵活,由一组列标识的实体的集合对应于关系数据库表中的行。下面通过熟悉MongoDB的基本管理命令,来了解MongoDB提供的DBMS的基本功能和行为。
0)MongoDB的安装
[root@centos6-vm01 ~]# curl -O https://fastdl.mongodb.org/linux/mongodb-linux-x86_64-3.0.6.tgz
[root@centos6-vm01 ~]# tar -zxvf mongodb-linux-x86_64-3.0.6.tgz
[root@centos6-vm01 ~]# mv  mongodb-linux-x86_64-3.0.6/ /usr/local/mongodb
[root@centos6-vm01 ~]# vim /etc/profile
......
export PATH=$PATH:/usr/local/mongodb/bin/
[root@centos6-vm01 ~]# source /etc/profile

启动mongodb
[root@centos6-vm01 ~]# mkdir -p /data/db
[root@centos6-vm01 ~]# cd /usr/local/mongodb/bin/
[root@centos6-vm01 bin]# ./mongod &

[root@centos6-vm01 bin]# lsof -i:27017
COMMAND   PID USER   FD   TYPE DEVICE SIZE/OFF NODE NAME
mongod  24304 root    5u  IPv4 187360      0t0  TCP *:27017 (LISTEN)
mongod  24304 root   12u  IPv4 187456      0t0  TCP localhost:27017->localhost:48742 (ESTABLISHED)
mongo   24319 root    3u  IPv4 187455      0t0  TCP localhost:48742->localhost:27017 (ESTABLISHED)

-----------------------------------------------------
连接mongodb报错:
Failed global initialization: BadValue Invalid or no user locale set. Please ensure LANG and/or LC_* environment variables are set correctly.

解决办法:
[root@centos6-vm01 ~]# vim /etc/profile
......
export LC_ALL=C
[root@centos6-vm01 ~]# source /etc/profile
-----------------------------------------------------
1)MongoDB命令帮助系统
在安装MongoDB后,启动服务器进程(mongod),可以通过在客户端命令mongo实现对MongoDB的管理和监控。看一下MongoDB的命令帮助系统:
[root@centos6-vm01 ~]# mongo
MongoDB shell version: 3.0.6
connecting to: test
Welcome to the MongoDB shell.
For interactive help, type "help".
For more comprehensive documentation, see
    http://docs.mongodb.org/
Questions? Try the support group
    http://groups.google.com/group/mongodb-user
Server has startup warnings:
2018-01-02T23:24:23.304+0000 I CONTROL  [initandlisten] ** WARNING: You are running this process as the root user, which is not recommended.
2018-01-02T23:24:23.304+0000 I CONTROL  [initandlisten]
2018-01-02T23:24:23.307+0000 I CONTROL  [initandlisten]
2018-01-02T23:24:23.307+0000 I CONTROL  [initandlisten] ** WARNING: /sys/kernel/mm/transparent_hugepage/enabled is 'always'.
2018-01-02T23:24:23.307+0000 I CONTROL  [initandlisten] **        We suggest setting it to 'never'
2018-01-02T23:24:23.307+0000 I CONTROL  [initandlisten]
2018-01-02T23:24:23.307+0000 I CONTROL  [initandlisten] ** WARNING: /sys/kernel/mm/transparent_hugepage/defrag is 'always'.
2018-01-02T23:24:23.307+0000 I CONTROL  [initandlisten] **        We suggest setting it to 'never'
2018-01-02T23:24:23.307+0000 I CONTROL  [initandlisten]
> help
    db.help()                    help on db methods
    db.mycoll.help()             help on collection methods
    sh.help()                    sharding helpers
    rs.help()                    replica set helpers
    help admin                   administrative help
    help connect                 connecting to a db help
    help keys                    key shortcuts
    help misc                    misc things to know
    help mr                      mapreduce

    show dbs                     show database names
    show collections             show collections in current database
    show users                   show users in current database
    show profile                 show most recent system.profile entries with time >= 1ms
    show logs                    show the accessible logger names
    show log [name]              prints out the last segment of log in memory, 'global' is default
    use <db_name>                set current database
    db.foo.find()                list objects in collection foo
    db.foo.find( { a : 1 } )     list objects in foo where a == 1
    it                           result of the last line evaluated; use to further iterate
    DBQuery.shellBatchSize = x   set default number of items to display on shell
    exit                         quit the mongo shell
>
这是MongoDB最顶层的命令列表,主要告诉我们管理数据库相关的一些抽象的范畴:数据库操作帮助、集合操作帮助、管理帮助。如果你想了解数据库操作更详细的帮助命令,可以直接使用db.help(),如下所示:
> db.help()
DB methods:
	db.adminCommand(nameOrDocument) - switches to 'admin' db, and runs command [ just calls db.runCommand(...) ]
	db.auth(username, password)
	db.cloneDatabase(fromhost)
	db.commandHelp(name) returns the help for the command
	db.copyDatabase(fromdb, todb, fromhost)
	db.createCollection(name, { size : ..., capped : ..., max : ... } )
	db.createUser(userDocument)
	db.currentOp() displays currently executing operations in the db
	db.dropDatabase()
	db.eval() - deprecated
	db.fsyncLock() flush data to disk and lock server for backups
	db.fsyncUnlock() unlocks server following a db.fsyncLock()
	db.getCollection(cname) same as db['cname'] or db.cname
	db.getCollectionInfos()
	db.getCollectionNames()
	db.getLastError() - just returns the err msg string
	db.getLastErrorObj() - return full status object
	db.getLogComponents()
	db.getMongo() get the server connection object
	db.getMongo().setSlaveOk() allow queries on a replication slave server
	db.getName()
	db.getPrevError()
	db.getProfilingLevel() - deprecated
	db.getProfilingStatus() - returns if profiling is on and slow threshold
	db.getReplicationInfo()
	db.getSiblingDB(name) get the db at the same server as this one
	db.getWriteConcern() - returns the write concern used for any operations on this db, inherited from server object if set
	db.hostInfo() get details about the server's host
	db.isMaster() check replica primary status
	db.killOp(opid) kills the current operation in the db
	db.listCommands() lists all the db commands
	db.loadServerScripts() loads all the scripts in db.system.js
	db.logout()
	db.printCollectionStats()
	db.printReplicationInfo()
	db.printShardingStatus()
	db.printSlaveReplicationInfo()
	db.dropUser(username)
	db.repairDatabase()
	db.resetError()
	db.runCommand(cmdObj) run a database command.  if cmdObj is a string, turns it into { cmdObj : 1 }
	db.serverStatus()
	db.setLogLevel(level,<component>)
	db.setProfilingLevel(level,<slowms>) 0=off 1=slow 2=all
	db.setWriteConcern( <write concern doc> ) - sets the write concern for writes to the db
	db.unsetWriteConcern( <write concern doc> ) - unsets the write concern for writes to the db
	db.setVerboseShell(flag) display extra information in shell output
	db.shutdownServer()
	db.stats()
	db.version() current version of the server
对数据库进行管理和操作的基本命令,可以从上面获取到。如果想要得到更多,而且每个命令的详细用法,可以使用上面列出的db.listCommands()查询。
另一个比较基础的是对指定数据库的集合进行操作、管理和监控,可以通过查询db.mycoll.help()获取到:
> db.mycoll.help()
DBCollection help
    db.mycoll.find().help() - show DBCursor help
    db.mycoll.count()
    db.mycoll.copyTo(newColl) - duplicates collection by copying all documents to newColl; no indexes are copied.
    db.mycoll.convertToCapped(maxBytes) - calls {convertToCapped:'mycoll', size:maxBytes}} command
    db.mycoll.dataSize()
    db.mycoll.distinct( key ) - e.g. db.mycoll.distinct( 'x' )
    db.mycoll.drop() drop the collection
    db.mycoll.dropIndex(index) - e.g. db.mycoll.dropIndex( "indexName" ) or db.mycoll.dropIndex( { "indexKey" : 1 } )
    db.mycoll.dropIndexes()
    db.mycoll.ensureIndex(keypattern[,options])
    db.mycoll.explain().help() - show explain help
    db.mycoll.reIndex()
    db.mycoll.find([query],[fields]) - query is an optional query filter. fields is optional set of fields to return.
                                                  e.g. db.mycoll.find( {x:77} , {name:1, x:1} )
    db.mycoll.find(...).count()
    db.mycoll.find(...).limit(n)
    db.mycoll.find(...).skip(n)
    db.mycoll.find(...).sort(...)
    db.mycoll.findOne([query])
    db.mycoll.findAndModify( { update : ... , remove : bool [, query: {}, sort: {}, 'new': false] } )
    db.mycoll.getDB() get DB object associated with collection
    db.mycoll.getPlanCache() get query plan cache associated with collection
    db.mycoll.getIndexes()
    db.mycoll.group( { key : ..., initial: ..., reduce : ...[, cond: ...] } )
    db.mycoll.insert(obj)
    db.mycoll.mapReduce( mapFunction , reduceFunction , <optional params> )
    db.mycoll.aggregate( [pipeline], <optional params> ) - performs an aggregation on a collection; returns a cursor
    db.mycoll.remove(query)
    db.mycoll.renameCollection( newName , <dropTarget> ) renames the collection.
    db.mycoll.runCommand( name , <options> ) runs a db command with the given name where the first param is the collection name
    db.mycoll.save(obj)
    db.mycoll.stats({scale: N, indexDetails: true/false, indexDetailsKey: <index key>, indexDetailsName: <index name>})
    db.mycoll.storageSize() - includes free space allocated to this collection
    db.mycoll.totalIndexSize() - size in bytes of all the indexes
    db.mycoll.totalSize() - storage allocated for all data and indexes
    db.mycoll.update(query, object[, upsert_bool, multi_bool]) - instead of two flags, you can pass an object with fields: upsert, multi
    db.mycoll.validate( <full> ) - SLOW
    db.mycoll.getShardVersion() - only for use with sharding
    db.mycoll.getShardDistribution() - prints statistics about data distribution in the cluster
    db.mycoll.getSplitKeysForChunks( <maxChunkSize> ) - calculates split points over all chunks and returns splitter function
    db.mycoll.getWriteConcern() - returns the write concern used for any operations on this collection, inherited from server/db if set
    db.mycoll.setWriteConcern( <write concern doc> ) - sets the write concern for writes to the collection
    db.mycoll.unsetWriteConcern( <write concern doc> ) - unsets the write concern for writes to the collection
有关数据库和集合管理的相关命令,是最基础和最常用的,如集合查询、索引操作等。下面通过实际的例子来演示一些常见的命令:
一、基本命令
1)show dbs
显示当前数据库服务器上的数据库
2)use pagedb
切换到指定数据库pagedb的上下文,可以在此上下文中管理pagedb数据库以及其中的集合等
3)show collections
显示数据库中所有的集合(collection)
4)db.serverStatus()
查看数据库服务器的状态。
有时,通过查看数据库服务器的状态,可以判断数据库是否存在问题,如果有问题,如数据损坏,可以及时执行修复。
5)查询指定数据库统计信息
use fragment
db.stats()
查询结果示例如下所示:
> use fragment
switched to db fragment
> db.stats()
{
    "db" : "fragment",
    "collections" : 0,
    "objects" : 0,
    "avgObjSize" : 0,
    "dataSize" : 0,
    "storageSize" : 0,
    "numExtents" : 0,
    "indexes" : 0,
    "indexSize" : 0,
    "fileSize" : 0,
    "ok" : 1
}
6)查询指定数据库包含的集合名称列表
db.getCollectionNames()
结果如下所示:
> db.getCollectionNames()
[
        "17u",
        "baseSe",
        "bytravel",
        "daodao",
        "go2eu",
        "lotour",
        "lvping",
        "mafengwo",
        "sina",
        "sohu",
        "system.indexes"
]
二、基本DDL和DML
1)创建数据库
如果你习惯了关系型数据库,你可能会寻找相关的创建数据库的命令。在MongoDB中,你可以直接通过use dbname来切换到这个数据库上下文下面,系统会自动延迟创建该数据库,例如:
> show dbs
local  0.078GB
> use LuceneIndexDB
switched to db LuceneIndexDB
> show dbs
local  0.078GB
> db
LuceneIndexDB
> db.storeCollection.save({'version':'3.5', 'segment':'e3ol6'})
WriteResult({ "nInserted" : 1 })
> show dbs
LuceneIndexDB  0.078GB
local          0.078GB
>
可见,在use指定数据库后,并且向指定其中的一个集合并插入数据后,数据库和集合都被创建了。
2)删除数据库
直接使用db.dropDatabase()即可删除数据库。
3)创建集合
可以使用命令db.createCollection(name, { size : ..., capped : ..., max : ... } )创建集合,示例如下所示:
> db.createCollection('replicationColletion', {'capped':true, 'size':10240, 'max':17855200})
{ "ok" : 1 }
> show collections
replicationColletion
storeCollection
system.indexes
4)删除集合
删除集合,可以执行db.mycoll.drop()。
5)插入更新记录
直接使用集合的save方法,如下所示:
> db.storeCollection.save({'version':'3.5', 'segment':'e3ol6'})
WriteResult({ "nInserted" : 1 })
更新记录,使用save会将原来的记录值进行覆盖实现记录更新。
6)查询一条记录
使用findOne()函数,参数为查询条件,可选,系统会随机查询获取到满足条件的一条记录(如果存在查询结果数量大于等于1)示例如下所示:
> db.storeCollection.findOne({'version':'3.5'})
{
	"_id" : ObjectId("5a4c1733f5c45f057ae82292"),
	"version" : "3.5",
	"segment" : "e3ol6"
}
7)查询多条记录
使用find()函数,参数指定查询条件,不指定条件则查询全部记录。
8)删除记录
使用集合的remove()方法,参数指定为查询条件,示例如下所示:
> db.storeCollection.remove({'version':'3.5'})
WriteResult({ "nRemoved" : 2 })
> db.storeCollection.findOne()
null
9)创建索引
可以使用集合的ensureIndex(keypattern[,options])方法,示例如下所示:
> use pagedb
switched to db pagedb
> db.page.ensureIndex({'title':1, 'url':-1})
{
    "createdCollectionAutomatically" : true,
    "numIndexesBefore" : 1,
    "numIndexesAfter" : 2,
    "ok" : 1
}
> db.system.indexes.find()
{ "v" : 1, "key" : { "_id" : 1 }, "name" : "_id_", "ns" : "pagedb.page" }
{ "v" : 1, "key" : { "title" : 1, "url" : -1 }, "name" : "title_1_url_-1", "ns" : "pagedb.page" }
上述,ensureIndex方法参数中,数字1表示升序,-1表示降序。
使用db.system.indexes.find()可以查询全部索引。
10)查询索引
我们为集合建立的索引,那么可以通过集合的getIndexes()方法实现查询,示例如下所示:
> db.page.getIndexes()
[
	{
		"v" : 1,
		"key" : {
			"_id" : 1
		},
		"name" : "_id_",
		"ns" : "pagedb.page"
	},
	{
		"v" : 1,
		"key" : {
			"title" : 1,
			"url" : -1
		},
		"name" : "title_1_url_-1",
		"ns" : "pagedb.page"
	}
]
当然,如果需要查询系统中全部的索引,可以使用db.system.indexes.find()函数。
11)删除索引
删除索引给出了两个方法:
> db.mycoll.dropIndex(name)
2018-01-02T23:45:50.155+0000 E QUERY    ReferenceError: name is not defined
    at (shell):1:21
> db.mycoll.dropIndexes()
{ "ok" : 0, "errmsg" : "ns not found" }
>
第一个通过指定索引名称,第二个删除指定集合的全部索引。
12)索引重建
可以通过集合的reIndex()方法进行索引的重建,示例如下所示:
> db.page.reIndex()
{
	"nIndexesWas" : 2,
	"nIndexes" : 2,
	"indexes" : [
		{
			"key" : {
				"_id" : 1
			},
			"name" : "_id_",
			"ns" : "pagedb.page"
		},
		{
			"key" : {
				"title" : 1,
				"url" : -1
			},
			"name" : "title_1_url_-1",
			"ns" : "pagedb.page"
		}
	],
	"ok" : 1
}
13)统计集合记录数
> use fragment
switched to db fragment
> db.baseSe.count()
36749
上述统计了数据库fragment的baseSe集合中记录数。
14)查询并统计结果记录数
> use fragment
switched to db fragment
> db.baseSe.find().count()
36749
find()可以提供查询参数,然后查询并统计结果。上述执行先根据查询条件查询结果,然后统计了查询数据库fragment的baseSe结果记录集合中记录数。
15)查询指定数据库的集合当前可用的存储空间
> use fragment
switched to db fragment
> db.baseSe.storageSize()
142564096
16)查询指定数据库的集合分配的存储空间
> db.baseSe.totalSize()
144096000
上述查询结果中,包括为集合(数据及其索引存储)分配的存储空间。
三、启动与终止
1)正常启动
[root@centos6-vm01 ~]# mongod --dbpath /data/db --logfile /var/mongo.log
说明:指定数据存储目录和日志目录
如果采用安全认证模式,需要加上--auth选项,如:
[root@centos6-vm01 ~]# mongod --auth --dbpath /data/db --logfile /var/mongo.log
2)以修复模式启动
[root@centos6-vm01 ~]# mongod --repair
以修复模式启动数据库。
实际很可能数据库数据损坏或数据状态不一致,导致无法正常启动MongoDB服务器,根据启动信息可以看到需要进行修复。或者执行:
[root@centos6-vm01 ~]# mongod -f /etc/mongodb.conf --repair
3)终止服务器进程
> db.shutdownServer()
终止数据库服务器进程。或者,可以直接kill掉mongod进程即可。
四、安全管理
1)以安全认证模式启动
[root@centos6-vm01 ~]# mongod --auth --dbpath /usr/mongo/data --logfile /var/mongo.log
使用--auth选项启动mongod进程即可启用认证模式。
或者,也可以修改/etc/mongodb.conf,设置auth=true,重启mongod进程。
2)添加用户
> db.createUser({user: "admin",pwd: "1234!@#$qwer",roles: [ "readWrite", "dbAdmin" ]})
添加数据库用户,添加成功,则显示结果如下所示:
> db.createUser({user: "admin",pwd: "1234!@#$qwer",roles: [ "readWrite", "dbAdmin" ]})
Successfully added user: { "user" : "admin", "roles" : [ "readWrite", "dbAdmin" ] }
3)安全认证
前提是必须进入该用户对应的database才行,出现1代表成功
> db.auth("admin", "1234!@#$qwer")
数据库安全认证。认证成功显示结果:
> use admin
switched to db admin
> db.auth("admin", "1234!@#$qwer")
1
如果是认证用户,执行某些命令,可以看到正确执行结果,如下所示:
> db.system.users.find()
{ "_id" : "fragment.admin", "user" : "admin", "db" : "fragment", "credentials" : { "SCRAM-SHA-1" : { "iterationCount" : 10000, "salt" : "/QZtFAvcavqZIm15FmbToA==", "storedKey" : "t91XZuIrnUYtuN1bG+hNg58R+w0=", "serverKey" : "vZLGW0nVpGSKfUHsS2RABOXhOb4=" } }, "roles" : [ { "role" : "readWrite", "db" : "fragment" }, { "role" : "dbAdmin", "db" : "fragment" } ] }
4、为数据库写数据(同步到磁盘)加锁
> db.runCommand({fsync:1,lock:1})
说明:该操作已经对数据库上锁,不允许执行写数据操作,一般在执行数据库备份时有用。执行命令,结果示例如下:
> db.runCommand({fsync:1,lock:1})
{
	"info" : "now locked against writes, use db.fsyncUnlock() to unlock",
	"seeAlso" : "http://dochub.mongodb.org/core/fsynccommand",
	"ok" : 1
}
5)查看当前锁状态
> db.currentOp()
说明:查询结果如下所示:
> db.currentOp()
{
	"inprog" : [ ],
	"fsyncLock" : true,
	"info" : "use db.fsyncUnlock() to terminate the fsync write/snapshot lock"
}
其中,fsyncLock为1表示MongoDB的fsync进程(负责将写入改变同步到磁盘)不允许其他进程执行写数据操作
6)解锁
> use admin
> db.$cmd.sys.unlock.findOne()
说明:执行解锁,结果如下所示:
> use admin
switched to db admin
> db.$cmd.sys.unlock.findOne()
{ "ok" : 1, "info" : "unlock completed" }
可以执行命令查看锁状态:
db.currentOp()
状态信息如下:
> db.currentOp()
{ "inprog" : [ ] }
说明当前没有锁,可以执行写数据操作。
五、据备份、恢复与迁移管理
1)备份全部数据库
[root@centos6-vm01 ~]# mkdir testbak
[root@centos6-vm01 ~]# cd testbak
[root@centos6-vm01 ~]# mongodump
说明:默认备份目录及数据文件格式为./dump/[databasename]/[collectionname].bson
2)备份指定数据库
[root@centos6-vm01 ~]# mongodump -d pagedb
说明:备份数据库pagedb中的数据。
3)备份一个数据库中的某个集合
[root@centos6-vm01 ~]# mongodump -d pagedb -c page
说明:备份数据库pagedb的page集合。
4)恢复全部数据库
[root@centos6-vm01 ~]# cd testbak
[root@centos6-vm01 ~]# mongorestore --drop
说明:将备份的所有数据库恢复到数据库,--drop指定恢复数据之前删除原来数据库数据,否则会造成回复后的数据中数据重复。
5)恢复某个数据库的数据
[root@centos6-vm01 ~]# cd testbak
[root@centos6-vm01 ~]# mongorestore -d pagedb --drop
说明:将备份的pagedb的数据恢复到数据库。
6)恢复某个数据库的某个集合的数据
[root@centos6-vm01 ~]# cd testbak
[root@centos6-vm01 ~]# mongorestore -d pagedb -c page --drop
说明:将备份的pagedb的的page集合的数据恢复到数据库。
7)向MongoDB导入数据
[root@centos6-vm01 ~]# mongoimport -d pagedb -c page --type csv --headerline --drop < csvORtsvFile.csv
说明:将文件csvORtsvFile.csv的数据导入到pagedb数据库的page集合中,使用cvs或tsv文件的列名作为集合的列名。
需要注意的是,使用--headerline选项时,只支持csv和tsv文件。
--type支持的类型有三个:csv、tsv、json
其他各个选项的使用,可以查看帮助:
[root@centos6-vm01 ~]# mongoimport --help
Usage:
  mongoimport <options> <file>

Import CSV, TSV or JSON data into MongoDB. If no file is provided, mongoimport reads from stdin.

See http://docs.mongodb.org/manual/reference/program/mongoimport/ for more information.

general options:
      --help                     print usage
      --version                  print the tool version and exit

verbosity options:
  -v, --verbose                  more detailed log output (include multiple times for more verbosity, e.g. -vvvvv)
      --quiet                    hide all log output

connection options:
  -h, --host=                    mongodb host to connect to (setname/host1,host2 for replica sets)
      --port=                    server port (can also use --host hostname:port)

authentication options:
  -u, --username=                username for authentication
  -p, --password=                password for authentication
      --authenticationDatabase=  database that holds the user's credentials
      --authenticationMechanism= authentication mechanism to use

namespace options:
  -d, --db=                      database to use
  -c, --collection=              collection to use

input options:
  -f, --fields=                  comma separated list of field names, e.g. -f name,age
      --fieldFile=               file with field names - 1 per line
      --file=                    file to import from; if not specified, stdin is used
      --headerline               use first line in input source as the field list (CSV and TSV only)
      --jsonArray                treat input source as a JSON array
      --type=                    input format to import: json, csv, or tsv (defaults to 'json')

ingest options:
      --drop                     drop collection before inserting documents
      --ignoreBlanks             ignore fields with empty values in CSV and TSV
      --maintainInsertionOrder   insert documents in the order of their appearance in the input source
  -j, --numInsertionWorkers=     number of insert operations to run concurrently (defaults to 1)
      --stopOnError              stop importing at first insert/upsert error
      --upsert                   insert or update objects that already exist
      --upsertFields=            comma-separated fields for the query part of the upsert
      --writeConcern=            write concern options e.g. --writeConcern majority, --writeConcern '{w: 3, wtimeout: 500, fsync:
                                 true, j: true}' (defaults to 'majority')
8)从向MongoDB导出数据
[root@centos6-vm01 ~]# mongoexport -d pagedb -c page -q {} -f _id,title,url,spiderName,pubDate --csv > pages.csv
说明:将pagedb数据库中page集合的数据导出到pages.csv文件,其中各选项含义:
-f 指定cvs列名为_id,title,url,spiderName,pubDate
-q 指定查询条件
其他各个选项的使用,可以查看帮助:
[root@centos6-vm01 ~]# mongoexport --help
Usage:
  mongoexport <options>

Export data from MongoDB in CSV or JSON format.

See http://docs.mongodb.org/manual/reference/program/mongoexport/ for more information.

general options:
      --help                     print usage
      --version                  print the tool version and exit

verbosity options:
  -v, --verbose                  more detailed log output (include multiple times for more verbosity, e.g. -vvvvv)
      --quiet                    hide all log output

connection options:
  -h, --host=                    mongodb host to connect to (setname/host1,host2 for replica sets)
      --port=                    server port (can also use --host hostname:port)

authentication options:
  -u, --username=                username for authentication
  -p, --password=                password for authentication
      --authenticationDatabase=  database that holds the user's credentials
      --authenticationMechanism= authentication mechanism to use

namespace options:
  -d, --db=                      database to use
  -c, --collection=              collection to use

output options:
  -f, --fields=                  comma separated list of field names (required for exporting CSV) e.g. -f "name,age"
      --fieldFile=               file with field names - 1 per line
      --type=                    the output format, either json or csv (defaults to 'json')
  -o, --out=                     output file; if not specified, stdout is used
      --jsonArray                output to a JSON array rather than one object per line
      --pretty                   output JSON formatted to be human-readable

querying options:
  -q, --query=                   query filter, as a JSON string, e.g., '{x:{$gt:1}}'
  -k, --slaveOk                  allow secondary reads if available (default true)
      --forceTableScan           force a table scan (do not use $snapshot)
      --skip=                    number of documents to skip
      --limit=                   limit the number of documents to export
      --sort=                    sort order, as a JSON string, e.g. '{x:1}'
注意:如果上面的选项-q指定一个查询条件,需要使用单引号括起来,如下所示:
[root@centos6-vm01 ~]# mongoexport -d page -c Article -q '{"spiderName": "mafengwoSpider"}' -f _id,title,content,images,publishDate,spiderName,url --jsonArray > mafengwoArticle.txt
2018-01-03T08:12:41.234+0800    connected to: localhost
2018-01-03T08:12:41.234+0800    exported 0 records

[root@centos6-vm01 ~]# ll mafengwoArticle.txt
-rw-r--r--. 1 root root 3 Jan  3 00:12 mafengwoArticle.txt
否则,就会出现下面的错误:
ERROR: too many positional options
六、远程连接管理
1)基于mongo实现远程连接
[root@centos6-vm01 ~]# mongo 192.168.10.220:27017/pagedb
或者
[root@centos6-vm01 ~]# mongo 192.168.10.220:27017/pagedb -ukevin -p123456kevin
通过mongo实现连接,可以非常灵活的选择参数选项,参看命令帮助,如下所示:
[root@centos6-vm01 ~]# mongo --help
MongoDB shell version: 3.0.6
usage: mongo [options] [db address] [file names (ending in .js)]
db address can be:
  foo                   foo database on local machine
  192.169.0.5/foo       foo database on 192.168.0.5 machine
  192.169.0.5:9999/foo  foo database on 192.168.0.5 machine on port 9999
Options:
  --shell                            run the shell after executing files
  --nodb                             don't connect to mongod on startup - no
                                     'db address' arg expected
  --norc                             will not run the ".mongorc.js" file on
                                     start up
  --quiet                            be less chatty
  --port arg                         port to connect to
  --host arg                         server to connect to
  --eval arg                         evaluate javascript
  -h [ --help ]                      show this usage information
  --version                          show version information
  --verbose                          increase verbosity
  --ipv6                             enable IPv6 support (disabled by default)

Authentication Options:
  -u [ --username ] arg              username for authentication
  -p [ --password ] arg              password for authentication
  --authenticationDatabase arg       user source (defaults to dbname)
  --authenticationMechanism arg      authentication mechanism
  --gssapiServiceName arg (=mongodb) Service name to use when authenticating
                                     using GSSAPI/Kerberos
  --gssapiHostName arg               Remote host name to use for purpose of
                                     GSSAPI/Kerberos authentication

file names: a list of files to run. files have to end in .js and will exit after unless --shell is specified
2)基于MongoDB支持的javascript实现远程连接
当你已经连接到一个远程的MongoDB数据库服务器(例如,通过mongo连接到192.168.0.184),现在想要在这个会话中连接另一个远程的数据库服务器(192.168.0.197),可以执行如下命令:
> var x = new Mongo('192.168.10.220:27017')
> var ydb = x.getDB('pagedb');
> use ydb
switched to db ydb
> db
ydb
> ydb.page.findOne()
{
        "_id" : ObjectId("4eded6a5bf3bfa0014000003"),
        "content" : "巴黎是浪漫的城市,可是...",
        "pubdate" : "2006-03-19",
        "title" : "巴黎:从布鲁塞尔赶到巴黎",
        "url" : "http://france.bytravel.cn/Scenery/528/cblsegdbl.html"
}
> var x = new Mongo('192.168.0.197:27017')
> var ydb = x.getDB('pagedb', 'shirdrn', '(jkfFS$343$_=\,.F@3');
> use ydb
switched to db ydb
==========================扩展知识==========================
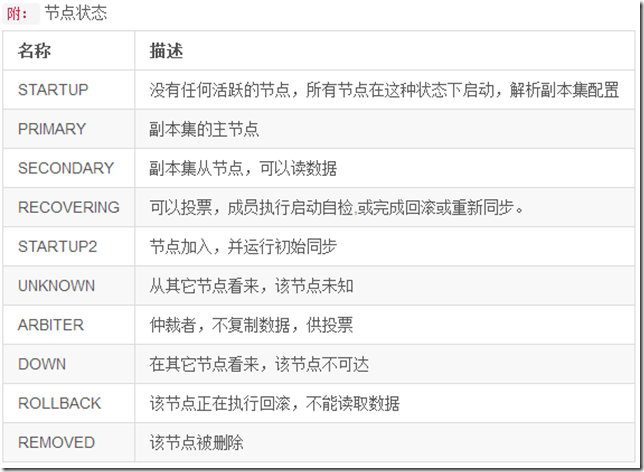
节点角色

MongoDB读写分离
MongoDB副本集对读写分离的支持是通过Read Preferences特性进行支持的,这个特性非常复杂和灵活。设置读写分离需要先在从节点SECONDARY设置setSlaveOk。应用程序驱动通过read reference来设定如何对副本集进行读取操作,默认的,客户端驱动所有的读操作都是直接访问primary节点的,从而保证了数据的严格一致性。有如下几种模式:

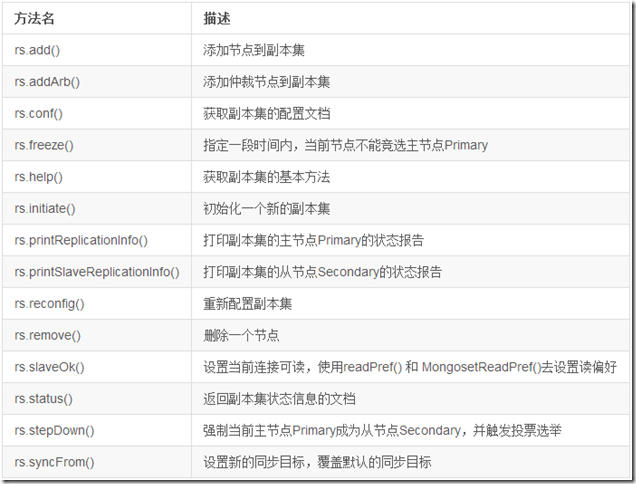
mongo shell中复制相关方法
复制数据库的命令

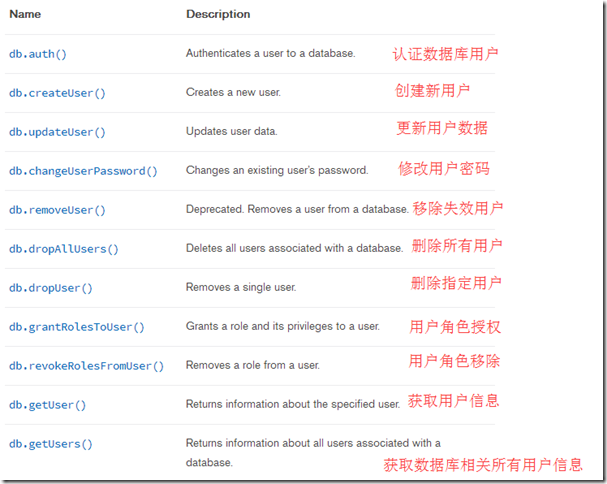
用户管理和认证方法
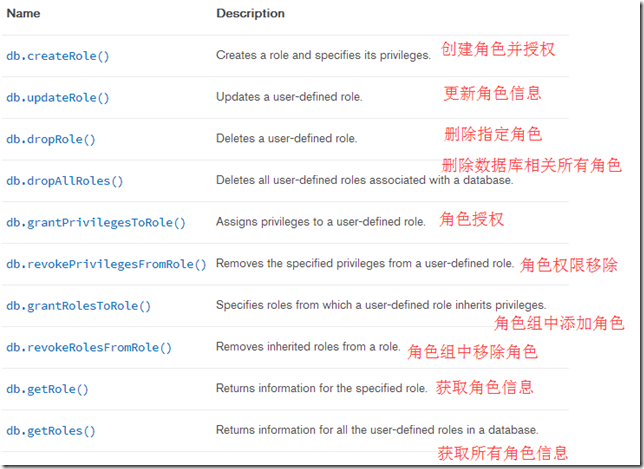
官方详细档:https://docs.mongodb.com/master/reference/security/#security-methods-in-the-mongo-shell
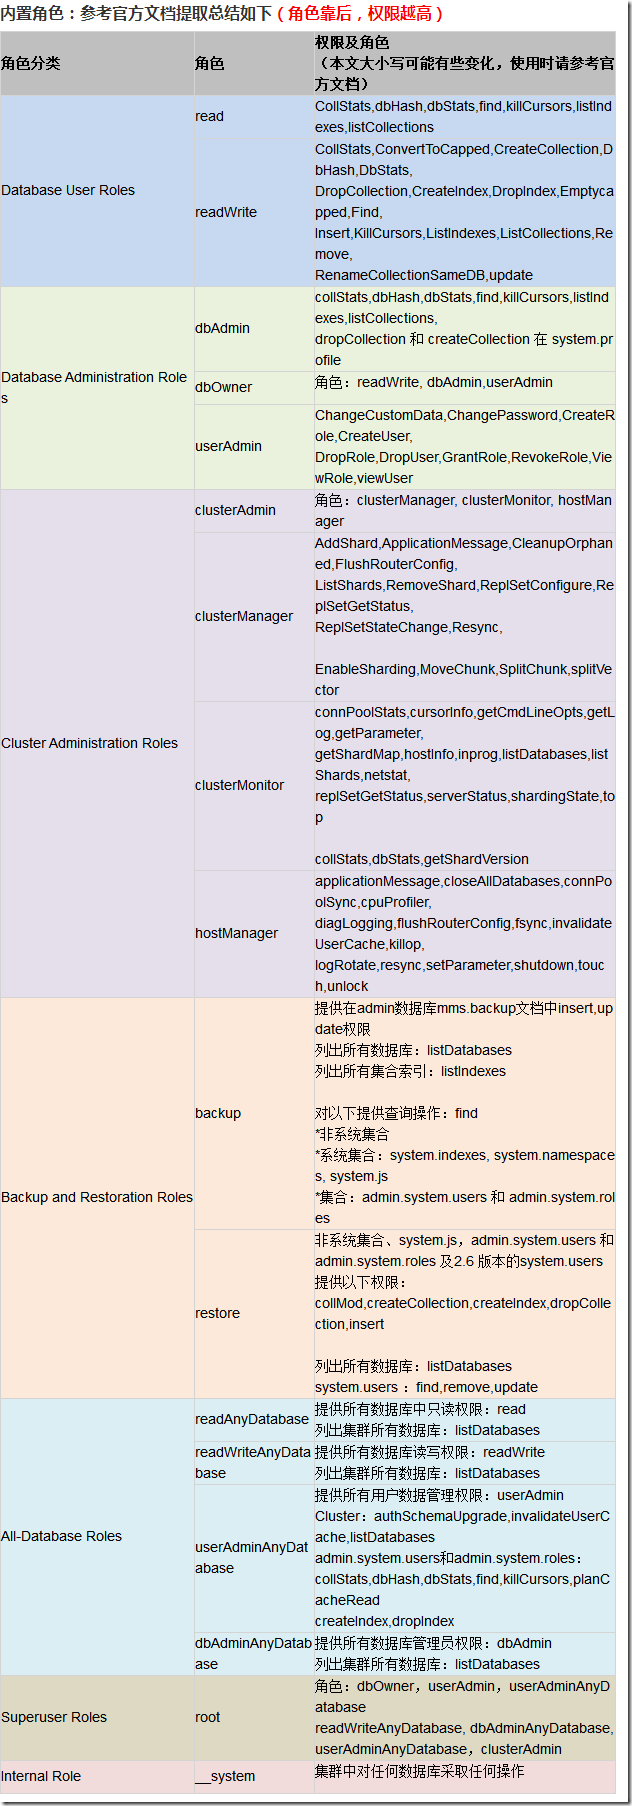
角色管理方法
官方详细档:https://docs.mongodb.com/master/reference/security/#security-methods-in-the-mongo-shell