Hadoop 分布式安装
环境说明:阿里云弹性实例ubuntu16.04 Hadoop版本2.7.6 java版本1.8
所有弹性实例都是在同一个区,ip全部用私有ip
阿里云服务器记得配置安全规则端口
We will create a 3 node cluster system(1-Master,2-slave).
-
Create 3 Nodes
-
Load nodes into VMs
-
Check if nodes are reachable
Find the ip Address of all 3 systems & try to ping each other

-
Change the hostname of all 3 system
Master vm
sudo vim /etc/hostname
Repeat the above step with salve1 & slave2 VM and change the host name to slave1,slave2
-
Update the hosts on all 3 nodes
Master :
sudo vim /etc/hosts
#127.0.0.1 localhost #dont touch this
#127.0.1.1 master #remove this line
192.168.220.185 master #Added this and below 2 lines
192.168.220.186 slave1
192.168.220.187 slave2 #IPAddress and HostName of slave2
Slave
#127.0.0.1 localhost #dont touch this
#127.0.1.1 master #remove this line
192.168.220.185 master #Added this and below 2 lines
192.168.220.186 slave1
192.168.220.187 slave2 #IPAddress and HostName of slave2
Repeat with salve1 and slave2
-
Restart all the VM in order to reflect the changes
-
Confirm the hostname of all 3 nodes
-
Ping Each other using Hostname
Start pinging each other system again using the hostname instead of ipaddress
Master->ping slave1 & slave2
Slave1->ping master only
Slave2->ping master only

-
Test SSH connectivity(All should be connect)
Test the SSH connectivity by doing the following. It will ask for yes or no and you should type 'yes'. Perform ssh master/slave1/salve2 on each of the node to verify the connectivity.

It will ask for yes or no and you sould type 'yes'
We should be able to SSH master and SSH slaves without password prompt.
If it asks for password while connecting to master or slave using SSH, there is something went wrong and you need to fix it before proceeding further.
ssh-keygen -t rsa -P '' -f ~/.ssh/id_rsa
cat ~/.ssh/id_rsa.pub >> ~/.ssh/authorized_keys
chmod 0600 ~/.ssh/authorized_keys
copy the id_rsa.pub to other authorized_keys
note: if the b public key in machine a authorized_keys then b can ssh a,but a can't ssh b
-
update Hadoop-en.sh
add java_home path
-
Update core-site.xml(Master+ All Slave Nodes)
sudo vim /usr/local/Hadoop/etc/Hadoop/core-site.xml
2 changes
-
Remove Hadoop.tmp.dir configuration. We don't require them
-
change localhost to master

master:
<configuration>
<property>
<name>fs.default.name</name>
<value>hdfs://master:9000</value>
</property>
</configuration>
slave1 & slave2
<configuration>
<property>
<name>fs.default.name</name>
<value>hdfs://master:9000</value>
</property>
</configuration>
note:all of these are master:9000
-
-
Update hdfs-site.xml(Master+All slave Nodes)
3 changes
-
Replication is set to 2
-
Namenode configured only in master
-
Datanode configured only in slave
-

master:
<configuration>
<property>
<name>dfs.replication</name>
<value>2</value>
</property>
<property>
<name>dfs.namenode.name.dir</name>
<value>file:/root/hadoop_tmp/hdfs/namenode</value>
</property>
</configuration>
slave1 & slave2
<configuration>
<property>
<name>dfs.replication</name>
<value>2</value>
</property>
<property>
<name>dfs.namenode.data.dir</name>
<value>file:/root/hadoop_tmp/hdfs/datanode</value>
</property>
</configuration>
-
Update yarn-site.xml(Master+All Slave Nodes)

master
<configuration>
<property>
<name>yarn.nodemanager.aux-services</name>
<value>mapreduce_shuffle</value>
</property>
<property>
<name>yarn.resourcemanager.resource-tracker.address</name>
<value>master:8025</value>
</property>
<property>
<name>yarn.resourcemanager.scheduler.address</name>
<value>master:8030</value>
</property>
<property>
<name>yarn.resourcemanager.address</name>
<value>master:8050</value>
</property>
</configuration>
slave
<configuration>
<property>
<name>yarn.nodemanager.aux-services</name>
<value>mapreduce_shuffle</value>
</property>
<property>
<name>yarn.resourcemanager.resource-tracker.address</name>
<value>master:8025</value>
</property>
<property>
<name>yarn.resourcemanager.scheduler.address</name>
<value>master:8030</value>
</property>
<property>
<name>yarn.resourcemanager.address</name>
<value>master:8050</value>
</property>
</configuration>
-
Update mapred-site.xml(Master+All Slave Nodes)

Master only Configuration
Master
<configuration>
<property>
<name>mapreduce.framework.name</name>
<value>yarn</value>
</property>
<property>
<name>mapreduce.jobhistory.address</name>
<value>master:10020</value>
</property>
</configuration>
Slave
<configuration>
<property>
<name>mapreduce.framework.name</name>
<value>yarn</value>
</property>
<property>
<name>mapreduce.jobhistory.address</name>
<value>master:10020</value>
</property>
</configuration>
-
Update Masters and slaves file(Master Node only)
If you see any entry related to localhost, feel free to delete it. This file is just helper file that are used by Hadoop scripts to start appropriate service on master and slave nodes.

Below masters file does not exists by default. It gets created the files

Note: you don't need to configure them in slave nodes
-
Recreate NameNOde folder(Master Only)

sudo mkdir -p /root/hadoop_tmp/hdfs/namenode
sudo chown root -R /root/hadoop_tmp
sudo chmod 777 /root/hadoop_tmp/hdfs/namenode
-
Recreate Datanode folder(All Slave Nodes Only)

sudo mkdir -p /root/hadoop_tmp/hdfs/datanode
sudo chown root -R /root/hadoop_tmp
sudo chmod 777 /root/hadoop_tmp/hdfs/datanode
-
Format the Name node(Master only)
Before starting the cluster, we need to format the Name node. Use the following command only on master node:
$hdfs namenode -format
-
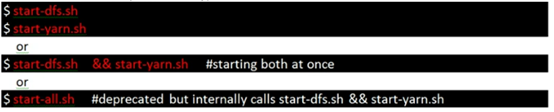
Start the DFS & Yarn(Master Only)
Jps on Master node

Jps on slave nodes(slave1 and slave2)

-
Review Yarn console:
If all the services started successfully on all nodes, then you should see all of your nodes listed under Yarn nodes. You can hit the following url on your browser and verify that:
http://master:8088/cluster/nodes
http://master:50070 #can show live node count and info about each live nodes
You can also get the report of your cluster by issuing the below commands
hdfs dfsadmin -report
-
In case you don't get to see the live nodes on the browers, there are some mistakes somewhere. You need to figure it out. You can look into the logs in the below location
/usr/local Hadoop/logs
Check in all the log files of both master and slaves and it sould hint you the problem.
总结:master和slave不同的地方
-
hdfs-site.xml中master是namenode的位置,而slave是datanode的位置
-
master 需要进行磁盘格式化
-
master 中需要配置slaves和masters文件
-
所有的服务启动全部在master中
值得注意的地方:
所有的阿里云服务器都在同一个区中,/etc/hosts全部的地址映射都为私有地址是否需要这样还有待考证?
/etc/hosts的配置如下
#127.0.0.1 localhost #dont touch this
#127.0.1.1 master #remove this line
192.168.220.185 master #Added this and below 2 lines
192.168.220.186 slave1
192.168.220.187 slave2 #IPAddress and HostName of slave2
将127.0.0.1和127.0.1.1注释掉
阿里云服务器记得配置安全规则端口