事务:事务就是一系列的动作,这些动作要么都完成,要么都不完成。
核心事务管理接口的实现类是DataSourceTransactionManager
spring事务管理的注解使用:
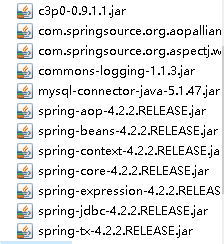
1.导入jar包。

2.定义一个bean事务管理类
3.在配置文件中开启事务管理的注解驱动
spring配置文件:applicationContext.xml
|
<?xml version="1.0" encoding="UTF-8"?> <beans xmlns="http://www.springframework.org/schema/beans" xmlns:xsi="http://www.w3.org/2001/XMLSchema-instance" xmlns:context="http://www.springframework.org/schema/context" xmlns:tx="http://www.springframework.org/schema/tx" xsi:schemaLocation="http://www.springframework.org/schema/beans http://www.springframework.org/schema/beans/spring-beans.xsd http://www.springframework.org/schema/context http://www.springframework.org/schema/context/spring-context-4.2.xsd http://www.springframework.org/schema/tx http://www.springframework.org/schema/tx/spring-tx-4.2.xsd"> <context:component-scan base-package="com.zhiyou100.kfs"></context:component-scan> <!-- 配置数据源(里面存放了若干个连接对象):数据库交互的。 数据源:c3p0,druid(阿里) --> <bean id="dataSource" class="com.mchange.v2.c3p0.ComboPooledDataSource"> <property name="user" value="root"/> <property name="password" value="123"/> <property name="driverClass" value="com.mysql.jdbc.Driver"></property> <property name="jdbcUrl" value="jdbc:mysql://127.0.0.1:3306/test"></property> </bean>
<!-- 配置springJdbc的模板类 --> <bean id="jdbcTemplate" class="org.springframework.jdbc.core.JdbcTemplate" autowire="byType"> <property name="dataSource" ref="dataSource"></property> </bean> <!-- 定义一个事务管理类 --> <bean id="transactionManager" class="org.springframework.jdbc.datasource.DataSourceTransactionManager"> <property name="dataSource" ref="dataSource"></property> </bean> <!-- 开启注解:如果你的事务管理bean的id是transactionManager,属性transaction-manager可以不写 --> <tx:annotation-driven transaction-manager="transactionManager"/> </beans> |
4.在事务方法上加事务注解@Transactional
|
package com.zhiyou100.kfs.service; import org.springframework.beans.factory.annotation.Autowired; import org.springframework.stereotype.Service; import org.springframework.transaction.annotation.Propagation; import org.springframework.transaction.annotation.Transactional; import com.zhiyou100.kfs.dao.BookShopDao; /** * 书店Service的接口的实现类 * @author KFS * */ @Service public class BookShopServiceImp implements BookShopService{ @Autowired private BookShopDao bookShopDao;
public void setBookShopDao(BookShopDao bookShopDao) { this.bookShopDao = bookShopDao; } /** * 更新用户余额 */ @Transactional //事务注解 @Override public void purchase(String username, String isbn) { //查书的价格 double price=bookShopDao.finBookPriceByIsbn(isbn); //更新书的库存 bookShopDao.updateBookShop(isbn); //更新用户余额 bookShopDao.updateAccount(username, price); } } |
5.测试
|
package com.zhiyou100.kfs.dao; import org.springframework.context.ApplicationContext; import org.springframework.context.support.ClassPathXmlApplicationContext; import com.zhiyou100.kfs.service.xml.BookShopService; public class Test { public static void main(String[] args) { ApplicationContext app=new ClassPathXmlApplicationContext("appxml.xml"); BookShopService bss=(BookShopService)app.getBean("bookShopServiceImp"); bss.purchase("tom", "001"); } } |
spring事务管理的xml使用:
1.导入jar包

2.定义一个bean事务管理类
3.在事务方法中不用注解
4.在spring配置文件中配置
|
<?xml version="1.0" encoding="UTF-8"?> <beans xmlns="http://www.springframework.org/schema/beans" xmlns:xsi="http://www.w3.org/2001/XMLSchema-instance" xmlns:context="http://www.springframework.org/schema/context" xmlns:tx="http://www.springframework.org/schema/tx" xmlns:aop="http://www.springframework.org/schema/aop" xsi:schemaLocation="http://www.springframework.org/schema/beans http://www.springframework.org/schema/beans/spring-beans.xsd http://www.springframework.org/schema/context http://www.springframework.org/schema/context/spring-context-4.2.xsd http://www.springframework.org/schema/aop http://www.springframework.org/schema/aop/spring-aop-4.2.xsd http://www.springframework.org/schema/tx http://www.springframework.org/schema/tx/spring-tx-4.2.xsd"> <context:component-scan base-package="com.zhiyou100.kfs.service.xml,com.zhiyou100.kfs.dao"></context:component-scan> <!-- 配置数据源(里面存放了若干个连接对象):数据库交互的。 数据源:c3p0,druid(阿里) --> <bean id="dataSource" class="com.mchange.v2.c3p0.ComboPooledDataSource"> <property name="user" value="root"/> <property name="password" value="123"/> <property name="driverClass" value="com.mysql.jdbc.Driver"></property> <property name="jdbcUrl" value="jdbc:mysql://127.0.0.1:3306/test"></property> </bean>
<!-- 配置springJdbc的模板类 --> <bean id="jdbcTemplate" class="org.springframework.jdbc.core.JdbcTemplate" autowire="byType"> <property name="dataSource" ref="dataSource"></property> </bean> <!-- 定义一个事务管理类 --> <bean id="transactionManager" class="org.springframework.jdbc.datasource.DataSourceTransactionManager"> <property name="dataSource" ref="dataSource"></property> </bean> <!-- 建议:设置事务方法属性 --> <tx:advice transaction-manager="transactionManager" id="advice"> <tx:attributes> <!-- read-only:只读。用在查询上 --> <tx:method name="query*" read-only="true"/> <tx:method name="purchase" propagation="REQUIRED"/> <tx:method name="insert*"/> <tx:method name="*"/> </tx:attributes> </tx:advice> <!-- xml切面的配置 --> <aop:config> <!-- 切点 --> <aop:pointcut expression="execution(* com.zhiyou100.kfs.service.xml.*.*(..))" id="pointcut"/> <aop:advisor advice-ref="advice" pointcut-ref="pointcut"/> </aop:config> </beans> |
5.然后测试